Note
Access to this page requires authorization. You can try signing in or changing directories.
Access to this page requires authorization. You can try changing directories.
[This article is prerelease documentation and is subject to change.]
Note
This article is for the 9.0.25073.10001 (7.3) version of the Sales Qualification Agent, which is being gradually deployed to different regions. To know the version in your organization, go to Settings(![]() ) > About, and check Server version in the Sales Hub app. To check your deployment schedule, go to Latest version availability and look for the 9.0.25073.10001 version. If your org is still on the earlier version, see Sales Qualification Agent overview (pre-7.3 version). However, the agent will go into Draft mode after the 7.3 deployment and you must reconfigure it to use the agent.
) > About, and check Server version in the Sales Hub app. To check your deployment schedule, go to Latest version availability and look for the 9.0.25073.10001 version. If your org is still on the earlier version, see Sales Qualification Agent overview (pre-7.3 version). However, the agent will go into Draft mode after the 7.3 deployment and you must reconfigure it to use the agent.
As an admin, you need to set up the Sales Qualification Agent before your sellers can use it for lead research, ideal customer profile (ICP) fit assessment, and initial email outreach. This article discusses how to configure the details about your company and products you sell, your ideal customer profile, and other settings to help the agent align with your company's sales strategy and goals.
Important
- This is a preview feature.
- Preview features aren’t meant for production use and might have restricted functionality. These features are subject to supplemental terms of use, and are available before an official release so that customers can get early access and provide feedback.
Prerequisites
Ensure that the following prerequisites are met:
Your tenant admin has granted the following consent:
- Consent for data movement across regions and Bing search. Learn more in Move data across regions for Copilots and generative AI features.
- The agent needs Copilot Studio capacity to run. Ensure that you have enough capacity. Learn more in Manage Copilot Studio messages and capacity.
You have admin permissions in Dynamics 365 Sales.
You have a Copilot Studio license. Learn more in Copilot Studio licensing.
You turned on the modern UI for the Sales Hub app. Learn more in Enabling the modern look for my app and removing the toggle.
You turned on AI prompts feature in Power Platform and Copilot Studio. Learn more in Enable AI prompts in Power Platform and Copilot Studio.
You modified Data policies to allow the following connectors:
Connector Why is it required? Knowledge source with public websites and data The agent needs it to access public data for enrichment. Microsoft Copilot Studio Copilot Studio is the core platform for building and deploying the agent. Knowledge source with SharePoint or OneDrive Required only if the agent is configured to use internal documents on SharePoint or OneDrive for enrichment. Knowledge source with documents Required only if the agent is configured to use internal documents for enrichment. Learn more in Manage data policies.
You configured server-side synchronization by integrating Dynamics 365 with Exchange. Learn more in Set up email by integrating with Exchange. If server-side synchronization isn't set up, the agent doesn't generate outreach emails.
You enabled in-app notifications to notify sellers and supervisors about lead handovers. Learn more in Enable in-app notifications for your organization.
(Optional but recommended) You turned on Copilot in Dynamics 365 Sales to allow your sellers to get a 360-degree view of the lead and their company. Learn more in Turn on and set up Copilot in Dynamics 365 Sales and Get information from Copilot.
Considerations
Review the following considerations before you start deploying the autonomous Sales Qualification Agent:
Only one of the following modes can be deployed in an organization:
- Research-only mode: Analyzes assigned leads and drafts outreach email based on the insights and provides recommended actions.
- Research and engage mode: Analyzes and autonomously engages with the customer. Hands over the leads to sellers with detected purchase interest and customer profile fit based on configured handover criteria.
You can upgrade from Research-only mode to the Research and engage mode later, but not the other way around.
Stopping the agent will prevent new leads from being assigned/processed by the agent. Existing leads which are already in pipeline (orchestration), will continue until the lead is either handed over to a seller or added to the supervisor dashboard for next steps.
You can’t delete an agent once configured. Contact Microsoft support to delete the agent from your organization.
Grant permissions to custom security role
If you're using custom security roles for your sales team instead of the out-of-the-box roles, you have two options.
Grant the necessary permissions, listed in the following table, to the custom role. This option is recommended if you want to allow all the users with the custom role to work on leads handed over by the agent.
Assign the out-of-the-box roles—Salesperson or Sales Manager—only to users who'll be working on leads handed over by the agent. This option is recommended if you want to allow only a subset of users to work on the agent-handed-over leads.
Permissions required for custom security roles:
| Purpose | Entity name (Logical name) | Permissions |
|---|---|---|
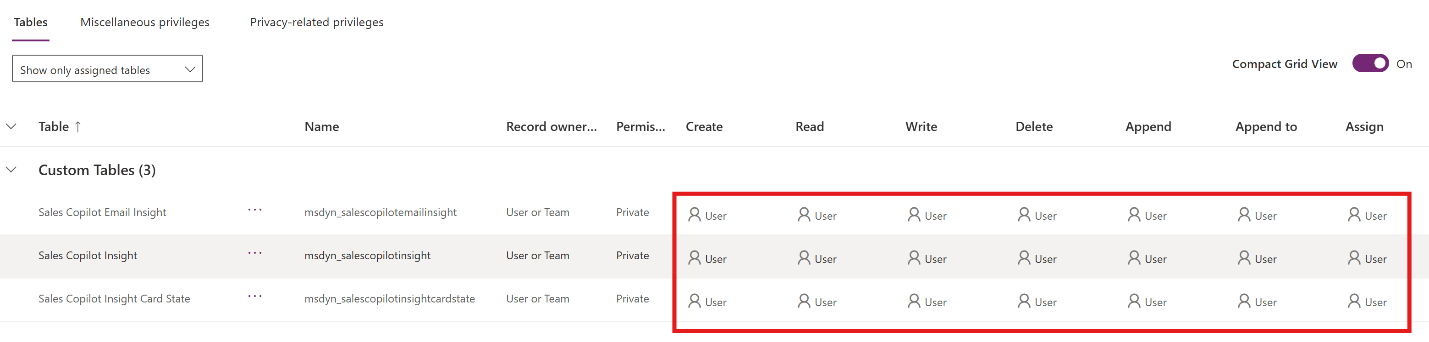
| Access research insights | Sales Copilot Email Insight (msdyn_salescopilotemailinsight) Sales Copilot Insight (msdyn_salescopilotinsight) Sales Copilot Insight Card State (msdyn_salescopilotinsightcardstate) |
User: Read, Write, Create, Append, Append To, Assign |
| Access leads handed over by the agent (Only for Research and engage mode) | Sales Agent Handover (msdyn_salesagenthandover) | Global: Read Basic: Append, Append To, Assign, Write, Create, Delete, Share |
| Access outreach emails generated by the agent | Email Activity (email) Lead (lead) |
User: Read, Create (Email Activity) User: Append, Append To (Lead) |
Learn more about granting permissions in Define the privileges and properties of a security role.
The following image shows the permissions to access research insights as an example:
Set up Sales Qualification Agent
The Sales Qualification Agent is available in two modes—Research-only mode and Research and engage mode—depending on the level of automation you want to achieve. The configuration steps are similar for both types, but the Engage has additional settings such as adding email signature, customized email instructions, and configuring BANT criteria for handover to work autonomously. Let's look at the steps to set up and configure the agents.
Follow these steps:
Configure the following prerequisites before you set up the agent.
Research-only mode Research and engage mode Prerequisites Create an app in Azure
Create an app user in DataverseCreate an app in Azure
Create an app user in Dataverse
Create a shared mailbox
Configure server-side synchronizationConfigure general information for agent such as profile, company info, and products.
Configure selection criteria for the agent process the leads.
Configure email instructions and address validation for the agent.
Configure handoff criteria for the agent to identify leads that are a good fit for further engagement.
Configure assignment rules for the agent to assign processed leads to the appropriate sellers.
Configure knowledge sources for research insights, outreach, and follow-up emails.
(Research and engage mode) Run simulation to review the agent's outreach emails are customized and relevant to the leads.
After you are satisfied with the configuration, start the agent.