Note
Access to this page requires authorization. You can try signing in or changing directories.
Access to this page requires authorization. You can try changing directories.
[This article is prerelease documentation and is subject to change.]
Important
- This is a preview feature.
- Preview features aren’t meant for production use and might have restricted functionality. These features are subject to supplemental terms of use, and are available before an official release so that customers can get early access and provide feedback.
Sales Agent is a powerful tool that helps you automate your sales processes and improve your productivity. It helps sellers qualify leads by generating insights from research and generating personalized outreach emails tailored to the lead and its product of interest.
As an admin, you can set up Sales Agent to connect to your CRM and enable it for your users. Once set up, sellers can view summaries of the research within their CRM or browse the list of researched leads in the Copilot for Sales app.
This article provides instructions to integrate Sales Agent with Salesforce to give sellers the best experience in Salesforce.
Prerequisites
- The Sales Agent is configured and connected to Salesforce.
- You have access to environment-level settings in the Copilot for Sales admin settings.
Create a link to Sales Agent research from leads
You can make it easy for Salesforce users to view the Sales Agent research by providing a direct link to the research from the CRM.
As an admin in Salesforce, open the Setup page and perform the following steps to add a link to research on the lead object:
Go to Objects and Fields > Object Manager, and open the object that represents the leads researched by the Sales Agent. For example, Lead.
In the left pane, select Fields & Relationships, and then select New to create a new field.
Under Data Type, select Formula, and then select Next.
Configure the following field options and select Next when done:
- Field Label: Sales Agent Research
- Field Name: Sales_Agent_Research
- Formula Return Type: Text
Enter the following formula into the formula text box and select Next when done:
HYPERLINK("https://teams.microsoft.com/v2/#/l/entity/c92c289e-ceb4-4755-819d-0d1dffdab6fa/homeTab?context=%7B%22subEntityId%22%3A%22%7B%5C%22route%5C%22%3A%5C%22/researchhub/lead/" & CASESAFEID(Id) & "%5C%22%7D%22%7D","Click here")Set the visibility to allow the field to be seen by the appropriate profile for your users. Set all profiles with visibility to Read-Only, and then select Next.
Add the field to the appropriate record pages and select Next.
Add the field to page layouts and select Save.
Show lead research summary on lead page
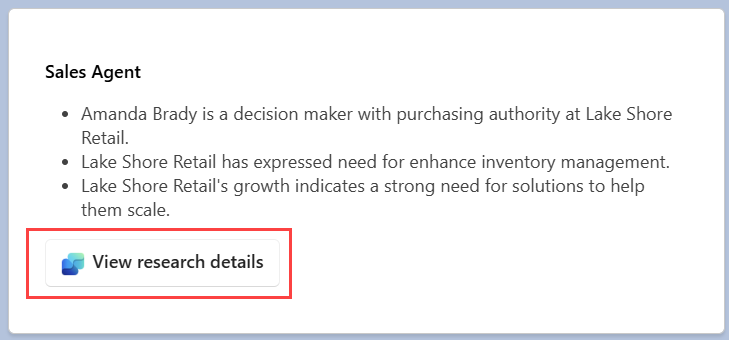
You can make a summary of the lead research available on each lead page. The summary provides a short summary of the information gathered about the lead, along with a link to view the full research details in the Copilot for Sales personal app.
Important
Sales Agent must be configured to write summaries into the SalesAgentResearchSummaries object and store a link to the summary from the lead in the SalesAgentResearchSummary field.
As an admin in Salesforce, open the Setup page and perform the following steps to add the Sales Agent summary to your lead page.
Upload the Copilot for Sales logo
- Go to Custom Code > Static Resources, and select New.
- Set the name of the resource to copilot_for_sales_logo.
- Upload this image:

Create Visualforce page for the Sales Agent summary
Go to Custom Code > Visualforce Pages, and select New.
Enter
Sales_Agent_Summaryas the value for Label and Name.Select Available for Lightning Experience, Experience Builder sites, and the mobile app.
Paste the following code in the Visualforce Markup box:
<apex:page standardController="Lead" lightningStylesheets="true">
    <head>
        <script type="module" src="https://unpkg.com/@fluentui/web-components"/>
        <style>
          html * {
            font-size: 12px;
            line-height: 16px;
          }

          .title-text {
            font-weight: 600;
            text-align: left;
            color: #000000;
          }

          .summary-text {
            font-weight: 400;
            color: #424242;

          }

          .button-text {
              font-weight: 600;
              color: #242424;
              margin-left: 5px;
          }

          .image {
              width: 16px;
              height: 16px;
              vertical-align: middle
          }
        </style>

    </head>

    <apex:form >
        <div>
            <h3><apex:outputText value="Sales Agent" styleClass="title-text"/></h3>
        </div>
        <div>
            <apex:outputText value="{!Lead.SalesAgentResearchSummary__r.SummaryText__c}" styleClass="summary-text" escape="false"/>
        </div>
        <fluent-button onclick="window.open('https://teams.microsoft.com/v2/#/l/entity/c92c289e-ceb4-4755-819d-0d1dffdab6fa/homeTab?context=%7B%22subEntityId%22%3A%22%7B%5C%22route%5C%22%3A%5C%22/researchhub/lead/{!Lead.Id}%5C%22%7D%22%7D', '_blank')" title="Sales Agent">
            <apex:image value="{!$Resource.copilot_for_sales_logo}"
                alt="logo"
                styleClass="image"
            />
            <apex:outputText value="View research details" styleClass="button-text"/>
        </fluent-button>
    </apex:form>
</apex:page>
Select Save.
From the list of pages, select Security for the Sales Agent Summary page and configure the page to be accessible to the appropriate profiles.
Tip
If your leads are stored in an object other than the standard Lead object, you need to modify the above code to replace all references to the Lead object with the one that stores your leads.
Add the summary to the lead page
- Go to User Interface > Lightning App Builder.
- Select Lead Record Page and then select Edit.
- In the left panel of the editor, search for the Visualforce component.
- Drag the Visualforce component onto the canvas.
- In the right panel of the editor, set the Visualforce Page Name to Sales_Agent_Summary
- Clear the Show Label checkbox.
- Set the Height (in pixels) to 200.
- Select Save.