Note
Access to this page requires authorization. You can try signing in or changing directories.
Access to this page requires authorization. You can try changing directories.
[This article is prerelease documentation and is subject to change.]
Important
- This is a preview feature.
- Preview features aren’t meant for production use and might have restricted functionality. These features are subject to supplemental terms of use, and are available before an official release so that customers can get early access and provide feedback.
Sales Agent is a powerful tool that helps you automate your sales processes and improve your productivity. It helps sellers qualify leads by generating insights from research and generating personalized outreach emails tailored to the lead and its product of interest.
Sales Agent connects to both Microsoft Dynamics 365 Sales and Salesforce Sales Cloud to research your leads, and discover related contact, account, opportunity, and activity records. Sales Agent uncovers the insights hidden in your CRM that go easily missed.
As an admin, you can set up Sales Agent to connect to your CRM and enable it for your users. Once set up, sellers can view summaries of the research within their CRM or browse the list of researched leads in the Copilot for Sales app.
Prerequisites
- The Copilot for Sales app is installed in either Outlook or Teams.
- You have access to environment-level settings in the Copilot for Sales admin settings.
- Copilot AI features must be turned on in your environment.
- The Dataverse environment connected to Copilot for Sales is a production environment.
- Message capacity purchased and assigned to the Copilot for Sales environment.
Additional prerequisites for Salesforce
- Convert the msdyn_viva environment to a production environment. Learn more about converting your environment to production.
- Configure the server-to-server connection between Copilot for Sales and Salesforce. Learn more about Connect your agents to a data source
Step 1: Create a view and query that defines the leads to research
Sales Agent uses a CRM list view to find, filter, and monitor the records to research. The list view also defines which fields the agent has access to read. You must create a list view that's specific to the Sales Agent and make sure it has access to that list view.
Sales Agent monitors the leads that are included in the query results and researches each of the leads returned. It also monitors the set of leads for changes and runs research anytime a record is modified.
In Dynamics 365, the view must be a System view that the admin has permission to view.
In Salesforce, the admin must have permission to read the view.
Learn more about creating a list view in Salesforce or Dynamics 365 Sales.
Tip
- You don't have to use the standard (out-of-the-box) lead object or entity for your leads. If your leads are stored in another type of record, you can choose to define your 'leads' using that object or entity.
- Only include records that are useful to research. It helps you save costs by only researching leads that your sellers are going to work on. For example, you can include leads that are created within the past 30 days so that Sales Agent is only researching new leads. Researching old leads isn't likely helpful to your sellers. Additionally, only researching leads that haven't yet been converted to opportunities and those which haven't been disqualified are helpful filters to save cost.
Step 2: Select where to store research summaries
The Sales Agent can optionally store a summary of the research in your CRM so that a seller can view the research directly on the lead record. To enable this capability, you must first create a table in the CRM to store the summary, and then create a field on your lead record that will be used to link the lead to the summary.
Important
At this time, the preview of Sales Agent doesn't support writing summaries to Dynamics 365 Sales.
Create a table to store Sales Agent research summary
- Create a custom table in your CRM to store the Sales Agent research summary. For example, SalesAgentResearchSummaries.
- In the summary table, create a field labeled SummaryText. In Salesforce, the type of the field should be Text Area (Rich). In Dynamics 365, the type of the filed should be Multiple Lines of Text.
- Set the permissions on the table and fields to allow your sellers read the content of the records. If you're using Salesforce, you must give permission to the Salesforce integration user to read and write to this table. Learn more about configuring Salesforce permissions for Sales Agent.
Create a field on lead record to reference the summary
- Locate the table in your CRM that represents your leads being researched. For example, Lead.
- Add a field named SalesAgentResearchSummary, to store the relationship from the lead to the summary table created above. In Salesforce, the data type of the field should be a Lookup Relationship related to the SalesAgentResearchSummaries table created above. In Dynamics 365, create a New relationship Many-to-one from the Relationships tab of the table.
- Set the permissions to allow the field be visible and read-only to your sellers. In Salesforce, you must give permission to the Salesforce integration user to write this field.
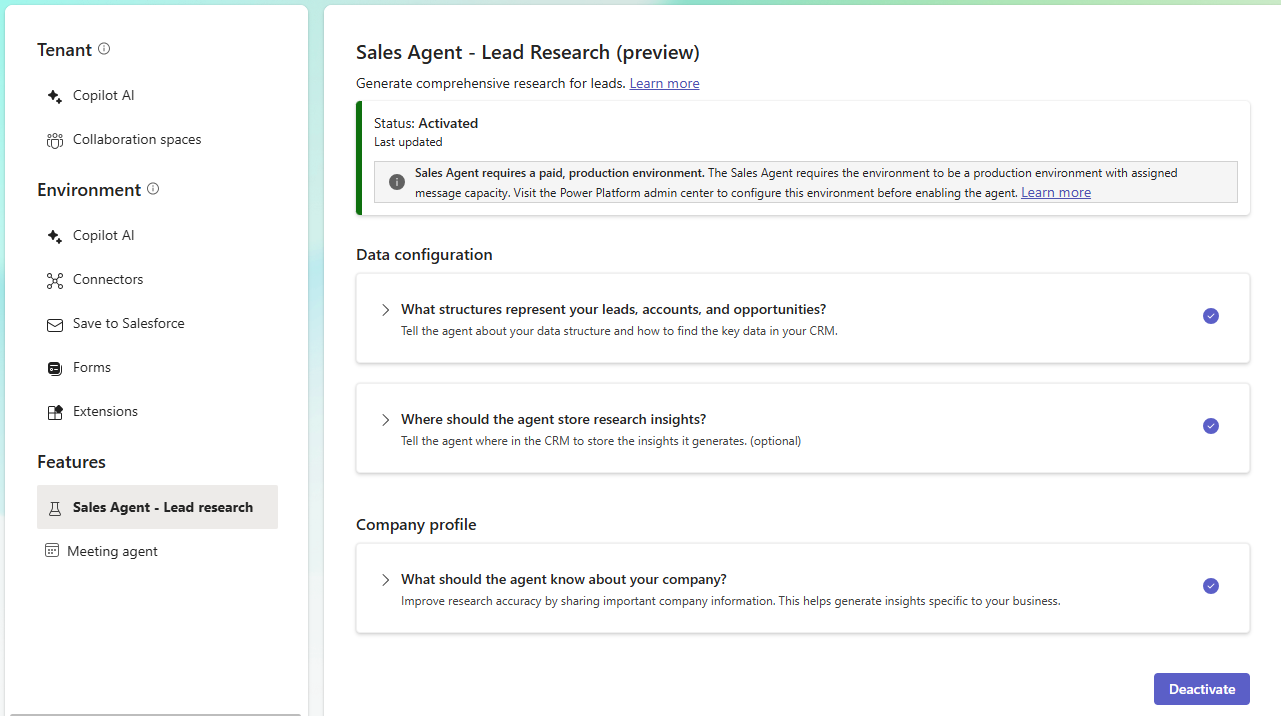
Step 3: Set up and activate the agent
- In the Copilot for Sales admin settings, select Sales Agent - Lead Research.
- If you're using Salesforce, confirm that the status doesn't show Connect to Salesforce. If it does, select Connect to Salesforce. Learn more about connecting your agents to a data source.
- Enter details in the following sections:
- Data configuration: Select the data sources to be used by the agent.
- Company profile: Enter the company profile details.
- Salesforce users need to take additional steps to configure permissions for the Sales Agent.
- Select Activate. The activation process may take a few minutes. Once activated, the status changes to Activated.
Data configuration
Allows you to select the data sources to be used by the agent and tell where to store the insights generated by the agent.
Add a data source
- Expand the What structures represent your leads, accounts, and opportunities? section and select Add data source.
- In the Choose lead table step, select the table that stores your leads, and then select Next.
- In the Choose a view for the Lead table step, select the view you created in Step 1, and then select Next.
- In the Map the fields step, map the fields in your lead table to the fields used by Sales Agent, and then select Next.
- In the Additional fields the agent should know about (recommended) step, add more fields that you want the agent to use for research. For example, source marketing campaign and source event description. To add more fields, select Add field and then select the field from the list.
Tip
Use the description field to describe the type of data the additional fields contain. The better your description, the better the agent is at interpreting this data and using it to research your leads.
- Select Done.
- To configure the data sources related to leads, select Add data source for accounts and Add data source for opportunities. Follow the same steps as above to select a table and view for accounts and opportunities.
Store research insights in CRM
Note
In the below steps, the table and field names are the ones you created in Step 2. If you used different names, use those names instead.
- Expand the Where should the agent store research insights? section.
- Turn on the toggle for Store a summary of research in your CRM, and then select Add data source.
- In the Choose table step, select the table to store the research summaries, and then select Next. For example, SalesAgentResearchSummaries.
- In the Map the fields step, select the field to store the summary, and then select Next. For example, SummaryText.
- In the Choose field step, select the field on the lead table that references the summary. For example, SalesAgentResearchSummary.
- Select Done.
Company profile
Allows you to enter the company profile details that will be used by the agent to generate insights. The company profile is used to provide context about your organization and helps the agent generate more relevant insights. Enter the following details:
- Company name: The name of your company.
- Company URL: The URL of your company website.
- Company offerings: A brief description of the products or services your company offers. To add more offerings, select Add and enter the details.
Tip
The names and descriptions of your offerings will be used by the agent to match leads with potential solutions they may be interested in.
Configure Salesforce permissions for Sales Agent
Note
These steps in this section are only needed for Salesforce CRM integration.
The Sales Agent connects to Salesforce using the server-to-server data connection which creates and manages permissions for the Copilot for Sales integration user user in Salesforce. By default, that user is granted permissions to read a subset of data in Salesforce. The Sales Agent needs additional permission to access records to fully research each lead.
As an admin in Salesforce, open the Setup page and perform the following steps to give the Sales Agent the necessary permissions:
Important
The server-to-server data connection creates a Salesforce permission set named Copilot for Sales connected app permission set which is managed by Copilot for Sales. Any changes made to this permission set will be automatically overwritten. By creating a separate permission set to manage additional permissions for the Sales Agent Copilot for Sales integration user you avoid having your changes being overwritten by future application updates.
Give permission to read activities, tasks, and events
- Go to Users > Permission Sets.
- Create a new permission set named Sales Agent.
- Set the license of permission set to None.
- Save the permission set and open it.
- Select System Permissions.
- Select Edit.
- Enable the Access Activities permission and select Save.
- Return to the Sales Agent permission set overview and select Object Settings.
- For both the Tasks and Events objects, ensure that Read Access is set on the following fields:
- Description
- Due Date
- Name
- Related To
- Type
- Return to the Sales Agent permission set overview and select Manage Assignments.
- Select Add Assignment and assign this permission set to the Copilot for Sales integration user user.
Give permission to read custom objects and fields
If the Sales Agent needs to access custom objects or custom fields configured in Salesforce, you need to give the Sales Agent explicit permission to read those objects and fields. For example, if you configured Additional fields the agent should know about (recommended), the Sales Agent needs to be granted read access to each of those fields on your lead object.
- Go to Users > Permission Sets.
- Open the Sales Agent permission set created in the previous step.
- Select Object Settings.
- For each custom object, ensure the object permissions are set to allow the following permissions: Read, View All Records.
- For each custom field used in the configuration, ensure the field level permissions allow for Read Access.
Give permission to write summaries to Salesforce
If configured to write research summaries to Salesforce, you need to give the Sales Agent permission to write to the summaries table.
- Go to Users > Permission Sets.
- Open the Sales Agent permission set created in the previous step.
- Select Object Settings.
- Select the object configured to store the research summaries. For example, SalesAgentResearchSummaries.
- Select Edit Properties, and set the following permissions:
- Object permissions: Read, Create, Edit, View All Records, View All Fields
- Field permissions:
- Created By: Read Access
- Last Modified By: Read Access
- Owner: Read Access, Edit Access
- SummaryText: Read Access, Edit Access
Give permission to create links from the lead to research summaries
If configured to write research summaries to Salesforce, you need to give the Sales Agent permission to write to the lead records to link to their summary.
- Go to Users > Permission Sets.
- Open the Sales Agent permission set created in the previous step.
- Select Object Settings.
- Select the object representing your leads being researched. For example, Lead.
- Select Edit Properties, and set the following permissions:
- Object permissions: Read, Edit, View All Records
- Field permissions:
- SalesAgentResearchSummary: Read Access, Edit Access
Complete the CRM configuration
Once the Sales Agent is activated, you must integrate Sales Agent with Salesforce to create a link to the lead's research, or optionally embed a widget to display the research summary on the lead page.
Deactivate the agent
You can deactivate the agent at any time. When you deactivate the agent, it stops researching leads and generating insights. However, the insights that have already been generated will still be available.
In the Copilot for Sales admin settings, select Sales Agent - Lead Research.
Scroll down to the bottom of the page and select Deactivate.
In the confirmation dialog, select Deactivate.
The status is changed to Deactivated.