Note
Access to this page requires authorization. You can try signing in or changing directories.
Access to this page requires authorization. You can try changing directories.
Integrating Azure Communication Services' phone calling capabilities into a custom Line of Business (LOB) application offers several key benefits to businesses and their users:
- Enables seamless and real-time communication between employees, customers, and partners, directly from within the LOB application, eliminating the need to switch between multiple platforms or devices.
- Enhances the user experience and improves overall operational efficiency.
- Facilitates rapid problem resolution, as users can quickly connect with relevant support teams or subject matter experts quickly and easily.
In this exercise, you will:
- Explore the phone calling feature in the application.
- Walk through the code to learn how the phone calling feature is built.
Using the Phone Calling Feature
In the previous exercise you created an Azure Communication Services (ACS) resource and started the database, web server, and API server. You also updated the following values in the .env file.
ACS_CONNECTION_STRING=<ACS_CONNECTION_STRING>
ACS_PHONE_NUMBER=<ACS_PHONE_NUMBER>
ACS_EMAIL_ADDRESS=<ACS_EMAIL_ADDRESS>
CUSTOMER_EMAIL_ADDRESS=<EMAIL_ADDRESS_TO_SEND_EMAIL_TO>
CUSTOMER_PHONE_NUMBER=<UNITED_STATES_BASED_NUMBER_TO_SEND_SMS_TO>
Ensure you've completed the previous exercise before continuing.
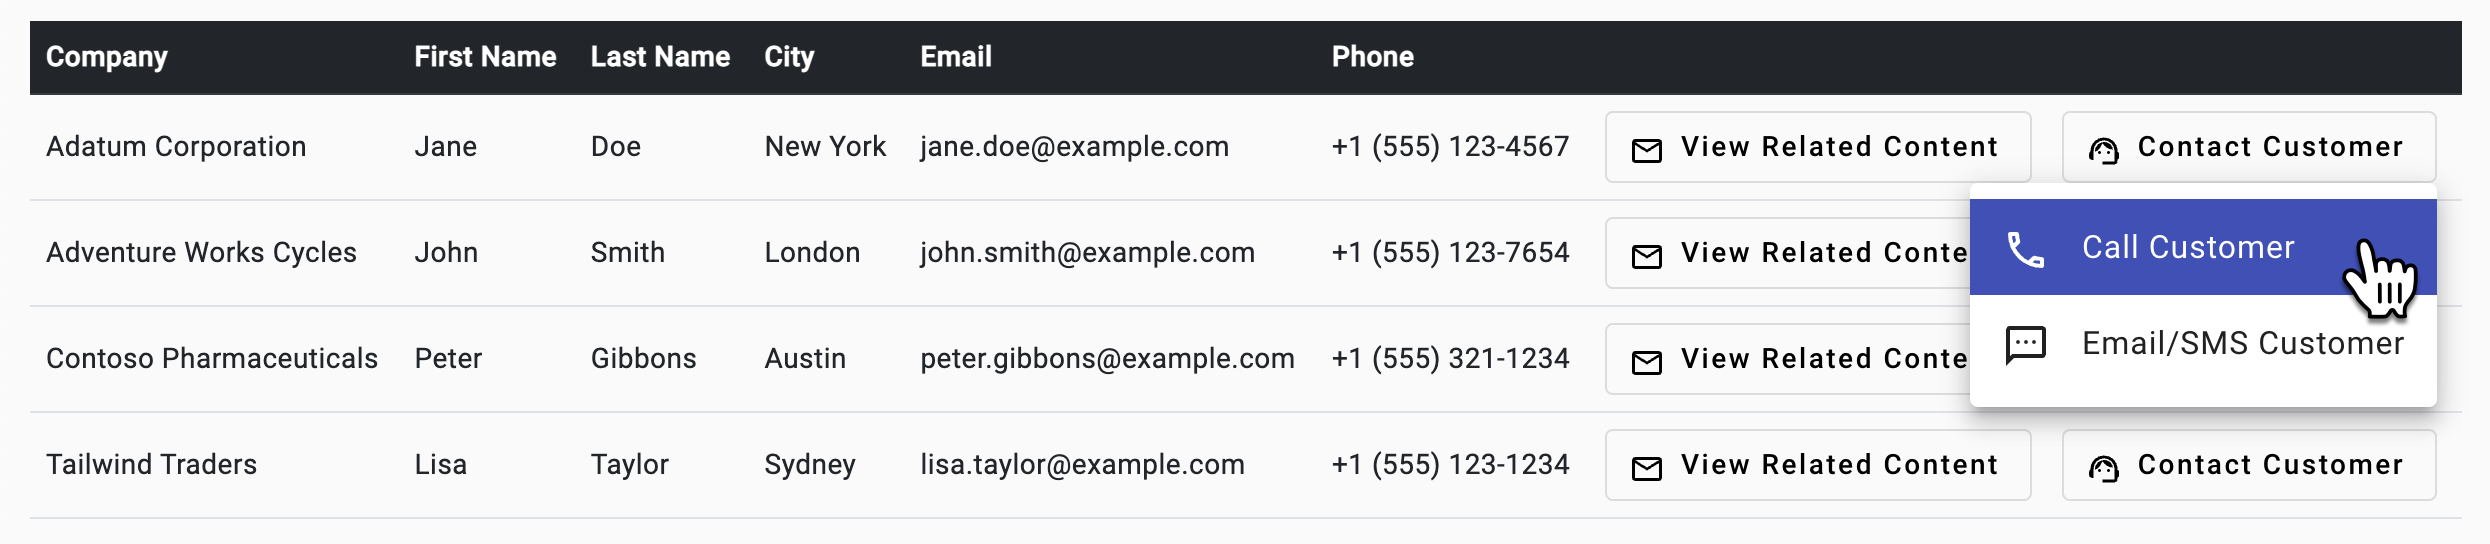
Go back to the browser (http://localhost:4200), locate the datagrid, and select Contact Customer followed by Call Customer in the first row.
A phone call component will be added into the header. Enter your phone number you'd like to call (ensure it starts with + and includes the country code) and select Call. You will be prompted to allow access to your microphone.

Select Hang Up to end the call. Select Close to close the phone call component.
Exploring the Phone Calling Code
Tip
If you're using Visual Studio Code, you can open files directly by selecting:
- Windows/Linux: Ctrl + P
- Mac: Cmd + P
Then type the name of the file you want to open.
Open the customers-list.component.ts file. The full path to the file is client/src/app/customers-list/customers-list.component.ts.
Note that
openCallDialog()sends aCustomerCallmessage and the customer phone number using an event bus.openCallDialog(data: Phone) { this.eventBus.emit({ name: Events.CustomerCall, value: data }); }Note
The event bus code can be found in the eventbus.service.ts file if you're interested in exploring it more. The full path to the file is client/src/app/core/eventbus.service.ts.
The header component's
ngOnInit()function subscribes to theCustomerCallevent sent by the event bus and displays the phone call component. You can find this code in header.component.ts.ngOnInit() { this.subscription.add( this.eventBus.on(Events.CustomerCall, (data: Phone) => { this.callVisible = true; // Show phone call component this.callData = data; // Set phone number to call }) ); }Open phone-call.component.ts. Take a moment to expore the code. The full path to the file is client/src/app/phone-call/phone-call.component.ts. Note the following key features:
- Retrieves an Azure Communication Services access token by calling the
acsService.getAcsToken()function inngOnInit(); - Adds a "phone dialer" to the page. You can see the dialer by clicking on the phone number input in the header.
- Starts and ends a call using the
startCall()andendCall()functions respectively.
- Retrieves an Azure Communication Services access token by calling the
Before looking at the code that makes the phone call, let's examine how the ACS access token is retrieved and how phone calling objects are created. Locate the
ngOnInit()function in phone-call.component.ts.async ngOnInit() { if (ACS_CONNECTION_STRING) { this.subscription.add( this.acsService.getAcsToken().subscribe(async (user: AcsUser) => { const callClient = new CallClient(); const tokenCredential = new AzureCommunicationTokenCredential(user.token); this.callAgent = await callClient.createCallAgent(tokenCredential); }) ); } }This function performs the following actions:
- Retrieves an ACS userId and access token by calling the
acsService.getAcsToken()function. - Once the access token is retrieved, the code performs the following actions:
- Creates a new instance of
CallClientandAzureCommunicationTokenCredentialusing the access token. - Creates a new instance of
CallAgentusing theCallClientandAzureCommunicationTokenCredentialobjects. Later you'll see thatCallAgentis used to start and end a call.
- Creates a new instance of
- Retrieves an ACS userId and access token by calling the
Open acs.services.ts and locate the
getAcsToken()function. The full path to the file is client/src/app/core/acs.service.ts. The function makes an HTTP GET request to the/acstokenroute exposed by the API server.getAcsToken(): Observable<AcsUser> { return this.http.get<AcsUser>(this.apiUrl + 'acstoken') .pipe( catchError(this.handleError) ); }An API server function named
createACSToken()retrieves the userId and access token and returns it to the client. It can be found in the server/typescript/acs.ts file.import { CommunicationIdentityClient } from '@azure/communication-identity'; const connectionString = process.env.ACS_CONNECTION_STRING as string; async function createACSToken() { if (!connectionString) return { userId: '', token: '' }; const tokenClient = new CommunicationIdentityClient(connectionString); const { user, token } = await tokenClient.createUserAndToken(["voip"]); return { userId: user.communicationUserId, token }; }This function performs the following actions:
- Checks if an ACS
connectionStringvalue is available. If not, returns an object with an emptyuserIdandtoken. - Creates a new instance of
CommunicationIdentityClientand passes theconnectionStringvalue to it. - Creates a new user and token using
tokenClient.createUserAndToken()with the "voip" scope. - Returns an object containing the
userIdandtokenvalues.
- Checks if an ACS
Now that you've seen how the userId and token are retrieved, go back to
phone-call.component.tsand locate thestartCall()function.This function is called when Call is selected in the phone call component. It uses the
CallAgentobject mentioned earlier to start a call. ThecallAgent.startCall()function accepts an object representing the number to call and the ACS phone number used to make the call.startCall() { this.call = this.callAgent?.startCall( [{ phoneNumber: this.customerPhoneNumber }], { alternateCallerId: { phoneNumber: this.fromNumber } }); console.log('Calling: ', this.customerPhoneNumber); console.log('Call id: ', this.call?.id); this.inCall = true; // Adding event handlers to monitor call state this.call?.on('stateChanged', () => { console.log('Call state changed: ', this.call?.state); if (this.call?.state === 'Disconnected') { console.log('Call ended. Reason: ', this.call.callEndReason); this.inCall = false; } }); }The
endCall()function is called when Hang Up is selected in the phone call component.endCall() { if (this.call) { this.call.hangUp({ forEveryone: true }); this.call = undefined; this.inCall = false; } else { this.hangup.emit(); } }If a call is in progress, the
call.hangUp()function is called to end the call. If no call is in progress, thehangupevent is emitted to the header parent component to hide the phone call component.Before moving on to the next exercise, let's review the key concepts covered in this exercise:
- An ACS userId and access token are retrieved from the API server using the
acsService.createUserAndToken()function. - The token is used to create a
CallClientandCallAgentobject. - The
CallAgentobject is used to start and end a call by calling thecallAgent.startCall()andcallAgent.hangUp()functions respectively.
- An ACS userId and access token are retrieved from the API server using the
Now that you've learned how phone calling can be integrated into an application, let's switch our focus to using Azure Communication Services to send email and SMS messages.