Note
Access to this page requires authorization. You can try signing in or changing directories.
Access to this page requires authorization. You can try changing directories.
In addition to phone calls, Azure Communication Services can also send email and SMS messages. This can be useful when you want to send a message to a customer or other user directly from the application.
In this exercise, you will:
- Explore how email and SMS messages can be sent from the application.
- Walk through the code to learn how the email and SMS functionality is implemented.
Using the Email and SMS Features
In a previous exercise you created an Azure Communication Services (ACS) resource and started the database, web server, and API server. You also updated the following values in the .env file.
ACS_CONNECTION_STRING=<ACS_CONNECTION_STRING>
ACS_PHONE_NUMBER=<ACS_PHONE_NUMBER>
ACS_EMAIL_ADDRESS=<ACS_EMAIL_ADDRESS>
CUSTOMER_EMAIL_ADDRESS=<EMAIL_ADDRESS_TO_SEND_EMAIL_TO>
CUSTOMER_PHONE_NUMBER=<UNITED_STATES_BASED_NUMBER_TO_SEND_SMS_TO>
Ensure you've completed the previous exercise before continuing.
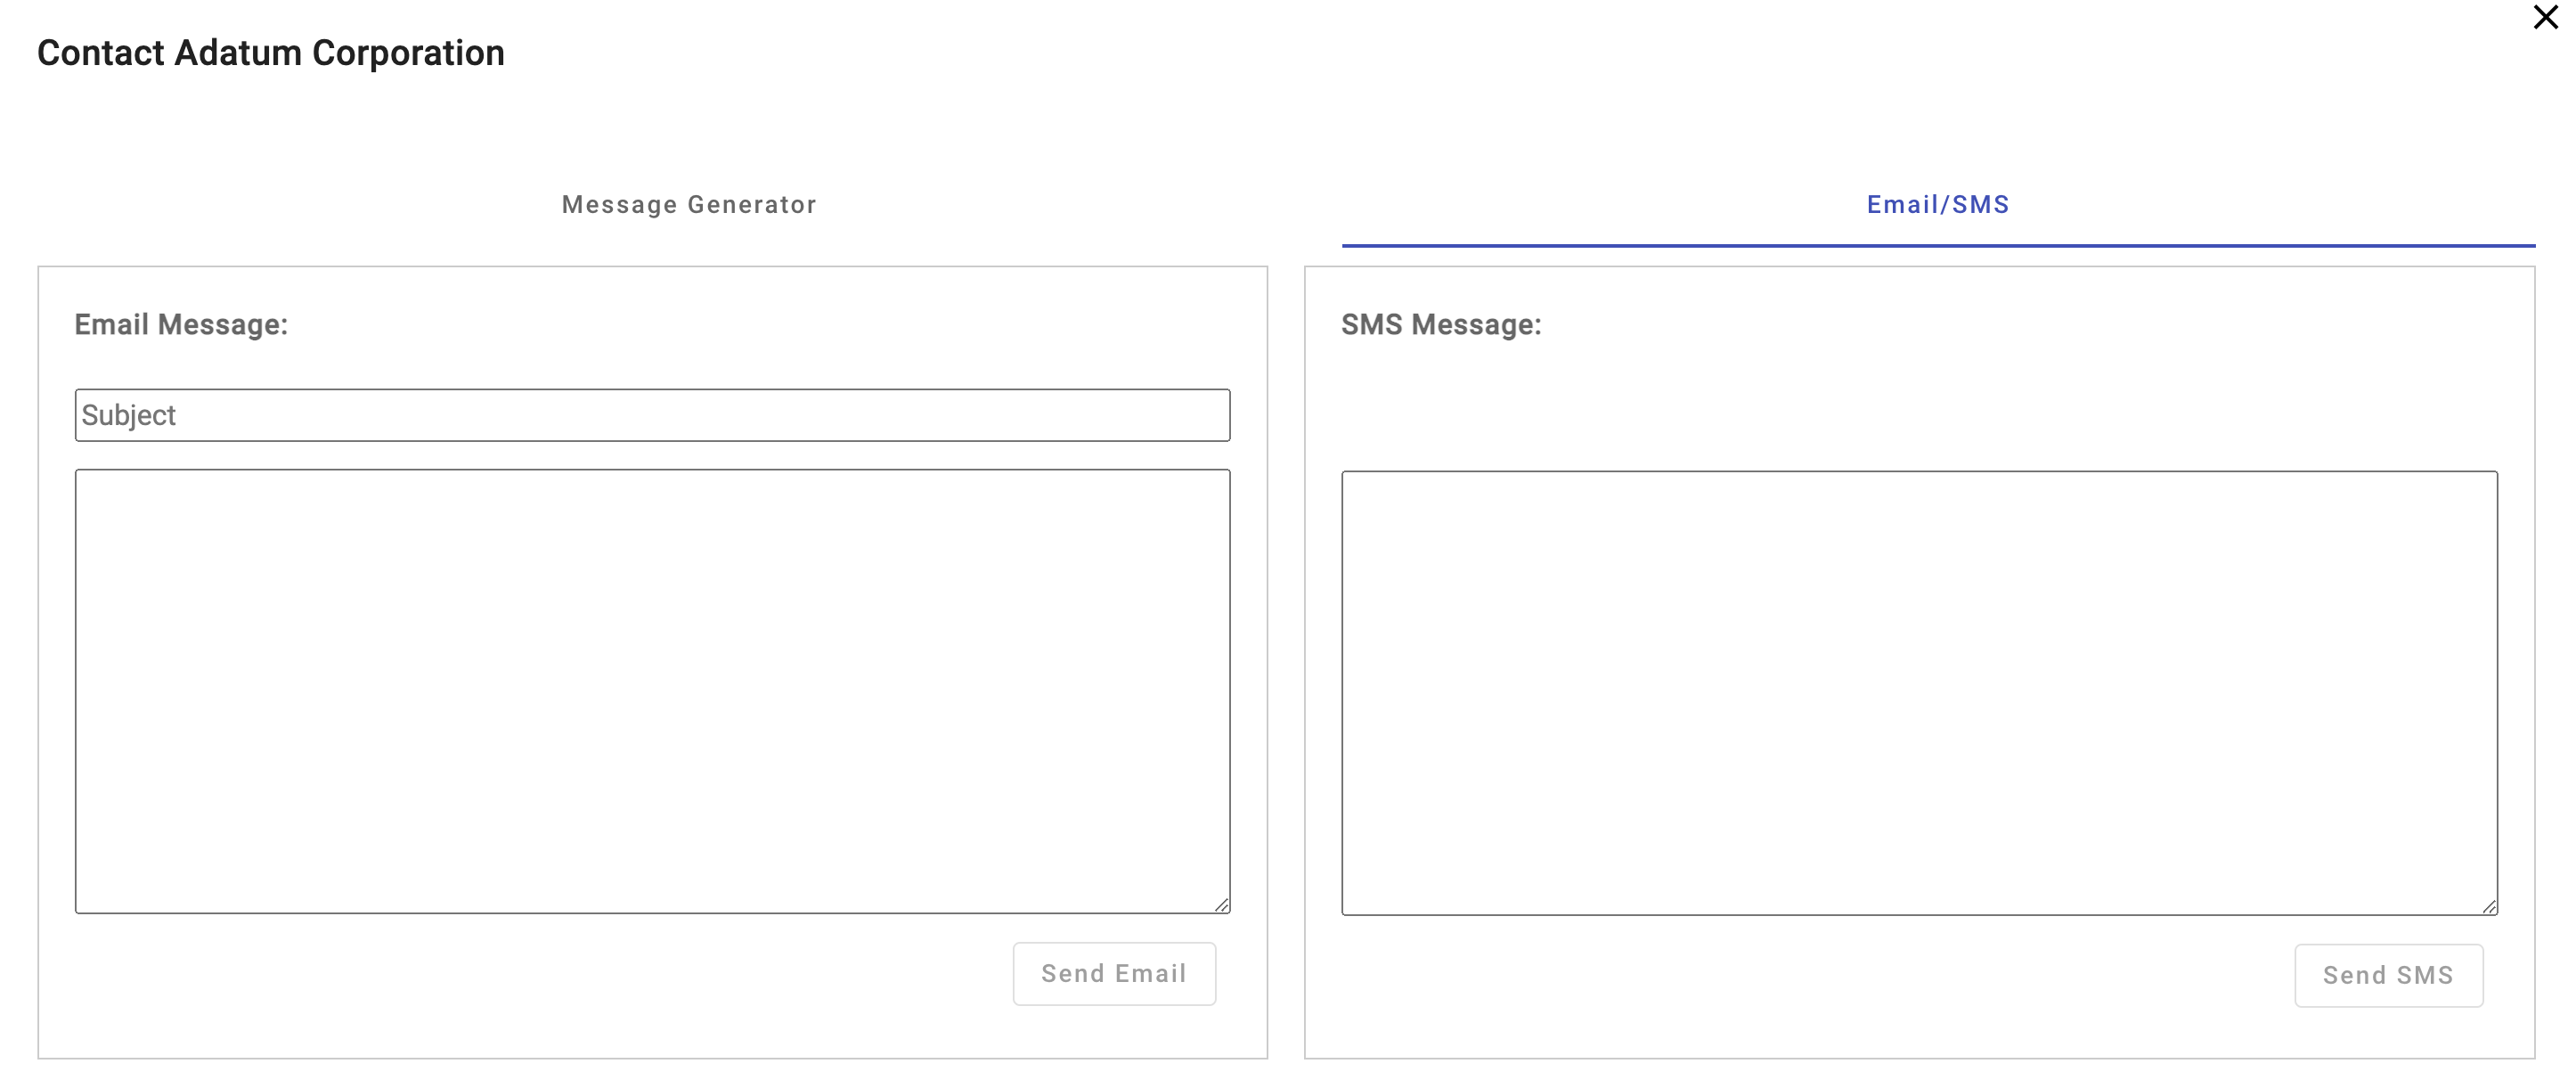
Go back to the browser (http://localhost:4200) and select Contact Customer followed by Email/SMS Customer in the first row.
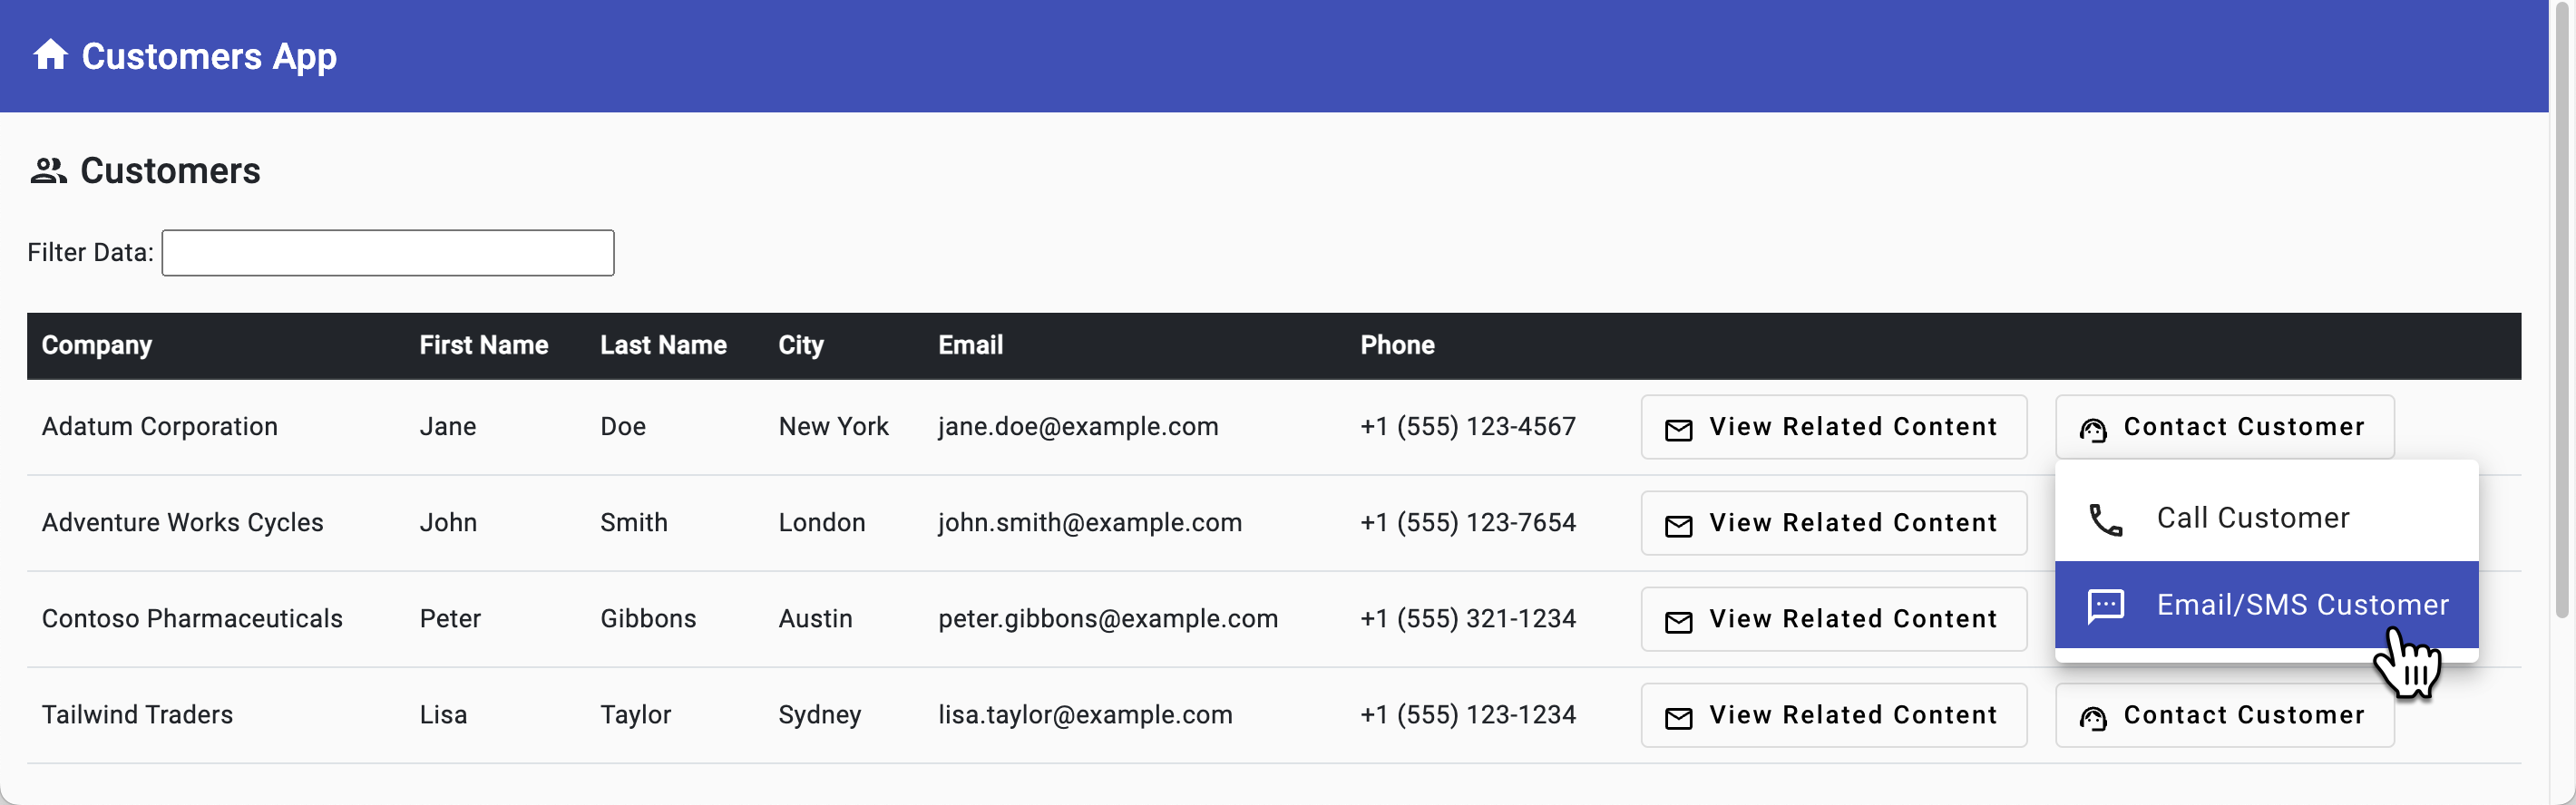
Select the Email/SMS tab and perform the following tasks:
- Enter an Email Subject and Body and select the Send Email button.
- Enter an SMS message and select the Send SMS button.
Note
SMS verification for toll-free numbers is now mandatory in the United States and Canada. To enable SMS messaging, you must submit verification after the phone number purchase. While this tutorial won't go through that process, you can select Telephony and SMS --> Regulatory Documents from your Azure Communication Services resource in the Azure portal and add the required validation documentation.
Check that you received the email and SMS messages. SMS functionality will only work if you submitted the regulatory documents mentioned in the previous note. As a reminder, the email message will be sent to the value defined for
CUSTOMER_EMAIL_ADDRESSand the SMS message will be sent to the value defined forCUSTOMER_PHONE_NUMBERin the .env file. If you weren't able to supply a United States based phone number to use for SMS messages you can skip that step.Note
If you don't see the email message in your inbox for the address you defined for
CUSTOMER_EMAIL_ADDRESSin the .env file, check your spam folder.
Exploring the Email Code
Tip
If you're using Visual Studio Code, you can open files directly by selecting:
- Windows/Linux: Ctrl + P
- Mac: Cmd + P
Then type the name of the file you want to open.
Open the customers-list.component.ts file. The full path to the file is client/src/app/customers-list/customers-list.component.ts.
When you selected Contact Customer followed by Email/SMS Customer in the datagrid, the
customer-listcomponent displayed a dialog box. This is handled by theopenEmailSmsDialog()function in the customer-list.component.ts file.openEmailSmsDialog(data: any) { if (data.phone && data.email) { // Create the data for the dialog let dialogData: EmailSmsDialogData = { prompt: '', title: `Contact ${data.company}`, company: data.company, customerName: data.first_name + ' ' + data.last_name, customerEmailAddress: data.email, customerPhoneNumber: data.phone } // Open the dialog const dialogRef = this.dialog.open(EmailSmsDialogComponent, { data: dialogData }); // Subscribe to the dialog afterClosed observable to get the dialog result this.subscription.add( dialogRef.afterClosed().subscribe((response: EmailSmsDialogData) => { console.log('SMS dialog result:', response); if (response) { dialogData = response; } }) ); } else { alert('No phone number available.'); } }The
openEmailSmsDialog()function performs the following tasks:- Checks to see if the
dataobject (which represents the row from the datagrid) contains aphoneandemailproperty. If it does, it creates adialogDataobject that contains the information to pass to the dialog. - Opens the
EmailSmsDialogComponentdialog box and passes thedialogDataobject to it. - Subscribes to the
afterClosed()event of the dialog box. This event is fired when the dialog box is closed. Theresponseobject contains the information that was entered into the dialog box.
- Checks to see if the
Open the email-sms-dialog.component.ts file. The full path to the file is client/src/app/email-sms-dialog/email-sms-dialog.component.ts.
Locate the
sendEmail()function:sendEmail() { if (this.featureFlags.acsEmailEnabled) { // Using CUSTOMER_EMAIL_ADDRESS instead of this.data.email for testing purposes this.subscription.add( this.acsService.sendEmail(this.emailSubject, this.emailBody, this.getFirstName(this.data.customerName), CUSTOMER_EMAIL_ADDRESS /* this.data.email */) .subscribe(res => { console.log('Email sent:', res); if (res.status) { this.emailSent = true; } }) ); } else { this.emailSent = true; // Used when ACS email isn't enabled } }The
sendEmail()function performs the following tasks:- Checks to see if the
acsEmailEnabledfeature flag is set totrue. This flag checks to see if theACS_EMAIL_ADDRESSenvironment variable has an assigned value. - If
acsEmailEnabledis true, theacsService.sendEmail()function is called and the email subject, body, customer name, and customer email address are passed. Because the database contains sample data, theCUSTOMER_EMAIL_ADDRESSenvironment variable is used instead ofthis.data.email. In a real-world application thethis.data.emailvalue would be used. - Subscribes to the
sendEmail()function in theacsServiceservice. This function returns an RxJS observable that contains the response from the client-side service. - If the email was sent successfully, the
emailSentproperty is set totrue.
- Checks to see if the
To provide better code encapsulation and reuse, client-side services such as acs.service.ts are used throughout the application. This allows all ACS functionality to be consolidated into a single place.
Open acs.service.ts and locate the
sendEmail()function. The full path to the file is client/src/app/core/acs.service.ts.sendEmail(subject: string, message: string, customerName: string, customerEmailAddress: string) : Observable<EmailSmsResponse> { return this.http.post<EmailSmsResponse>(this.apiUrl + 'sendEmail', { subject, message, customerName, customerEmailAddress }) .pipe( catchError(this.handleError) ); }The
sendEmail()function inAcsServiceperforms the following tasks:- Calls the
http.post()function and passes the email subject, message, customer name, and customer email address to it. Thehttp.post()function returns an RxJS observable that contains the response from the API call. - Handles any errors returned by the
http.post()function using the RxJScatchErroroperator.
- Calls the
Now let's examine how the application interacts with the ACS email feature. Open the acs.ts file and locate the
sendEmail()function. The full path to the file is server/typescript/acs.ts.The
sendEmail()function performs the following tasks:Creates a new
EmailClientobject and passes the ACS connection string to it (this value is retrieved from theACS_CONNECTION_STRINGenvironment variable).const emailClient = new EmailClient(connectionString);Creates a new
EmailMessageobject and passes the sender, subject, message, and recipient information.const msgObject: EmailMessage = { senderAddress: process.env.ACS_EMAIL_ADDRESS as string, content: { subject: subject, plainText: message, }, recipients: { to: [ { address: customerEmailAddress, displayName: customerName, }, ], }, };Sends the email using the
emailClient.beginSend()function and returns the response. Although the function is only sending to one recipient in this example, thebeginSend()function can be used to send to multiple recipients as well.const poller = await emailClient.beginSend(msgObject);Waits for the
pollerobject to signal it's done and sends the response to the caller.
Exploring the SMS Code
Go back to the email-sms-dialog.component.ts file that you opened earlier. The full path to the file is client/src/app/email-sms-dialog/email-sms-dialog.component.ts.
Locate the
sendSms()function:sendSms() { if (this.featureFlags.acsPhoneEnabled) { // Using CUSTOMER_PHONE_NUMBER instead of this.data.customerPhoneNumber for testing purposes this.subscription.add( this.acsService.sendSms(this.smsMessage, CUSTOMER_PHONE_NUMBER /* this.data.customerPhoneNumber */) .subscribe(res => { if (res.status) { this.smsSent = true; } }) ); } else { this.smsSent = true; } }The
sendSMS()function performs the following tasks:- Checks to see if the
acsPhoneEnabledfeature flag is set totrue. This flag checks to see if theACS_PHONE_NUMBERenvironment variable has an assigned value. - If
acsPhoneEnabledis true, theacsService.SendSms()function is called and the SMS message and customer phone number are passed. Because the database contains sample data, theCUSTOMER_PHONE_NUMBERenvironment variable is used instead ofthis.data.customerPhoneNumber. In a real-world application thethis.data.customerPhoneNumbervalue would be used. - Subscribes to the
sendSms()function in theacsServiceservice. This function returns an RxJS observable that contains the response from the client-side service. - If the SMS message was sent successfully, it sets the
smsSentproperty totrue.
- Checks to see if the
Open acs.service.ts and locate the
sendSms()function. The full path to the file is client/src/app/core/acs.service.ts.sendSms(message: string, customerPhoneNumber: string) : Observable<EmailSmsResponse> { return this.http.post<EmailSmsResponse>(this.apiUrl + 'sendSms', { message, customerPhoneNumber }) .pipe( catchError(this.handleError) ); }The
sendSms()function performs the following tasks:- Calls the
http.post()function and passes the message and customer phone number to it. Thehttp.post()function returns an RxJS observable that contains the response from the API call. - Handles any errors returned by the
http.post()function using the RxJScatchErroroperator.
- Calls the
Finally, let's examine how the application interacts with the ACS SMS feature. Open the acs.ts file. The full path to the file is server/typescript/acs.ts and locate the
sendSms()function.The
sendSms()function performs the following tasks:Creates a new
SmsClientobject and passes the ACS connection string to it (this value is retrieved from theACS_CONNECTION_STRINGenvironment variable).const smsClient = new SmsClient(connectionString);Calls the
smsClient.send()function and passes the ACS phone number (from), customer phone number (to), and SMS message:const sendResults = await smsClient.send({ from: process.env.ACS_PHONE_NUMBER as string, to: [customerPhoneNumber], message: message }); return sendResults;Returns the response to the caller.
You can learn more about ACS email and SMS functionality in the following articles:
Before moving on to the next exercise, let's review the key concepts covered in this exercise:
- The acs.service.ts file encapsulates the ACS email and SMS functionality used by the client-side application. It handles the API calls to the server and returns the response to the caller.
- The server-side API uses the ACS
EmailClientandSmsClientobjects to send email and SMS messages.
Now that you've learned how email and SMS messages can be sent, let's switch our focus to integrating organizational data into the application.