Note
Access to this page requires authorization. You can try signing in or changing directories.
Access to this page requires authorization. You can try changing directories.
The Copilot Studio agent builder experience provides a simple interface for you to integrate knowledge sources to make your declarative agent more intelligent and context-aware. These knowledge sources ground your agent in enterprise data, public content, and user-specific information to enable them to deliver more accurate, relevant, and personalized responses.
This article describes the supported knowledge sources and the steps to configure them in agent builder. For general information about how to use agent builder, see Build agents with Copilot Studio agent builder.
For more information about supported knowledge sources and licensing requirements, see Knowledge sources.
Add knowledge sources in agent builder
To add knowledge sources to your agent:
- In Microsoft 365 Copilot, choose Create agent, and go to the Configure tab.
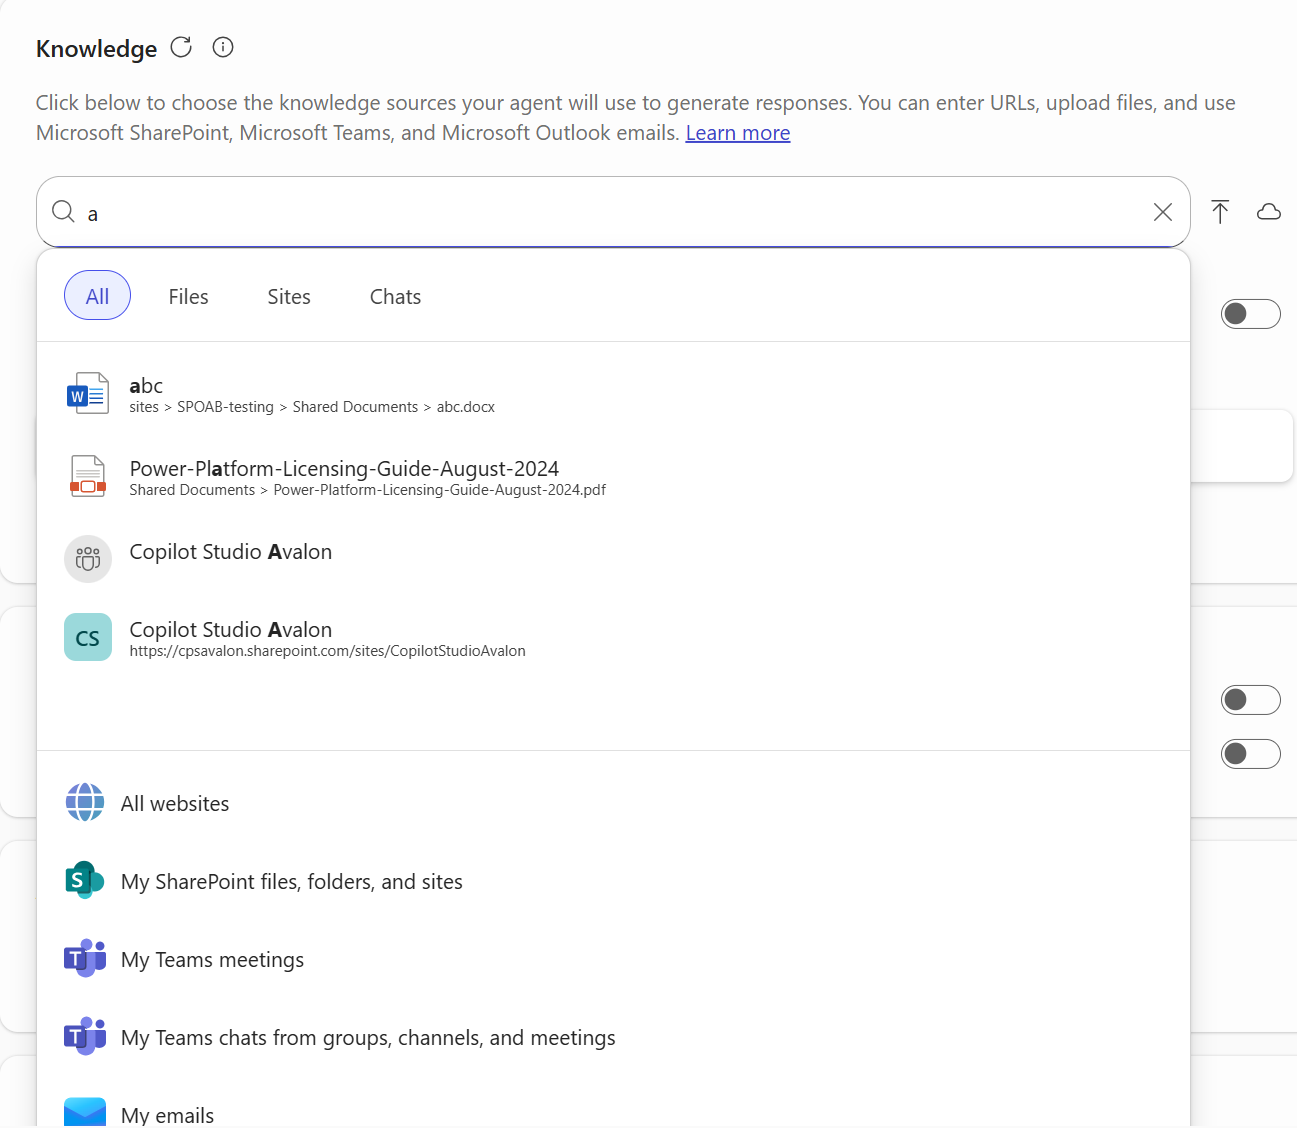
- In the Knowledge section, use one of the following methods to add knowledge sources:
- Search bar - Type keywords to search for SharePoint items.
- Enter URL - Add a public website or SharePoint link (must be two levels deep and without query parameters).
- Picker - Use the file picker UI to browse for and select SharePoint files or folders.
- Select the items to include. You can add:
- Up to four public website URLs.
- SharePoint files, folders, or sites.
- Up to five Teams chat URLs.
- Embedded files uploaded from your device.
- Microsoft 365 Copilot connectors (if enabled by your organization's administrator).
Public websites
You can add specific public websites as agent knowledge sources to make your agent context-aware. When you reference websites as knowledge sources, the following limits apply:
- Public website URLs must only be two levels; for example,
https://example.org/a/b/cis an invalid URL because it's more than two levels. - URLs can't contain query parameters; for example,
https://example.org?test=1is invalid. - You can add up to four URLs.
To configure your agent to use any web data as knowledge, on the Configure tab, click the Knowledge box, and choose All websites.
SharePoint content
You can reference specific SharePoint sites, files, and folders as agent knowledge sources. When you reference sources from SharePoint, consider the following limits:
- A total of 100 SharePoint files can be selected for each agent.
- Files already uploaded to SharePoint might have existing permissions and sensitivity labels, which are respected when the agent is generating a response.
For information about SharePoint knowledge file size limits, see File size limits.
Important
If Restricted SharePoint Search is enabled, you can't use SharePoint as a knowledge source.
Note
If you're configured with a pay-as-you-go plan in the Microsoft 365 admin center, you might not have access to this knowledge source.
Entering a URL for a SharePoint site, folder, or file
You can enter a URL for a SharePoint site, folder, or file, such as contoso.sharepoint.com/sites/policies. The agent searches the URL and subpaths. For example, a URL such as contoso.sharepoint.com/sites also includes subpaths like contoso.sharepoint.com/sites/policies. The agent uses relevant information to provide a targeted response.
After you provide the SharePoint URL, press Enter to add it as a knowledge source.
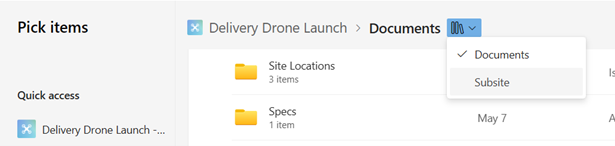
SharePoint file picker
You can also select files or folders from the SharePoint file picker by choosing the cloud icon in the Knowledge section. The left pane on the picker displays your recently accessed SharePoint sites. To view more SharePoint sites, select More places. If you recently created a site, it will appear after several minutes.
Note
The SharePoint picker might not show all the communication sites that you have access to. Communication sites only show up in the Quick Access and Recent sections of the SharePoint picker.
After you select a site, you can select several files and folders. Doing so adds the SharePoint file or folder to the agent's knowledge sources. When the same site includes multiple folders, select the button next to the folder name to view other folders.
You can also upload files into SharePoint by using the picker. The file appears in the same folder after it finishes uploading and is ready for use in agent builder.
File readiness
When new files are uploaded to SharePoint, they can take up to several minutes to be ready for the agent to include in its response. You can still test your agent in the test pane if sources aren't ready. However, responses don't include information from the newly uploaded file until it's ready.
You can check the file readiness by looking in the Knowledge section in the Configure tab; the file has the word "Preparing" next to it. When the underlying file uploaded to SharePoint is renamed or deleted, the agent picks up the changes. You can also select the reload button on top of the Knowledge section to manually reload the state.
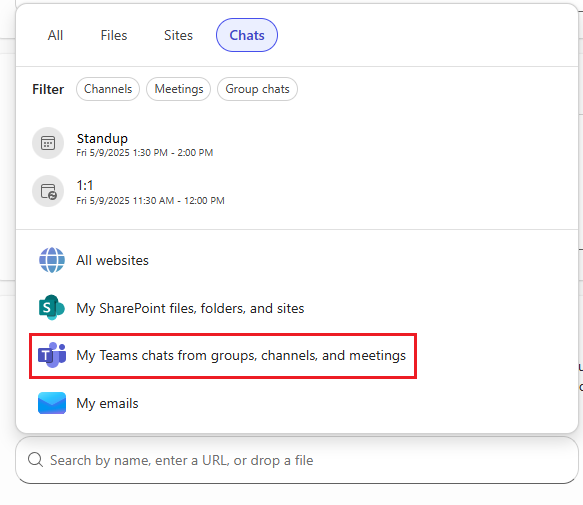
Teams chat messages
You can ground your agent in Teams channel, group, and meeting chat messages. To add Teams chat messages, on the Configure tab, in the Knowledge section, click the search bar. On the Chats tab, you can include specific chats that you want to add as knowledge.
Important
You can add up to five chat sources.
If you don't want to scope the agent's knowledge to specific chats, under Teams chats, choose My Teams chats from group chat, channels, and meetings to use all chat messages you have the access to as knowledge.
Outlook emails
You can ground your agent in Outlook email. To add email as a knowledge source, on the Configure tab, in the Knowledge section, click the search bar, and choose My emails.
Note
- You can't scope email knowledge. When you add email, the agent uses all email in your mailbox as knowledge.
- Users that you share the agent with don't have access to your email as knowledge.
Embedded file content
You can upload files directly from your device for your agent to use as knowledge. The files that you upload become embedded content in the agent. To upload files, you can drag-and-drop from your device into the Describe tab or the Configure tab. You can also choose the arrow icon on the Configure tab to upload files from your device. You can upload individual files from your device, but not file folders.
You can add up to 20 files as knowledge sources.
Note
If you're configured with a pay-as-you-go plan in the Microsoft 365 admin center, you might not have access to this knowledge source.
Embedded files are displayed on the Configure tab under Uploaded files. Files can take a few minutes to upload and appear gray until they're fully uploaded. The upload time can vary based on the file size and internet speed. For information about size limits for embedded files, see File size limits.
To remove a file you uploaded, choose the X next to the file, and choose Remove.
Files with any of the following characteristics aren't supported:
- Double key encryption.
- Sensitivity labels that have user-defined permissions. If you upload a file with user-defined permissions, agent creation fails.
- Sensitivity labels that have extract rights permission disabled. If you upload these files, agent creation fails. If an agent user doesn't have extract rights to an embedded file, the user can't access the agent.
- Files from another tenant that have encryption enabled.
- Password protection.
For details, see Unsupported sensitivity label scenarios.
Caution
When you upload files as knowledge sources for your agent, any user who has access to the agent has access to the information in the file. Access to the agent is restricted if a user doesn't have extract rights access permissions to any sensitivity label on the files.
For information about embedded file content indexing and retrieval, see Optimize content retrieval.
Sensitivity labels for agent embedded content
A sensitivity label is applied to the agent embedded content if any of the files uploaded have a sensitivity label on them, or if the tenant has a default sensitivity labeling policy. The sensitivity label applied to the agent embedded content ensures that the agent is compliant with the organization's Microsoft Purview policies.
The sensitivity label applied to the embedded content is the higher priority of the following labels:
- The highest priority sensitivity label applied to any embedded file.
- The default sensitivity label policy applied by the organization.
For example, if a file with a General label and a file with a Confidential label are embedded in the agent, the Confidential sensitivity label is applied to the embedded content.
Note
The sensitivity label applies only to the embedded content; it doesn't apply to other knowledge sources that the agent references, such as SharePoint files or Copilot connector content.
Only users who have extract right permissions to the sensitivity label applied to the embedded content can access and use the agent. The label doesn't appear on the Agent Store listing. Users who don't have extract right permissions to the embedded content can view the agent and the agent description, but they can't install and use the agent.
A sensitivity label is also applied to agent responses. This label is the higher priority of the following labels:
- The sensitivity label of the embedded content
- The sensitivity label of any other agent knowledge sources, such as SharePoint and OneDrive files.
Currently, agent builders can't set a sensitivity label on an agent.
Unsupported sensitivity label scenarios
The following table lists sensitivity label scenarios that aren't currently supported, describes the behavior when a builder uploads the file to the agent, and provides the recommended action for the builder.
| Scenario | Behavior | Action |
|---|---|---|
| Sensitivity label with Double Key Encryption (DKE) enabled | The file is embedded but isn't used as knowledge. The builder doesn't see an error message when they upload the file. | We recommend that you avoid uploading files with DKE because they can't be used as knowledge. |
| Sensitivity label with user-defined permissions enabled | The file is uploaded but agent creation fails without an error message. | Remove any uploaded files with user-defined permissions. |
| Sensitivity label with extract rights enabled for the user | The file is uploaded but agent creation fails without an error message. | Remove any uploaded files with extract rights enabled. |
| Files with sensitivity labels from another tenant that has encryption enabled | The file is embedded in the agent but isn't used as knowledge. | We recommend that you avoid uploading files with sensitivity labels from tenants with encryption enabled because they can't be used as knowledge. |
| Files with password protection | The file is uploaded and the builder sees an error message next to the uploaded file. | Remove any uploaded files with password protection. |
Sharing an agent with embedded files
When you share an agent with embedded files, the files are only shared with users when they have acquired the agent. After they acquire the agent, users can get responses from Copilot based on those knowledge sources. You have the following options for sharing an agent with embedded files as knowledge:
- Anyone in your organization
- Specific users in your organization
- Only you
Note
Sharing an agent with embedded files to groups isn't currently supported.
When you share the agent, if sensitivity labels are set on the embedded content, the sensitivity label is displayed on the Share screen.
File size limits
The following table lists the file types that you can add as knowledge to your agent and the size limits for each file type.
| File type | SharePoint Online limit | Embedded file limit |
|---|---|---|
| .doc | 150 MB | 100 MB |
| .docx | 512 MB | 100 MB |
| .html | 150 MB | NA |
| 512 MB | 100 MB | |
| .ppt | 150 MB | 100 MB |
| .pptx | 512 MB | 100 MB |
| .txt | 150 MB | 100 MB |
| .xls | 150 MB | 100 MB |
| .xlsx | 150 MB | 100 MB |
Note
- Agents respond best to queries based on data in Excel when the data is in one sheet within a workbook.
- To optimize for Copilot, we recommend that you keep the contents of files that you upload concise. For more information, see Length of documents that you provide to Copilot.
Copilot connectors
Copilot connectors allow agents to access and apply knowledge from external systems such as customer accounts, incident tickets, code repositories, and knowledge articles. With agent builder, you can integrate enterprise data from your workspace directly into your agents, empowering them with domain-specific knowledge.
Note
- Admins must enable and configure Copilot connectors in the Microsoft 365 admin center.
- If you're configured with a pay-as-you-go plan in the Microsoft 365 admin center, you might not have access to this knowledge source.
For more information about Copilot connectors, see Microsoft 365 Copilot connectors overview.
Scope Copilot connector data sources
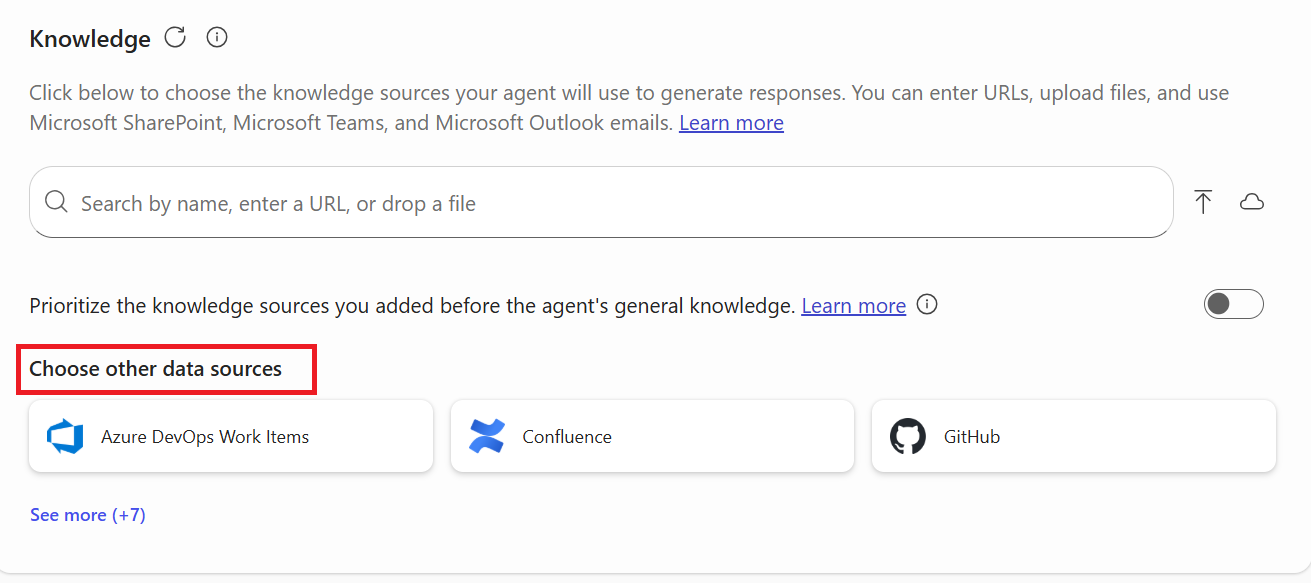
To enhance the accuracy and relevance of agent responses, agents can be grounded not only in broad organizational data but also in specific scoped data. To scope connector data in your agent to a specific attribute:
On the Configure tab, under Choose other data sources, choose the connector for your data source.
On the card for that connector, add the connections that are relevant to your scenario.
Choose the arrow to go back to the Knowledge section.
Expand the connector that you added and select the attribute that you want to scope the knowledge to (for example, project, space, folder), and search for or type the attribute name.
Note
If the attribute doesn't appear in the search results, it might be because:
- The scoped content hasn't been configured by your administrator.
- You don't have the required permissions to access the content.
- The scope isn't valid for the selected connector.
Select the attribute from the list to add it.
Your agent's knowledge is now scoped to the data associated with the scoped attribute.
For example, when you use the Azure DevOps Work Items connector, you can scope the agent to a particular area path to ensure that the agent focuses only on the most pertinent work items.
To scope the Azure DevOps Work Items area path:
- Under Choose other data sources, select Azure DevOps Work Items.
- Choose the Add button next to the connections that are relevant to your tasks.
- Choose the arrow to return to the Knowledge section.
- Choose Select an area path and search for or type the area path name.
- Select the area path to add it.
The following table lists the Copilot connectors that support scoping and the attributes that you can use to scope the data.
| Connector | Scoping attribute |
|---|---|
| Azure DevOps Work Items | Area path |
| Azure DevOps Wiki | Project |
| Confluence | Space |
| Google Drive | Folder |
| GitHub Cloud Pull Requests | Repository |
| GitHub Cloud Issues | Repository |
| GitHub Cloud Knowledge | Repository |
| Jira | Project |
| ServiceNow Knowledge | Knowledge base |
| ServiceNow Catalog | Catalog |
| ServiceNow Tickets | Entity type (Sys_class_name/ Category/ Subcategory) |
For more information about the Copilot connectors that are availlable, see the Connectors gallery.
Prioritize your knowledge sources over general knowledge
You can configure your agent to prioritize the knowledge sources you provide—such as SharePoint content or embedded files—when it responds to queries that require knowledge-based searches. Knowledge-based searches are user requests to look up specific information; for example:
- Who is the current company CEO?
- When is the next business conference?
- What's the most recent update related to a feature?
Some user requests don't require knowledge-based searches; the agent can respond based on general AI knowledge. For example:
- Translate this phrase into Spanish: "Hello, how are you?"
- What is 1+1?
When you enable this feature, the agent answers simple questions that don't require searching based on its general knowledge, but uses your knowledge sources only to answer any search-based questions. If the agent can't find relevant information in the knowledge sources you provide, it responds with a fallback message that states that it can't find the information.
To configure your agent to prioritize your knowledge sources, on the Configure tab, choose the toggle next to Prioritize the knowledge source you added over general agent knowledge.