Note
Access to this page requires authorization. You can try signing in or changing directories.
Access to this page requires authorization. You can try changing directories.
This quickstart shows you how to author a Bicep file using the VS Code Bicep extension for type safety, syntax validation and autocompletion. You declare a Microsoft Entra security group and a managed service identity (MSI) and add the MSI as an owner of the group, and finally deploy the file using a signed-in user.
Prerequisites
- Azure subscription: Create a free account if you don't have one.
- Bicep tools: Install the Bicep tools for authoring and deployment. This guide uses VS Code with the Bicep extension and Azure CLI. Minimum required Bicep version: v0.36.1.
- Microsoft Entra role: Ensure you have permissions to create a security group. By default, users have this permission, but admins can restrict it. If restricted, you need at least the Groups Administrator role.
Add a Microsoft Graph application group
Create two files in VS Code: main.bicep and bicepconfig.json. They should be in the same folder.
In bicepconfig.json, specify the Microsoft Graph Bicep type version. This example uses v1.0 resources and assigns the alias "microsoftGraphV1" for the br:mcr.microsoft.com/bicep/extensions/microsoftgraph/v1.0:1.0.0 type version.
{
  "extensions": {
    "microsoftGraphV1": "br:mcr.microsoft.com/bicep/extensions/microsoftgraph/v1.0:1.0.0"
  }
}
You can also declare Microsoft Graph resources from beta and v1.0 in the same Bicep file by adding another reference to a beta type version from the Microsoft Artifact Registry.
In main.bicep, type extension microsoftGraphV1, where microsoftGraphV1 is the user-friendly name for referencing the dynamic types package in the Microsoft Artifact Registry. The extension statement lets the Bicep compiler know that the Microsoft Graph types defined in bicepconfig.json are included. On the next line, define a resource by using the resource keyword. Type resource exampleGroup.
extension microsoftGraphV1
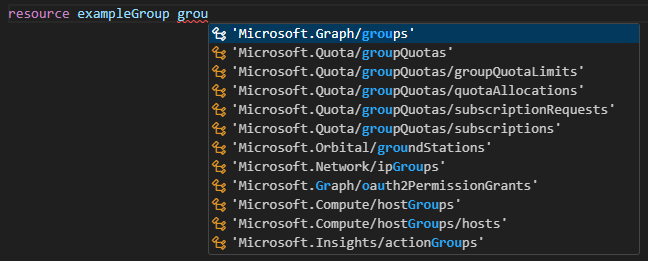
resource exampleGroup
Add a space after the symbolic name to display a list of resource types. Continue typing group and then select Microsoft.Graph/Groups from the available options.
Tip
If you don't see the Intellisense options in VS Code, make sure you installed the Bicep extension as specified in Prerequisites. If the extension is installed, give the Bicep language service some time to start after opening your Bicep file. A notification in the lower right corner indicates that the service is starting. When that notification disappears, the service is running.
After selecting Microsoft.Graph/Groups, you're presented with the available API versions - beta or v1.0. Select v1.0 unless it's unavailable or the resource properties needed are only in beta. For this quickstart, use v1.0.

After the single quote for the resource type, add = and a space. Options for adding properties to the resource are displayed. Select required-properties.

This option adds all of the properties for the resource type that are required for deployment. After selecting this option, the group has the following properties:
resource exampleGroup 'Microsoft.Graph/groups@v1.0' = {
  displayName:
  mailEnabled:
  mailNickname:
  securityEnabled:
  uniqueName:
}
Provide values for those properties: set mailEnabled to false, securityEnabled to true, and uniqueName to an immutable client-provided key for the group resource.
Add a managed identity resource
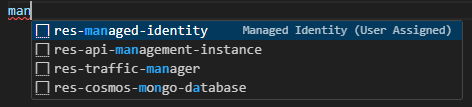
VS Code with the Bicep extension simplifies development by providing predefined snippets, such as a snippet that creates a managed identity. In main.bicep, type man, then select res-managed-identity from the list, and press [TAB] or [ENTER].
Note: Resource snippets for extensible resources, like Microsoft Graph resources, aren't supported.
Your Bicep file now contains the following code:
resource managedIdentity 'Microsoft.ManagedIdentity/userAssignedIdentities@2018-11-30' = {
  name: 'name'
  location: location
}
Fix the missing parameter definition error by adding a parameter definition for location. Under the extension definition, enter param location string = resourceGroup().location. For more information about the function used here, see resourceGroup(). Change the name for the managed identity from name to exampleManagedIdentity.
Make the managed identity an owner of the group resource
In the exampleGroup resource, create a new line under uniqueName. Type ow, which shows owners as the only matching property option, and select [TAB] or [ENTER].

The owners property is an object. Select [SPACE] and choose required-properties. The owners property looks like this:
owners: {
  relationships:
}
The relationships property is an array. Add [] and reference the managed identity's principal ID using IntelliSense. Type m and pick managedIdentity (the symbolic name for the managed identity), type a . and pick properties, then type another . and pick principalId.
The main.bicep file looks like this:
extension microsoftGraphV1

param location string = resourceGroup().location

resource exampleGroup 'Microsoft.Graph/groups@v1.0' = {
  displayName: 'My example group'
  mailEnabled: false
  mailNickname: 'my-example-group'
  securityEnabled: true
  uniqueName: 'myExampleGroup'
  owners: {
    relationships: [managedIdentity.properties.principalId]
  }
}

resource managedIdentity 'Microsoft.ManagedIdentity/userAssignedIdentities@2018-11-30' = {
  name: 'exampleManagedIdentity'
  location: location
}
Deploy the Bicep file using a signed-in user
Deploy the Bicep file by signing in to Azure CLI or Azure PowerShell. These Azure CLI examples use the Bash console.
## Sign in to Azure CLI
az login

## Create a resource group
az group create --name exampleRG --location eastus

## Deploy the Bicep file
az deployment group create --resource-group exampleRG --template-file main.bicep
When the deployment finishes, you see a message indicating the deployment succeeded.
Note
Because of replication delays, adding the managed service identity (MSI) as an owner of the Microsoft Entra group might cause the deployment to fail. Wait briefly, then deploy the same Bicep file again.
Clean up resources
When you no longer need the Azure resources you created, use the Azure CLI or Azure PowerShell to delete the quickstart resource group.
Note
Resource groups are an Azure concept and don't affect Microsoft Graph resources. Microsoft Graph resources need another request to Microsoft Graph for cleanup. You can use Azure CLI, Azure PowerShell, or Microsoft Graph PowerShell.
The following examples show commands to delete the Azure resource first, and then the Microsoft Graph resource using Azure CLI and Azure PowerShell.
## Delete the resource group
az group delete --name exampleRG

## Delete the Microsoft Graph group
az rest --method delete --url 'https://graph.microsoft.com/v1.0/groups%28uniqueName=%27myExampleGroup%27%29'