Note
Access to this page requires authorization. You can try signing in or changing directories.
Access to this page requires authorization. You can try changing directories.
A job is a one-time or repeatedly scheduled task that runs a KQL (Kusto Query Language) query against the data in the data lake tier to promote the results to the analytics tier. Once in the analytics tier, use the advanced hunting KQL editor to query the data. Promoting data to the analytics tier has the following benefits:
Combine current and historical data in the analytics tier to run advanced analytics and machine learning models on your data.
Reduce query costs by running queries in the analytics tier.
Combine data from multiple workspaces to a single workspace in the analytics tier.
Combine Microsoft Entra ID, Microsoft 365, and Microsoft Resource Graph data in the analytics tier to run advanced analytics across data sources.
Note
Storage in the analytics tier incurs higher billing rates than in the data lake tier. To reduce costs, only promote data that you need to analyze further. Use the KQL in your query to project only the columns you need, and filter the data to reduce the amount of data promoted to the analytics tier.
When promoting data to the analytics tier, make sure that the destination workspace is visible in the advanced hunting query editor. You can only query connected workspaces in the advanced hunting query editor. You will not be able to see data promoted to workspaces that aren't connected or to the default workspace in advance hunting. For more information on connected workspaces, see Connect a workspace. You can promote data to a new table or append the results to an existing table in the analytics tier. When creating a new table, the table name is suffixed with _KQL_CL to indicate that the table was created by a KQL job.
Prerequisites
The following prerequisites are required to create and manage KQL jobs in the Microsoft Sentinel data lake.
Onboard to the data lake
To create and manage KQL jobs in the Microsoft Sentinel data lake, you must first onboard to the data lake. For more information on onboarding to the data lake, see Onboard to the Microsoft Sentinel data lake (preview).
Permissions
Microsoft Entra ID roles provide broad access across all workspaces in the data lake. To read tables across all workspaces, write to the analytics tier, and schedule jobs using KQL queries, you must have one of the supported Microsoft Entra ID roles. For more information on roles and permissions, see Microsoft Sentinel data lake roles and permissions.
To create new custom tables in the analytics tier, the data lake managed identity must be assigned the Log Analytics Contributor role in the Log Analytics workspace.
To assign the role, follow the steps below:
- In the Azure portal, navigate to the Log Analytics workspace that you want to assign the role to.
- Select Access control (IAM) in the left navigation pane.
- Select Add role assignment.
- In the Role table, select *Log Analytics Contributor, then select Next
- Select Managed identity, then select Select members.
- Your data lake managed identity is a system assigned managed identity named
msg-resources-<guid>Select the managed identity, then select Select. - Select Review and assign.
For more information on assigning roles to managed identities, see Assign Azure roles using the Azure portal.
Create a job
You can create a job to run a KQL query against the data in the data lake tier and promote the results to the analytics tier. You can create jobs to run on a schedule or one-time. When you create a job, you specify the destination workspace and table for the results. The results can be written to a new table or appended to an existing table in the analytics tier.
You can create and manage jobs from the Jobs management page under Data lake exploration in the navigation panel. Use this page to create new jobs, view their status and details, and run, edit, delete, or disable jobs. For more information, see Manage KQL jobs.
You can start the job creation process from KQL query editor, or from the jobs management page.
- To create a job from the KQL query editor, select the Create job button in the upper right corner of the query editor.

- To create a job from the jobs management page, select Microsoft Sentinel > Data lake exploration > Jobs then select the Create a new job button.

- To create a job from the KQL query editor, select the Create job button in the upper right corner of the query editor.
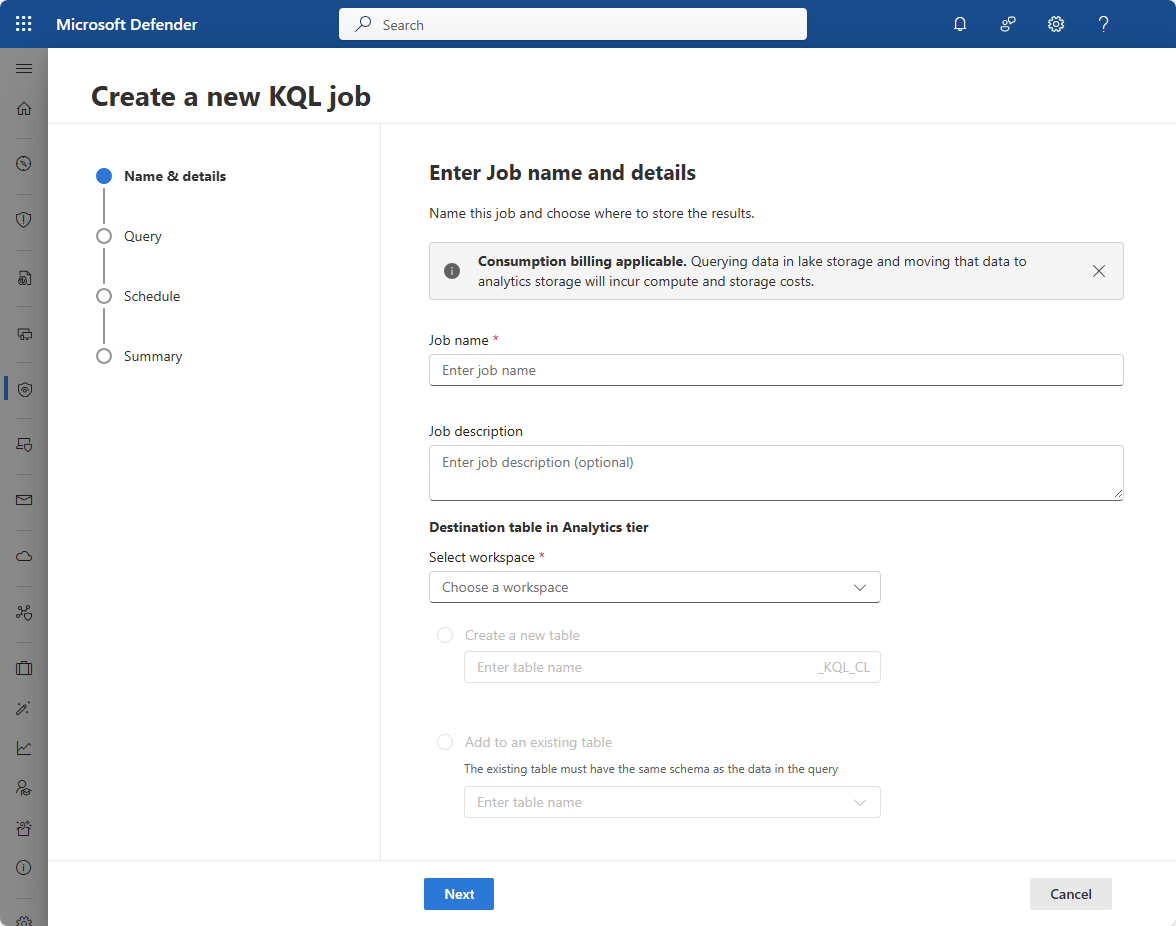
Enter a Job name. The job name must be unique for the tenant. Job names can contain up to 256 characters. You can't use a
#in a job name.Enter a Job Description providing the context and purpose of the job.
From the Select workspace dropdown, select the destination workspace in the analytics tier to write the result to.
Select the destination table:
To create a new table, select Create a new table and enter a table name. Tables created by KQL jobs have the suffix _KQL_CL appended to the table name.
To append to an existing table, select Add to an existing table and select the table name form the drop-down list. When adding to an existing table, the query results must match the schema of the existing table.
Select Next.
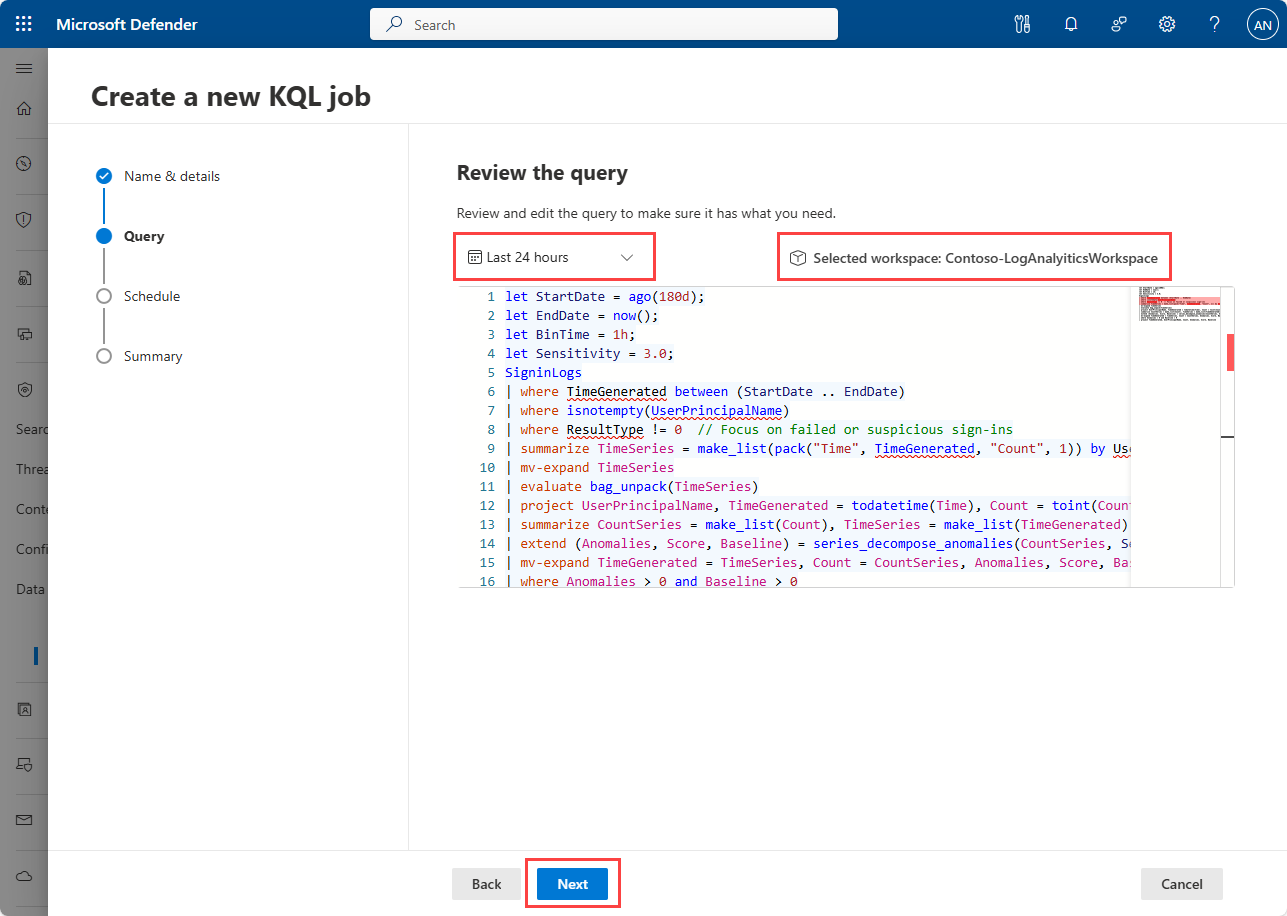
Review or write your query in the Review the query panel. Check that the time picker is set to the required time range for the job if the date range isn't specified in the query.
Select the workspace to run the query against from the Selected workspace drop-down.
Note
The query must return a table with a schema that matches the destination table schema. If the query doesn't return a table with the correct schema, the job fails when it runs.
Select Next.
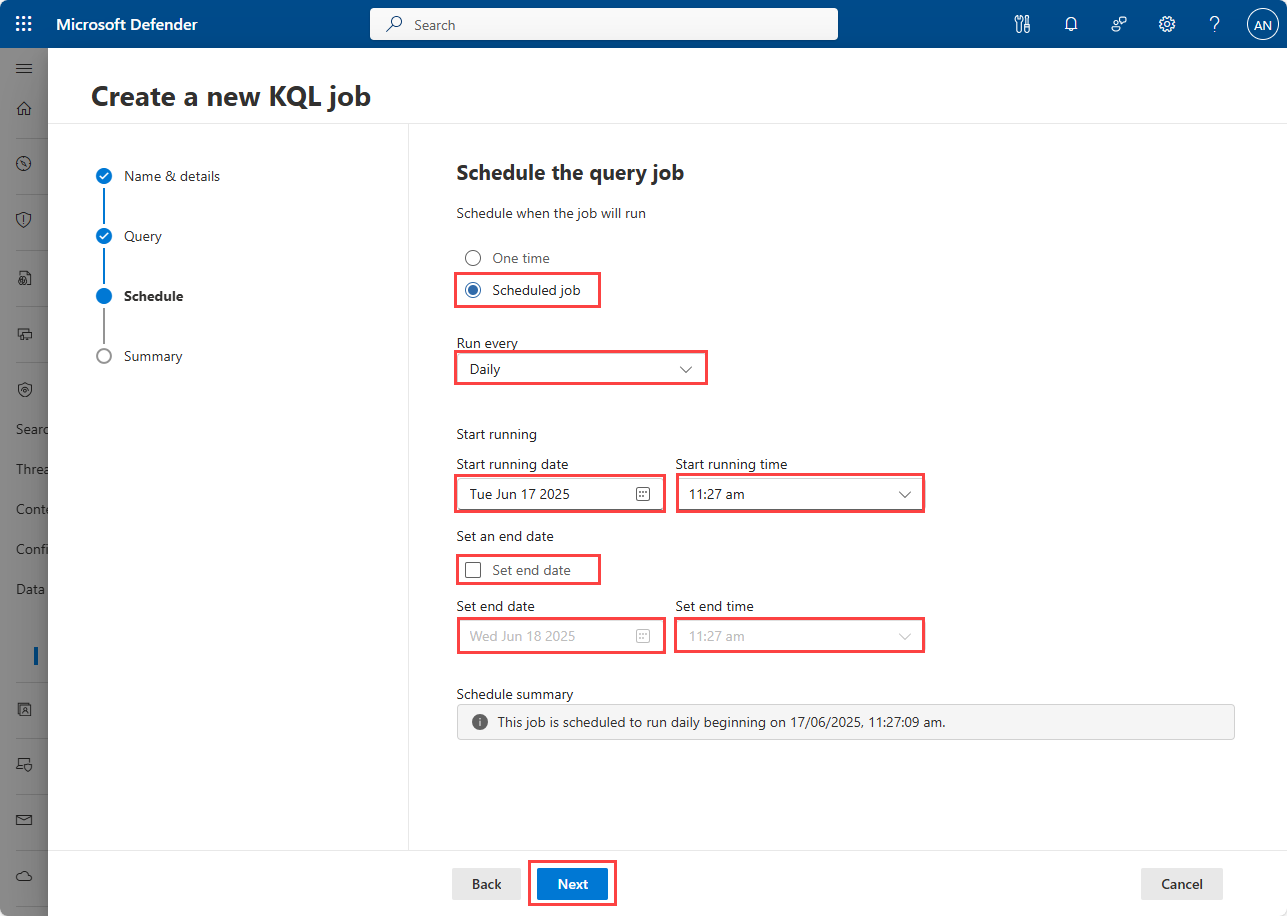
In the Schedule the query job panel, select whether you want to run the job once or on a schedule. If you select One time, the job runs as soon as the job definition is complete. If you select Schedule, you can specify a date and time for the job to run, or run the job on a recurring schedule.
Select One time or Scheduled job.
Note
Editing a one-time job will immediately trigger its execution.
If you selected Schedule, enter the following details:
- Select the run frequency from the Run every drop-down. Select Daily, Weekly, or Monthly.
- Under Start running, enter the Start running date and Start running time. The job start time must be at least 30 minutes after job creation. The job runs from this date and time according to the frequency select in the Run every dropdown.
- Select the Set end date checkbox to specify an end date and time for the job schedule. If you don't select the end date checkbox, the job runs according to the run frequency until you disable or delete it.
Select Next to review the job details.
Review the job details and select Submit to create the job. If the job is a one-time job, it runs after you select Submit. If the job is scheduled, it's added to the list of jobs in the Jobs page and runs according to the start data and time.
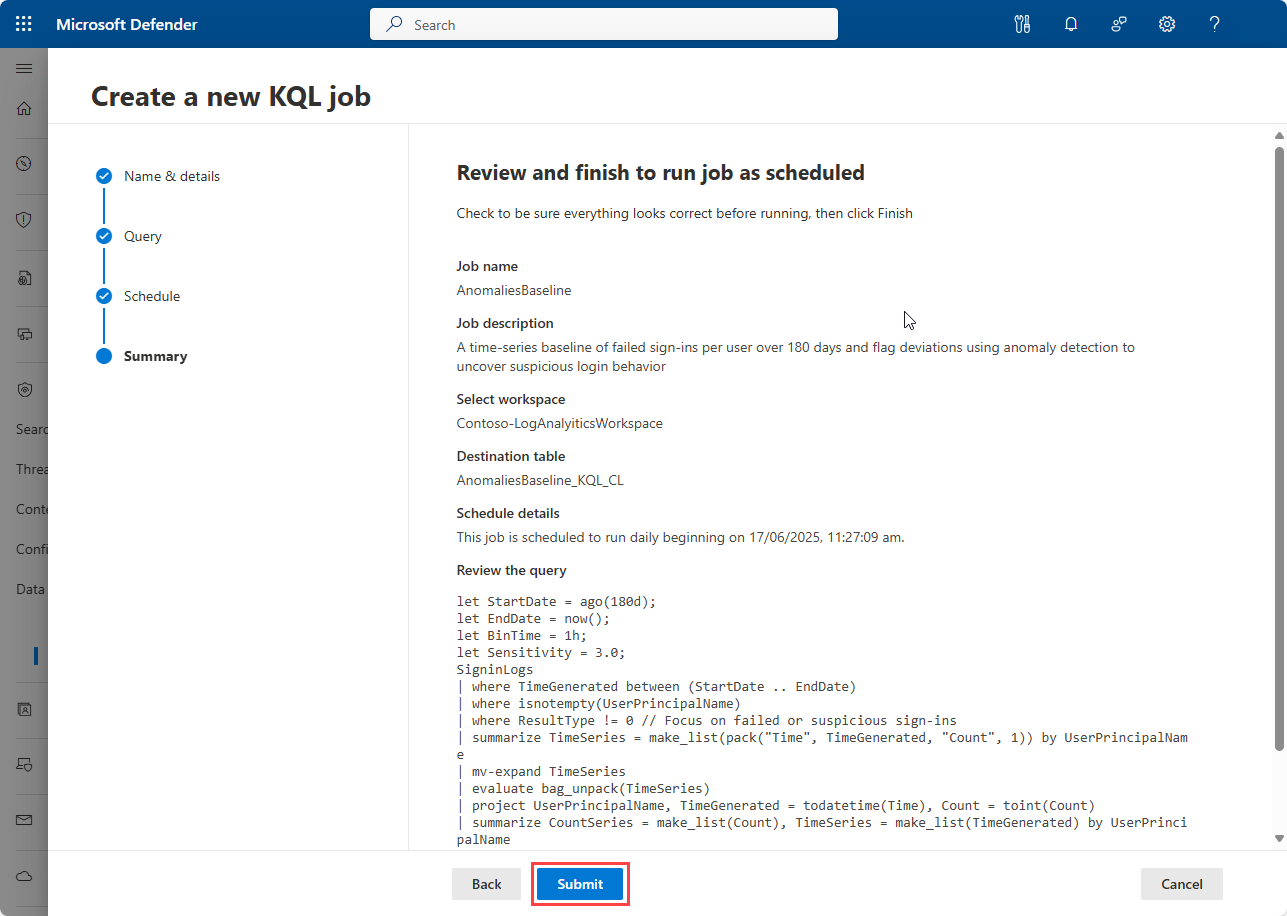
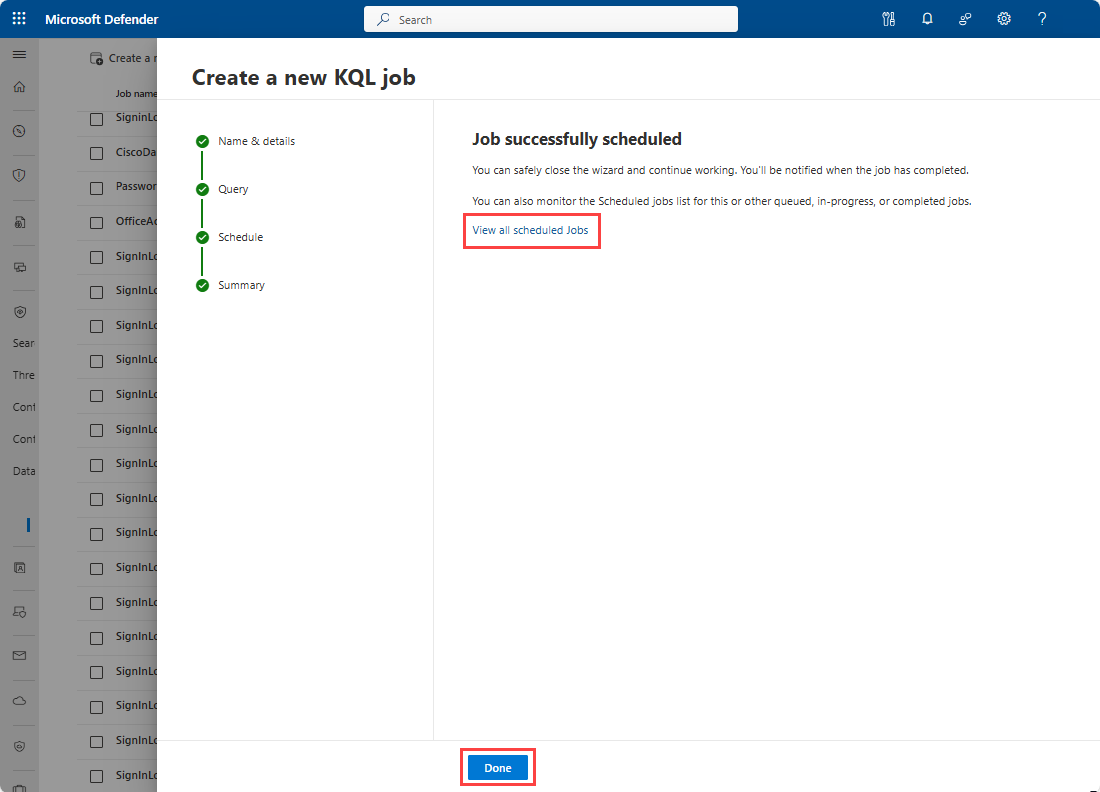
The job is scheduled and the following page is displayed. You can view the job by selecting the link.


Considerations and limitations
When creating jobs in the Microsoft Sentinel data lake, consider the following limitations and best practices:
Jobs
- Job names must be unique for the tenant.
- Job names can be up to 256 characters.
- Job names can't contain a
#. - Job start time must be at least 30 minutes after job creation or editing.
- During public preview, the scope of KQL job is limited to a single workspace.
Column names
The following standard columns aren't supported for export. These columns are overwritten in the destination tier during the ingestion:
TenantId
_TimeReceived
Type
SourceSystem
_ResourceId
_SubscriptionId
_ItemId
_BilledSize
_IsBillable
_WorkspaceId
TimeGeneratedwill be overwritten if it's older that 2 days. To preserve the original event time, we recommend writing the source timestamp to a separate column.
For service limits, see Microsoft Sentinel data lake (preview) service limits.
Note
Partial results may be promoted if the job's query exceeds the one hour limit.
Service parameters and limits for KQL jobs
The following table lists the service parameters and limits for KQL jobs in the Microsoft Sentinel data lake (Preview).
| Category | Parameter/limit |
|---|---|
| Concurrent job execution per tenant | 3 |
| Job query execution timeout | 1 hour |
| Jobs per tenant (enabled jobs) | 100 |
| Number of output tables per job | 1 |
| Query scope | Single workspace |
| Query time range | Up to 12 years |
For troubleshooting tips and error messages, see Troubleshooting KQL queries for the Microsoft Sentinel data lake (preview).