Note
Access to this page requires authorization. You can try signing in or changing directories.
Access to this page requires authorization. You can try changing directories.
In this quickstart, you use role-based access control (RBAC) and Microsoft Entra ID to establish a keyless connection to your Azure AI Search service. You then use Python in Visual Studio Code to interact with your service.
Keyless connections provide enhanced security through granular permissions and identity-based authentication. We don't recommend hard-coded API keys, but if you prefer them, see Connect to Azure AI Search using keys.
Prerequisites
An Azure account with an active subscription. Create an account for free.
An Azure AI Search service in any region or tier.
The Azure CLI for keyless authentication with Microsoft Entra ID.
Visual Studio Code with the Python extension and Jupyter package.
Configure role-based access
In this section, you enable RBAC on your Azure AI Search service and assign the necessary roles for creating, loading, and querying search objects. For more information about these steps, see Connect to Azure AI Search using roles.
To configure access:
Sign in to the Azure portal and select your search service.
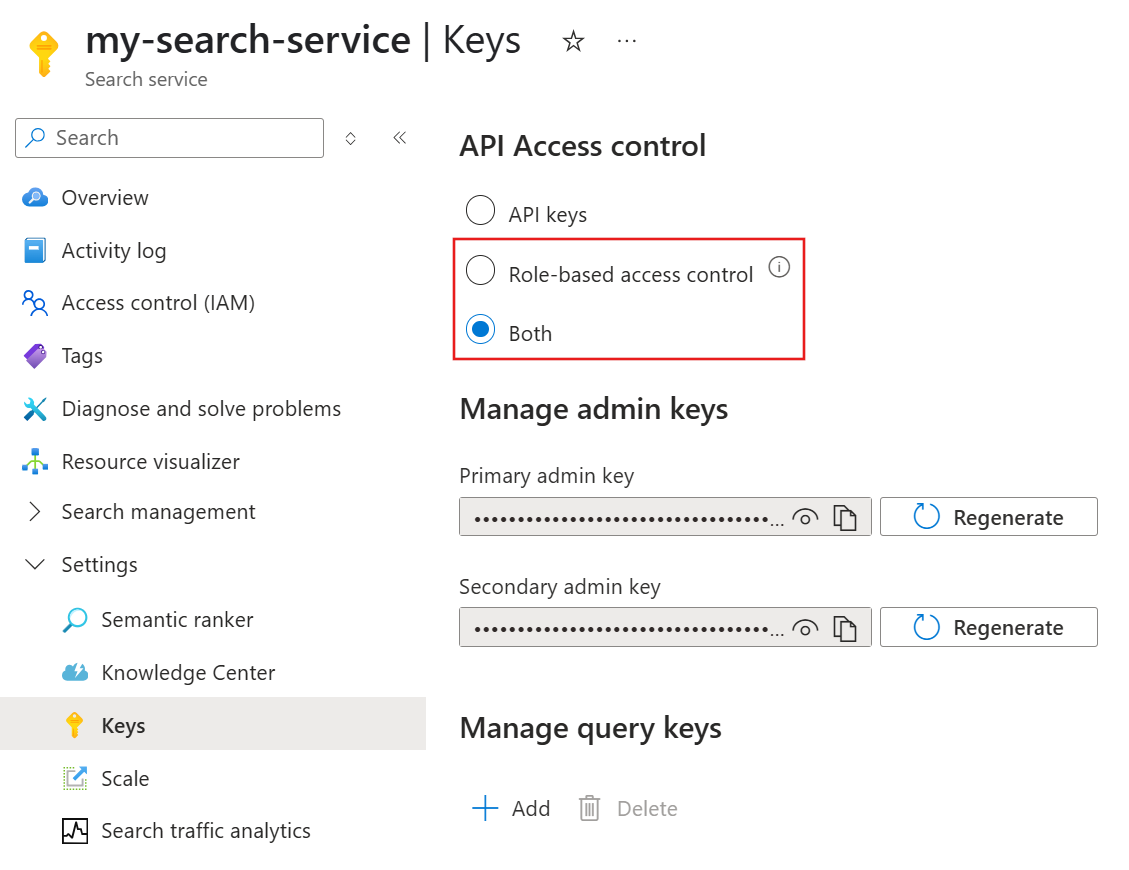
From the left pane, select Settings > Keys.
Select Role-based access control or Both if you need time to transition clients to RBAC.
From the left pane, select Access control (IAM).
Select Add > Add role assignment.
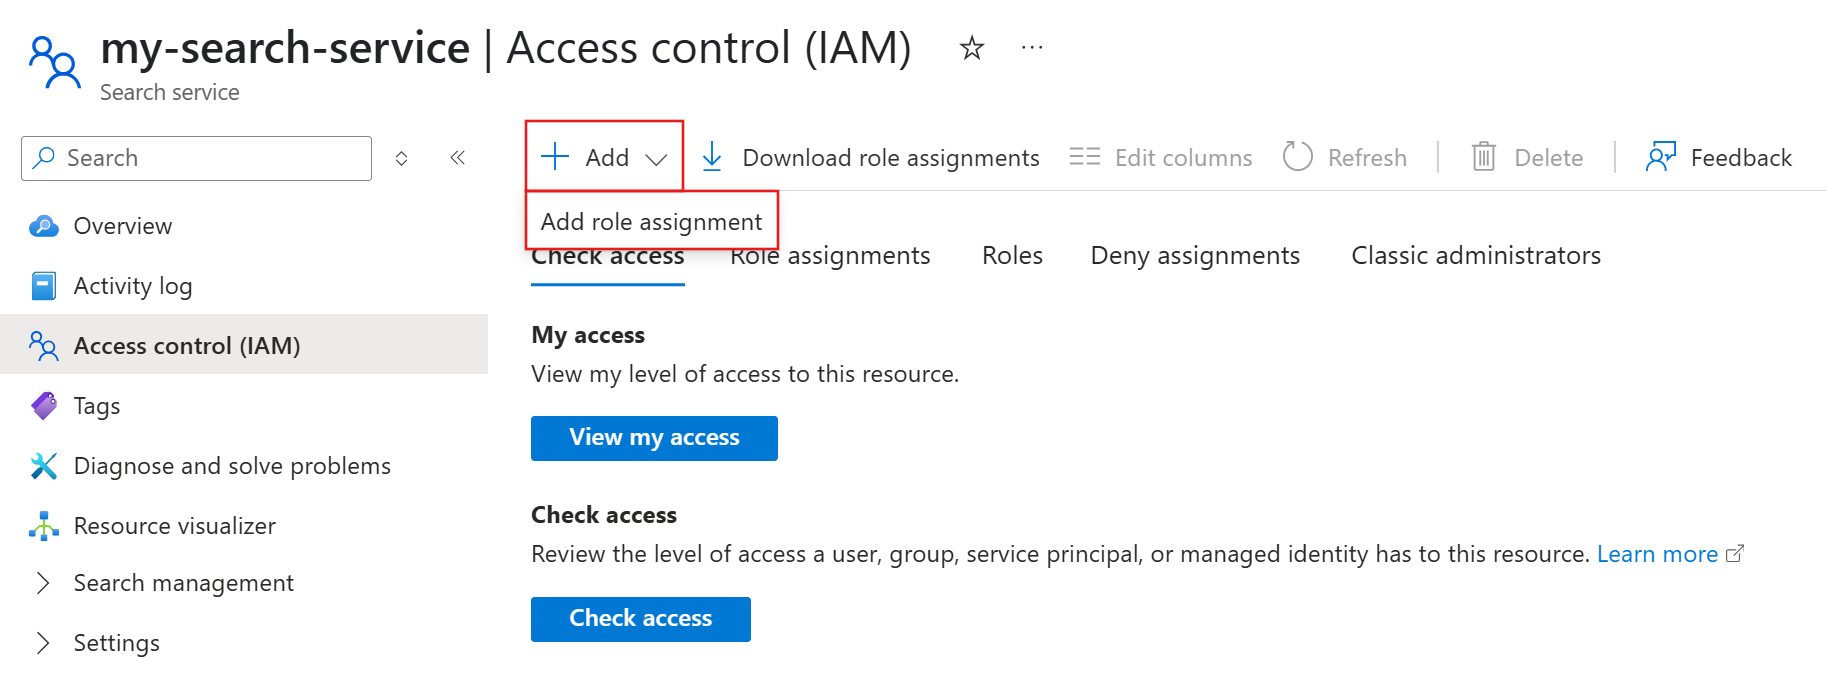
Assign the Search Service Contributor role to your user account or managed identity.
Repeat the role assignment for Search Index Data Contributor.


Get service information
In this section, you retrieve the subscription ID and endpoint of your Azure AI Search service. If you only have one subscription, skip the subscription ID and only retrieve the endpoint. You use these values in the remaining sections of this quickstart.
To get your service information:
Sign in to the Azure portal and select your search service.
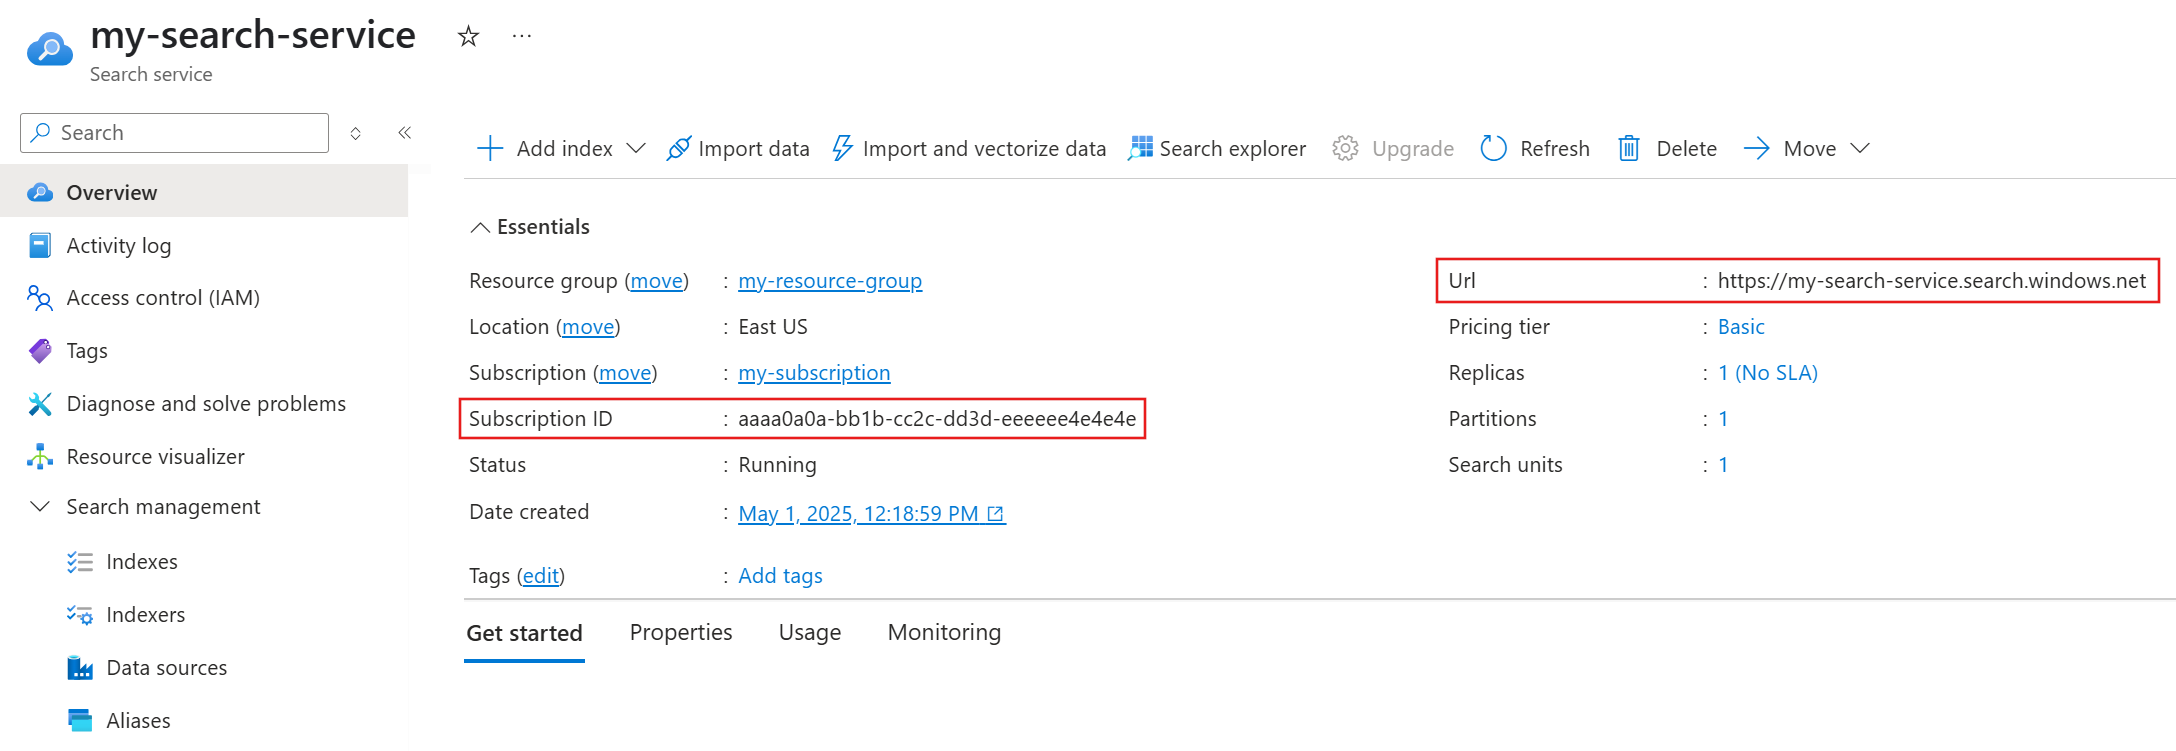
From the left pane, select Overview.
Make a note of the subscription ID and endpoint.

Sign in to Azure
Before you connect to your Azure AI Search service, use the Azure CLI to sign in to the subscription that contains your service. This step establishes your Microsoft Entra identity, which DefaultAzureCredential uses to authenticate requests in the next section.
To sign in:
On your local system, open a command-line tool.
Sign in to Azure. If you have multiple subscriptions, select the one whose ID you obtained in Get service information.
az login
Connect to Azure AI Search
Note
This section illustrates the basic Python pattern for keyless connections. For comprehensive guidance, see a specific quickstart or tutorial, such as Quickstart: Run agentic retrieval in Azure AI Search.
You can use Python notebooks in Visual Studio Code to send requests to your Azure AI Search service. For request authentication, use the DefaultAzureCredential class from the Azure Identity library.
To connect using Python:
On your local system, open Visual Studio Code.
Create a
.ipynbfile.Create a code cell to install the
azure-identityandazure-search-documentslibraries.pip install azure-identity azure-search-documentsCreate another code cell to authenticate and connect to your search service.
from azure.identity import DefaultAzureCredential
from azure.search.documents.indexes import SearchIndexClient

service_endpoint = "PUT-YOUR-SEARCH-SERVICE-ENDPOINT-HERE"
credential = DefaultAzureCredential()
client = SearchIndexClient(endpoint=service_endpoint, credential=credential)

# List existing indexes
indexes = client.list_indexes()

for index in indexes:
   index_dict = index.as_dict()
   print(json.dumps(index_dict, indent=2))
Set
service_endpointto the value you obtained in Get service information.Select Run All to run both code cells.
The output should list the existing indexes (if any) on your search service, indicating a successful connection.
Troubleshoot 401 errors
If you encounter a 401 error, follow these troubleshooting steps:
Revisit Configure role-based access. Your search service must have Role-based access control or Both enabled. Policies at the subscription or resource group level might also override your role assignments.
Revisit Sign in to Azure. You must sign in to the subscription that contains your search service.
Make sure your endpoint variable has surrounding quotes.
If all else fails, restart your device to remove cached tokens and then repeat the steps in this quickstart, starting with Sign in to Azure.
In this quickstart, you use role-based access control (RBAC) and Microsoft Entra ID to establish a keyless connection to your Azure AI Search service. You then use REST in Visual Studio Code to interact with your service.
Keyless connections provide enhanced security through granular permissions and identity-based authentication. We don't recommend hard-coded API keys, but if you prefer them, see Connect to Azure AI Search using keys.
Prerequisites
An Azure account with an active subscription. Create an account for free.
An Azure AI Search service in any region or tier.
The Azure CLI for keyless authentication with Microsoft Entra ID.
Visual Studio Code with the REST Client extension.
Configure role-based access
In this section, you enable RBAC on your Azure AI Search service and assign the necessary roles for creating, loading, and querying search objects. For more information about these steps, see Connect to Azure AI Search using roles.
To configure access:
Sign in to the Azure portal and select your search service.
From the left pane, select Settings > Keys.
Select Role-based access control or Both if you need time to transition clients to RBAC.
From the left pane, select Access control (IAM).
Select Add > Add role assignment.
Assign the Search Service Contributor role to your user account or managed identity.
Repeat the role assignment for Search Index Data Contributor.
Get service information
In this section, you retrieve the subscription ID and endpoint of your Azure AI Search service. If you only have one subscription, skip the subscription ID and only retrieve the endpoint. You use these values in the remaining sections of this quickstart.
To get your service information:
Sign in to the Azure portal and select your search service.
From the left pane, select Overview.
Make a note of the subscription ID and endpoint.
Get token
Before you connect to your Azure AI Search service, use the Azure CLI to sign in to the subscription that contains your service and generate a Microsoft Entra ID token. You use this token to authenticate requests in the next section.
To get your token:
On your local system, open a command-line tool.
Sign in to Azure. If you have multiple subscriptions, select the one whose ID you obtained in Get service information.
az loginGenerate an access token.
az account get-access-token --scope https://search.azure.com/.default --query accessToken --output tsvMake a note of the token output.
Connect to Azure AI Search
Note
This section illustrates the basic REST pattern for keyless connections. For comprehensive guidance, see a specific quickstart or tutorial, such as Quickstart: Run agentic retrieval in Azure AI Search.
You can use the REST Client extension in Visual Studio Code to send requests to your Azure AI Search service. For request authentication, include an Authorization header with the Microsoft Entra ID token you previously generated.
To connect using REST:
On your local system, open Visual Studio Code.
Create a
.restor.httpfile.Paste the following placeholders and request into the file.
@baseUrl = PUT-YOUR-SEARCH-SERVICE-ENDPOINT-HERE
@token = PUT-YOUR-PERSONAL-IDENTITY-TOKEN-HERE

### List existing indexes
GET {{baseUrl}}/indexes?api-version=2024-07-01  HTTP/1.1
   Content-Type: application/json
   Authorization: Bearer {{token}}
Replace
@baseUrlwith the value you obtained in Get service information.Replace
@tokenwith the value you obtained in Get token.Under
### List existing indexes, select Send Request.You should receive an
HTTP/1.1 200 OKresponse, indicating a successful connection to your search service.
Troubleshoot 401 errors
If you encounter a 401 error, follow these troubleshooting steps:
Revisit Configure role-based access. Your search service must have Role-based access control or Both enabled. Policies at the subscription or resource group level might also override your role assignments.
Revisit Get token. You must sign in to the subscription that contains your search service.
Make sure your endpoint and token variables don't have surrounding quotes or extra spaces.
Make sure your token doesn't have the
@symbol in the request header. For example, if the variable is@token, the reference in the request should be{{token}}.If all else fails, restart your device to remove cached tokens and then repeat the steps in this quickstart, starting with Get token.