Note
Access to this page requires authorization. You can try signing in or changing directories.
Access to this page requires authorization. You can try changing directories.
Learn how to deploy Azure IoT Operations to a Kubernetes cluster with secure settings for production using the Azure portal.
If you deployed a test instance of Azure IoT Operations to a cluster and you want to use the same cluster for production scenarios, follow the steps in Enable secure settings on an existing Azure IoT Operations instance.
Before you begin
This article discusses Azure IoT Operations deployments and instances, which are two different concepts:
An Azure IoT Operations deployment describes all of the components and resources that enable the Azure IoT Operations scenario. These components and resources include:
- An Azure IoT Operations instance
- Arc extensions
- Custom locations
- Resources that you can configure in your Azure IoT Operations solution, like assets and devices.
An Azure IoT Operations instance is the parent resource that bundles the suite of services that are defined in What is Azure IoT Operations? like MQTT broker, data flows, and connector for OPC UA.
When we talk about deploying Azure IoT Operations, we mean the full set of components that make up a deployment. Once the deployment exists, you can view, manage, and update the instance.
Prerequisites
Cloud resources:
An Azure subscription.
Azure access permissions. For more information, see Deployment details > Required permissions.
Development resources:
Azure CLI installed on your development machine. This scenario requires Azure CLI version 2.53.0 or higher. Use
az --versionto check your version andaz upgradeto update if necessary. For more information, see How to install the Azure CLI.The Azure IoT Operations extension for Azure CLI. Use the following command to add the extension or update it to the latest version:
az extension add --upgrade --name azure-iot-ops
A cluster host:
Have an Azure Arc-enabled Kubernetes cluster with the custom location and workload identity features enabled. If you don't have one, follow the steps in Prepare your Azure Arc-enabled Kubernetes cluster.
If you deployed Azure IoT Operations to your cluster previously, uninstall those resources before continuing. For more information, see Update Azure IoT Operations.
(Recommended) Configure your own certificate authority issuer before deploying Azure IoT Operations: Bring your own issuer.
Deploy in Azure portal
The Azure portal deployment experience is a helper tool that generates a deployment command based on your resources and configuration. The final step is to run an Azure CLI command, so you still need the Azure CLI prerequisites described in the previous section.
Sign in to Azure portal.
In the search box, search for and select Azure IoT Operations.
Select Create.
On the Basics tab, provide the following information:
Parameter Value Subscription Select the subscription that contains your Arc-enabled cluster. Resource group Select the resource group that contains your Arc-enabled cluster. Cluster name Select the cluster that you want to deploy Azure IoT Operations to. Custom location name Optional: Replace the default name for the custom location. Deployment version Select 1.1 (GA version) or 1.2 (Preview version). If you select 1.2 (Preview version), check the box to consent to the preview terms. For more information, see IoT Operations versions. 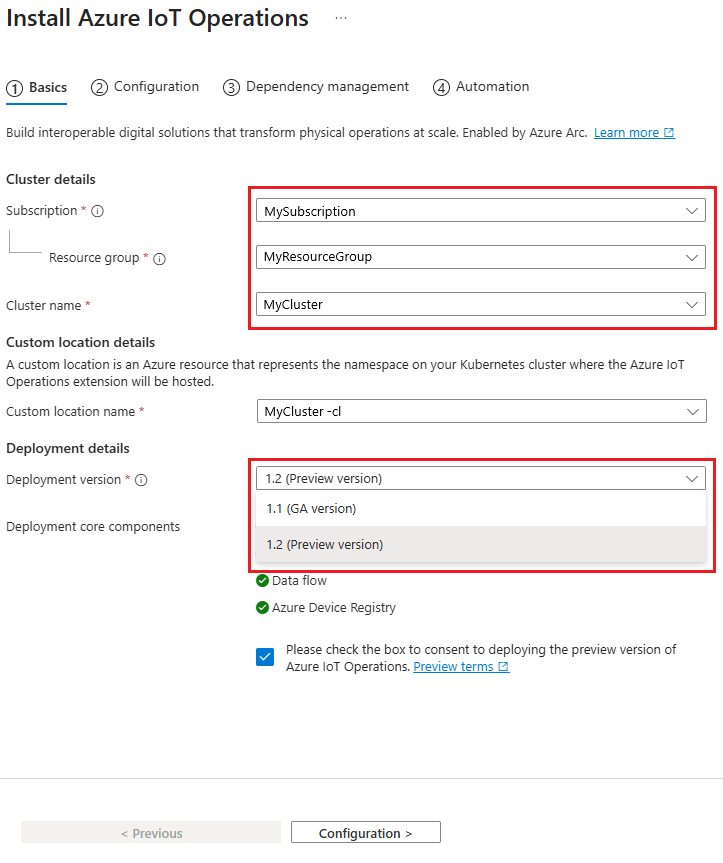
Select Next: Configuration.
On the Configuration tab, provide the following information:
Parameter Value Azure IoT Operations name Optional: Replace the default name for the Azure IoT Operations instance. MQTT broker configuration Optional: Edit the default settings for the MQTT broker. In Azure portal it's possible to configure cardinality and memory profile settings. To configure other settings including disk-backed message buffer and advanced MQTT client options, see Azure CLI support for advanced MQTT broker configuration. Data flow profile configuration Optional: Edit the default settings for data flows. For more information, see Configure data flow profile. 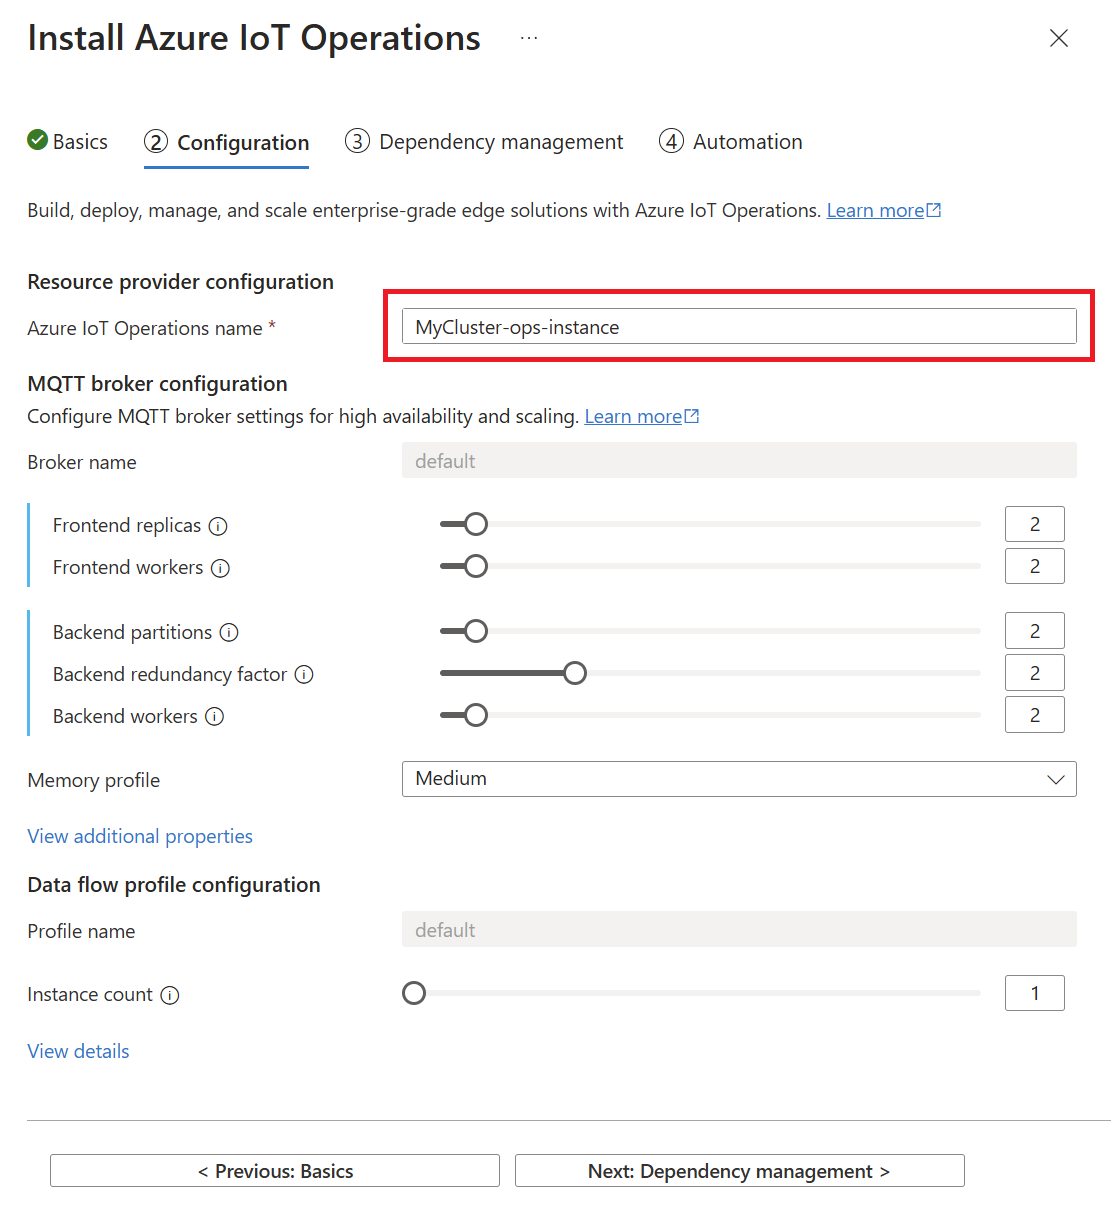
Select Next: Dependency management.
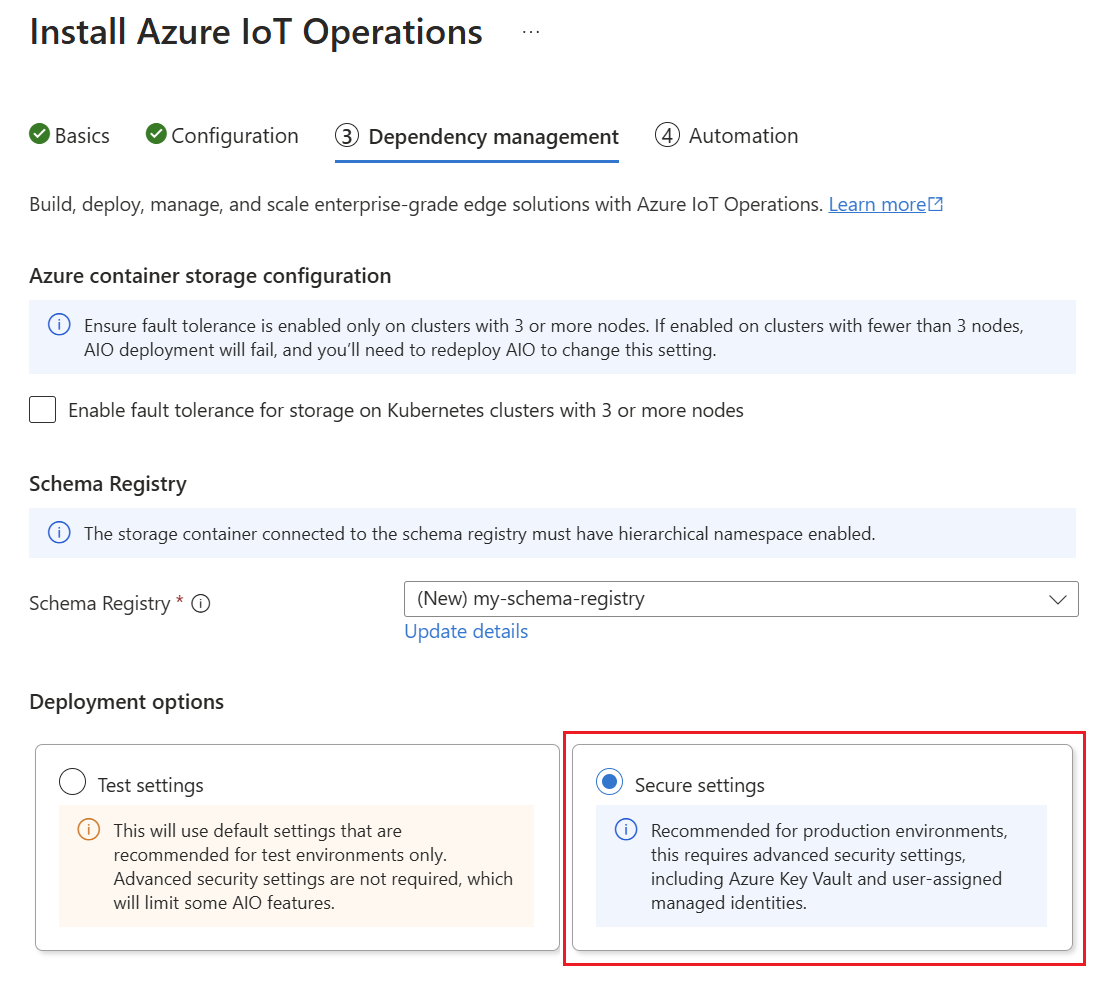
On the Dependency management tab, select an existing schema registry or use these steps to create one:
Select Create new.
Provide a Schema registry name and Schema registry namespace.
Select Select Azure Storage container.
Choose a storage account from the list of hierarchical namespace-enabled accounts, or select Create to create one.
Schema registry requires an Azure Storage account with hierarchical namespace and public network access enabled. When creating a new storage account, choose a General purpose v2 storage account type and set Hierarchical namespace to Enabled.
For more information on configuring your storage account, see Production deployment guidelines.
Select a container in your storage account or select Container to create one.
Select Apply to confirm the schema registry configurations.
On the Dependency management tab, select the Secure settings deployment option.
In the Deployment options section, provide the following information:
Parameter Value Subscription Select the subscription that contains your Azure key vault. Azure Key Vault Select an Azure key vault or select Create new.
Ensure that your key vault has Azure role-based access control as its permission model. To check this setting, select Manage selected vault > Settings > Access configuration.
Ensure to give your user account permissions to manage secrets with theKey Vault Secrets Officerrole.User assigned managed identity for secrets Select an identity or select Create new. User assigned managed identity for AIO components Select an identity or select Create new. Don't use the same managed identity as the one you selected for secrets. 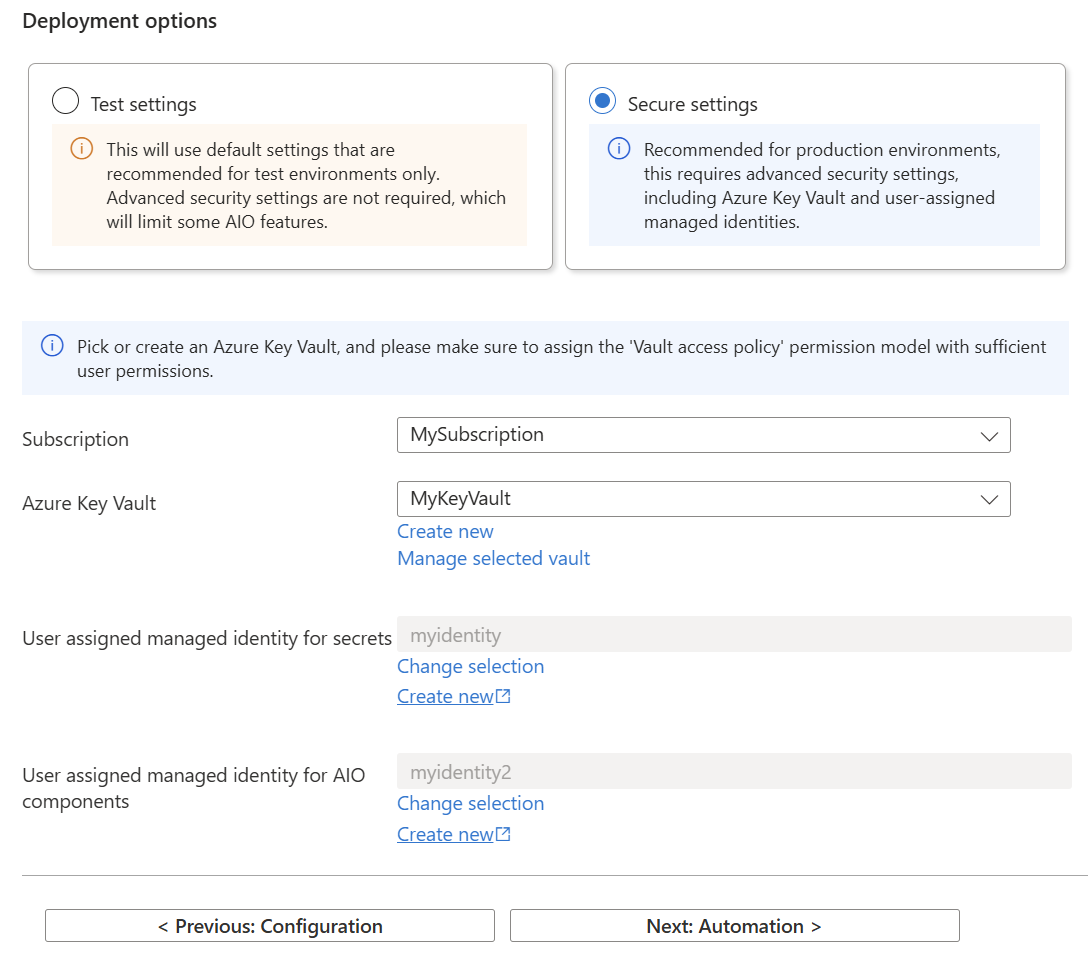
Select Next: Automation.
Run Azure CLI commands
The final step in the Azure portal deployment experience is to run a set of Azure CLI commands to deploy Azure IoT Operations to your cluster. The commands are generated based on the information you provided in the previous steps.
One at a time, run each Azure CLI command on the Automation tab in a terminal:
Sign in to Azure CLI interactively with a browser even if you already signed in before. If you don't sign in interactively, you might get an error that says Your device is required to be managed to access your resource when you continue to the next step to deploy Azure IoT Operations.
az loginInstall the latest Azure IoT Operations CLI extension.
az upgrade
az extension add --upgrade --name azure-iot-ops
Important
For preview releases, you need to append the
--allow-previewflag to theaz extension addcommand to install the preview version of the Azure IoT Operations CLI extension.az extension add --upgrade --name azure-iot-ops --allow-previewCopy and run the provided az iot ops schema registry create command to create a schema registry which is used by Azure IoT Operations components. If you chose to use an existing schema registry, this command isn't displayed on the Automation tab.
Note
This command requires that you have role assignment write permissions because it assigns a role to give schema registry access to the storage account. By default, the role is the built-in Storage Blob Data Contributor role, or you can create a custom role with restricted permissions to assign instead. For more information, see az iot ops schema registry create.
Azure IoT Operations uses namespaces to organize assets and devices. Each Azure IoT Operations instance uses a single namespace for its assets and devices. You can use an existing namespace or run the
az iot ops ns createcommand to create an Azure Device Registry namespace. Replace<my namespace name>with a unique name for your namespace.az iot ops ns create -n <my namespace name> -g $RESOURCE_GROUPAlternatively, you can create a new Azure Device Registry namespace in Azure portal:
- In the search box, type and select Azure Device Registry.
- In the left menu, select Namespaces.
- Then select + Create to create a new namespace. Make sure to use the same resource group as your Arc-enabled Kubernetes cluster.
Note
Namespace resources are available from 2507 preview release. If you're using an earlier release version, namespaces aren't available and you can skip this step.
To prepare the cluster for Azure IoT Operations deployment, copy and run the provided az iot ops init command.
Tip
The
initcommand only needs to be run once per cluster. If you're reusing a cluster that already had Azure IoT Operations version 0.8.0 deployed on it, you can skip this step.This command might take several minutes to complete. You can watch the progress in the deployment progress display in the terminal.
Deploy Azure IoT Operations. Copy and run the provided az iot ops create command. This command might take several minutes to complete. You can watch the progress in the deployment progress display in the terminal.
If you want to use an existing namespace, add the following parameter to the
createcommand:--ns-resource-id $(az iot ops ns show --name <my namespace name> --resource-group $RESOURCE_GROUP -o tsv --query id)If you want to use the preview connector configuration, add the following parameter to the
createcommand:--feature connectors.settings.preview=EnabledNote
The
--featureconfiguration parameter is only available in the latest GA version. If you're using the 2507 preview release, this parameter isn't available.If you followed the optional prerequisites to set up your own certificate authority issuer, add the
--trust-settingsparameters to thecreatecommand:--trust-settings configMapName=<CONFIGMAP_NAME> configMapKey=<CONFIGMAP_KEY_WITH_PUBLICKEY_VALUE> issuerKind=<CLUSTERISSUER_OR_ISSUER> issuerName=<ISSUER_NAME>
Enable secret sync for the deployed Azure IoT Operations instance. Copy and run the provided az iot ops secretsync enable command. This command:
- Creates a federated identity credential using the user-assigned managed identity.
- Adds a role assignment to the user-assigned managed identity for access to the Azure Key Vault.
- Adds a minimum secret provider class associated with the Azure IoT Operations instance.
Assign a user-assigned managed identity to the deployed Azure IoT Operations instance. Copy and run the provided az iot ops identity assign command. This command creates a federated identity credential using the OIDC issuer of the indicated connected cluster and the Azure IoT Operations service account.
Restart the schema registry pods to apply the new identity.
kubectl delete pods adr-schema-registry-0 adr-schema-registry-1 -n azure-iot-operationsOnce all of the Azure CLI commands complete successfully, you can close the Install Azure IoT Operations wizard.
Once the create command completes successfully, you have a working Azure IoT Operations instance running on your cluster. At this point, your instance is configured for production scenarios.
Verify deployment
After the deployment is complete, use az iot ops check to evaluate IoT Operations service deployment for health, configuration, and usability. The check command can help you find problems in your deployment and configuration.
az iot ops check
The check command displays a warning about missing data flows, which is normal and expected until you create a data flow. For more information, see Process and route data with data flows.
You can check the configurations of topic maps, QoS, and message routes by adding the --detail-level 2 parameter to the check command for a verbose view.
You can view all versions of the Azure IoT Operations CLI extension that are available by running the following command:
az iot ops get-versions
Next steps
- If your components need to connect to Azure endpoints like SQL or Fabric, learn how to Manage secrets for your Azure IoT Operations deployment.
- To upgrade your Azure IoT Operations deployment to a newer version, see Upgrade Azure IoT Operations.