Active Directory 联合身份验证服务 (AD FS) 提供了简便而安全的联合身份验证和 Web 单一登录 (SSO) 功能。 与 Microsoft Entra ID 和 Microsoft 365 联合的用户可以使用本地凭据进行身份验证,以访问所有云资源。 因此,部署必须具有高度可用的 AD FS 基础结构,以确保对本地和云中资源的访问。
在 Azure 中部署 AD FS 可以帮助轻松实现高可用性。 在 Azure 中部署 AD FS 有几个优点:
- Azure 可用性集的强大功能为你提供了高度可用的基础结构。
- 部署易于扩展。 如果需要更高的性能,可以使用 Azure 中的简化部署过程轻松迁移到功能更强大的计算机。
- Azure 异地冗余可确保基础结构在全球范围内高度可用。
- Azure 门户通过高度简化的管理选项使基础结构更易于管理。
Design principles
下图显示了在 Azure 中部署 AD FS 基础结构的建议基本拓扑。
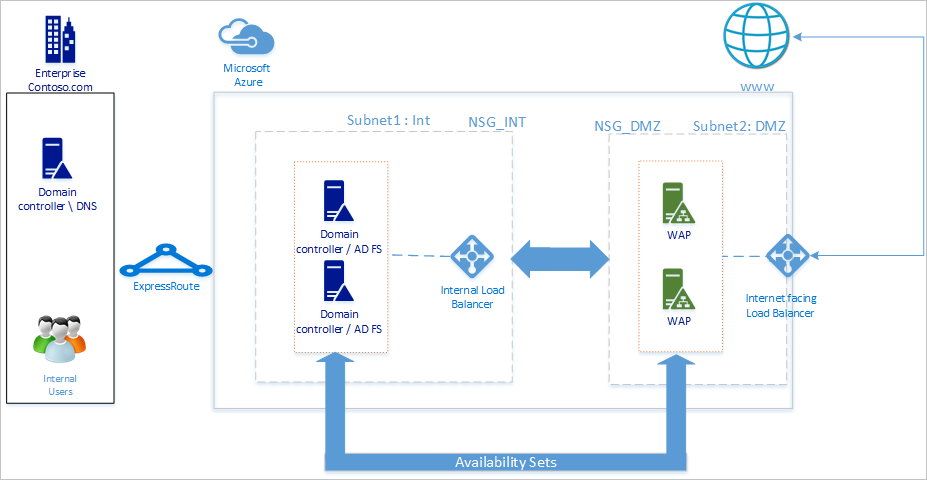
我们建议网络拓扑遵循以下一般原则:
- 在单独的服务器上部署 AD FS,以避免影响域控制器的性能。
- 必须部署 Web 应用程序代理 (WAP) 服务器,以便用户在不在公司网络上时可以访问 AD FS。
- 应在非管制区域 (DMZ) 中设置 Web 应用程序代理服务器,并且仅允许 DMZ 和内部子网之间的 TCP/443 访问。
- 为了确保 AD FS 和 Web 应用程序代理服务器的高可用性,建议对 AD FS 服务器使用内部负载均衡器,对 Web 应用程序代理服务器使用 Azure 负载均衡器。
- 要为 AD FS 部署提供冗余,建议将两个或更多虚拟机 (VM) 分组到一个可用性集中,以用于类似的工作负载。 此配置可确保在计划内或计划外维护事件期间至少有一个 VM 可用。
- 应在单独的 DMZ 网络中部署 Web 应用程序代理服务器。 可以将一个虚拟网络划分为两个子网,然后在隔离的子网中部署 Web 应用程序代理服务器。 可以为每个子网配置网络安全组设置,并仅允许两个子网之间的所需通信。
部署网络
创建网络时,可以在同一虚拟网络中创建两个子网,也可以创建两个不同的虚拟网络。 建议使用单网络方法,因为创建两个单独的虚拟网络还需要创建两个用于通信目的的单独虚拟网络网关。
创建虚拟网络
创建虚拟网络:
Sign in to the Azure portal with your Azure account.
In the portal, search for and select Virtual networks.
On the Virtual networks page, select + Create.
在创建虚拟网络中,转到基本信息选项卡,并配置以下设置:
Configure the following settings under Project details:
For Subscription, select the name of your subscription.
For Resource group, either select the name of an existing resource group or select Create new to make a new one.
Configure the following settings for Instance details:
对于虚拟网络名称,请输入虚拟网络的名称。
For Region, select the region you want to create your virtual network in.
Select Next.
In the Security tab, enable any security service you want to use, then select Next.
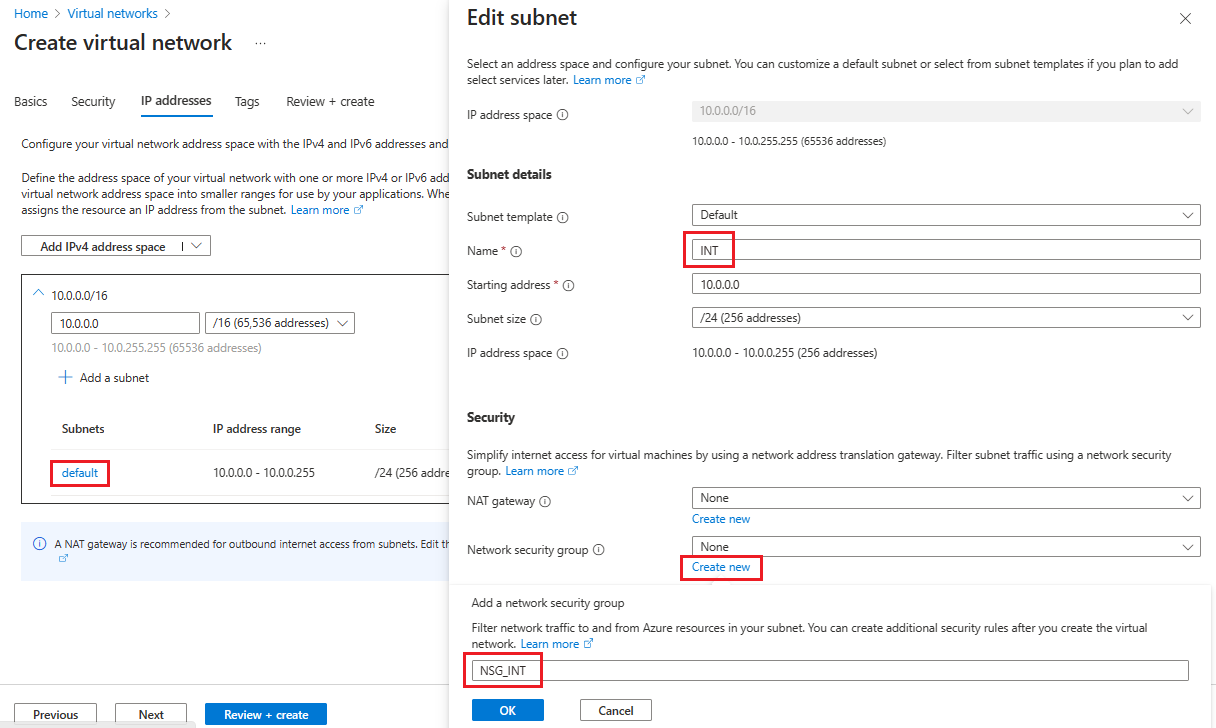
On the IP addresses tab, select the name of the subnet you want to edit. For this example, we're editing the default subnet that the service automatically creates.
On the Edit subnet page, rename the subnet to INT.
Enter the IP address and Subnet size information for your subnet to define an IP address space.
对于网络安全组,请选择“新建”。
For this example, enter the name NSG_INT and select OK, then select Save. 你现在拥有了第一个子网。
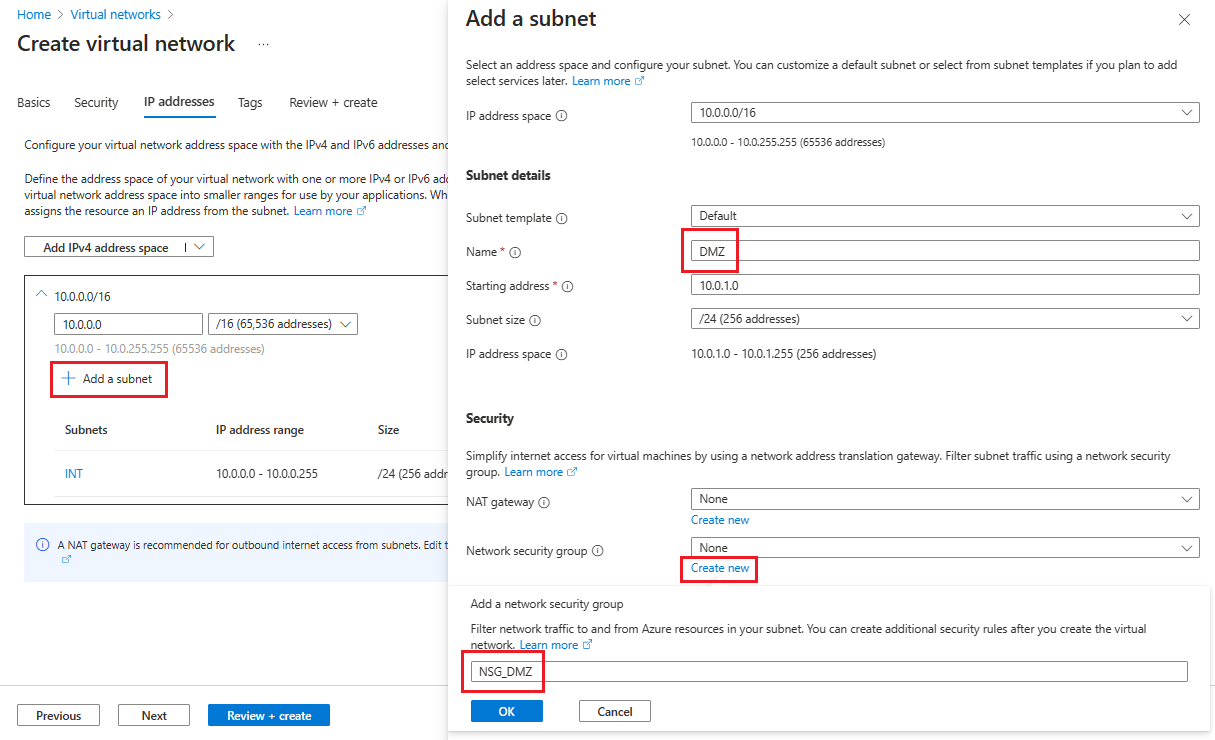
若要创建第二个子网,请选择“+ 添加子网”。
在添加子网页上,输入 DMZ 作为第二个子网名称,然后在空字段中输入有关子网的信息以定义 IP 地址空间。
对于网络安全组,请选择“新建”。
Enter the name NSG_DMZ, select OK, then select Add.
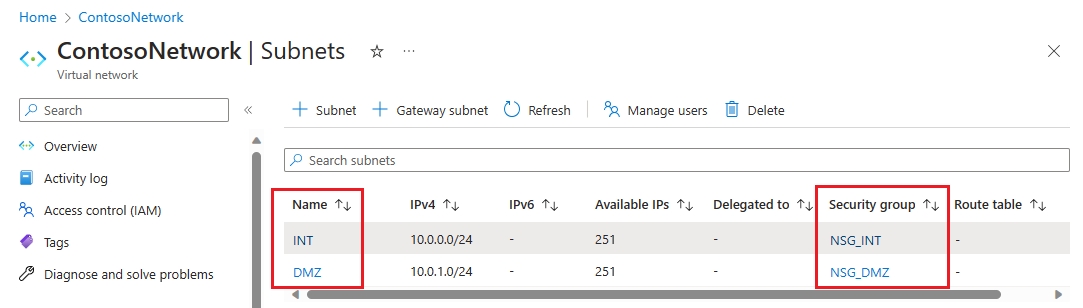
首先选择“审阅 + 创建”,然后选择“创建”。
现在,你有一个包含两个子网的虚拟网络,每个子网都有一个关联的网络安全组。
保护虚拟网络
网络安全组 (NSG) 包含一系列访问控制列表 (ACL) 规则,这些规则可以允许或拒绝虚拟网络中流向 VM 实例的网络流量。 可将 NSG 与任一子网或该子网内的单个 VM 实例关联。 当 NSG 与子网关联时,ACL 规则将应用于该子网中的所有 VM 实例。
与您的子网关联的 NSG 会自动包含一些默认的入站和出站规则。 无法删除默认安全规则,但可以使用更高优先级的规则将其覆盖。 此外,可以根据所需的安全级别添加更多入站和出站规则。
现在,将几个规则添加到两个安全组中的每一个。 For the first example, let's add an inbound security rule to the NSG_INT security group.
On your virtual network's Subnets page, select NSG_INT.
在左侧,选择“入站安全规则”,然后选择“+ 添加”。
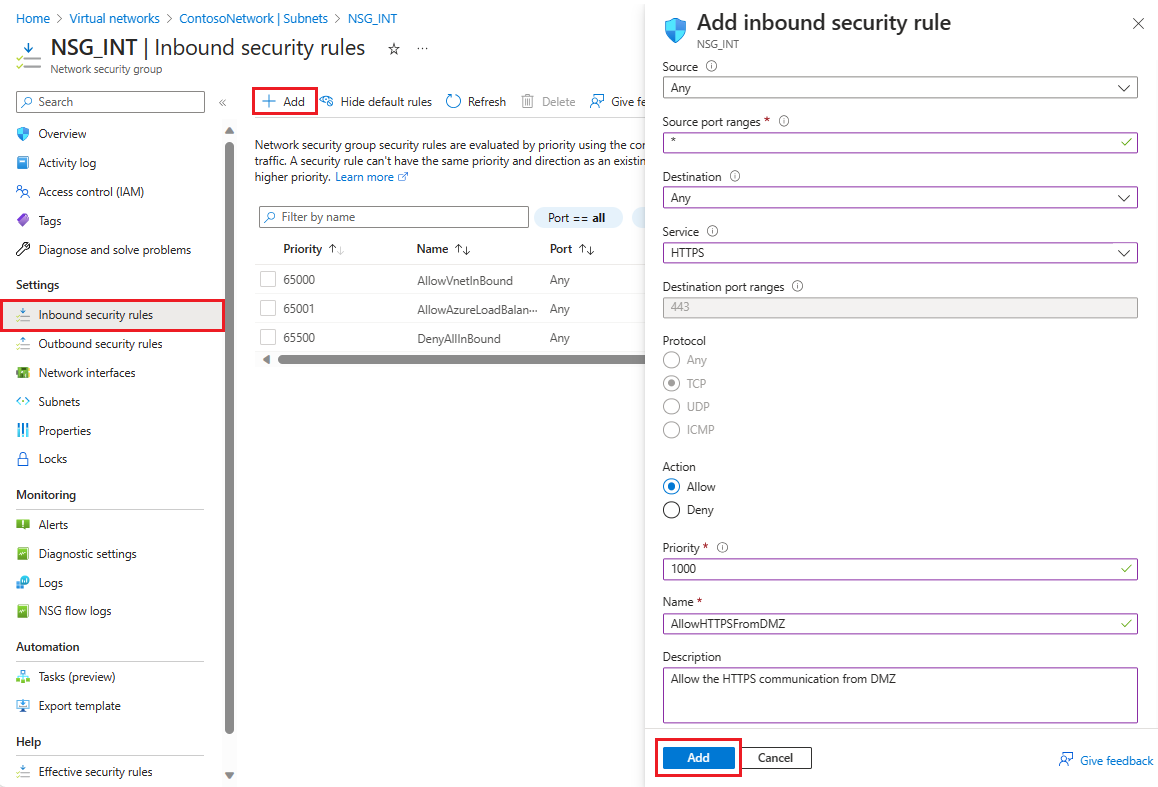
在添加入站安全规则中,使用以下信息配置规则:
For Source, enter 10.0.1.0/24.
对于源端口范围,如果不想允许流量,请将其留空;或者如果选择星号 (*),则允许任何端口上的流量。
For Destination, enter 10.0.0.0/24.
For Service, select HTTPS. 根据选择的服务,该服务会自动填充目标端口范围和协议的信息字段。
For Action, select Allow.
For Priority, enter 1010.
For Name, enter AllowHTTPSFromDMZ.
For Description, enter Allow the HTTPS communication from DMZ.
After you're finished, select Add.
 新的入站安全规则现已添加到 NSG_INT 规则列表的顶部。
对下表中显示的值重复这些步骤。 除了创建的新规则之外,还必须按列出的优先级顺序添加以下额外规则,以帮助保护内部子网和 DMZ 子网。
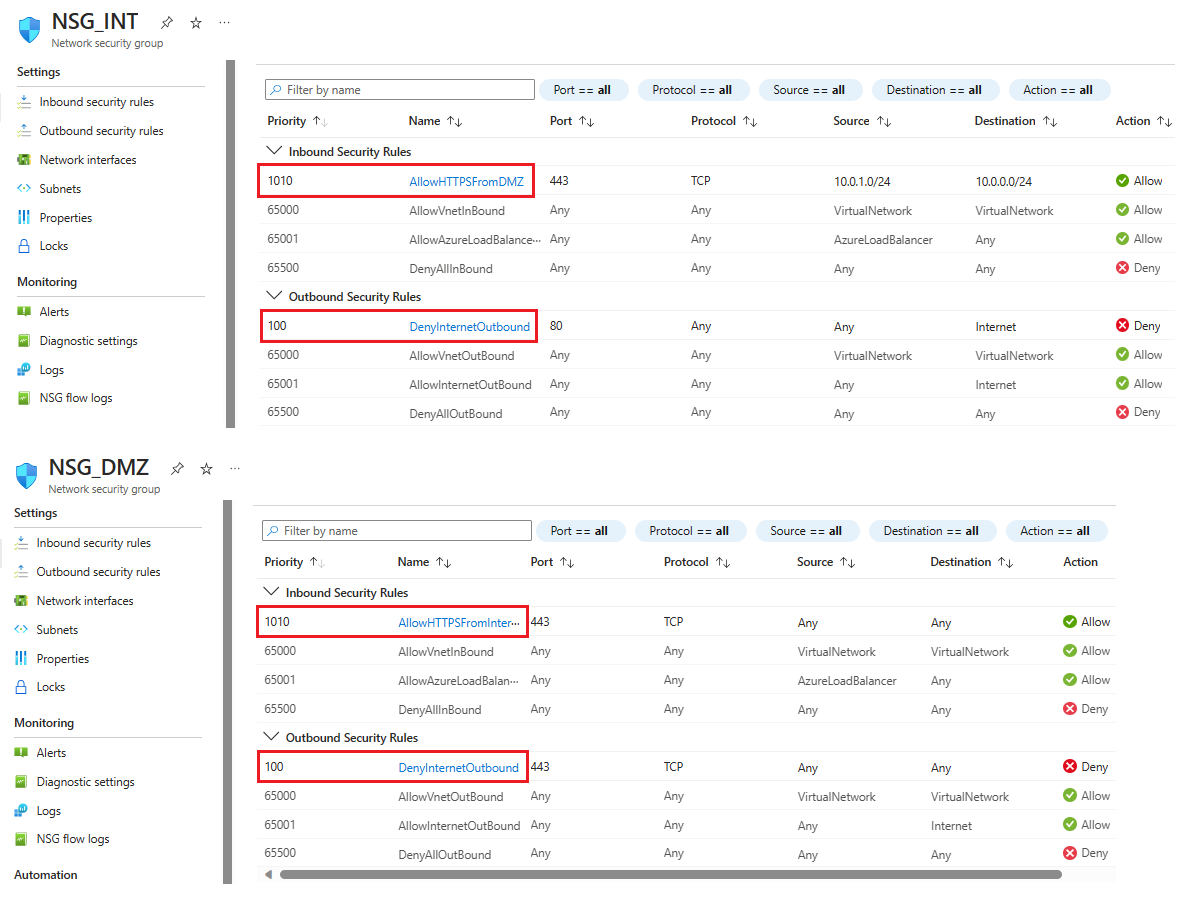
NSG 规则类型 Source Destination Service Action Priority Name Description NSG_INT Outbound Any Service Tag/Internet Custom (80/Any) Deny 100 DenyInternetOutbound 无法访问 Internet。 NSG_DMZ Inbound Any Any 自定义(星号(*)/任意) Allow 1010 AllowHTTPSFromInternet 允许从 Internet 到 DMZ 的 HTTPS。 NSG_DMZ Outbound Any Service Tag/Internet Custom (80/Any) Deny 100 DenyInternetOutbound 除 HTTPS 到 Internet 之外的任何内容都将被阻止。 After you finish entering the values for each new rule, select Add and proceed to the next until two new security rules are added for each NSG.
After configuration, the NSG pages should look like the following screenshot:
Note
如果虚拟网络需要客户端用户证书身份验证(例如,使用 X.509 用户证书的 clientTLS 身份验证),则必须启用 TCP 端口 49443 进行入站访问。
创建到本地的连接
需要连接到本地才能在 Azure 中部署 DC。 可以使用以下选项之一将本地基础结构连接到 Azure 基础结构:
- Point-to-site
- 虚拟网络站点
- ExpressRoute
如果组织不需要点到站点连接或虚拟网络站点到站点连接,建议使用 ExpressRoute。 使用 ExpressRoute,可在 Azure 数据中心与本地环境或共同租用环境中的基础结构之间创建专用连接。 ExpressRoute 连接也不会连接到公共互联网,这使得它们更加可靠、更快且更安全。 要详细了解 ExpressRoute 以及如何使用它的各种连接选项,可以阅读 ExpressRoute 技术概述。
创建可用性集
对于每个角色(DC/AD FS 和 WAP),请创建至少包含两台计算机的可用性集。 此配置有助于提高每个角色的可用性。 在创建可用性集时,必须决定要使用以下哪个域:
在容错域中,VM 共享相同的电源和物理网络交换机。 建议至少使用两个容错域。 The default value is 2 and you can leave it as-is for this deployment.
在更新域中,计算机在更新期间一起重启。 建议至少两个更新域。 The default value is 5, and you can leave it as-is for this deployment.
若要创建可用性集,请执行以下操作:
Search for and select Availability sets in the Azure portal, then select + Create.
在创建可用性集中,转到基本信息选项卡,然后输入以下信息:
Under Project details:
For Subscription, select the name of your subscription.
For Resource group, either select an existing resource group or Create new to make a new one.
Under Instance details:
For Name, enter the name for your availability set. For this example, enter contosodcset.
For Region, select the region you want to use.
For Fault domains, leave it on the default value of 2.
For Update domains, leave it at the default value of 5.
对于使用托管磁盘,请在此示例中选择否(经典)。
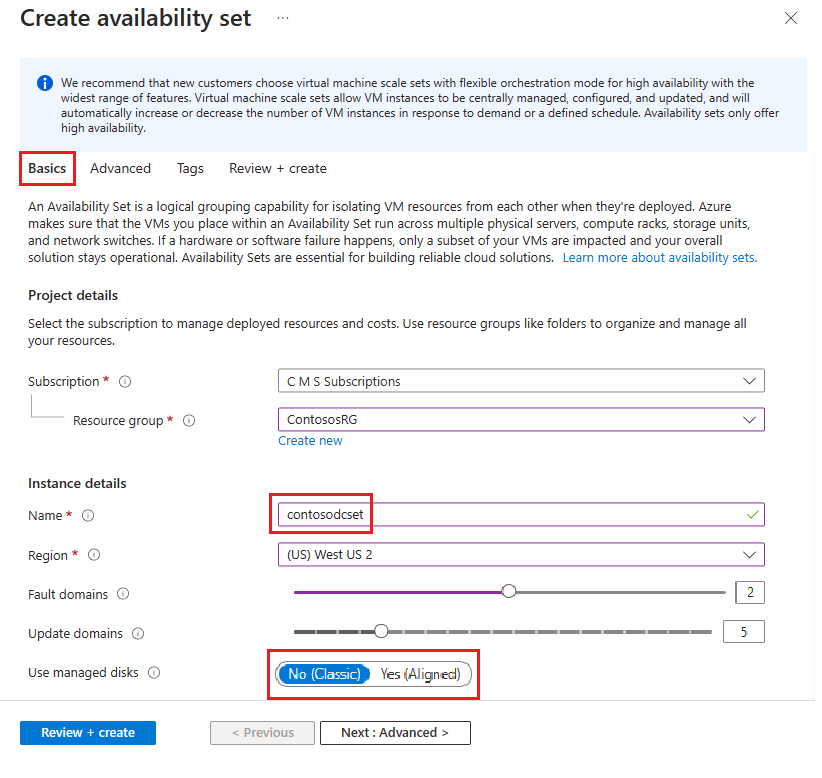
完成后,在查看 + 创建页面上选择创建。
Repeat the previous steps to create a second availability set with the name contososac2.
部署虚拟机
下一步是部署在基础结构中托管不同角色的 VM。 我们建议在每个可用性集中至少有两台计算机。 在本例中,我们为基本部署创建了四个 VM。
若要创建 VM,请执行以下操作:
Search for and select Virtual machines in the Azure portal.
On the Virtual machines page, select + Create, then choose Azure virtual machine.
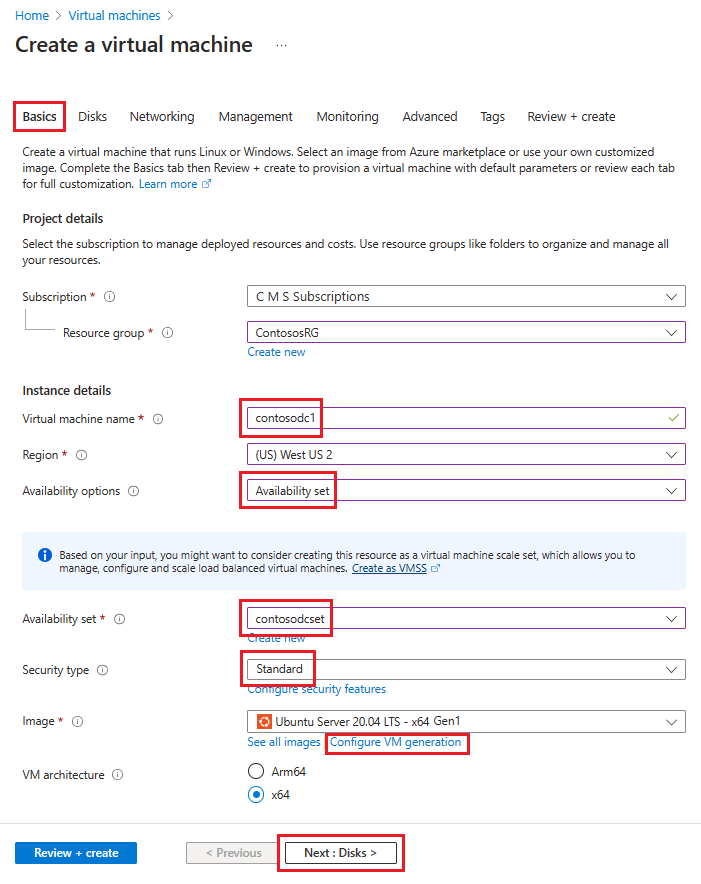
在创建虚拟机中,转到基本信息选项卡,并输入以下信息:
Under Project details:
For Subscription, select the name of your subscription.
For Resource group, either select an existing resource group or Create new to make a new one.
Under Instance details:
在虚拟机名称中,为 VM 输入一个名称。 For the first machine in this example, enter contosodc1.
For Region, select the region you want to use.
For Availability options, select Availability set.
For Availability set, select contosodcset
For Security type, select Standard.
For Subscription, select the name of your subscription.
For Image, select the image you want to use, then select Configure VM generation and select Gen 1.
Under Administrator account:
For Authentication type, select SSH public key.
For Username, enter a user name to use for the account.
对于密钥对名称,输入要用于账户的密钥对名称。
对于未指定的任何内容,可以保留默认值。
When you're finished, select Next: Disks.
In the Networking tab, enter the following information:
For virtual network, select the name of the virtual network that contains the subnets you created in the previous section.
For Subnet, select your INT subnet.
对于“NIC 网络安全组”,请选择“无” 。
对于未指定的任何内容,可以保留默认值。
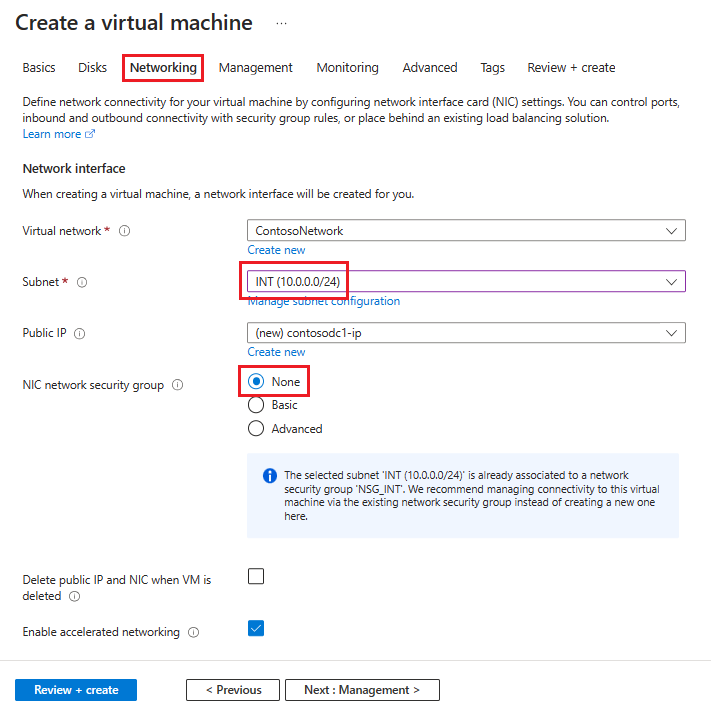
做出所有选择后,选择查看 + 创建,然后选择创建。
使用下表中的信息重复这些步骤,以创建其余三个 VM:
| 虚拟机名称 | Subnet | Availability options | Availability set | Storage account |
|---|---|---|---|---|
| contosodc2 | INT | Availability set | contosodcset | contososac2 |
| contosowap1 | DMZ | Availability set | contosowapset | contososac1 |
| contosowap2 | DMZ | Availability set | contosowapset | contososac2 |
这些设置未指定 NSG,因为 Azure 允许在子网级别使用 NSG。 可以使用与子网或网络接口卡 (NIC) 对象关联的单个 NSG 来控制计算机网络流量。 有关详细信息,请参阅什么是网络安全组 (NSG)。
如果要管理 DNS,建议使用静态 IP 地址。 可以使用 Azure DNS,并通过域的 DNS 记录中的 Azure FQDN 来引用新计算机。 有关详细信息,请参阅将专用 IP 地址更改为静态。
Your Virtual machines page should show all four VMs after the deployment completes.
配置 DC 和 AD FS 服务器
若要对任何传入请求进行身份验证,AD FS 需要联系 DC。 若要节省从 Azure 到本地 DC 的开销,以便进行身份验证,建议在 Azure 中部署 DC 的副本。 为了获得高可用性,最好创建至少两个 DC 的可用性集。
| Domain controller | Role | Storage account |
|---|---|---|
| contosodc1 | Replica | contososac1 |
| contosodc2 | Replica | contososac2 |
建议你执行以下操作:
使用 DNS 将两个服务器提升为副本 DC
使用服务器管理器安装 AD FS 角色来配置 AD FS 服务器。
创建和部署内部负载均衡器 (ILB)
若要创建和部署 ILB,请执行以下操作:
Search for and select Load Balancers in the Azure portal and choose + Create.
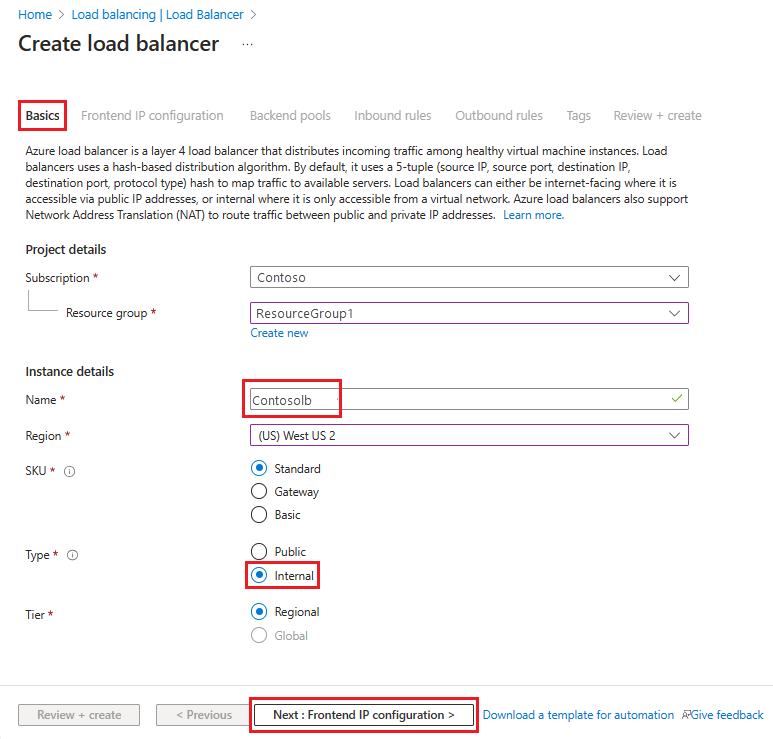
在“创建负载平衡器”中,在“基本信息”选项卡中输入或选择此信息:
Under Project details:
For Subscription, select the name of your subscription.
For Resource group, either select an existing resource group or Create new to make a new one.
Under Instance details:
For Name, enter the name of your load balancer.
For Region, select the region you want to use.
For Type, select Internal.
Leave SKU and Tier as their defaults and then select Next: Frontend IP Configuration
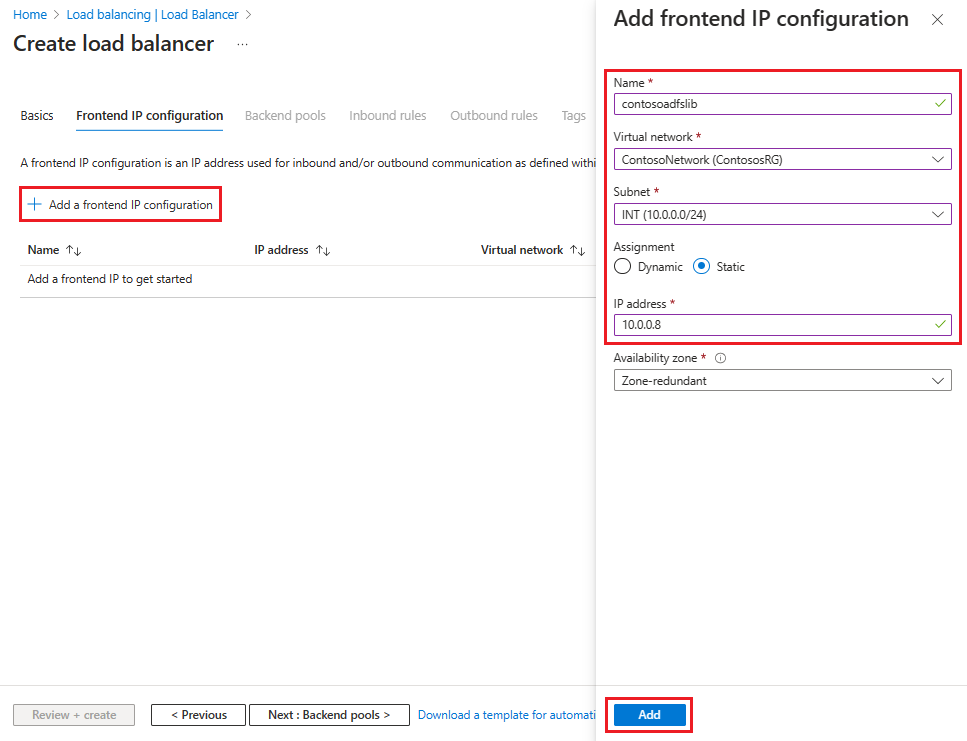
选择“添加前端 IP 配置”,然后在“添加前端 IP 配置”页中输入或选择此信息。
For Name, enter a frontend IP configuration name.
For Virtual network, select the virtual network where you want to deploy your AD FS.
For Subnet, select INT, which was the internal subnet you created in the previous section.
For Assignment, select Static.
For IP address, enter your IP address.
Leave Availability zone as the default and then select Add.
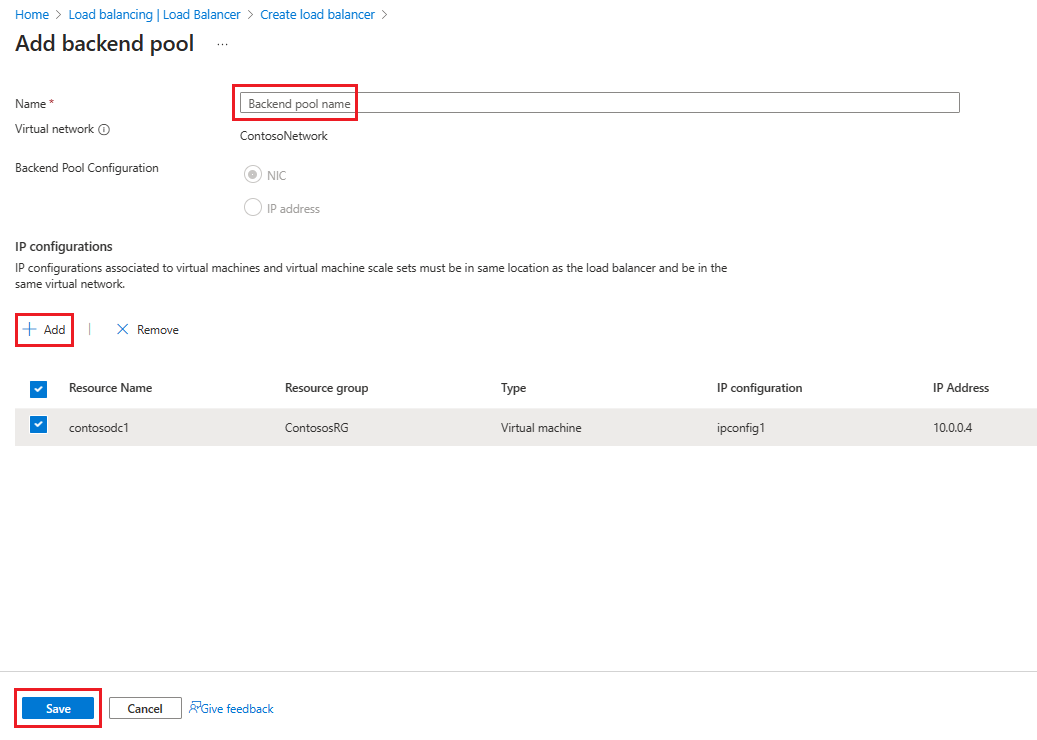
选择下一步:后端池,然后选择 + 添加后端池。
在添加后端池页上,在名称字段中输入后端池的名称。 In the IP configurations area, select + Add.
在“添加后端池”页上,选择要与后端池保持一致的 VM,选择“添加”,然后选择“保存”。
选择下一步:入站规则。
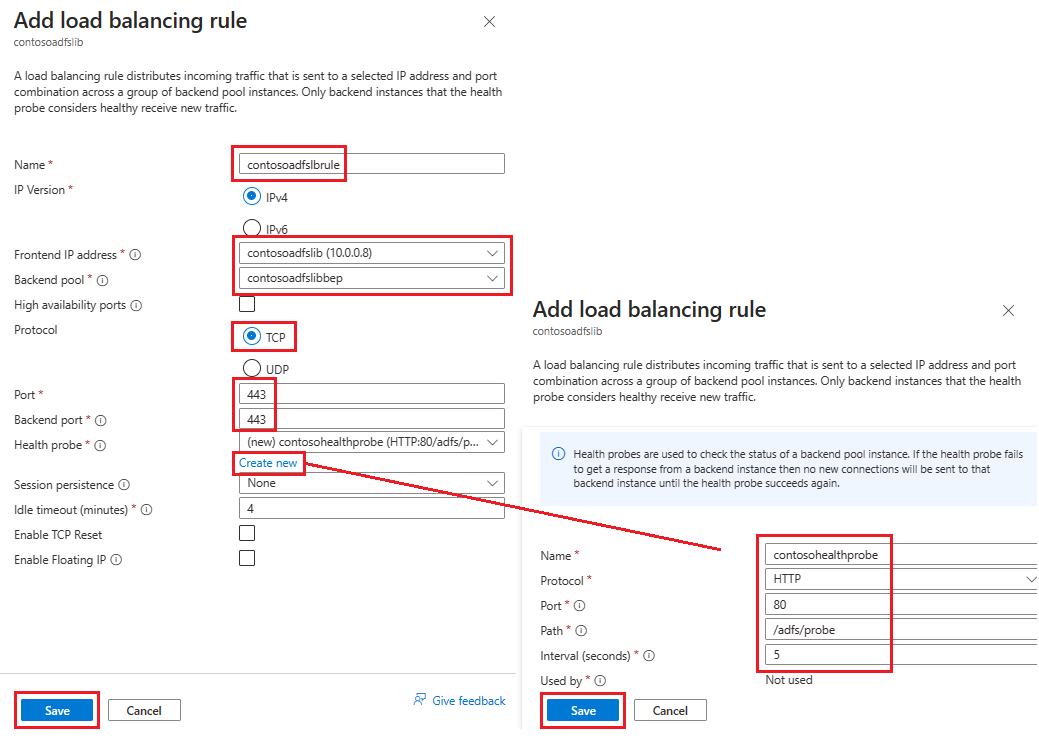
On the Inbound rules tab, select Add a load balancing rule, then enter the following information in the Add load balancing rule page:
For Name, enter a name for the rule.
对于前端 IP 地址,请选择之前创建的地址。
For Backend pool, select the backend pool you created earlier.
For Protocol, select TCP.
For Port, enter 443.
For Backend port, select Create new, then enter the following values to create a health probe:
For Name, enter the name of the health probe.
For Protocol, enter HTTP.
For Port, enter 80.
For Path, enter /adfs/probe.
For Interval, leave it at the default value of 5.
When you're finished, select Save.
When you're done, select Save to save the inbound rule.
Select Save to save the inbound rule.
首先选择“审阅 + 创建”,然后选择“创建”。
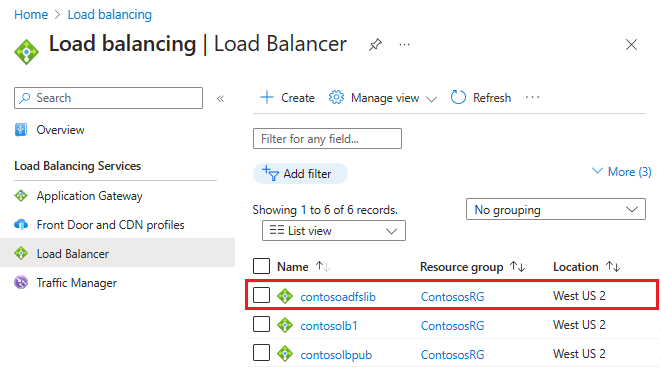
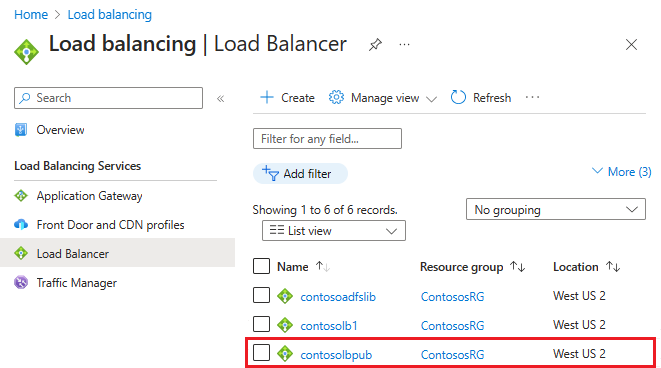
After you select Create and the ILB deploys, you can see it in the list of load balancers, as shown in the following screenshot.
使用 ILB 更新 DNS 服务器
使用内部 DNS 服务器为 ILB 创建 A 记录。 此设置可确保传输到 fs.contoso.com 的所有数据最终都使用适当的路由到达 ILB。 A 记录应用于联合身份验证服务,其 IP 地址指向 ILB 的 IP 地址。 例如,如果 ILB IP 地址为 10.3.0.8,安装的联合身份验证服务为 fs.contoso.com,则为 fs.contoso.com 创建一个指向 10.3.0.8 的 A 记录。
Warning
如果正在为 AD FS 数据库使用 Windows 内部数据库 (WID),请将此值设置为暂时指向主 AD FS 服务器。 如果不进行此临时设置更改,Web 应用程序代理将无法注册。 成功注册所有 Web 应用程序代理服务器后,请更改此 DNS 条目以指向负载均衡器。
Note
如果部署也使用 IPv6,请创建相应的 AAAA 记录。
配置 Web 应用程序代理服务器以访问 AD FS 服务器
若要确保 Web 应用程序代理服务器能够访问 ILB 后面的 AD FS 服务器,请在 ILB 的 %systemroot%\system32\drivers\etc\hosts 文件中创建记录。 可分辨名称 (DN) 应为联合服务名称,例如 fs.contoso.com。 IP 条目应为 ILB 的 IP 地址,在本例中为 10.3.0.8。
Warning
如果正在为 AD FS 数据库使用 Windows 内部数据库 (WID),请将此值设置为暂时指向主 AD FS 服务器。 否则,Web 应用程序代理将无法注册。 成功注册所有 Web 应用程序代理服务器后,请更改此 DNS 条目以指向负载均衡器。
安装 Web 应用程序代理角色
确保 Web 应用程序代理服务器能够访问 ILB 后面的 AD FS 服务器后,接下来可以安装 Web 应用程序代理服务器。 Web 应用代理服务器无需加入域。 Install the web application proxy roles on the two web application proxy servers by selecting the Remote Access role. 服务器管理器指导你完成 WAP 安装。
有关如何部署 WAP 的详细信息,请参阅安装和配置 Web 应用程序代理服务器。
创建和部署面向 Internet 的(公共)负载均衡器
若要创建和部署面向 Internet 的负载均衡器,请执行以下操作:
In the Azure portal, select Load balancers and then choose Create.
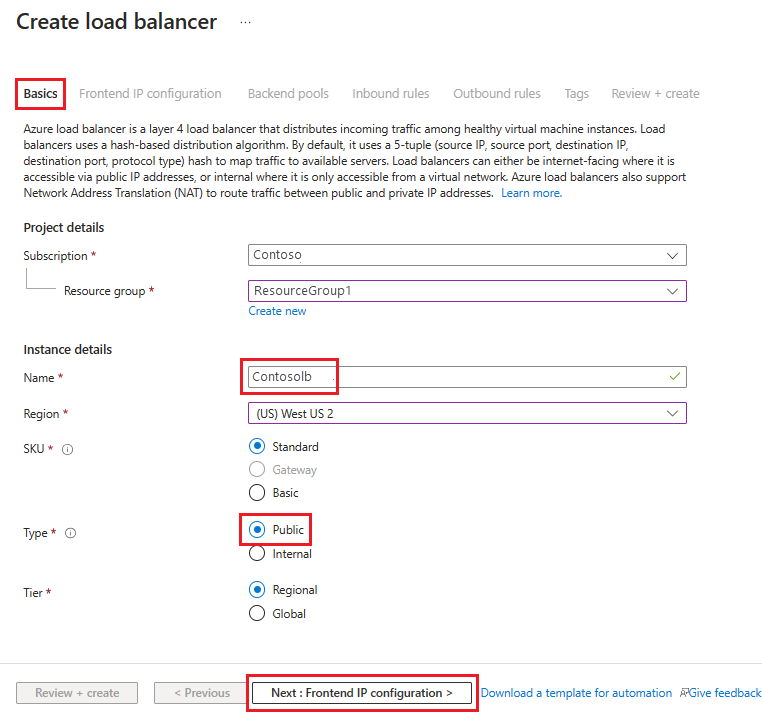
在创建负载均衡器中,转到基本信息选项卡,并配置以下设置:
Under Project details:
For Subscription, select the name of your subscription.
For Resource group, either select an existing resource group or Create new to make a new one.
Under Instance details:
For Name, enter the name of your load balancer.
For Region, select the region you want to use.
For Type, select Public.
Leave SKU and Tier as their defaults and then select Next : Frontend IP Configuration
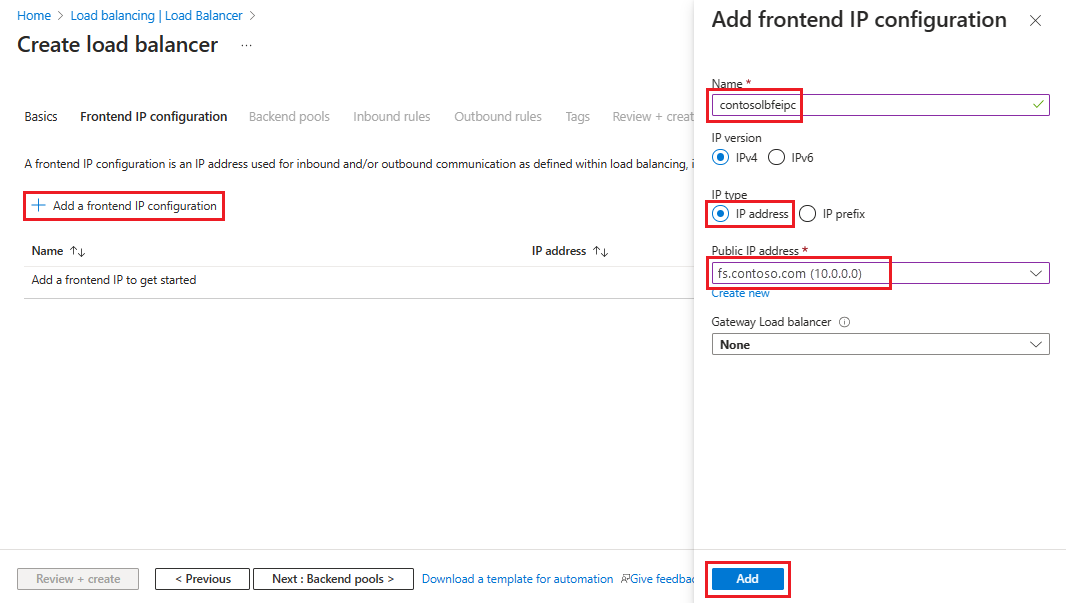
选择“添加前端 IP 配置”,然后在“添加前端 IP 配置”页中输入或选择此信息。
For Name, enter a frontend IP configuration name.
For IP type, select IP address.
对于公共 IP 地址,请从下拉列表中选择要使用的公共 IP 地址,或选择创建以创建新的 IP 地址,然后选择添加。
选择下一步:后端池,然后选择 + 添加后端池。
在添加后端池页上,在名称字段中输入后端池的名称。 In the IP configurations area, select + Add.
在“添加后端池”页上,选择要与后端池保持一致的 VM,选择“添加”,然后选择“保存”。
选择下一步:入站规则,然后选择添加负载均衡规则。 在添加负载均衡规则页面中,配置以下设置:
For Name, enter a name for the rule.
对于前端 IP 地址,请选择之前创建的地址。
For Backend pool, select the backend pool you created earlier.
For Protocol, select TCP.
For Port, enter 443.
For Backend port, enter 443.
For Health probe, enter the following values:
For Name, enter the name of the health probe.
For Protocol, enter HTTP.
For Port, enter 80.
For Path, enter /adfs/probe.
For Interval, leave it at the default value of 5.
When you're finished, select Save.
When you're done, select Save to save the inbound rule.
首先选择“审阅 + 创建”,然后选择“创建”。
After you select Create and the public ILB deploys, it should contain a list of load balancers.
向公共 IP 分配 DNS 标签
若要配置用于公共 IP 的 DNS 标签,请执行以下操作:
在 Azure 门户中,搜索公共 IP 地址,然后选择要编辑的 IP 地址。
Under Settings, select Configuration.
在“提供 DNS 标签(可选)”下,在解析为外部负载均衡器的 DNS 标签(如 contosofs.westus.cloudapp.azure.com)的文本字段中添加一个条目(如 fs.contoso.com)。
Select Save to complete assigning a DNS label.
测试 AD FS 登录
测试 AD FS 的最简单方法是使用 IdpInitiatedSignOn.aspx 页。 为此,必须在 AD FS 属性上启用 IdpInitiatedSignOn。
若要检查是否已启用 IdpInitiatedSignOn 属性,请执行以下操作:
在 PowerShell 中,在 AD FS 服务器上运行以下 cmdlet 以将其设置为已启用。
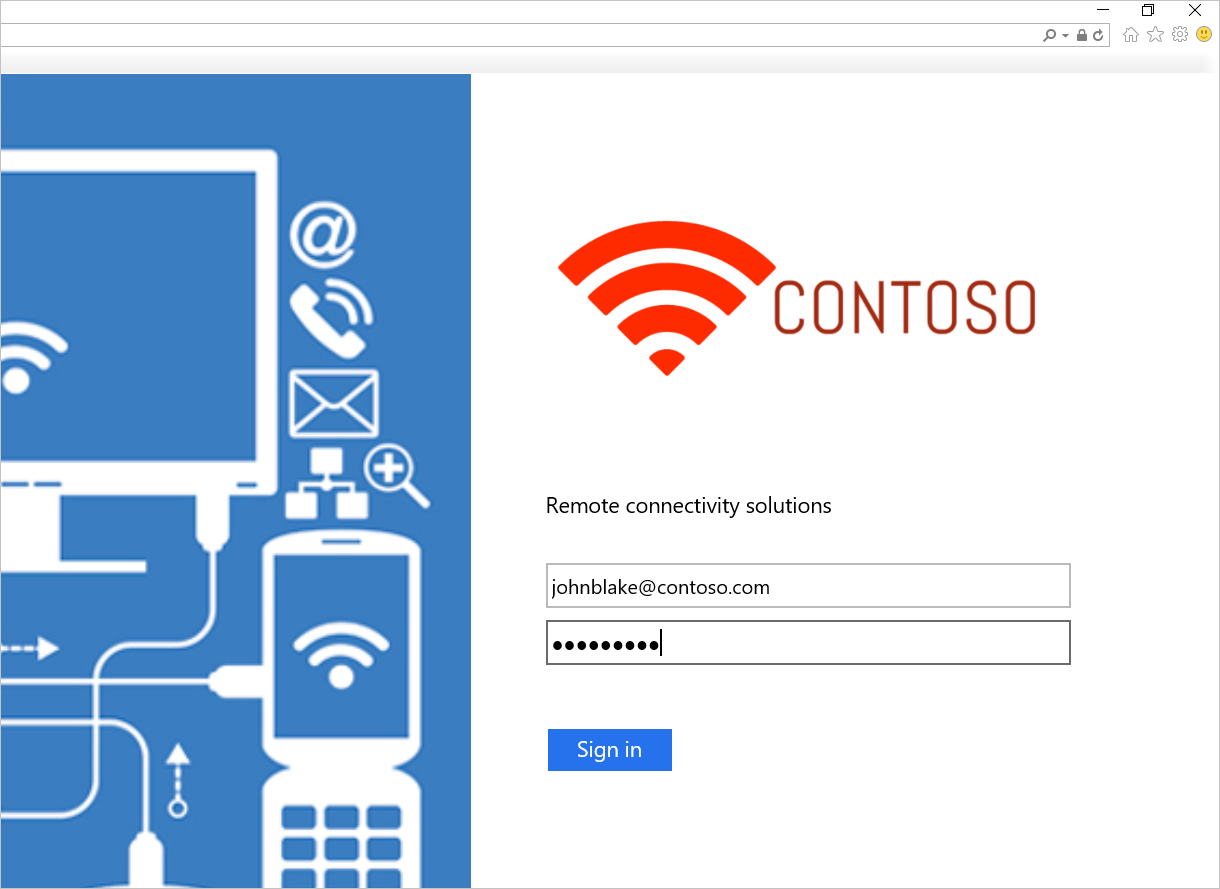
Set-AdfsProperties -EnableIdPInitiatedSignOnPage $true从任何外部计算机访问
https:\//adfs-server.contoso.com/adfs/ls/IdpInitiatedSignon.aspx。你应该看到以下 AD FS 页面:
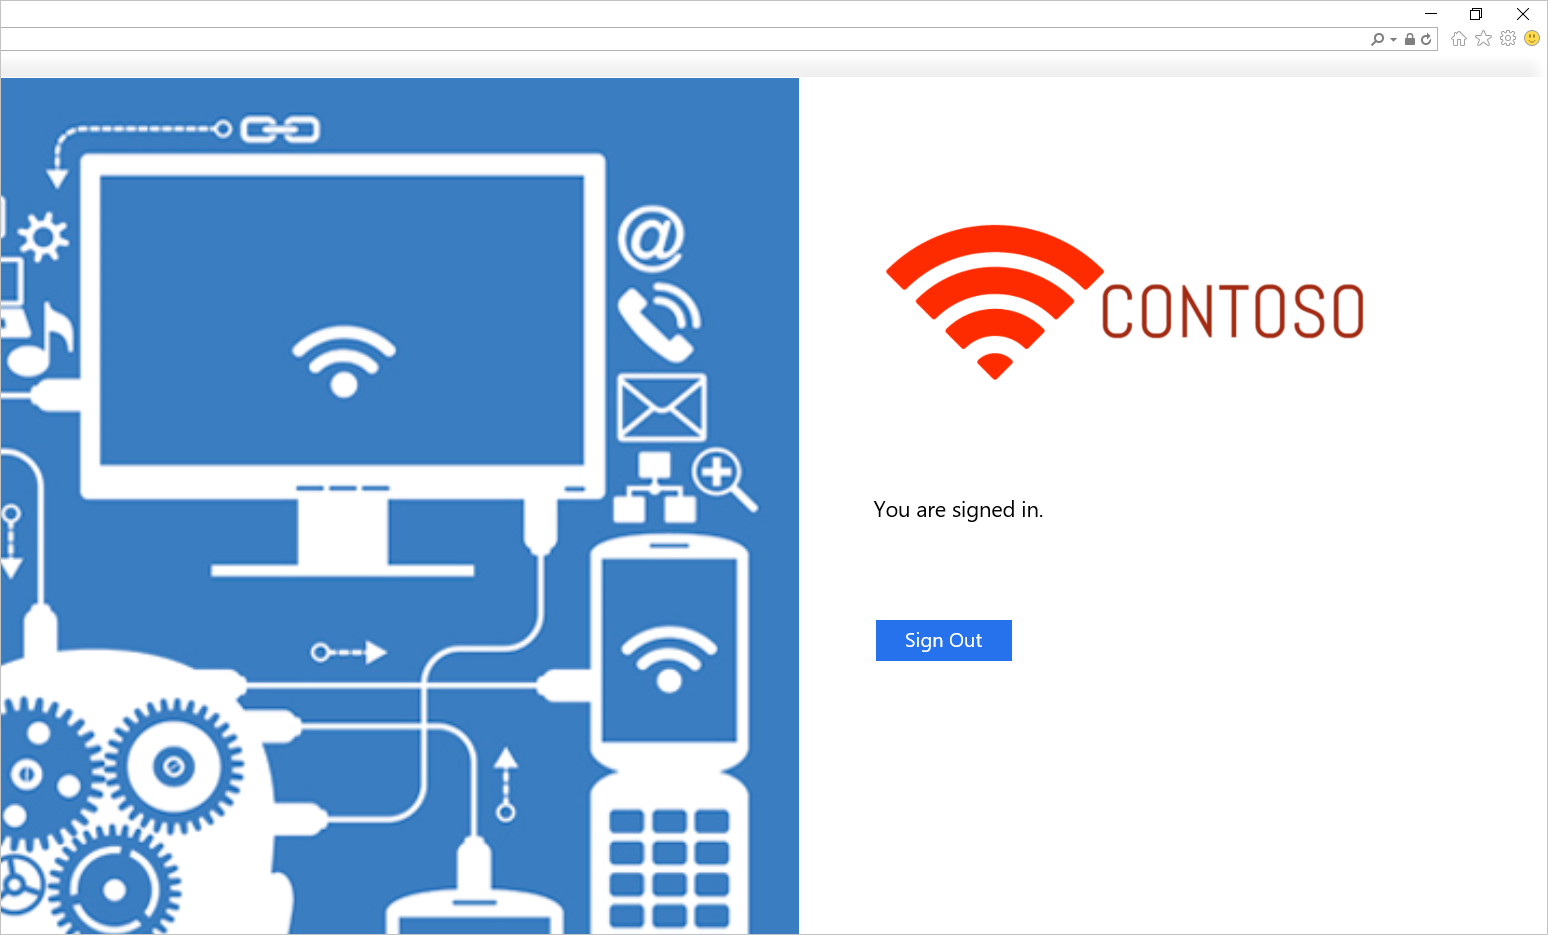
请尝试登录。 如果成功登录,你应该会看到出现一条消息,如下面的屏幕截图所示。
用于在 Azure 中部署 AD FS 的模板
该模板部署了一个六台计算机的设置,其中两台分别用于域控制器、AD FS 和 WAP。
部署此模板时,可以使用现有虚拟网络或创建新的虚拟网络。 下表列出了可用于自定义部署的参数。
| Parameter | Description |
|---|---|
| Location | 要将资源部署到的区域。 |
| StorageAccountType | 要创建的存储帐户的类型。 |
| VirtualNetworkUsage | 指示是创建新的虚拟网络还是使用现有的虚拟网络。 |
| VirtualNetworkName | 虚拟网络的名称。 对现有或新的虚拟网络使用情况是必需的。 |
| VirtualNetworkResourceGroupName | 指定现有虚拟网络所在的资源组的名称。 使用现有虚拟网络时,此选项是必需参数,因此部署可以找到现有虚拟网络的 ID。 |
| VirtualNetworkAddressRange | 新虚拟网络的地址范围。 如果创建新的虚拟网络,则是必需的。 |
| InternalSubnetName | 内部子网的名称。 对于新的和现有的虚拟网络使用选项都是必需的。 |
| InternalSubnetAddressRange | 内部子网的地址范围,其中包含域控制器和 AD FS 服务器。 如果创建新的虚拟网络,则是必需的。 |
| DMZSubnetAddressRange | DMZ 子网的地址范围,其中包含 Windows 应用程序代理服务器。 如果创建新的虚拟网络,则是必需的。 |
| DMZSubnetName | 内部子网的名称,这对于新的和现有的虚拟网络使用选项都是必需的。 |
| ADDC01NICIPAddress | 第一个域控制器的内部 IP 地址。 此 IP 地址静态分配给 DC,并且必须是内部子网内的有效 IP 地址。 |
| ADDC02NICIPAddress | 第二个域控制器的内部 IP 地址。 此 IP 地址静态分配给 DC,并且必须是内部子网内的有效 IP 地址。 |
| ADFS01NICIPAddress | 第一台 AD FS 服务器的内部 IP 地址。 此 IP 地址静态分配给 AD FS 服务器,并且必须是内部子网内的有效 IP 地址。 |
| ADFS02NICIPAddress | 第二台 AD FS 服务器的内部 IP 地址。 此 IP 地址静态分配给 AD FS 服务器,并且必须是内部子网内的有效 IP 地址。 |
| WAP01NICIPAddress | 第一台 WAP 服务器的内部 IP 地址。 此 IP 地址静态分配给 WAP 服务器,并且必须是 DMZ 子网内的有效 IP 地址。 |
| WAP02NICIPAddress | 第二台 WAP 服务器的内部 IP 地址。 此 IP 地址静态分配给 WAP 服务器,并且必须是 DMZ 子网内的有效 IP 地址。 |
| ADFSLoadBalancerPrivateIPAddress | AD FS 负载均衡器的内部 IP 地址。 此 IP 地址静态分配给负载均衡器,并且必须是内部子网内的有效 IP 地址。 |
| ADDCVMNamePrefix | 域控制器的 VM 名称前缀。 |
| ADFSVMNamePrefix | AD FS 服务器的 VM 名称前缀。 |
| WAPVMNamePrefix | WAP 服务器的 VM 名称前缀。 |
| ADDCVMSize | 域控制器的 VM 大小。 |
| ADFSVMSize | AD FS 服务器的 VM 大小。 |
| WAPVMSize | WAP 服务器的 VM 大小。 |
| AdminUserName | VM 的本地管理员的名称。 |
| AdminPassword | VM 的本地管理员帐户的密码。 |
Related links
- Availability sets
- Azure 负载均衡器
- 内部负载均衡器
- 面向 Internet 的负载均衡器
- Storage Accounts
- Azure 虚拟网络
- AD FS 和 Web 应用程序代理链接
Next steps
- 将本地标识与 Microsoft Entra ID 集成
- 使用 Microsoft Entra Connect 配置和管理 AD FS
- 使用 Azure 流量管理器在 Azure 中进行跨区域 AD FS 部署以实现高可用性