附录 F:保护 Active Directory 中的 Domain Admins 组
与 Enterprise Admins (EA) 组的情况一样,只有在生成或灾难恢复方案中才需要 Domain Admins (DA) 组中的成员身份。 DA 组中不应有任何日常用户帐户,但域的内置 Administrator 帐户除外,前提是已按照附录 D:保护 Active Directory 中的内置 Administrator 帐户中所述进行了保护。
默认情况下,Domain Admins 是其各自域中所有成员服务器和工作站上的本地管理员组的成员。 不应出于可支持性和灾难恢复目的而修改此默认嵌套。 如果 Domain Admins 已从成员服务器上的本地管理员组中删除,则该组应添加到域中每个成员服务器和工作站上的管理员组中。 每个域的 Domain Admins 组都应按照下面的分步说明进行保护。
对于林中每个域中的 Domain Admins 组:
删除该组中的所有成员,域的内置 Administrator 帐户可能除外,前提是已按照附录 D:保护 Active Directory 中的内置 Administrator 帐户中所述进行了保护。
在链接到包含每个域中的成员服务器和工作站的 OU 的 GPO 中,应将 DA 组添加到以下用户权限中(路径为“计算机配置”\“策略”\“Windows 设置”\“安全设置”\“本地策略”\“用户权限分配”):
拒绝通过网络访问该计算机
拒绝以批处理作业身份登录
拒绝以服务身份登录
拒绝本地登录
“拒绝通过远程桌面服务登录”用户权限
审核应配置为在对 Domain Admins 组的属性或成员身份进行任何修改时发送警报。
有关删除 Domain Admins 组中所有成员的分步说明
In Server Manager, click Tools, and click Active Directory Users and Computers.
要删除 DA 组中的所有成员,请执行以下步骤:
Double-click the Domain Admins group and click the Members tab.
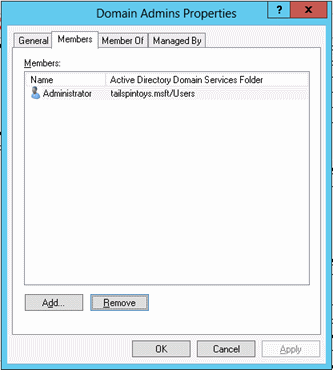
Select a member of the group, click Remove, click Yes, and click OK.
重复步骤 2,直到删除 DA 组的所有成员。
有关保护 Active Directory 中的 Domain Admins 的分步说明
In Server Manager, click Tools, and click Group Policy Management.
在控制台树中,展开“<Forest>”\“域”\“<Domain>”,然后展开“组策略对象”(其中“<Forest>”是林的名称,“<Domain>”是要在其中设置组策略的域的名称)。
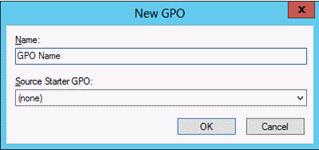
在控制台树中,右键单击“组策略对象”,然后单击“新建”。

In the New GPO dialog box, type <GPO Name>, and click OK (where <GPO Name> is the name of this GPO).
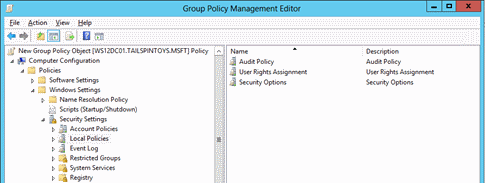
In the details pane, right-click <GPO Name>, and click Edit.
导航到“Computer Configuration\Policies\Windows Settings\Security Settings\Local Policies”,然后单击“用户权限分配”。
通过执行以下操作配置用户权限,以阻止 Domain Admins 组的成员通过网络访问成员服务器和工作站:
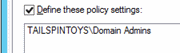
双击“拒绝通过网络访问该计算机”,然后选择“定义这些策略设置”。
单击“添加用户或组”,然后单击“浏览”。
Type Domain Admins, click Check Names, and click OK.

Click OK, and OK again.
通过执行以下操作配置用户权限,以阻止 DA 组的成员以批处理作业形式登录:
双击“拒绝以批处理作业登录”,然后选择“定义这些策略设置”。
单击“添加用户或组”,然后单击“浏览”。
Type Domain Admins, click Check Names, and click OK.

Click OK, and OK again.
通过执行以下操作配置用户权限,以阻止 DA 组的成员以服务形式登录:
双击“拒绝以服务登录”,然后选择“定义这些策略设置”。
单击“添加用户或组”,然后单击“浏览”。
Type Domain Admins, click Check Names, and click OK.

Click OK, and OK again.
通过执行以下操作配置用户权限,以阻止 Domain Admins 组的成员在本地登录到成员服务器和工作站:
双击“拒绝本地登录”,然后选择“定义这些策略设置”。
单击“添加用户或组”,然后单击“浏览”。
Type Domain Admins, click Check Names, and click OK.
Click OK, and OK again.
通过执行以下操作配置用户权限,以阻止 Domain Admins 组的成员通过远程桌面服务访问成员服务器和工作站:
双击“拒绝通过远程桌面服务登录”,然后选择“定义这些策略设置”。
单击“添加用户或组”,然后单击“浏览”。
Type Domain Admins, click Check Names, and click OK.

Click OK, and OK again.
要退出“组策略管理编辑器”,请依次单击“文件”和“退出”。
在“组策略管理”中,通过执行以下操作将 GPO 链接到成员服务器和工作站 OU:
导航到“<Forest>”\“域”\“<Domain>”(其中“<Forest>”是林的名称,“<Domain>”是要设置组策略的域的名称)。
右键单击 GPO 将应用到的 OU,然后单击“链接现有 GPO”。
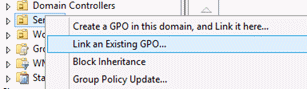
Select the GPO that you just created and click OK.

创建包含工作站的所有其他 OU 的链接。
创建包含成员服务器的所有其他 OU 的链接。
Important
如果使用跳转服务器来管理域控制器和 Active Directory,请确保跳转服务器位于此 GPO 未链接到的 OU 中。
Verification Steps
验证“拒绝通过网络访问该计算机”GPO 设置
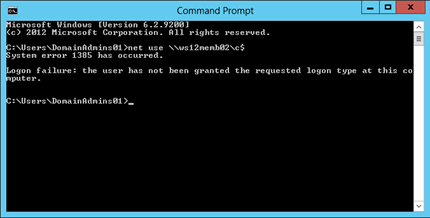
在不受 GPO 更改影响的任何成员服务器或工作站(例如“跳转服务器”)中,尝试通过网络访问受 GPO 更改影响的成员服务器或工作站。 To verify the GPO settings, attempt to map the system drive by using the NET USE command.
使用 Domain Admins 组成员帐户在本地登录。
使用鼠标将指针移动到屏幕的右上角或右下角。 When the Charms bar appears, click Search.
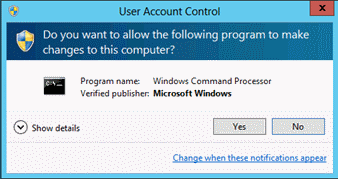
In the Search box, type command prompt, right-click Command Prompt, and then click Run as administrator to open an elevated command prompt.
When prompted to approve the elevation, click Yes.
In the Command Prompt window, type net use \\<Server Name>\c$, where <Server Name> is the name of the member server or workstation you're attempting to access over the network.
以下屏幕截图显示了应出现的错误消息。
验证“拒绝以批处理作业登录”GPO 设置
在本地从受 GPO 更改影响的任何成员服务器或工作站登录。
创建批处理文件
使用鼠标将指针移动到屏幕的右上角或右下角。 When the Charms bar appears, click Search.
In the Search box, type notepad, and click Notepad.
In Notepad, type dir c:.
Click File, and click Save As.
In the File name field, type <Filename>.bat (where <Filename> is the name of the new batch file).
计划任务
使用鼠标将指针移动到屏幕的右上角或右下角。 When the Charms bar appears, click Search.
In the Search box, type task scheduler, and click Task Scheduler.
Note
On computers running Windows 8, in the Search box, type schedule tasks, and click Schedule tasks.
In the Task Scheduler menu bar, click Action, and click Create Task.
In the Create Task dialog box, type <Task Name> (where <Task Name> is the name of the new task).
Click the Actions tab, and click New.
In the Action field, select Start a program.
Under Program/script, click Browse, locate and select the batch file created in the Create a Batch File section, and click Open.
Click OK.
Click the General tab.
Under Security options, click Change User or Group.
Type the name of an account that is a member of the Domain Admins group, click Check Names, and click OK.
依次选择“运行(无论用户是否登录)”和“不存储密码”。 该任务将只能访问本地计算机资源。
Click OK.
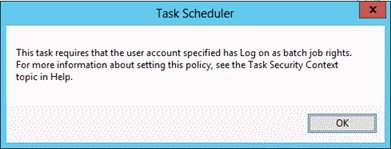
此时应显示一个对话框,请求使用用户帐户凭据运行任务。
After entering the credentials, click OK.
随即应显示类似于以下的对话框。
验证“拒绝以服务登录”GPO 设置
在本地从受 GPO 更改影响的任何成员服务器或工作站登录。
使用鼠标将指针移动到屏幕的右上角或右下角。 When the Charms bar appears, click Search.
In the Search box, type services, and click Services.
Locate and double-click Print Spooler.
Click the Log On tab.
在“登录方式”下,选择“此帐户”选项。
Click Browse, type the name of an account that is a member of the Domain Admins group, click Check Names, and click OK.
Under Password and Confirm password, type the selected account's password, and click OK.
Click OK three more times.
Right-click Print Spooler and click Restart.
重新启动服务时,应显示如下所示的对话框。

还原对打印机后台处理程序服务所做的更改
在本地从受 GPO 更改影响的任何成员服务器或工作站登录。
使用鼠标将指针移动到屏幕的右上角或右下角。 When the Charms bar appears, click Search.
In the Search box, type services, and click Services.
Locate and double-click Print Spooler.
Click the Log On tab.
在“登录方式”下,选择“本地系统”帐户,然后单击“确定”。
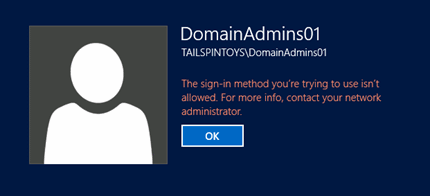
验证“拒绝本地登录”GPO 设置
在受 GPO 更改影响的任何成员服务器或工作站中,尝试使用 Domain Admins 组成员帐户在本地登录。 随即应显示类似于以下的对话框。
验证“拒绝通过远程桌面服务登录”GPO 设置
使用鼠标将指针移动到屏幕的右上角或右下角。 When the Charms bar appears, click Search.
In the Search box, type remote desktop connection, and click Remote Desktop Connection.
In the Computer field, type the name of the computer that you want to connect to, and click Connect. (除计算机名称外,还可以键入 IP 地址。)
出现提示时,请提供 Domain Admins 组成员帐户的凭据。
随即应显示类似于以下的对话框。
