你当前正在访问 Microsoft Azure Global Edition 技术文档网站。 如果需要访问由世纪互联运营的 Microsoft Azure 中国技术文档网站,请访问 https://docs.azure.cn。
在本指南中,你将使用目标筛选器向 Node.js 应用程序的目标受众推出功能。 有关目标筛选器的详细信息,请参阅《向目标受众推出功能》。
先决条件
- 拥有有效订阅的 Azure 帐户。 免费创建一个。
- 应用配置存储区,如 创建存储区的教程所示。
- 具有目标筛选器的 Beta 功能标志。 创建功能标志。
- Node.js的 LTS 版本 。
使用功能标志创建 Web 应用程序
在本部分中,你将创建一个 Web 应用程序,该应用程序使用 Beta 功能标志 来控制对网页 beta 版本的访问。
设置 Node.js Express 项目
创建一个名为
targeting-filter-tutorial的文件夹,并初始化项目。mkdir targeting-filter-tutorial cd targeting-filter-tutorial npm init -y安装以下包。
npm install @azure/app-configuration-provider
npm install @microsoft/feature-management
npm install express
创建名为 app.js 的新文件,并添加以下代码。
const express = require("express");
const server = express();
const port = "8080";

server.listen(port, () => {
    console.log(`Server is running at http://localhost:${port}`);
});
连接到 Azure 应用配置
更新 app.js 并添加以下代码。
// Existing code ...
const appConfigEndpoint = process.env.AZURE_APPCONFIG_ENDPOINT;
const { DefaultAzureCredential } = require("@azure/identity");
const { load } = require("@azure/app-configuration-provider");
const { FeatureManager, ConfigurationMapFeatureFlagProvider } = require("@microsoft/feature-management");

let appConfig;
let featureManager;

async function initializeConfig() {
    // Load feature flags from App Configuration.
    appConfig = await load(appConfigEndpoint, new DefaultAzureCredential(), {
        featureFlagOptions: {
            enabled: true,
            refresh: {
                enabled: true
            }
        }
    });

    // Create feature manager with feature flag provider that accesses feature flags from App Configuration.
    featureManager = new FeatureManager(
        new ConfigurationMapFeatureFlagProvider(appConfig));
}

// Use a middleware to refresh the configuration before each request.
server.use((req, res, next) => {
    appConfig.refresh();
    next();
});
// Existing code ...
连接到 Azure 应用配置以加载功能标志、启用自动刷新,并创建一个
FeatureManager对象,以便稍后访问功能标志。 在每次请求之前,都会添加一个中间件以刷新配置。更新代码以确保仅当配置成功初始化后,Express 服务器才会启动。
// Existing code ...
initializeConfig()
    .then(() => {
        // Start the express server.
        server.listen(port, () => {
            console.log(`Server is running at http://localhost:${port}`);
        });
    })
使用功能标志
将以下代码添加到 app.js 文件,以配置 Express 服务器的路由处理程序。 服务器将根据 Beta 功能标志是否启用提供不同的内容。
// Existing code ...
server.get("/", async (req, res) => {
    const isBetaEnabled = await featureManager.isEnabled("Beta");
    const [title, message] = isBetaEnabled
        ? ["Beta Page", "This is a beta page."]
        : ["Home Page", "Welcome."];

    res.send(
        `<!DOCTYPE html>
        <html>
            <head><title>${title}</title></head>
            <body style="display: flex; justify-content: center; align-items: center; min-height: 100vh; margin: 0;">
                <h1 style="text-align: center; font-size: 5rem;">${message}</h1>
            </body>
        </html>`
    );
});

initializeConfig()
// Existing code ...
为 Web 应用程序启用目标
在评估启用定位的功能时,需要定位上下文。 若要为功能评估显式提供此上下文,可以将它作为参数 featureManager.isEnabled 传递给方法。
const isBetaEnabled = await featureManager.isEnabled("Beta", { userId: "UserA", groups: ["Group1"] });
在 Web 应用程序中,目标上下文也可以通过实现 ITargetingContextAccessor 接口作为环境上下文提供。 环境目标上下文意味着从环境(例如当前 HTTP 请求)自动检索目标信息,而无需将其显式传递给每个 featureManager.isEnabled() 调用。
在此教程中使用环境目标上下文。
在 Express 服务器声明后添加以下代码。 它用于
AsyncLocalStorage存储当前请求,允许功能管理器通过目标上下文访问器回调自动检索目标上下文。 有关详细信息,请参阅 对请求上下文使用 AsyncLocalStorage。const express = require("express"); const server = express(); const port = 8080; const { AsyncLocalStorage } = require("async_hooks"); const requestAccessor = new AsyncLocalStorage(); // Use a middleware to store request context. server.use((req, res, next) => { // Store the request in AsyncLocalStorage for this request chain. requestAccessor.run(req, () => { next(); }); }); // Create a targeting context accessor that retrieves user data from the current request. const targetingContextAccessor = { getTargetingContext: () => { // Get the current request from AsyncLocalStorage. const request = requestAccessor.getStore(); if (!request) { return undefined; } const { userId, groups } = request.query; return { userId: userId, groups: groups ? groups.split(",") : [] }; } }; // Existing code ...构造
FeatureManager时,将目标上下文访问器传递给FeatureManagerOptions。featureManager = new FeatureManager( new ConfigurationMapFeatureFlagProvider(appConfig), { targetingContextAccessor: targetingContextAccessor });
完成上述步骤后, app.js 文件现在应包含以下完整的实现。
const express = require("express");
const server = express();
const port = 8080;
const { AsyncLocalStorage } = require("async_hooks");
const requestAccessor = new AsyncLocalStorage();
// Use a middleware to store request context
server.use((req, res, next) => {
// Store the request in AsyncLocalStorage for this request chain
requestAccessor.run(req, () => {
next();
});
});
// Create a targeting context accessor that retrieves user data from the current request
const targetingContextAccessor = {
getTargetingContext: () => {
// Get the current request from AsyncLocalStorage
const request = requestAccessor.getStore();
if (!request) {
return undefined;
}
const { userId, groups } = request.query;
return {
userId: userId,
groups: groups ? groups.split(",") : []
};
}
};
const appConfigEndpoint = process.env.AZURE_APPCONFIG_ENDPOINT;
const { DefaultAzureCredential } = require("@azure/identity");
const { load } = require("@azure/app-configuration-provider");
const { FeatureManager, ConfigurationMapFeatureFlagProvider } = require("@microsoft/feature-management");
let appConfig;
let featureManager;
async function initializeConfig() {
// Load feature flags from App Configuration.
appConfig = await load(appConfigEndpoint, new DefaultAzureCredential(), {
featureFlagOptions: {
enabled: true,
refresh: {
enabled: true
}
}
});
// Create feature manager with feature flag provider that accesses feature flags from App Configuration and targeting context accessor.
featureManager = new FeatureManager(
    new ConfigurationMapFeatureFlagProvider(appConfig),
    {
        targetingContextAccessor: targetingContextAccessor
    });
}
// Use a middleware to refresh the configuration before each request
server.use((req, res, next) => {
appConfig.refresh();
next();
});
server.get("/", async (req, res) => {
const isBetaEnabled = await featureManager.isEnabled("Beta");
const [title, message] = isBetaEnabled
? ["Beta Page", "This is a beta page."]
: ["Home Page", "Welcome."];
res.send(
`<!DOCTYPE html>
<html>
<head><title>${title}</title></head>
<body style="display: flex; justify-content: center; align-items: center; min-height: 100vh; margin: 0;">
<h1 style="text-align: center; font-size: 5rem;">${message}</h1>
</body>
</html>`
);
});
// Initialize the configuration and start the server
initializeConfig()
.then(() => {
// Start the express server.
server.listen(port, () => {
console.log(`Server is running at http://localhost:${port}`);
});
})
实际操作中的目标筛选器
将名为 AZURE_APPCONFIG_ENDPOINT 的环境变量设置为 Azure 门户中应用商店的“概述”下找到的应用程序配置存储区的终结点。
如果使用 Windows 命令提示符,则请运行以下命令并重启命令提示符,这样更改才会生效:
setx AZURE_APPCONFIG_ENDPOINT "<endpoint-of-your-app-configuration-store>"如果使用 PowerShell,请运行以下命令:
$Env:AZURE_APPCONFIG_ENDPOINT = "<endpoint-of-your-app-configuration-store>"如果使用 macOS 或 Linux,则请运行以下命令:
export AZURE_APPCONFIG_ENDPOINT='<endpoint-of-your-app-configuration-store>'运行该应用程序。
node app.js打开浏览器并导航到
localhost:8080。 应会看到应用的默认视图。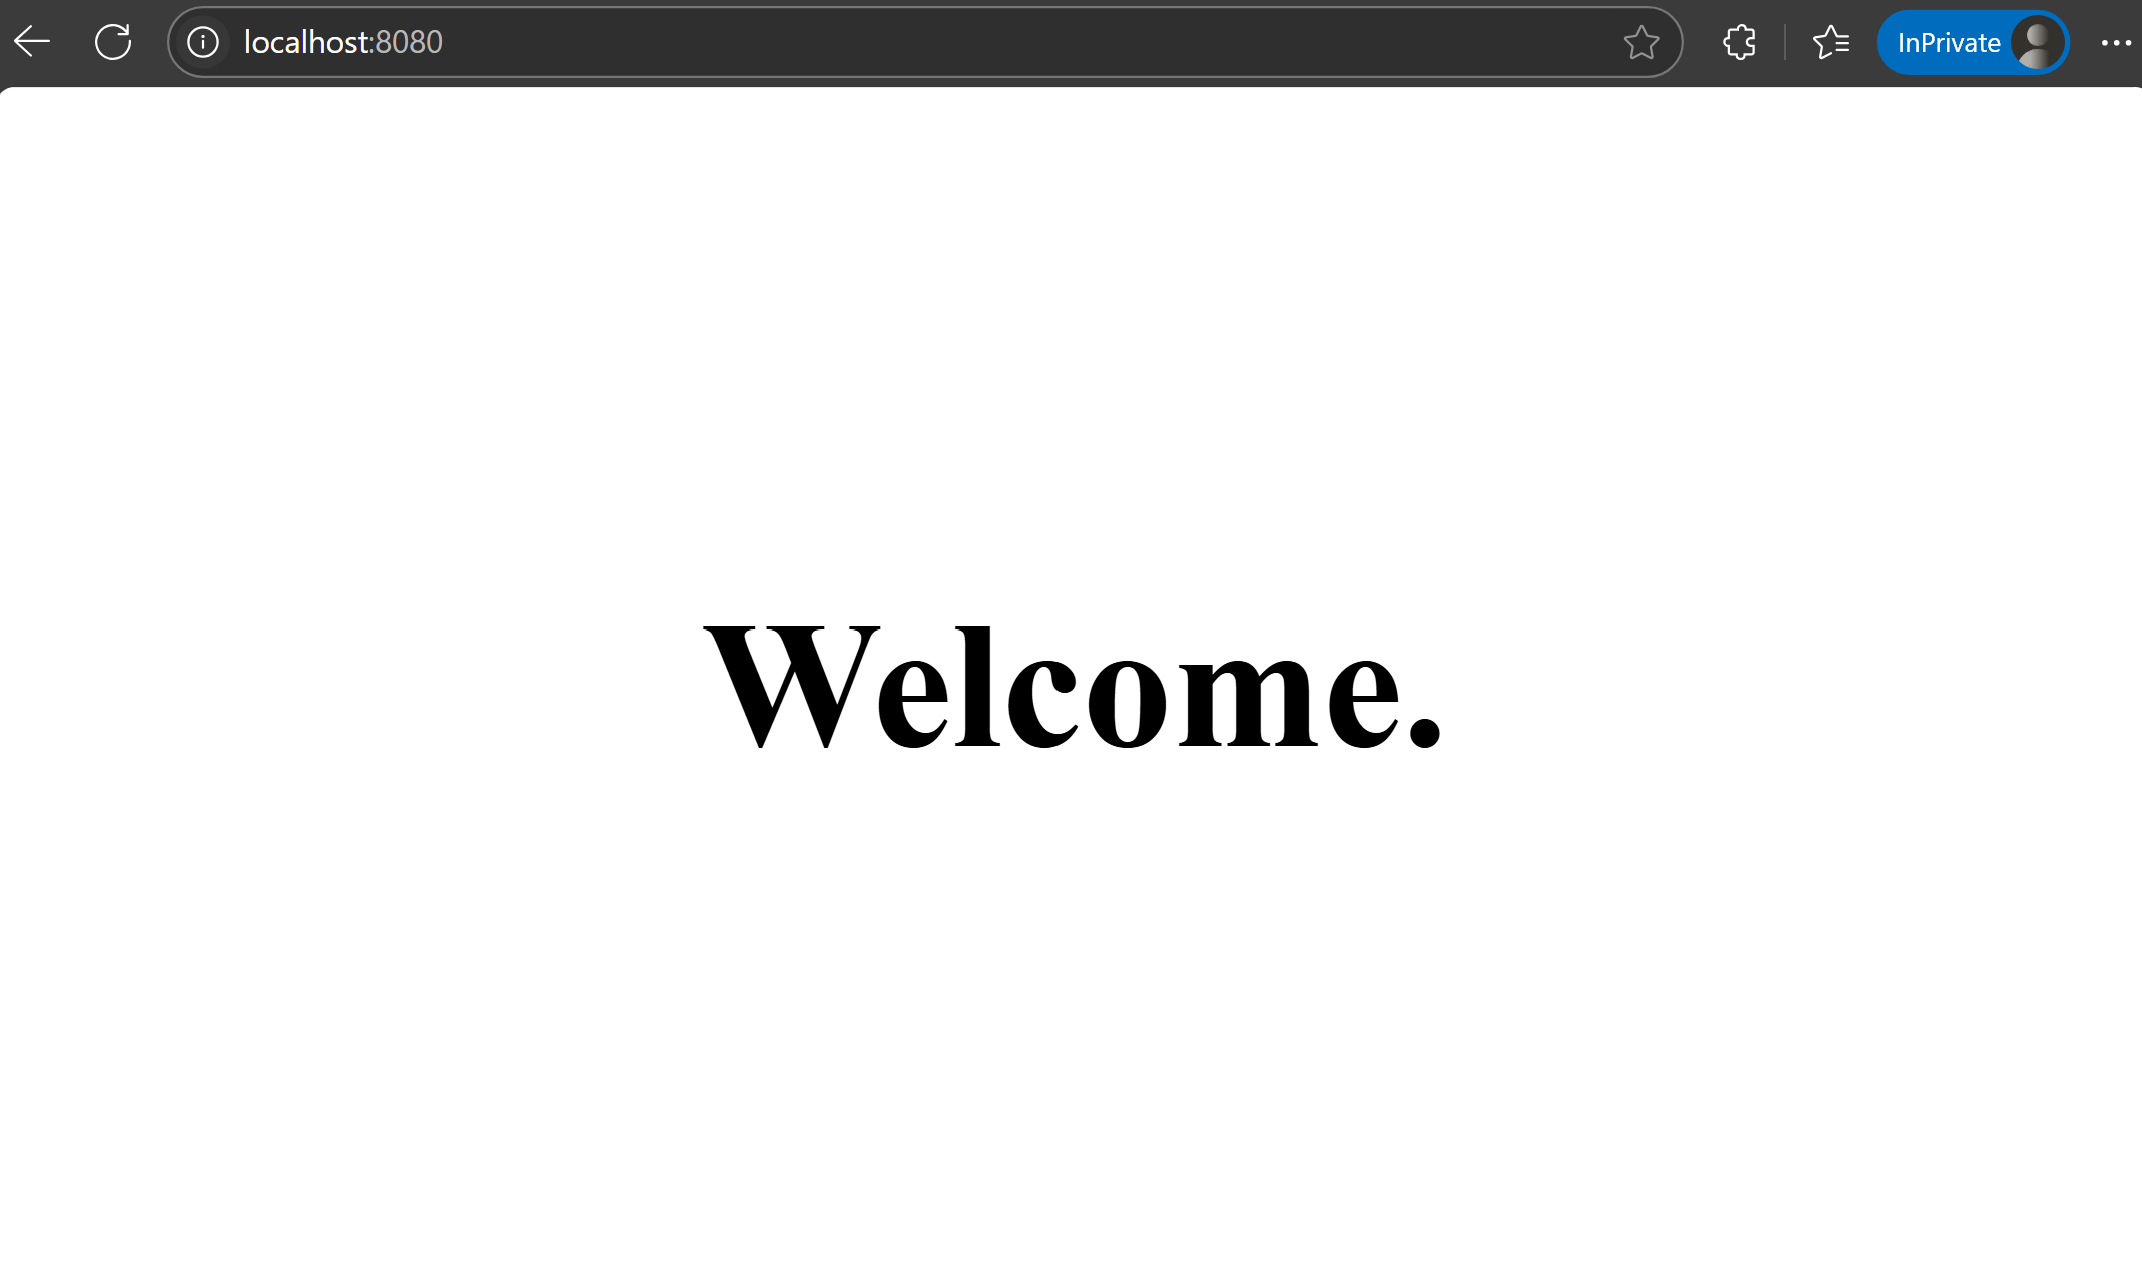
-
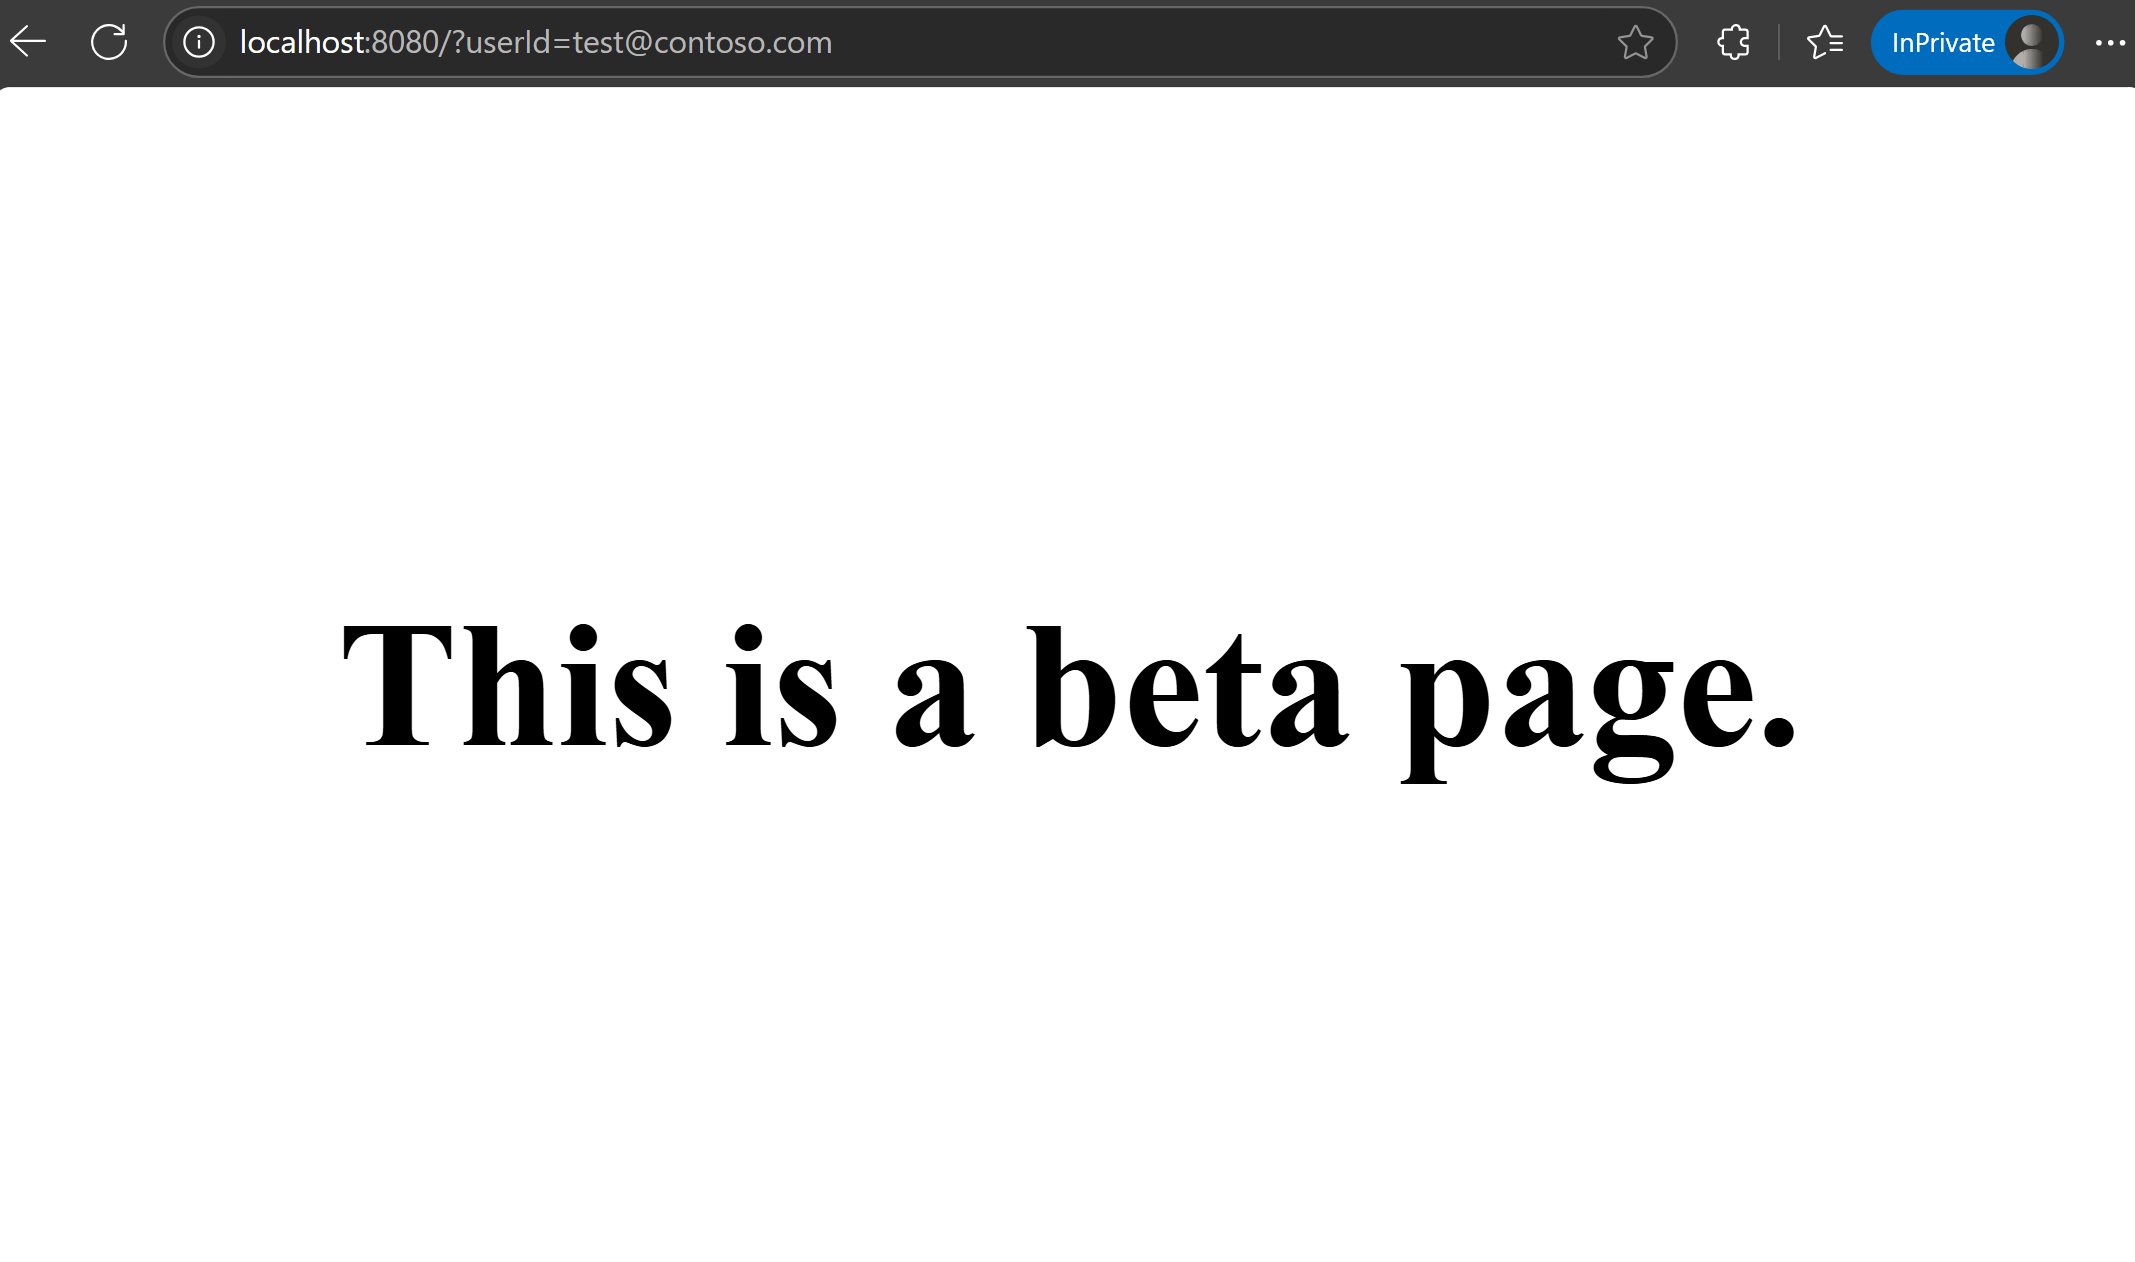
- 在
userIdURL 中添加为查询参数以指定用户 ID。 访问localhost:8080/?userId=test@contoso.com。 你会看到 beta 页,因为test@contoso.com指定为目标用户。
- 在
访问
localhost:8080/?userId=testuser@contoso.com。 无法看到 beta 页面,因为testuser@contoso.com已指定为已排除的用户。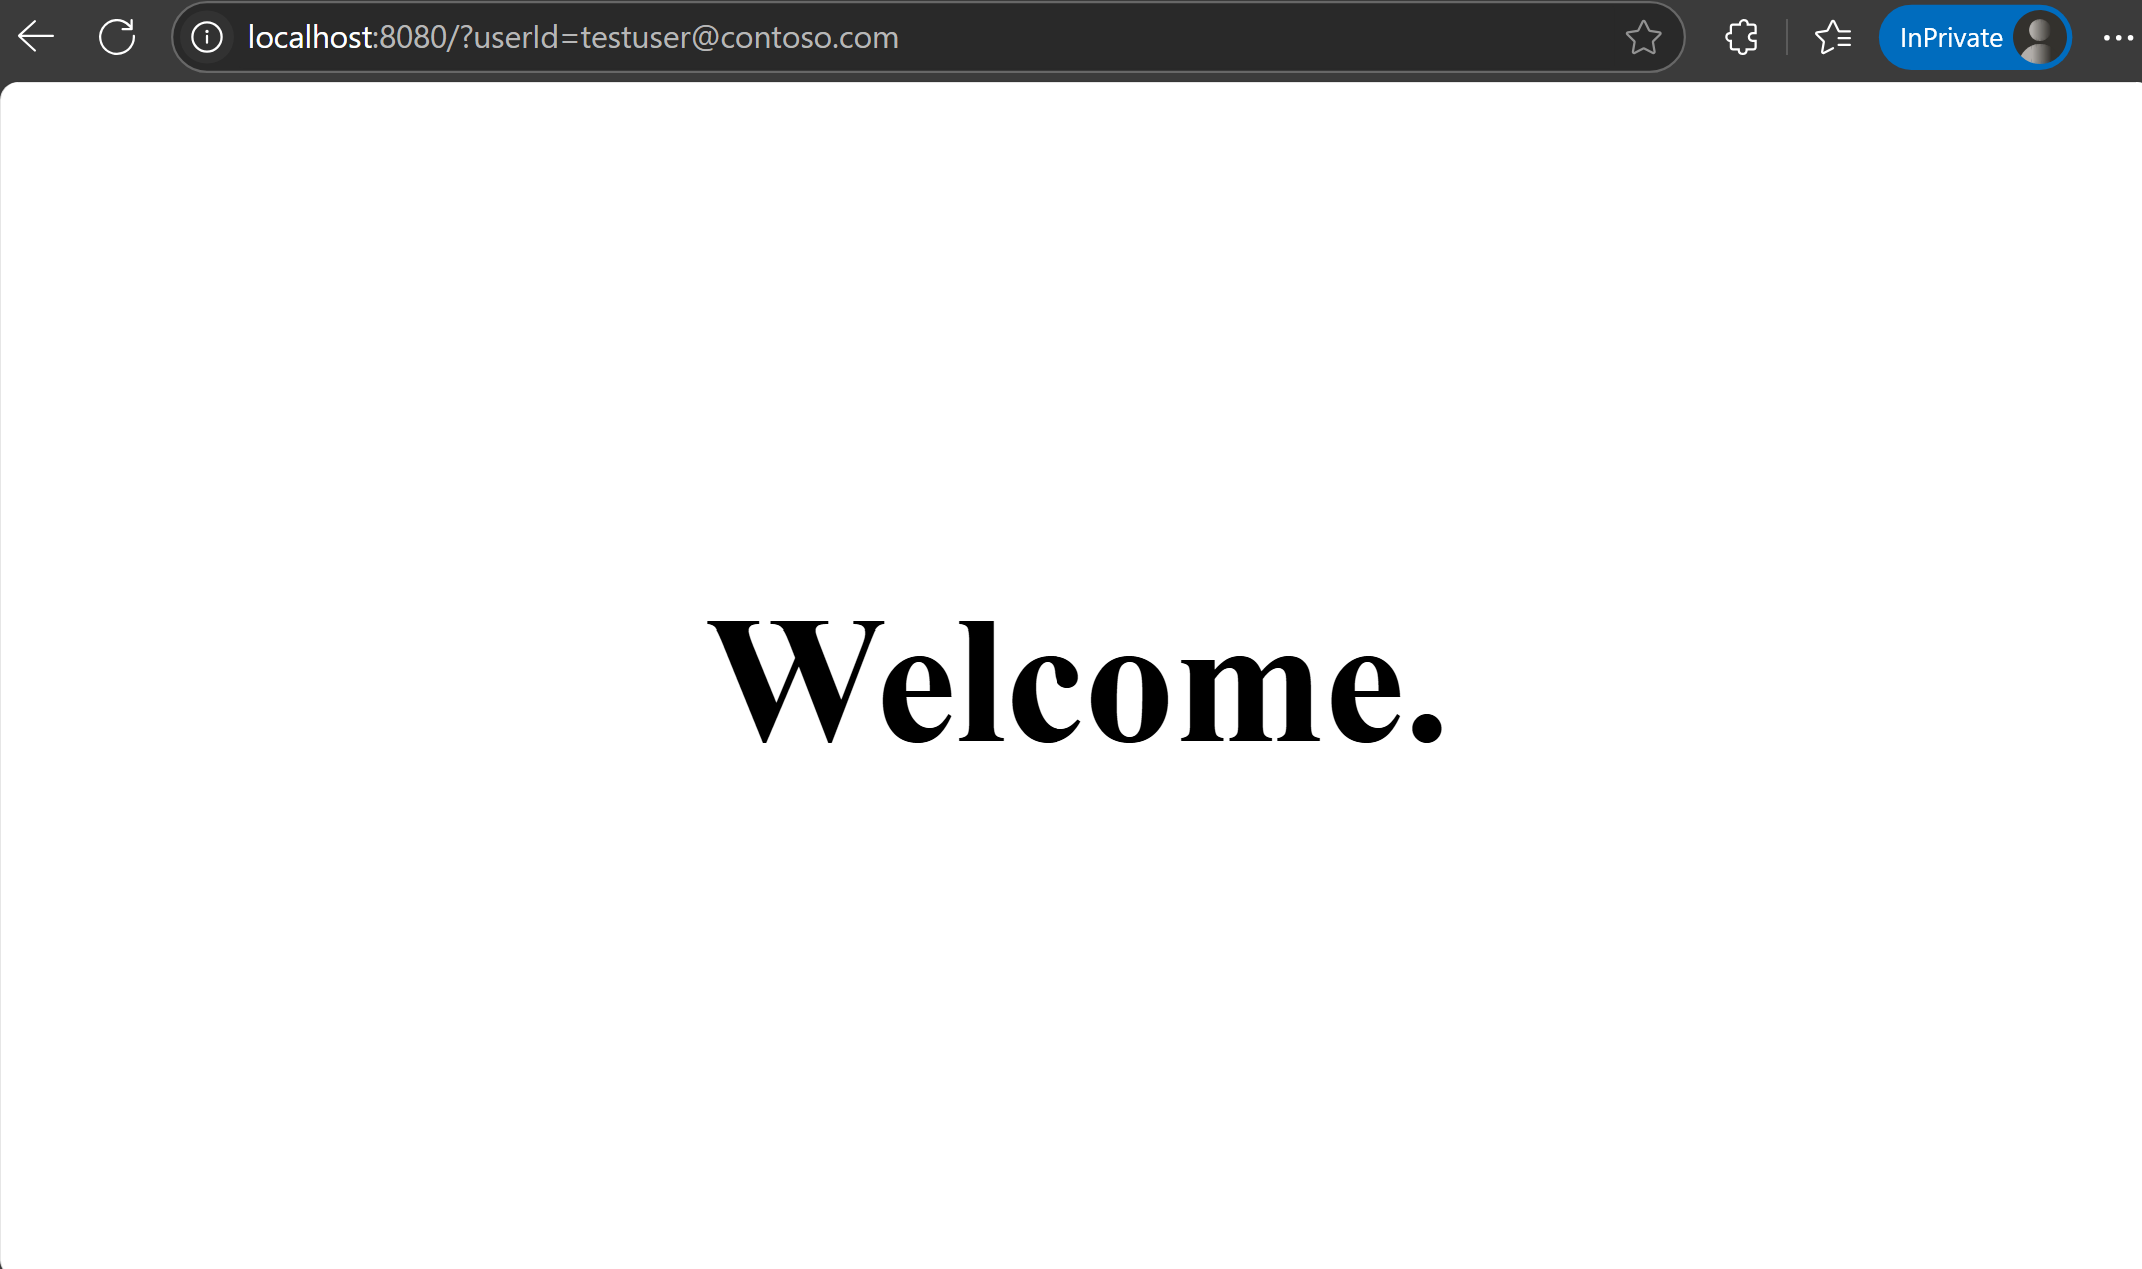
后续步骤
若要了解有关功能筛选器的详细信息,请继续学习以下文档。
有关 JavaScript 功能管理库的完整功能概要,请继续阅读以下文档。