你当前正在访问 Microsoft Azure Global Edition 技术文档网站。 如果需要访问由世纪互联运营的 Microsoft Azure 中国技术文档网站,请访问 https://docs.azure.cn。
Azure Kubernetes 服务 (AKS) 是可用于快速部署和管理群集的托管式 Kubernetes 服务。 此快速入门介绍如何:
- 使用 Azure CLI 部署 AKS 群集。
- 使用一组微服务和 Web 前端运行示例多容器应用程序,以模拟零售方案。
Note
本文包含仅出于评估目的部署具有默认设置的群集的步骤。 在部署生产就绪群集之前,建议熟悉 基线参考体系结构 ,以考虑它如何符合业务需求。
开始之前
本快速入门假设读者基本了解 Kubernetes 的概念。 有关详细信息,请参阅 Azure Kubernetes 服务 (AKS) 的 Kubernetes 核心概念。
- 如果没有 Azure 帐户,请在开始前创建一个免费帐户。
在 Azure Cloud Shell 中使用 Bash 环境。 有关详细信息,请参阅 Azure Cloud Shell 入门。
如果要在本地运行 CLI 引用命令,请安装 Azure CLI。 如果在 Windows 或 macOS 上运行,请考虑在 Docker 容器中运行 Azure CLI。 有关详细信息,请参阅如何在 Docker 容器中运行 Azure CLI。
如果使用的是本地安装,请使用 az login 命令登录到 Azure CLI。 要完成身份验证过程,请遵循终端中显示的步骤。 有关其他登录选项,请参阅 使用 Azure CLI 向 Azure 进行身份验证。
如果系统发出提示,则在首次使用时安装 Azure CLI 扩展。 有关扩展的详细信息,请参阅 使用和管理 Azure CLI 中的扩展。
运行 az version 以查找所安装的版本和依赖库。 若要升级到最新版本,请运行 az upgrade。
- 确保用于创建群集的标识具有合适的的最低权限。 有关 AKS 的访问和标识的详细信息,请参阅 Azure Kubernetes 服务 (AKS) 的访问和标识选项。
- 如果有多个 Azure 订阅,请使用 az account set 命令选择应在其中计收资源费用的相应订阅 ID。 有关详细信息,请参阅如何管理 Azure 订阅 - Azure CLI。
定义环境变量
定义以下环境变量,以便在本快速入门中使用。
export RANDOM_ID="$(openssl rand -hex 3)"
export MY_RESOURCE_GROUP_NAME="myAKSResourceGroup$RANDOM_ID"
export REGION="westus"
export MY_AKS_CLUSTER_NAME="myAKSCluster$RANDOM_ID"
export MY_DNS_LABEL="mydnslabel$RANDOM_ID"
变量RANDOM_ID的值是一个附加到资源组和群集名称中的六字符字母数字值,以确保名称唯一。 使用echo命令查看变量值,例如echo $RANDOM_ID。
创建资源组
Azure 资源组是用于部署和管理 Azure 资源的逻辑组。 创建资源组时,系统会提示你指定一个位置。 此位置是资源组元数据的存储位置,也是资源在 Azure 中运行的位置(如果你在创建资源期间未指定其他区域)。
使用 az group create 命令创建资源组。
az group create --name $MY_RESOURCE_GROUP_NAME --location $REGION
结果如以下示例所示。
{
  "id": "/subscriptions/aaaa0a0a-bb1b-cc2c-dd3d-eeeeee4e4e4e/resourceGroups/myAKSResourceGroup<randomIDValue>",
  "location": "westus",
  "managedBy": null,
  "name": "myAKSResourceGroup<randomIDValue>",
  "properties": {
    "provisioningState": "Succeeded"
  },
  "tags": null,
  "type": "Microsoft.Resources/resourceGroups"
}
创建 AKS 群集
使用 az aks create 命令创建 AKS 群集。 以下示例使用一个节点创建一个群集,并启用系统分配的托管标识。
az aks create \
  --resource-group $MY_RESOURCE_GROUP_NAME \
  --name $MY_AKS_CLUSTER_NAME \
  --node-count 1 \
  --generate-ssh-keys
Note
当你创建新群集时,AKS 会自动创建第二个资源组来存储 AKS 资源。 有关详细信息,请参阅为什么使用 AKS 创建两个资源组?
连接到群集
若要管理 Kubernetes 群集,请使用 Kubernetes 命令行客户端 kubectl。 如果使用的是 Azure Cloud Shell,则 kubectl 已安装。 若要在本地安装 kubectl,请使用 az aks install-cli 命令。
使用 az aks get-credentials 命令将
kubectl配置为连接到你的 Kubernetes 群集。 此命令将下载凭据,并将 Kubernetes CLI 配置为使用这些凭据。az aks get-credentials --resource-group $MY_RESOURCE_GROUP_NAME --name $MY_AKS_CLUSTER_NAME使用 kubectl get 命令验证与群集之间的连接。 此命令将返回群集节点的列表。
kubectl get nodes
部署应用程序
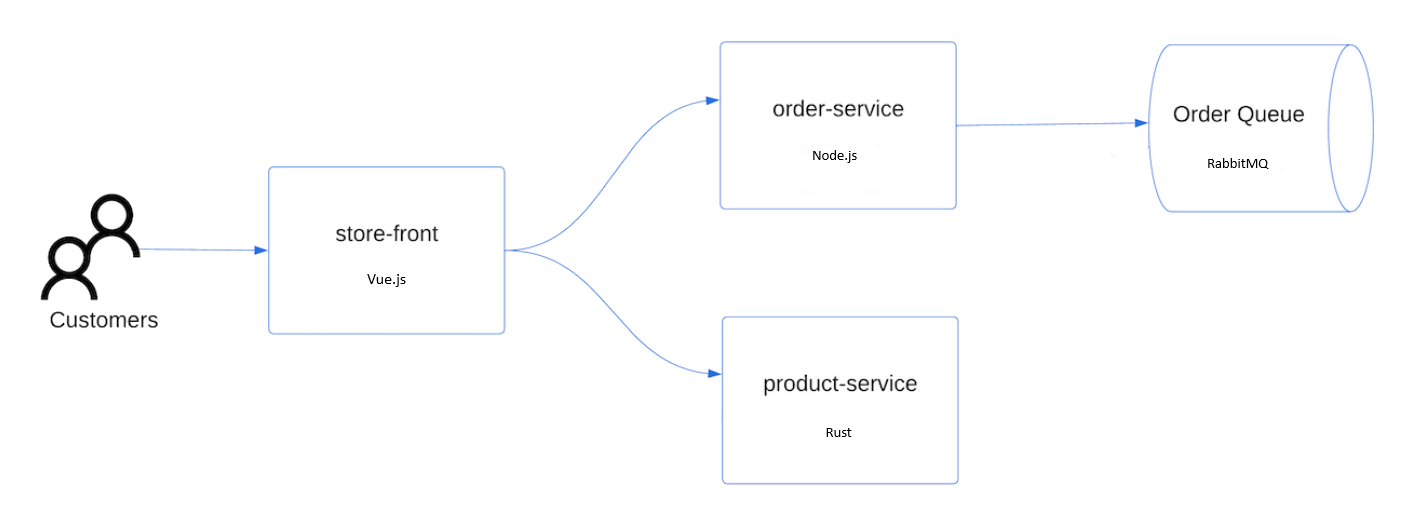
要部署该应用程序,请使用清单文件创建运行 AKS 应用商店应用程序所需的所有对象。 Kubernetes 清单文件定义群集的所需状态,例如,要运行哪些容器映像。 该清单包括以下 Kubernetes 部署和服务:
- 店面前台:供客户查看产品和下单的 Web 应用程序。
- 产品服务:显示产品信息。
- 订单服务:下订单。
RabbitMQ:订单队列的消息队列。
Note
建议不要运行有状态容器,例如 RabbitMQ,在没有用于生产环境的持久性存储的情况下。 为了简单起见,我们建议使用托管服务,例如 Azure CosmosDB 或 Azure 服务总线。
创建名为 aks-store-quickstart.yaml 的文件,并在以下清单中复制。
apiVersion: apps/v1
kind: StatefulSet
metadata:
  name: rabbitmq
spec:
  serviceName: rabbitmq
  replicas: 1
  selector:
    matchLabels:
      app: rabbitmq
  template:
    metadata:
      labels:
        app: rabbitmq
    spec:
      nodeSelector:
        "kubernetes.io/os": linux
      containers:
      - name: rabbitmq
        image: mcr.microsoft.com/mirror/docker/library/rabbitmq:3.10-management-alpine
        ports:
        - containerPort: 5672
          name: rabbitmq-amqp
        - containerPort: 15672
          name: rabbitmq-http
        env:
        - name: RABBITMQ_DEFAULT_USER
          value: "username"
        - name: RABBITMQ_DEFAULT_PASS
          value: "password"
        resources:
          requests:
            cpu: 10m
            memory: 128Mi
          limits:
            cpu: 250m
            memory: 256Mi
        volumeMounts:
        - name: rabbitmq-enabled-plugins
          mountPath: /etc/rabbitmq/enabled_plugins
          subPath: enabled_plugins
      volumes:
      - name: rabbitmq-enabled-plugins
        configMap:
          name: rabbitmq-enabled-plugins
          items:
          - key: rabbitmq_enabled_plugins
            path: enabled_plugins
---
apiVersion: v1
data:
  rabbitmq_enabled_plugins: |
    [rabbitmq_management,rabbitmq_prometheus,rabbitmq_amqp1_0].
kind: ConfigMap
metadata:
  name: rabbitmq-enabled-plugins
---
apiVersion: v1
kind: Service
metadata:
  name: rabbitmq
spec:
  selector:
    app: rabbitmq
  ports:
    - name: rabbitmq-amqp
      port: 5672
      targetPort: 5672
    - name: rabbitmq-http
      port: 15672
      targetPort: 15672
  type: ClusterIP
---
apiVersion: apps/v1
kind: Deployment
metadata:
  name: order-service
spec:
  replicas: 1
  selector:
    matchLabels:
      app: order-service
  template:
    metadata:
      labels:
        app: order-service
    spec:
      nodeSelector:
        "kubernetes.io/os": linux
      containers:
      - name: order-service
        image: ghcr.io/azure-samples/aks-store-demo/order-service:latest
        ports:
        - containerPort: 3000
        env:
        - name: ORDER_QUEUE_HOSTNAME
          value: "rabbitmq"
        - name: ORDER_QUEUE_PORT
          value: "5672"
        - name: ORDER_QUEUE_USERNAME
          value: "username"
        - name: ORDER_QUEUE_PASSWORD
          value: "password"
        - name: ORDER_QUEUE_NAME
          value: "orders"
        - name: FASTIFY_ADDRESS
          value: "0.0.0.0"
        resources:
          requests:
            cpu: 1m
            memory: 50Mi
          limits:
            cpu: 75m
            memory: 128Mi
        startupProbe:
          httpGet:
            path: /health
            port: 3000
          failureThreshold: 5
          initialDelaySeconds: 20
          periodSeconds: 10
        readinessProbe:
          httpGet:
            path: /health
            port: 3000
          failureThreshold: 3
          initialDelaySeconds: 3
          periodSeconds: 5
        livenessProbe:
          httpGet:
            path: /health
            port: 3000
          failureThreshold: 5
          initialDelaySeconds: 3
          periodSeconds: 3
      initContainers:
      - name: wait-for-rabbitmq
        image: busybox
        command: ['sh', '-c', 'until nc -zv rabbitmq 5672; do echo waiting for rabbitmq; sleep 2; done;']
        resources:
          requests:
            cpu: 1m
            memory: 50Mi
          limits:
            cpu: 75m
            memory: 128Mi
---
apiVersion: v1
kind: Service
metadata:
  name: order-service
spec:
  type: ClusterIP
  ports:
  - name: http
    port: 3000
    targetPort: 3000
  selector:
    app: order-service
---
apiVersion: apps/v1
kind: Deployment
metadata:
  name: product-service
spec:
  replicas: 1
  selector:
    matchLabels:
      app: product-service
  template:
    metadata:
      labels:
        app: product-service
    spec:
      nodeSelector:
        "kubernetes.io/os": linux
      containers:
      - name: product-service
        image: ghcr.io/azure-samples/aks-store-demo/product-service:latest
        ports:
        - containerPort: 3002
        env:
        - name: AI_SERVICE_URL
          value: "http://ai-service:5001/"
        resources:
          requests:
            cpu: 1m
            memory: 1Mi
          limits:
            cpu: 2m
            memory: 20Mi
        readinessProbe:
          httpGet:
            path: /health
            port: 3002
          failureThreshold: 3
          initialDelaySeconds: 3
          periodSeconds: 5
        livenessProbe:
          httpGet:
            path: /health
            port: 3002
          failureThreshold: 5
          initialDelaySeconds: 3
          periodSeconds: 3
---
apiVersion: v1
kind: Service
metadata:
  name: product-service
spec:
  type: ClusterIP
  ports:
  - name: http
    port: 3002
    targetPort: 3002
  selector:
    app: product-service
---
apiVersion: apps/v1
kind: Deployment
metadata:
  name: store-front
spec:
  replicas: 1
  selector:
    matchLabels:
      app: store-front
  template:
    metadata:
      labels:
        app: store-front
    spec:
      nodeSelector:
        "kubernetes.io/os": linux
      containers:
      - name: store-front
        image: ghcr.io/azure-samples/aks-store-demo/store-front:latest
        ports:
        - containerPort: 8080
          name: store-front
        env:
        - name: VUE_APP_ORDER_SERVICE_URL
          value: "http://order-service:3000/"
        - name: VUE_APP_PRODUCT_SERVICE_URL
          value: "http://product-service:3002/"
        resources:
          requests:
            cpu: 1m
            memory: 200Mi
          limits:
            cpu: 1000m
            memory: 512Mi
        startupProbe:
          httpGet:
            path: /health
            port: 8080
          failureThreshold: 3
          initialDelaySeconds: 5
          periodSeconds: 5
        readinessProbe:
          httpGet:
            path: /health
            port: 8080
          failureThreshold: 3
          initialDelaySeconds: 3
          periodSeconds: 3
        livenessProbe:
          httpGet:
            path: /health
            port: 8080
          failureThreshold: 5
          initialDelaySeconds: 3
          periodSeconds: 3
---
apiVersion: v1
kind: Service
metadata:
  name: store-front
spec:
  ports:
  - port: 80
    targetPort: 8080
  selector:
    app: store-front
  type: LoadBalancer
有关 YAML 清单文件的明细,请参阅部署和 YAML 清单。
如果在本地创建并保存 YAML 文件,则可以通过选择 “上传/下载文件 ”按钮并从本地文件系统中选择文件,将清单文件上传到 Cloud Shell 中的默认目录。
使用 kubectl apply 命令部署应用程序,并指定 YAML 清单的名称。
kubectl apply -f aks-store-quickstart.yaml
测试应用程序
可以通过访问公共 IP 地址或应用程序 URL 来验证应用程序是否正在运行。
使用以下命令来获取应用程序 URL:
runtime="5 minutes"
endtime=$(date -ud "$runtime" +%s)
while [[ $(date -u +%s) -le $endtime ]]
do
   STATUS=$(kubectl get pods -l app=store-front -o 'jsonpath={..status.conditions[?(@.type=="Ready")].status}')
   echo $STATUS
   if [ "$STATUS" == 'True' ]
   then
      export IP_ADDRESS=$(kubectl get service store-front --output 'jsonpath={..status.loadBalancer.ingress[0].ip}')
      echo "Service IP Address: $IP_ADDRESS"
      break
   else
      sleep 10
   fi
done
curl $IP_ADDRESS
Results:
<!doctype html>
<html lang="">
   <head>
      <meta charset="utf-8">
      <meta http-equiv="X-UA-Compatible" content="IE=edge">
      <meta name="viewport" content="width=device-width,initial-scale=1">
      <link rel="icon" href="/favicon.ico">
      <title>store-front</title>
      <script defer="defer" src="/js/chunk-vendors.df69ae47.js"></script>
      <script defer="defer" src="/js/app.7e8cfbb2.js"></script>
      <link href="/css/app.a5dc49f6.css" rel="stylesheet">
   </head>
   <body>
      <div id="app"></div>
   </body>
</html>
echo "You can now visit your web server at $IP_ADDRESS"
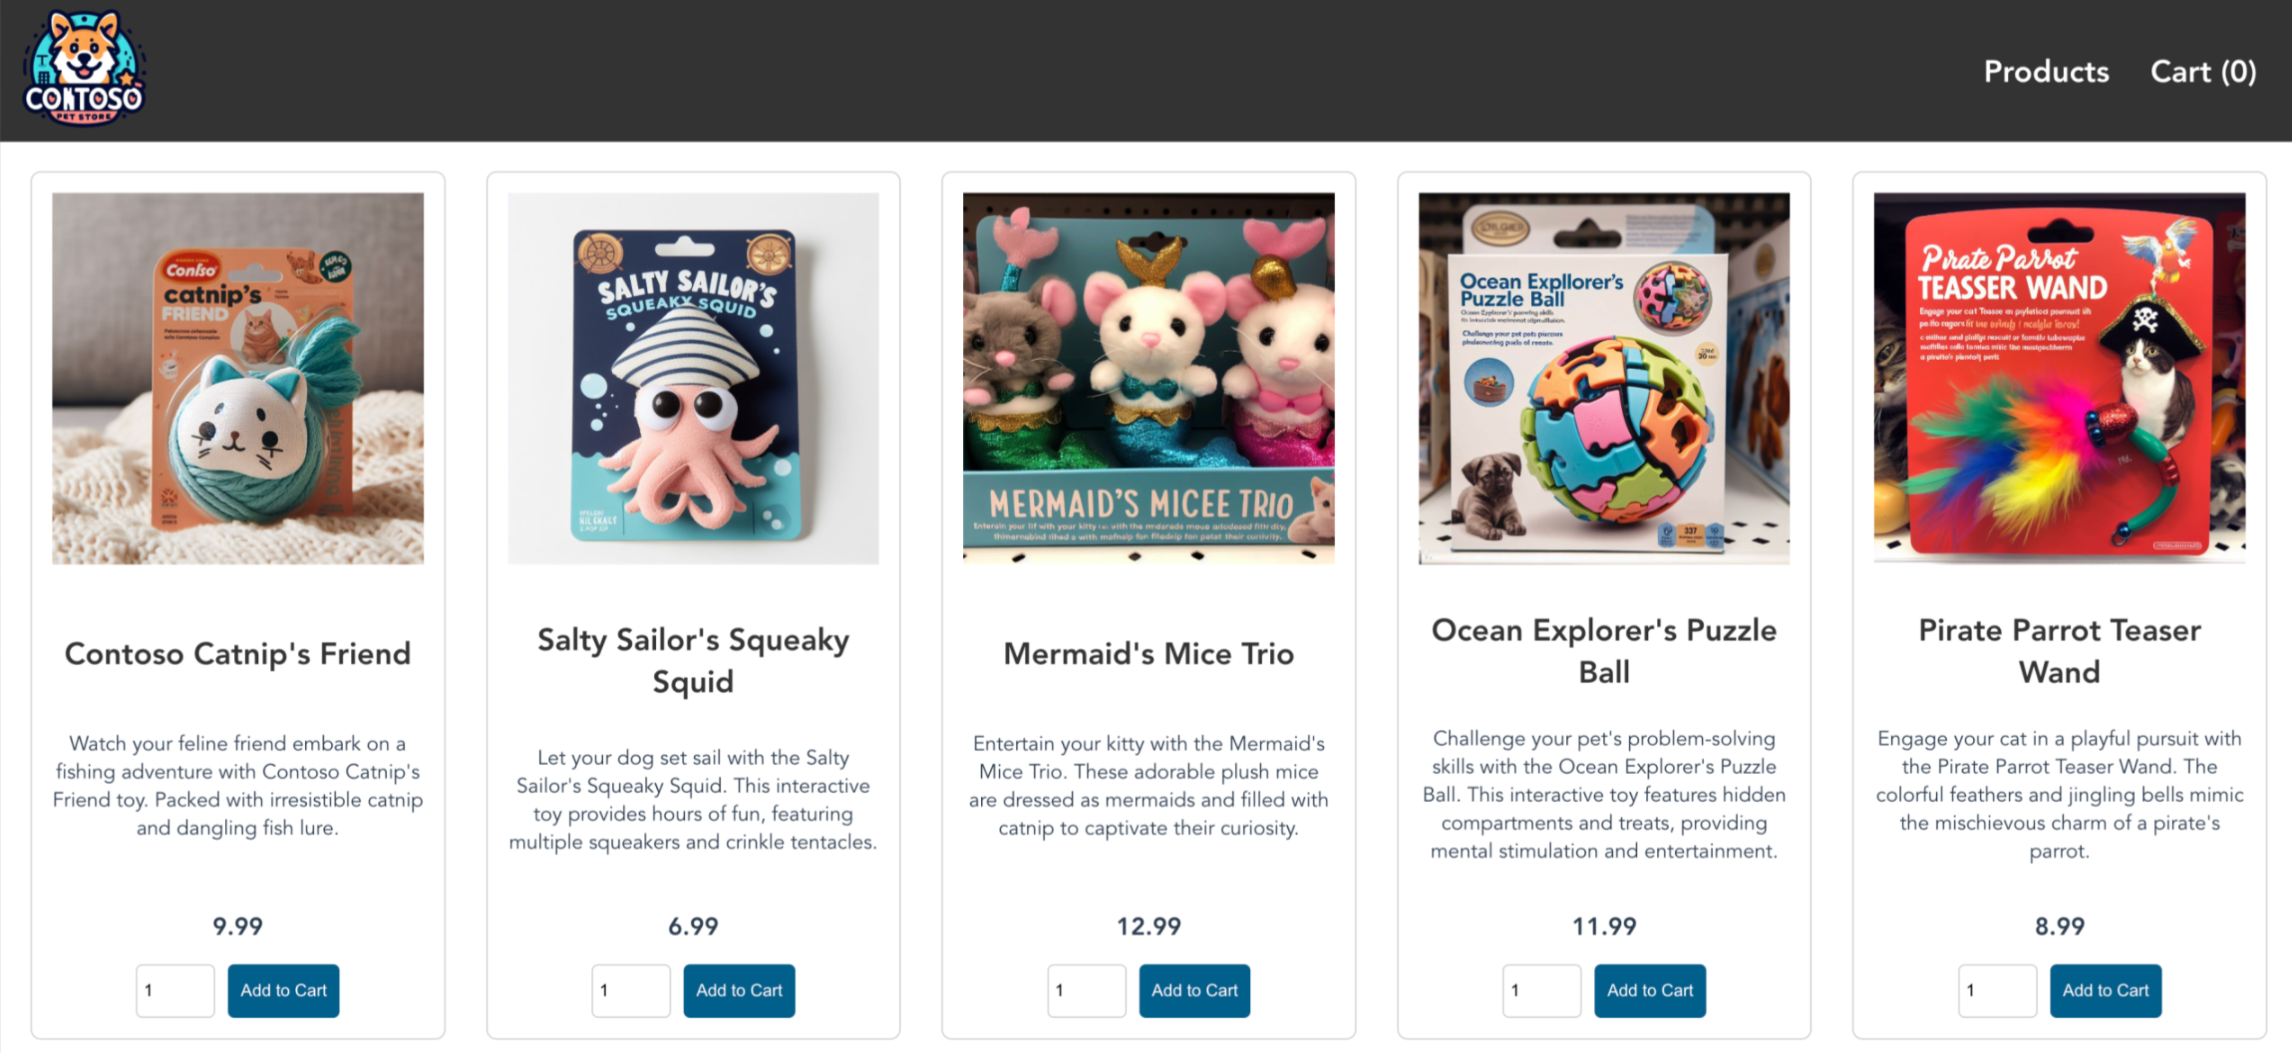
若要查看应用程序网站,请打开浏览器并输入 IP 地址。 页面如以下示例所示。
删除群集
如果不打算完成 AKS 教程,请清理不必要的资源以避免 Azure 计费费用。 可以使用 az group delete 命令删除资源组、容器服务和所有相关资源。
az group delete --name $MY_RESOURCE_GROUP_NAME
AKS 群集是使用系统分配的托管标识创建的,这是本快速入门中使用的默认标识选项。 平台将负责管理此标识,因此你无需手动删除它。
Next steps
在本快速入门中,你部署了一个 Kubernetes 群集,然后在其中部署了示例多容器应用程序。 此示例应用程序仅用于演示目的,并未展示出 Kubernetes 应用程序的所有最佳做法。 有关如何使用 AKS 创建完整解决方案以供生产的指导,请参阅 AKS 解决方案指南。
若要详细了解 AKS 并执行完整的代码到部署示例,请继续学习 Kubernetes 群集教程。


