Примечание
Для доступа к этой странице требуется авторизация. Вы можете попробовать войти или изменить каталоги.
Для доступа к этой странице требуется авторизация. Вы можете попробовать изменить каталоги.
Из этой статьи вы узнаете, как использовать кэш Redis Azure с языком Python и подключиться с помощью идентификатора Microsoft Entra.
Предпосылки
- Подписка Azure — создайте бесплатную учетную запись.
- Установка языковой среды Python 3.7+
- Добавьте эти импорты в ваш проект и в вашу среду разработки
-
redis— Клиент Redis Python -
redis-entraid— расширение аутентификации Redis Microsoft Entra ID -
azure-identity— библиотека проверки подлинности Azure
-
Создайте управляемый экземпляр Redis в Azure
Сначала создайте кэш. Кэш можно создать с помощью Azure Managed Redis или Azure Cache для Redis через портал Azure. В этом кратком руководстве мы используем Управляемый Redis Azure.
При создании кэша идентификатор Microsoft Entra включен по умолчанию, что делает его безопасным с самого начала. Ваш кэш также должен использовать общедоступную конечную точку для этого быстрого старта.
Чтобы создать кэш с помощью портала, выполните одну из следующих процедур:
При необходимости можно создать кэш с помощью Azure CLI, PowerShell, независимо от того, что вы предпочитаете.
Код для подключения к кэшу Redis
В первой части примера кода задайте подключение к кэшу.
- Порты для управляемых redis и корпоративных кэшей Azure: 10000
- Порты для экземпляров кэша Azure для Redis: 6380
import redis
from azure.identity import DefaultAzureCredential
from redis_entraid.cred_provider import create_from_default_azure_credential

# Connection details for your cache
# Get the connection details for the Redis instance
redis_host = "contosob116.westus3.redis.azure.net"
redis_port = 10000  #For an Azure

print("🚀 Starting Azure Redis Cache connection test...")
print(f"📡 Connecting to: {redis_host}:{redis_port}")

# Validate configuration
if not redis_host or not redis_port:
    print("❌ Error: Redis host and port must be configured")
    exit(1)

print()  # Add a new line

try:
    # Create credential provider using DefaultAzureCredential for Azure Entra ID authentication
    credential_provider = create_from_default_azure_credential(
         ("https://redis.azure.com/.default",),)

    # Create a Redis client with Azure Entra ID authentication
    r = redis.Redis(host=redis_host,
                    port=redis_port,
                    ssl=True,
                    decode_responses=True,
                    credential_provider=credential_provider,
                    socket_timeout=10,
                    socket_connect_timeout=10
                    )
Код для проверки подключения
В следующем разделе проверьте подключение с помощью команды ping Redis, возвращающей True значение.
# Ping the Redis server to test the connection
result = r.ping()
if result:
    print("Ping returned: ", result)
Набор кода ключа, получение ключа
В этом разделе используйте базовую set и get последовательность, чтобы начать использование кэша Redis самым простым способом начала работы.
    # Create a simple set and get operation
    result = r.set("Message", "Hello, The cache is working with Python!")
    print("✅ SET Message succeeded: " + str(result))
    print()  # Add a new line

    value = r.get("Message")

    if value is not None:
        print("✅ GET Message returned : " + str(value))
        print()  # Add a new line
    else:
        print("⚠️  GET Message returned None")
        print()  # Add a new line

    print("🎉 All Redis operations completed successfully!")
    print()  # Add a new line
Прежде чем запустить этот код, необходимо добавить себя в кэш в качестве пользователя Redis.
Необходимо также авторизовать подключение к Azure из командной строки с помощью командной строки Azure или командной строки разработчика Azure (azd).
Вы также должны добавить пользователей или системную учетную запись в кэш. Добавьте всех, кто может запустить программу как пользователя в кэше Redis.
Результат выглядит следующим образом:
C:\utils\python-quickstart>python quickstart-amr.py
🚀 Starting Azure Redis Cache connection test...
📡 Connecting to: contosob116.westus3.redis.azure.net:10000

✅ Ping returned : True

✅ SET Message succeeded: True

✅ GET Message returned : Hello, The cache is working with Python!

🎉 All Redis operations completed successfully!

🔐 Redis connection closed
Здесь вы можете увидеть этот пример кода в полном объеме. Код содержит некоторые проверки ошибок, пропущенные из более ранних объяснений кода для простоты. Последний шаг закрывает подключение к кэшу.
# Python Quickstart using Azure Entra ID authentication
# Azure Managed Redis cache that you created using the Azure portal, or CLI
# This script demonstrates secure connection using Microsoft Entra ID authentication
# This script demonstrates secure connection using the default Azure credential provider
# You should be a user on the cache and logged in to Azure CLI with the same account using `az login`

import redis
from azure.identity import DefaultAzureCredential
from redis_entraid.cred_provider import create_from_default_azure_credential

# Connection details for your cache
# Get the connection details for the Redis instance
redis_host = "<host-url>"  # Replace with your cache info
redis_port = <port number>  # Replace with your cache info

print("🚀 Starting Azure Redis Cache connection test...")
print(f"📡 Connecting to: {redis_host}:{redis_port}")

# Validate configuration
if not redis_host or not redis_port:
    print("❌ Error: Redis host and port must be configured")
    exit(1)

print()  # Add a new line

try:
    # Create credential provider using DefaultAzureCredential for Azure Entra ID authentication
    credential_provider = create_from_default_azure_credential(
         ("https://redis.azure.com/.default",),)

    # Create a Redis client with Azure Entra ID authentication
    r = redis.Redis(host=redis_host,
                    port=redis_port,
                    ssl=True,
                    decode_responses=True,
                    credential_provider=credential_provider,
                    socket_timeout=10,
                    socket_connect_timeout=10
                    )

    # Test connection
    result = r.ping()
    print("✅ Ping returned : " + str(result))
    print()  # Add a new line

    # Create a simple set and get operation
    result = r.set("Message", "Hello, The cache is working with Python!")
    print("✅ SET Message succeeded: " + str(result))
    print()  # Add a new line

    value = r.get("Message")

    if value is not None:
        print("✅ GET Message returned : " + str(value))
        print()  # Add a new line
    else:
        print("⚠️  GET Message returned None")
        print()  # Add a new line

    print("🎉 All Redis operations completed successfully!")
    print()  # Add a new line

except redis.ConnectionError as e:
    print(f"❌ Connection error: {e}")
    print("💡 Check if Redis host and port are correct, and ensure network connectivity")
    print()  # Add a new line
except redis.AuthenticationError as e:
    print(f"❌ Authentication error: {e}")
    print("💡 Check if Azure Entra ID authentication is properly configured")
    print()  # Add a new line
except redis.TimeoutError as e:
    print(f"❌ Timeout error: {e}")
    print("💡 Check network latency and Redis server performance")
    print()  # Add a new line
except Exception as e:
    print(f"❌ Unexpected error: {e}")
    if "999" in str(e):
        print("💡 Error 999 typically indicates a network connectivity issue or firewall restriction")
        print("   - Verify the Redis hostname is correct")
        print("   - Verify that you have logged in with Az CLI")
        print("   - Ensure the Redis cache is running and accessible")
    print()  # Add a new line
finally:
    # Clean up connection if it exists
    if 'r' in locals():
        try:
            r.close()
            print("🔐 Redis connection closed")
        except Exception as e:
            print(f"❌ Error closing connection: {e}")
Очистите ресурсы
Если вы хотите продолжить использовать ресурсы, созданные в этой статье, сохраните группу ресурсов.
В противном случае, если вы закончите работу с ресурсами, можно удалить созданную группу ресурсов Azure, чтобы избежать расходов.
Это важно
Удаление группы ресурсов — процесс необратимый. Группа ресурсов и все содержащиеся в ней ресурсы удаляются без возможности восстановления. Будьте внимательны, чтобы случайно не удалить не ту группу ресурсов или не те ресурсы. Если вы создали ресурсы внутри существующей группы ресурсов, содержащей ресурсы, которые необходимо сохранить, можно удалить каждый ресурс по отдельности, а не удалить группу ресурсов.
Удаление группы ресурсов
Войдите на портал Azure и выберите группы ресурсов.
Выберите группу ресурсов, которую вы хотите удалить.
Если существует множество групп ресурсов, используйте фильтр для любого поля... введите имя группы ресурсов, созданной для этой статьи. Выберите группу ресурсов в списке результатов.
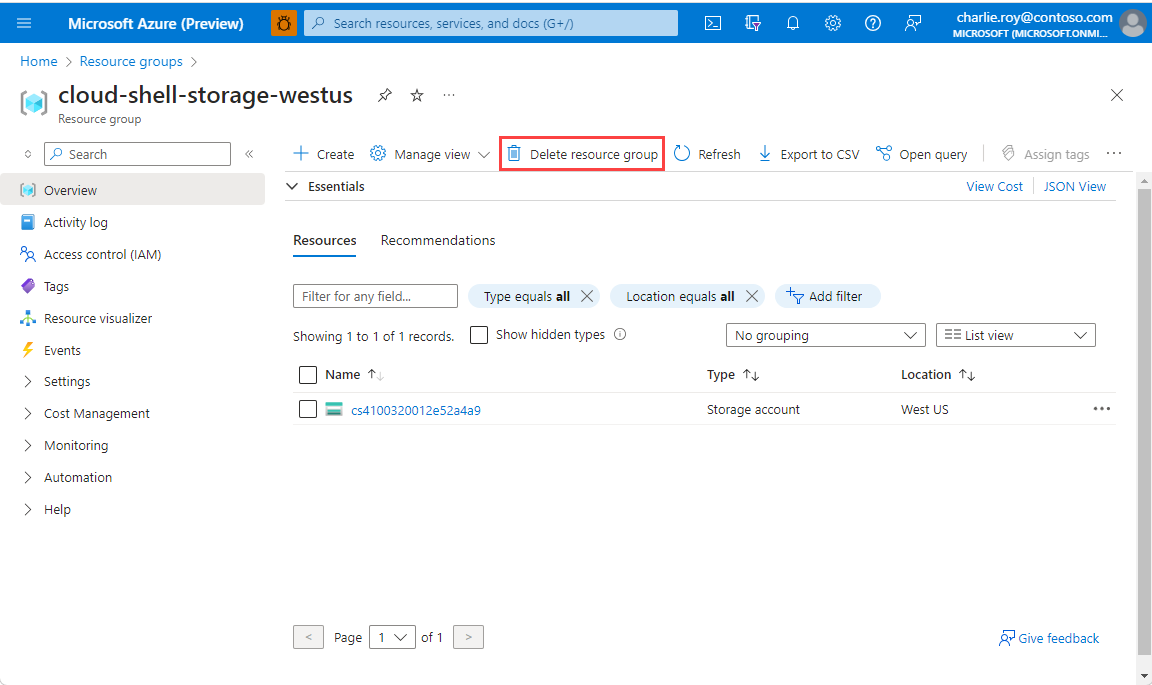
Выберите команду Удалить группу ресурсов.
Вам предлагается подтвердить удаление группы ресурсов. Введите имя группы ресурсов, которую необходимо удалить, и щелкните Удалить.

Через некоторое время группа ресурсов и все ее ресурсы будут удалены.