Notitie
Voor toegang tot deze pagina is autorisatie vereist. U kunt proberen u aan te melden of de directory te wijzigen.
Voor toegang tot deze pagina is autorisatie vereist. U kunt proberen de mappen te wijzigen.
In dit artikel leert u hoe u een Azure Redis-cache gebruikt met de Python-taal en verbinding maakt met behulp van Microsoft Entra-id.
Vereiste voorwaarden
- Azure-abonnement: u kunt een gratis abonnement nemen
- Python 3.7+ taalomgeving installeren
- Voeg deze importbewerkingen toe aan uw project en aan uw ontwikkelomgeving
-
redis- De Redis Python-client -
redis-entraid- Redis Microsoft Entra ID-verificatieextensie -
azure-identity- Azure-verificatiebibliotheek
-
Een Azure Managed Redis-exemplaar maken
Maak eerst een cache. U kunt een cache maken met behulp van Azure Managed Redis of Azure Cache voor Redis met behulp van Azure Portal. In deze quickstart gebruiken we Azure Managed Redis.
Wanneer u de cache maakt, wordt Microsoft Entra-id standaard ingeschakeld, zodat deze vanaf het begin veilig is. Uw cache moet ook een openbaar eindpunt gebruiken voor deze quickstart.
Volg een van de volgende procedures om een cache te maken met de portal:
U kunt desgewenst een cache maken met behulp van Azure CLI, PowerShell, afhankelijk van wat u wilt.
Code om verbinding te maken met een Redis-cache
Stel in het eerste deel van het codevoorbeeld de verbinding met de cache in.
- Poorten voor Azure Managed Redis- en Enterprise-caches: 10000
- Poorten voor Azure Cache voor Redis-exemplaren: 6380
import redis
from azure.identity import DefaultAzureCredential
from redis_entraid.cred_provider import create_from_default_azure_credential

# Connection details for your cache
# Get the connection details for the Redis instance
redis_host = "contosob116.westus3.redis.azure.net"
redis_port = 10000  #For an Azure

print("🚀 Starting Azure Redis Cache connection test...")
print(f"📡 Connecting to: {redis_host}:{redis_port}")

# Validate configuration
if not redis_host or not redis_port:
    print("❌ Error: Redis host and port must be configured")
    exit(1)

print()  # Add a new line

try:
    # Create credential provider using DefaultAzureCredential for Azure Entra ID authentication
    credential_provider = create_from_default_azure_credential(
         ("https://redis.azure.com/.default",),)

    # Create a Redis client with Azure Entra ID authentication
    r = redis.Redis(host=redis_host,
                    port=redis_port,
                    ssl=True,
                    decode_responses=True,
                    credential_provider=credential_provider,
                    socket_timeout=10,
                    socket_connect_timeout=10
                    )
Code voor het testen van een verbinding
Test in de volgende sectie de verbinding met behulp van de Redis-opdracht ping die de True waarde retourneert.
# Ping the Redis server to test the connection
result = r.ping()
if result:
    print("Ping returned: ", result)
Codeer een sleutel instellen, een sleutel verkrijgen
In deze sectie gebruikt u een basis set - en get volgorde om de Redis-cache te gebruiken op de eenvoudigste manier om aan de slag te gaan.
    # Create a simple set and get operation
    result = r.set("Message", "Hello, The cache is working with Python!")
    print("✅ SET Message succeeded: " + str(result))
    print()  # Add a new line

    value = r.get("Message")

    if value is not None:
        print("✅ GET Message returned : " + str(value))
        print()  # Add a new line
    else:
        print("⚠️  GET Message returned None")
        print()  # Add a new line

    print("🎉 All Redis operations completed successfully!")
    print()  # Add a new line
Voordat u deze code kunt uitvoeren, moet u uzelf als Redis-gebruiker toevoegen aan de cache.
U moet ook uw verbinding met Azure vanaf de opdrachtregel autoriseren met behulp van de Azure-opdrachtregel of de Azure Developer-opdrachtregel (azd).
U moet ook gebruikers of een systeemprincipaal toevoegen aan uw cache. Voeg iedereen toe die het programma kan uitvoeren als gebruiker in de Redis-cache.
Het resultaat ziet er als volgt uit:
C:\utils\python-quickstart>python quickstart-amr.py
🚀 Starting Azure Redis Cache connection test...
📡 Connecting to: contosob116.westus3.redis.azure.net:10000

✅ Ping returned : True

✅ SET Message succeeded: True

✅ GET Message returned : Hello, The cache is working with Python!

🎉 All Redis operations completed successfully!

🔐 Redis connection closed
Hier ziet u dit codevoorbeeld in zijn geheel. De code bevat een foutcontrole die is weggelaten uit de eerdere code-uitleg om het eenvoudig te maken. De laatste stap is het sluiten van de verbinding met de cache.
# Python Quickstart using Azure Entra ID authentication
# Azure Managed Redis cache that you created using the Azure portal, or CLI
# This script demonstrates secure connection using Microsoft Entra ID authentication
# This script demonstrates secure connection using the default Azure credential provider
# You should be a user on the cache and logged in to Azure CLI with the same account using `az login`

import redis
from azure.identity import DefaultAzureCredential
from redis_entraid.cred_provider import create_from_default_azure_credential

# Connection details for your cache
# Get the connection details for the Redis instance
redis_host = "<host-url>"  # Replace with your cache info
redis_port = <port number>  # Replace with your cache info

print("🚀 Starting Azure Redis Cache connection test...")
print(f"📡 Connecting to: {redis_host}:{redis_port}")

# Validate configuration
if not redis_host or not redis_port:
    print("❌ Error: Redis host and port must be configured")
    exit(1)

print()  # Add a new line

try:
    # Create credential provider using DefaultAzureCredential for Azure Entra ID authentication
    credential_provider = create_from_default_azure_credential(
         ("https://redis.azure.com/.default",),)

    # Create a Redis client with Azure Entra ID authentication
    r = redis.Redis(host=redis_host,
                    port=redis_port,
                    ssl=True,
                    decode_responses=True,
                    credential_provider=credential_provider,
                    socket_timeout=10,
                    socket_connect_timeout=10
                    )

    # Test connection
    result = r.ping()
    print("✅ Ping returned : " + str(result))
    print()  # Add a new line

    # Create a simple set and get operation
    result = r.set("Message", "Hello, The cache is working with Python!")
    print("✅ SET Message succeeded: " + str(result))
    print()  # Add a new line

    value = r.get("Message")

    if value is not None:
        print("✅ GET Message returned : " + str(value))
        print()  # Add a new line
    else:
        print("⚠️  GET Message returned None")
        print()  # Add a new line

    print("🎉 All Redis operations completed successfully!")
    print()  # Add a new line

except redis.ConnectionError as e:
    print(f"❌ Connection error: {e}")
    print("💡 Check if Redis host and port are correct, and ensure network connectivity")
    print()  # Add a new line
except redis.AuthenticationError as e:
    print(f"❌ Authentication error: {e}")
    print("💡 Check if Azure Entra ID authentication is properly configured")
    print()  # Add a new line
except redis.TimeoutError as e:
    print(f"❌ Timeout error: {e}")
    print("💡 Check network latency and Redis server performance")
    print()  # Add a new line
except Exception as e:
    print(f"❌ Unexpected error: {e}")
    if "999" in str(e):
        print("💡 Error 999 typically indicates a network connectivity issue or firewall restriction")
        print("   - Verify the Redis hostname is correct")
        print("   - Verify that you have logged in with Az CLI")
        print("   - Ensure the Redis cache is running and accessible")
    print()  # Add a new line
finally:
    # Clean up connection if it exists
    if 'r' in locals():
        try:
            r.close()
            print("🔐 Redis connection closed")
        except Exception as e:
            print(f"❌ Error closing connection: {e}")
De hulpbronnen opschonen
Als u de resources wilt blijven gebruiken die u in dit artikel hebt gemaakt, moet u de resourcegroep behouden.
Als u klaar bent met de resources, kunt u de Azure-resourcegroep verwijderen die u hebt gemaakt om kosten te voorkomen.
Belangrijk
Het verwijderen van een resourcegroep kan niet ongedaan worden gemaakt. Wanneer u een resourcegroep verwijdert, worden alle resources in de groep definitief verwijderd. Zorg ervoor dat u niet per ongeluk de verkeerde bron of bronngroep verwijdert. Als u de resources in een bestaande resourcegroep hebt gemaakt die resources bevat die u wilt behouden, kunt u elke resource afzonderlijk verwijderen in plaats van de resourcegroep te verwijderen.
Een resourcegroep verwijderen
Meld u aan bij Azure Portal en selecteer vervolgens Resourcegroepen.
Selecteer de resourcegroep die u wilt verwijderen.
Als er veel resourcegroepen zijn, gebruikt u het vak Filter voor een veld... en typt u de naam van de resourcegroep die u voor dit artikel hebt gemaakt. Selecteer de bronnen groep in de lijst met resultaten.
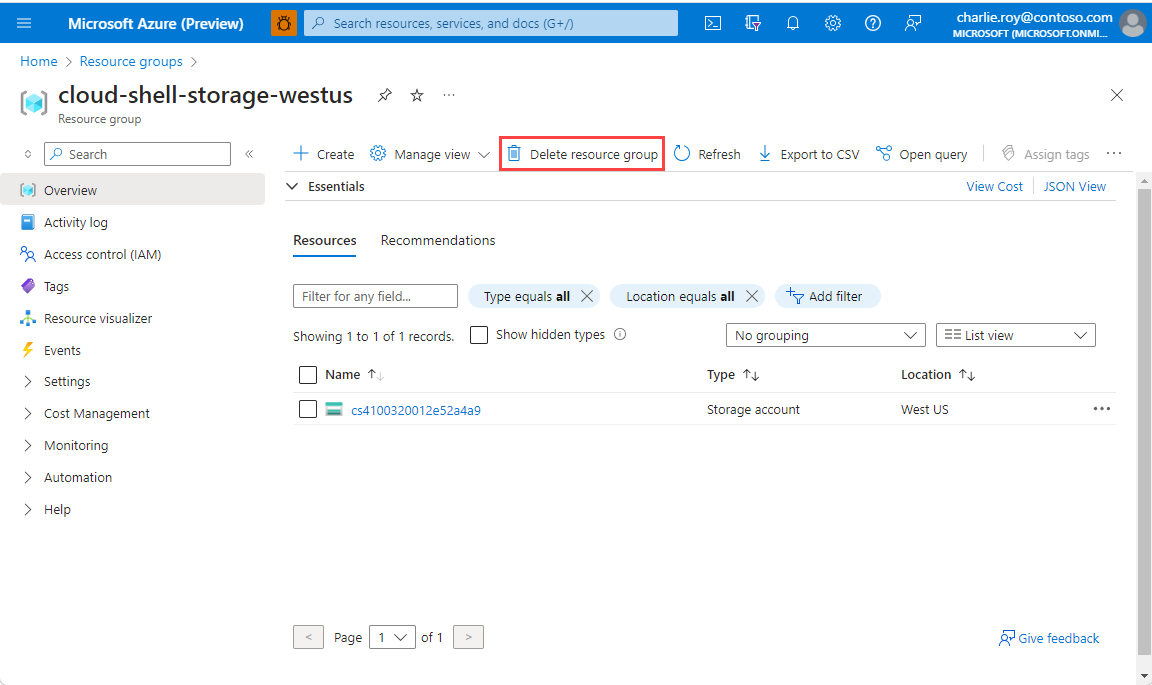
Selecteer Resourcegroep verwijderen.
U wordt gevraagd om het verwijderen van de resourcegroep te bevestigen. Typ ter bevestiging de naam van de resourcegroep. Selecteer vervolgens Verwijderen.
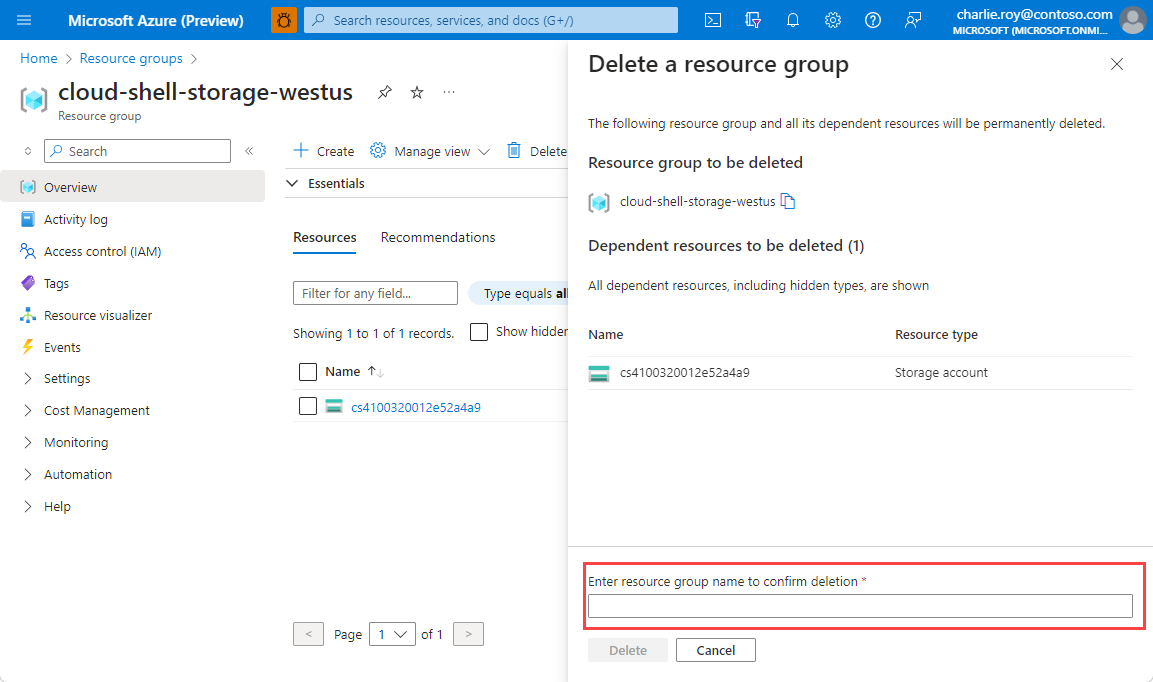
Na enkele ogenblikken worden de resourcegroep en alle bijbehorende resources verwijderd.