Windows 用デバッグ ツール では、ネットワーク経由でのカーネル デバッグがサポートされています。 This article describes how to set up network debugging automatically by using the KDNET (kdnet.exe) setup tool.
The computer that runs the debugger is the host computer, and the computer being debugged is the target computer. The host computer must run Windows 7 or later, and the target computer must run Windows 8 or later.
ホスト コンピューターの IP アドレスを確認する
ホスト コンピューターの IP アドレスを検索するには、次の手順を使用します。
ターゲット PC とホスト PC がネットワーク ハブに接続されているか、適切なネットワーク ケーブルを使用してスイッチに接続されていることを確認します。
On the host computer, open a command prompt and enter IPConfig to display the IP configuration.
コマンド出力で、コンピューターのイーサネット アダプターの IPv4 アドレスを見つけます。
<Host-IP-Address>。... Ethernet adapter Ethernet: ... IPv4 Address. . . . . . . . . . . : <Host-IP-Address> ...Alternatively, use Settings>Network & internet>Ethernet to gather the IPv4 address information.
デバッグに使用するネットワーク アダプターの IPv4 アドレスを書き留めておきます。
ホストとターゲットコンピューターをセットアップします
KDNET ユーティリティを使用して、次の手順でターゲット PC のデバッガー設定を自動的に構成します。
Note
この手順では、ホストとターゲットの両方のコンピューティングで 64 ビット バージョンの Windows が実行されていることを前提としています。 構成が異なる場合、最適な方法は、ターゲットで実行されているホスト上で同じツールの "ビット数" を実行することです。 たとえば、ターゲットが 32 ビット Windows を実行している場合は、ホストで 32 ビット バージョンのデバッガーを実行します。 詳細については、 「32ビットまたは64ビットのデバッグツールを選択する」 を参照してください。
Windows デバッグ ツールがホスト コンピューターにインストールされていることを確認します。 ツールのダウンロードとインストールの詳細については、「 Windows 用デバッグ ツール」を参照してください。
Locate the kdnet.exe and VerifiedNICList.xml files on the host computer. 既定では、ファイルは C:\Program Files (x86)\Windows Kits\10\Debuggers\x64 フォルダーにあります。
ターゲット コンピューターで使用できるように、ホスト コンピューター上の 2 つのファイルをネットワーク共有またはサム ドライブにコピーします。
On the target computer, create a C:\KDNET folder, and copy the kdnet.exe and VerifiedNICList.xml files to the folder.
Important
Before you use kdnet.exe to change boot information, you might need to temporarily suspend Windows security features on the test PC, such as BitLocker and Secure Boot. テストが完了したら、セキュリティ機能を再び適用します。 セキュリティ機能が無効になっている場合は、必ずテスト PC を適切に管理してください。
ターゲット コンピューターで、管理者としてコマンド プロンプトを開きます。 次のコマンドを入力して、ターゲット コンピューターにサポートされているネットワーク アダプターがあることを確認します。
C:\KDNET>kdnet.exe
Network debugging is supported on the following NICs:
busparams=1.0.0, Broadcom NetXtreme Gigabit Ethernet, Plugged in.
This Microsoft hypervisor supports using KDNET in guest VMs.
After the output from the KDNET (kdnet.exe) command shows the network adapter supported on the target, you can proceed.
次のコマンドを入力して、ホストシステムのIPアドレスを設定し、一意の接続キーを生成します。
-
<Host-Computer-IP-Address>値には、ホスト システムの IP アドレスまたは名前を使用します。 -
<Debug-Port>値には、使用するターゲットとホストのペアごとに、推奨される 50000 から 50039 の範囲内の一意のポート アドレスを入力します。
C:\KDNET>kdnet.exe <Host-Computer-IP-Address> Enabling network debugging on Intel(R) 82577LM Gigabit Network Connection. Key=2steg4fzbj2sz.23418vzkd4ko3.1g34ou07z4pev.1sp3yo9yz874p-
Save the key value returned by the KDNET command in a notepad .txt file.
カーネルデバッグのためにWinDbgをターゲットに接続します。
次の手順に従って、カーネル デバッグのために WinDbg をターゲット コンピューターに接続します。
On the host computer, open WinDbg, and select File>Kernel Debug.
In the Kernel Debugging dialog, select the Net tab.
Paste the port number and key from the notepad.txt file into the tab fields, and select OK.
You can also start the WinDbg session from the command line by using the windbg.exe command and the values you saved in the notepad.txt file.
windbg.exe -k -d net:port=<Debug-Port>,key=<KDNET-Key>
<Debug-Port>値は、前に選択したポートです。
<KDNET-Key>値は、KDNET によって返されるキーです。 省略可能な -d パラメーターを使用すると、早期の中断が可能になります。 詳細については、 「WinDbgのコマンドラインオプション」 を参照してください。
接続を開始すると、WinDbg によって、ファイアウォール経由でポートへのアクセスを許可するように求められる場合があります。
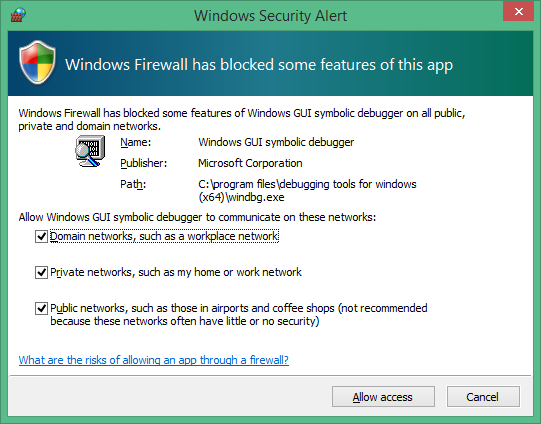
In the message dialog, select each checkbox to enable access for all three network types, and select Allow access.
この時点で、デバッガーはターゲットが再接続するのを待機し、デバッガー のコマンド ウィンドウに進行状況を表示します。
Microsoft (R) Windows Debugger Version 1.0.1908.30002 AMD64
Copyright (c) Microsoft Corporation. All rights reserved.

Using NET for debugging
Opened WinSock 2.0
Waiting to reconnect...
ターゲットPCを再起動します。
デバッガーに "Waiting to reconnect..." (再接続を待機しています...メッセージを表示し、ターゲット コンピューターを再起動します。
PC を再起動する方法の 1 つは、管理者としてコマンド プロンプトで次のコマンドを実行することです。
shutdown -r -t 0
ターゲット PC を再起動したら、デバッガーは自動的に接続されます。
Troubleshoot issues
ポート接続の確立またはデバッグ セッションの開始に関する問題がある場合は、次のトラブルシューティングのヒントを確認してください。
ファイアウォール経由でのアプリのデバッグを許可する
デバッガーが実行されているホスト側では、すべての種類のネットワークを有効にして、デバッガーがファイアウォールを介してターゲットと通信できるようにする必要があります。
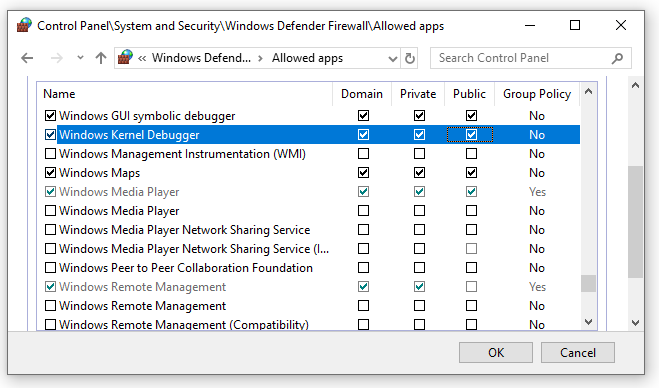
Use the Windows Control Panel to allow access through the firewall.
Open Control Panel>System and Security and select the appropriate Allow an app through Windows Firewall options:
WinDbg: In the list of applications, locate the WinDbg engine process (TCP) (all) option.
WinDbg (Classic): In the list of applications, locate the Windows GUI Symbolic Debugger and Windows Kernel Debugger options.
Select the checkboxes to allow all debugging applications through all three network types.
Select OK to save the firewall changes, and then restart the debugger.
ping を使用して接続をテストする
デバッガーがタイムアウトして接続しない場合は、ターゲット PC で ping コマンドを使用して接続を確認します。
C:\>Ping <HostComputerIPAddress>
ネットワーク デバッグ用のポートを選択する
デバッガーがタイムアウトして接続されない場合は、既定のポート番号5万が既に使用されているか、ブロックされている可能性があります。
49152 から 65535 までの任意のポート番号を選択できます (含む)。 推奨される範囲は 50000 ~ 50039 です。 選択したポートが開き、ホスト コンピューターで実行されているデバッガーが排他的にアクセスできます。
会社のネットワーク ポリシーでは、ネットワーク デバッグに使用できるポート番号の範囲が制限される場合があります。 会社のポリシーでネットワーク デバッグ用のポートの範囲が制限されているかどうかを確認するには、ネットワーク管理者に確認してください。
サポートされているネットワーク アダプターを検索する
KDNET の実行時 に、このマシン メッセージのどの NIC でもネットワーク デバッグがサポートされていない 場合、ネットワーク アダプターはサポートされません。
ホスト コンピューターは任意のネットワーク アダプターを使用できますが、ターゲット コンピューターでは、Windows 用デバッグ ツールでサポートされているネットワーク アダプターを使用する必要があります。 サポートされているネットワーク アダプターの一覧については、次の記事を参照してください。
- Windows 10 のネットワーク カーネル デバッグ用にサポートされているイーサネット NIC
- Windows 8.1 のネットワーク カーネル デバッグ用にサポートされているイーサネット NIC
その他のデバッグの種類を有効にします
Windows 10 October 2020 Update (20H2) 以降では、次の 4 種類のデバッグがサポートされています。
| KDNET option | Debugging type | 同等のsetコマンド | More information |
|---|---|---|---|
b |
Bootmgr debugging | bcdedit /bootdebug {bootmgr} on |
BCDEdit /bootdebug |
w |
Winload debugging | bcdedit /bootdebug on |
BCDEdit /bootdebug |
k |
Kernel debugging | bcdedit /debug on |
WinDbg の使い始め (カーネル モード) |
h |
Hypervisor debugging | bcdedit /set hypervisordebug on |
BCDEdit /hypervisorsettings |
デバッグの種類の操作の詳細を次に示します。
- デバッグ型の任意の組み合わせを指定できます。
- デバッグの種類を指定しない場合、システムはカーネル デバッグを有効にします。
- ハイパーバイザーとカーネル デバッグの両方を有効にした場合、ハイパーバイザー ポートは
<Debug-Port>+ 1 に設定されます。
例: bootmgr、カーネル、winload デバッグを有効にする
次の例では、 - bkw オプションを使用して bootmgr、kernel、winload のデバッグを有効にします。
C:\>kdnet.exe <HostComputerIPAddress> <YourDebugPort> -bkw

Enabling network debugging on Intel(R) 82577LM Gigabit Network Connection.
Key=2steg4fzbj2sz.23418vzkd4ko3.1g34ou07z4pev.1sp3yo9yz874p
バスパラメーターを指定します
KDNET でトランスポートのバス パラメーターを自動的に決定できない場合は、コマンド ラインで /busparams オプションを使用してパラメーターを指定できます。
kdnet.exe /busparams [b.d.f] [host] [port] [-[b][h][k][w]]
b.d.f部分は、構成するデバイスのバス パラメーターを指定します。
Use Device Manager on the target computer to determine the PCI bus number (b), the device number (d), and the function number (f) of the adapter you want to use for debugging. These values are available in the General tab under the Location setting.
For example:
C:\>kdnet.exe /busparams 0.29.7 <Host-Computer-IP-Address> <Debug-Port> -bkw