Azure Cosmos DB for MongoDB を使用してアカウント、データベース、コレクションを作成する
Azure Cosmos DB はフルマネージドのサービスとしてのプラットフォーム (PaaS) です。 このサービスを使用するには、まずサブスクリプションの下に Azure Cosmos DB アカウントを作成する必要があります。 アカウントを作成したら、その中にデータベース、コレクション、ドキュメントを追加できます。

Azure Cosmos DB for MongoDB のさまざまなモデル要素を作成する方法をいくつか見ていきます。
Azure portal を使用して Azure Cosmos DB for MongoDB のアカウント、データベース、コンテナーを作成する
Azure Cosmos DB アカウントとその要素を作成する 1 つの方法は、Azure portal を使用することです。 この例では、Azure portal を使用して、Azure Cosmos DB for MongoDB を使用する Azure Cosmos DB アカウントを作成します。 次に、データベースとコレクションを追加します。 この時点では、より高度な設定を入力する必要はありません。後のモジュールで詳しく説明します。 この例では、[基本] タブを確認しましょう。アカウントとその要素を作成しましょう。
Azure Cosmos DB for MongoDB のアカウントを作成する
Azure portal で、[+ リソースの作成] を選択し、[Azure Cosmos DB]、[作成] の順に選択します。
[Azure Cosmos DB for MongoDB] を選択します。
次のパラメーターを入力します。
- [サブスクリプション] - 現在使用している Azure サブスクリプション。
- [リソース グループ] - Azure Cosmos DB アカウントを作成する新規または既存の Azure リソース グループ。
- [アカウント名] - Azure Cosmos DB アカウントの一意の名前。 この名前は Azure 全体で一意である必要があります。 アカウント名に mongo.cosmos.azure.com が追加されたものがアカウント URI になります。
- [場所] - Azure Cosmos DB アカウントをホストする地理的な場所。 通常は、ユーザーまたはアプリケーションに近い場所を選択する必要があります。
- [容量モード] - 前のユニットで説明したように、アカウントで [プロビジョニングされたスループット] または [サーバーレス] の使用を選択できます。 この例では、[プロビジョニングされたスループット] を選択します。
- [Free レベル割引の適用] - この例では、[適用しない] を選択します。
- [アカウントの合計スループットを制限する] - この例では、"オフ" のままにします。
- [バージョン] - 4.0 を選択します。
注意
サポートされている機能を最大限に活用するには、可能な限りバージョン 3.6 以降を使用することをお勧めします。
[確認と作成] を選択し、検証が成功したら [作成] を選択します。
注意
Azure Cosmos DB アカウントの作成には数分かかる場合があります。
![Azure Cosmos DB アカウントの作成を示すスクリーンショット - [Azure Cosmos DB for MongoDB] 作成ページ。](../../wwl-azure/get-started-mongodb-api-azure-cosmos-db/media/3-create-azure-cosmos-db-account-mongodb.png#lightbox)
Azure Cosmos DB for MongoDB のデータベースとコンテナーを作成する
Azure portal でデータベースとコンテナーを作成するのは簡単です。まず、データベースを作成しましょう。
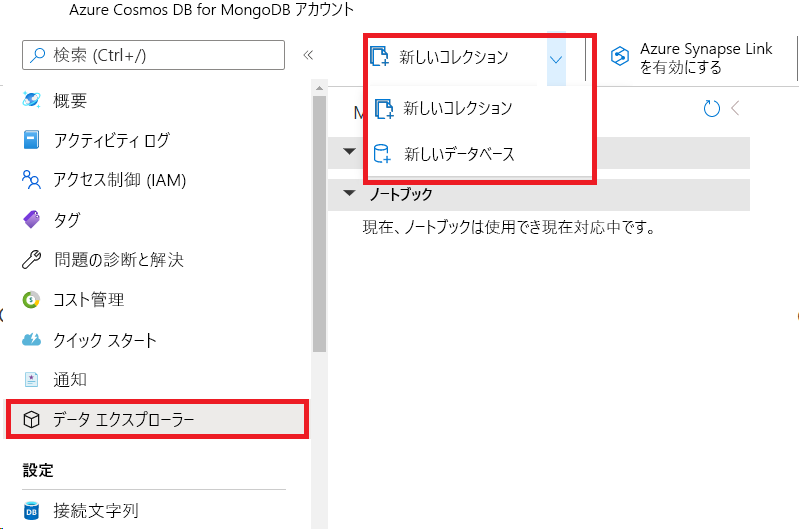
[Azure Cosmos DB for MongoDB アカウント] の左側のメニューで、[データ エクスプローラー] を選択します。
[新しいコレクション] アイコンの右側にあるプルダウンを選択し、[新しいデータベース] を選択します。
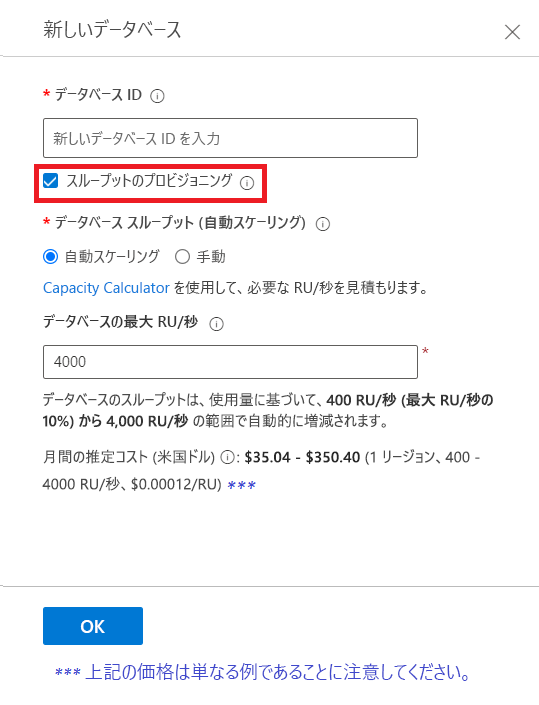
[データベース ID] テキストボックスの下で、データベースに新しい名前を付けます。
[新しいデータベース] ダイアログで [プロビジョニング スループット] を定義できますが、ほとんどの場合、プロビジョニングされたスループットをコンテナー レベルで選択します。 この例では、[プロビジョニング スループット] チェックボックスを "オフ" にして、[OK] を選択します。
[MONGO API] セクションの下に新しいデータベースが表示されていることに気付くはずです。 次は、新しいコレクションを作成します。
[新しいコレクション] アイコンを選択します。
[新しいコレクション] ダイアログで、次のパラメーターを入力します。
- [データベース名] - [新規作成] または [既存のものを使用] の 2 つのオプションがあります。 ここで、新しいコレクションを作成するときに新しいデータベースを作成できます。 前の手順で既に新しいデータベースを作成しているので、[既存のものを使用] を選択し、プルダウン オプションからデータベース名を選択します。
- [コレクション ID] - このパラメーターは、コレクションに指定する名前です。
- [シャーディング] - 通常は、[シャード] を選択します。 このオプションにより、Azure Cosmos DB で、[シャード キー] に基づいて複数のテナント間でシャード化されたコンテナーを作成できます。 大規模なコンテナーの場合、テナントが Azure Cosmos DB によって複数の物理ノードに分散され、高度なスケーリングが実現します。 シャーディングの詳細については、"デザイン" モジュールで説明します。 [シャード] を選択します。
- [シャード キー] - [シャード] を選択した場合、"シャード キー" を追加する必要があります。 このキーは、パーティション分割戦略を定義するパーティション キーです。 たとえば、IoT (モノのインターネット) コレクションでは、選択したパーティション分割戦略に応じて、/deviceid や /region になります。 パーティション分割戦略の詳細については、"デザイン" モジュールで説明します。
- [このコレクションの専用スループットをプロビジョニングする] チェック ボックス - 通常は、コレクションのスループットを [自動スケーリング] または [手動] としてプロビジョニングします。 この設定を使用すると、個々のコレクションのコストをより適切に制御できます。 スループットの詳細については、"デザイン" モジュールで説明します。 ここでは、チェックボックスをオンにして [自動スケーリング] を選択します。
- [コレクション スループット] または [コレクションの最大 RU/秒] - [手動] または [自動スケーリング] のどちらを選択したかに応じて、それぞれ [コレクション スループット] または [コレクションの最大 RU/秒]、つまりスループット モードを入力する必要があります。 主な違いは、[手動] モードでは、使用するかどうかに関係なく、選択した RU/秒の量が課金されることです。 [自動スケール] では、選択した最大 RU/秒までの使用量のみが課金されます。 どちらの場合でも、コレクションのスループットが選択した値に達すると、スロットリングが開始されます。 この例では、事前定義された値のままにします。
- [分析ストア] - Azure Cosmos DB 分析ストアは、これらのレッスンの範囲を超えています。 そのトピックの詳細については、「Azure Cosmos DB 分析ストアとは」を参照してください。
- [詳細] - [インデックス作成] - インデックスの詳細については、"デザイン" モジュールで説明します。 チェックボックスはオンのままにします。


これで、接続するデータベースとコレクションを 1 つ作成できました。 次のユニットでは、Azure Cosmos DB for MongoDB アカウントへの接続についてさらに詳細に説明します。 その前に、Azure Cosmos DB for MongoDB データベースおよびコレクションを作成するための別の方法を確認しましょう。
Azure Cosmos DB for MongoDB のデータベースとコレクションを作成するか、またはそれに接続する
Java、Python、Node.js、.NET、またはその他のプログラミング言語を MongoDB ドライバーと共に使用して、Azure Cosmos DB for MongoDB アカウントを作成するか、またはそれに接続できます。 いくつかの異なる言語を使用してこれらの要素を作成するために使用する関数をいくつか紹介しましょう。 このモジュールの冒頭で、"開発者は使い慣れた MongoDB ドライバー、SDK、ツールを引き続き使用して Azure Cosmos DB に接続し、アプリを作成できる" と述べました。これらのドライバーとそのプロパティとメソッドを使用して、Azure Cosmos DB for MongoDB アカウントに対するアクセスと操作をプログラムします。
Azure Cosmos DB for MongoDB のデータベースを作成するか、またはそれに接続する
お気に入りの開発ツールを使用して、Azure Cosmos DB for MongoDB アプリケーションを作成できます。 各プログラミング言語の MongoDB ドライバーを使用して、データベースとコレクションを作成します。 Azure Cosmos DB for MongoDB アカウントに接続したり、products データベースに接続したりするためのコードを確認しましょう。
Node.js
import { DefaultAzureCredential, ClientSecretCredential } from "@azure/identity";
const { MongoClient, ObjectId } = require('mongodb');
import axios from "axios";

async function main() {
  // Environment variables
  const endpoint = process.env.AZURE_COSMOS_RESOURCEENDPOINT;
  const listConnectionStringUrl = process.env.AZURE_COSMOS_LISTCONNECTIONSTRINGURL;
  const scope = process.env.AZURE_COSMOS_SCOPE;

  // Uncomment the corresponding lines for the authentication type you want to use.
  // For system-assigned managed identity.
  // const credential = new DefaultAzureCredential();

  // For user-assigned managed identity.
  // const clientId = process.env.AZURE_COSMOS_CLIENTID;
  // const credential = new DefaultAzureCredential({
  //     managedIdentityClientId: clientId
  // });

  // For service principal.
  // const tenantId = process.env.AZURE_COSMOS_TENANTID;
  // const clientId = process.env.AZURE_COSMOS_CLIENTID;
  // const clientSecret = process.env.AZURE_COSMOS_CLIENTSECRET;
  // const credential = new ClientSecretCredential(tenantId, clientId, clientSecret);

  // Acquire the access token
  const accessToken = await credential.getToken(scope);

  // Get the connection string
  const config = {
    method: 'post',
    url: listConnectionStringUrl,
    headers: {
        'Authorization': 'Bearer ${accessToken.token}'
    }
  };
  const response = await axios(config);
  const keysDict = response.data;
  const connectionString = keysDict['connectionStrings'][0]['connectionString'];

  // Connect to Azure Cosmos DB for MongoDB
  const client = new MongoClient(connectionString);

  try {
    // Open the connection
    await client.connect();

    // Connect to the database "products"
    const ProductDatabase = client.db('products');

    // Add code to connect to a collection and add an entry here
  } catch (err) {
    console.error("An error occurred:", err);
  } finally {
    // Close the connection
    await client.close();
  }
}

main().catch((err) => console.error("Unhandled error:", err));
Java
package com.fabrikam;

import com.mongodb.MongoClient;
import com.mongodb.MongoClientURI;
import com.mongodb.client.MongoCollection;
import com.mongodb.client.MongoDatabase;
import com.mongodb.client.model.Filters;
import javax.net.ssl.*;
import java.net.InetSocketAddress;
import com.azure.identity.*;
import com.azure.core.credential.*;
import java.net.http.*;
import java.net.URI;

public class App {
  public static void main(String[] args) {
    // Environment variables
    String endpoint = System.getenv("AZURE_COSMOS_RESOURCEENDPOINT");
    String listConnectionStringUrl = System.getenv("AZURE_COSMOS_LISTCONNECTIONSTRINGURL");
    String scope = System.getenv("AZURE_COSMOS_SCOPE");

    // Uncomment the corresponding lines for the authentication type you want to use.
    // For system-assigned managed identity.
    // DefaultAzureCredential defaultCredential = new DefaultAzureCredentialBuilder().build();

    // For user-assigned managed identity.
    // DefaultAzureCredential defaultCredential = new DefaultAzureCredentialBuilder()
    //     .managedIdentityClientId(System.getenv("AZURE_COSMOS_CLIENTID"))
    //     .build();

    // For service principal.
    // ClientSecretCredential defaultCredential = new ClientSecretCredentialBuilder()
    //     .clientId(System.getenv("AZURE_COSMOS_CLIENTID"))
    //     .clientSecret(System.getenv("AZURE_COSMOS_CLIENTSECRET"))
    //     .tenantId(System.getenv("AZURE_COSMOS_TENANTID"))
    //     .build();

    MongoClient mongoClient = null;

    try {
      // Acquire the access token
      AccessToken accessToken = defaultCredential
          .getToken(new TokenRequestContext().addScopes(scope))
          .block();
      String token = accessToken.getToken();

      // Retrieve the connection string
      HttpClient client = HttpClient.newBuilder().build();
      HttpRequest request = HttpRequest.newBuilder()
          .uri(new URI(listConnectionStringUrl))
          .header("Authorization", "Bearer " + token)
          .POST(HttpRequest.BodyPublishers.noBody())
          .build();
      HttpResponse<String> response = client.send(request, HttpResponse.BodyHandlers.ofString());

      JSONParser parser = new JSONParser();
      JSONObject responseBody = parser.parse(response.body());
      List<Map<String, String>> connectionStrings = responseBody.get("connectionStrings");
      String connectionString = connectionStrings.get(0).get("connectionString");

      // Connect to Azure Cosmos DB for MongoDB
      MongoClientURI uri = new MongoClientURI(connectionString);
      mongoClient = new MongoClient(uri);

      // Connect to the database
      MongoDatabase ProductDatabase = mongoClient.getDatabase("products");

      // Add code to connect to a collection and add an entry here

    } catch (Exception e) {
      e.printStackTrace();
    } finally {
      if (mongoClient != null) {
        mongoClient.close();
      }
    }
  }
}
Python
import os
import pymongo
import requests
from azure.identity import ManagedIdentityCredential, ClientSecretCredential

# Environment variables
endpoint = os.getenv('AZURE_COSMOS_RESOURCEENDPOINT')
listConnectionStringUrl = os.getenv('AZURE_COSMOS_LISTCONNECTIONSTRINGURL')
scope = os.getenv('AZURE_COSMOS_SCOPE')

# Uncomment the following lines corresponding to the authentication type you want to use.
# For system-assigned managed identity
# cred = ManagedIdentityCredential()

# For user-assigned managed identity
# managed_identity_client_id = os.getenv('AZURE_COSMOS_CLIENTID')
# cred = ManagedIdentityCredential(client_id=managed_identity_client_id)

# For service principal
# tenant_id = os.getenv('AZURE_COSMOS_TENANTID')
# client_id = os.getenv('AZURE_COSMOS_CLIENTID')
# client_secret = os.getenv('AZURE_COSMOS_CLIENTSECRET')
# cred = ClientSecretCredential(tenant_id=tenant_id, client_id=client_id, client_secret=client_secret)

# Get the connection string
session = requests.Session()
token = cred.get_token(scope)
response = session.post(listConnectionStringUrl, headers={"Authorization": "Bearer {}".format(token.token)})
keys_dict = response.json()
conn_str = keys_dict["connectionStrings"][0]["connectionString"]

# Connect to Azure Cosmos DB for MongoDB
client = pymongo.MongoClient(conn_str)

# To connect to the database, use the connection variable ("client" in this case), and the database name
ProductDatabase = client["products"]

# Add code to connect to a collection and add an entry here
C#
using MongoDB.Driver;
using Azure.Identity;
using Azure.Core;
using System;
using System.Net.Http;
using System.Text.Json;
using System.Collections.Generic;
using System.Threading.Tasks;

public class Products
{
  public int ProductId { get; set; }
  public string name { get; set; }
}

class test
{
  public static async Task Main(string[] args)
  {
      // Environment variables
      var endpoint = Environment.GetEnvironmentVariable("AZURE_COSMOS_RESOURCEENDPOINT");
      var listConnectionStringUrl = Environment.GetEnvironmentVariable("AZURE_COSMOS_LISTCONNECTIONSTRINGURL");
      var scope = Environment.GetEnvironmentVariable("AZURE_COSMOS_SCOPE");

      // Uncomment the corresponding lines for the authentication type you want to use.
      // For system-assigned identity.
      // var tokenProvider = new DefaultAzureCredential();

      // For user-assigned identity.
      // var tokenProvider = new DefaultAzureCredential(
      //     new DefaultAzureCredentialOptions
      //     {
      //         ManagedIdentityClientId = Environment.GetEnvironmentVariable("AZURE_COSMOS_CLIENTID")
      //     });

      // For service principal.
      // var tenantId = Environment.GetEnvironmentVariable("AZURE_COSMOS_TENANTID");
      // var clientId = Environment.GetEnvironmentVariable("AZURE_COSMOS_CLIENTID");
      // var clientSecret = Environment.GetEnvironmentVariable("AZURE_COSMOS_CLIENTSECRET");
      // var tokenProvider = new ClientSecretCredential(tenantId, clientId, clientSecret);

      // Acquire the access token.
      AccessToken accessToken = await tokenProvider.GetTokenAsync(
          new TokenRequestContext(scopes: new[] { scope }));

      // Get the connection string.
      using var httpClient = new HttpClient();
      httpClient.DefaultRequestHeaders.Add("Authorization", $"Bearer {accessToken.Token}");
      var response = await httpClient.PostAsync(listConnectionStringUrl, null);
      response.EnsureSuccessStatusCode();
      var responseBody = await response.Content.ReadAsStringAsync();

      // Parse the connection string.
      var connectionStrings = JsonSerializer.Deserialize<Dictionary<string, List<Dictionary<string, string>>>>(responseBody);
      string connectionString = connectionStrings["connectionStrings"][0]["connectionString"];

      // Initialize the MongoClient with the connection string.
      var mongoClient = new MongoClient(connectionString);

      // Connect to the "products" database.
      var ProductDatabase = mongoClient.GetDatabase("products");

      // Add code to connect to a collection and add an entry here.
  }
}
とても簡単です。ドライバーを使用して接続したら、新しいデータベースを作成するか、言語に応じて、GetDatabase または同様のメソッドを使用して既存のデータベースを指定します。 これで、アプリケーションで ProductDatabase 変数を使用して、目的のデータベースを参照できるようになりました。 コレクションの作成または接続は、新しいデータベースを作成するのと同じくらい簡単です。
Azure Cosmos DB for MongoDB のコレクションを作成する
既存のコレクションを作成またはアクセスするには、プログラミング言語に応じて get コレクション メソッドまたは参照を使用します。 先ほどの例に、コレクションを作成または接続し、そのコレクションにエントリを 1 つ追加するコードを追加しましょう。
Node.js
          // Add code to connect to a collection and add and find an entry here
          var collection = ProductDatabase.collection('documents');
          var insertResult = await collection.insertOne({ ProductId: 1, name: "bread" });

          // return data where ProductId = 1
          const findProduct = await collection.find({ProductId: 1});
          await findProduct.forEach(console.log);
Java
          // Add code to connect to a collection and add and find an entry here
          MongoCollection collection = ProductDatabase.getCollection("products");

          collection.insertOne(new Document()
                      .append("ProductId", 1)
                      .append("name", "bread"));

          // return data where ProductId = 1
          Document findProduct = (Document) collection.find(eq("ProductId", 1)).first();
          System.out.println(findProduct.toJson());
Python
# Add code to connect to a collection and add an entry here
collection = ProductDatabase["products"]
collection.insert_one({ "ProductId": 1, "name": "bread" })
C#
    // Add code to connect to a collection and add an entry here
    var ProductCollection = ProductDatabase.GetCollection<Products>("products");

    Products Product = new Products {ProductId=1,name="bread"};
    ProductCollection.InsertOne (Product);
次のユニットで、接続文字列を正確に作成した方法について説明します。
Azure Cosmos DB の MongoDB 用 API に格納されているデータを管理するために MongoDB 拡張コマンドを使用する
前に説明したように、Azure Cosmos DB for MongoDB には、Azure Cosmos DB アカウント用の MongoDB サーバーでオブジェクトにアクセスしたり作成したりするために使用したものと同じドライバーやコードを使用する機能があります。 ただし、そのコードを使用してデータベースとコレクションを作成すると、既定の Azure Cosmos DB 作成パラメーターが使用されます。 Azure Cosmos DB の機能を利用するには、スループット、自動スケーリング、シャード キーの割り当て、インデックスの定義など、データベースとコレクション作成パラメーターを制御できる必要があります。 Azure Cosmos DB for MongoDB は、これらのパラメーターを定義するための拡張コマンドを使用して、この機能を提供します。 これらのコマンドを使用すると、Azure Cosmos DB 専用のデータベースとコレクションを作成または変更する方法について、より正確な手順をコーディングできます。
Azure Cosmos DB for MongoDB には、次の要求の種類に関する拡張コマンドが用意されています。
- データベースの作成
- データベースを更新する
- データベースの取得
- コレクションの作成
- コレクションの更新
- コレクションの取得
MongoDB ドライバーには、データベースに対してコマンドを実行する関数が用意されているので、この関数を使用して、拡張コマンドを Azure Cosmos DB に送信することにします。 2000 RU (要求ユニット) のスループットと DeviceId のシャード キーを使用して IoT デバイス コレクションを作成するコードを見てみましょう。
Node.js
    // create the Devices collection with a throughput of 2000 RUs and with DeviceId as the sharding key
    var result = IOTDatabase.command({customAction: "CreateCollection", collection: "Devices", offerThroughput: 2000, shardKey: "DeviceId"});
Java
      // create the Devices collection with a throughput of 2000 RUs and with DeviceId as the sharding key
      Document DevCollectionDef = new Document();
      DevCollectionDef.append("customAction", "CreateCollection");
      DevCollectionDef.append("collection", "Devices");
      DevCollectionDef.append("offerThroughput", 2000);
      DevCollectionDef.append("shardKey", "DeviceId");

      Document result = IOTDatabase.runCommand(DevCollectionDef);
Python
      # create the Devices collection with a throughput of 2000 RUs and with DeviceId as the sharding key
      IOTDatabase.command({'customAction': "CreateCollection", 'collection': "Devices", 'offerThroughput': 2000, 'shardKey': "DeviceId"})
C#
      // create the Devices collection with a throughput of 1000 RUs and with EmployeeId as the sharding key
      var result = IOTDatabase.RunCommand<BsonDocument>(@"{customAction: ""CreateCollection"", collection: ""Devices"", offerThroughput: 2000, shardKey: ""DeviceId""}");
同様の方法で、コレクションを変更したり、データベースを作成または変更したりできます。 詳細については、「Azure Cosmos DB の MongoDB 用 API に格納されているデータを管理するために MongoDB 拡張コマンドを使用する」記事を参照してください。