Azure Automation では証明書を安全に保存し、Azure Resource Manager リソースの Get-AzAutomationCertificate コマンドレットを使用して、Runbook および DSC 構成でアクセスできるようにします。 証明書を安全に保存できることで、認証に証明書を使用する Runbook および DSC 構成を作成したり、それらを Azure またはサードパーティのリソースに追加したりすることができます。
注
Azure Automation でセキュリティ保護される資産としては、資格情報、証明書、接続、暗号化された変数などがあります。 これらの資産は、各 Automation アカウント用に生成された一意のキーを使って暗号化され、Automation に保存されます。 Automation では、キーはシステムによって管理される Key Vault サービスに格納されます。 セキュリティで保護された資産を保存する前に、Automation によって Key Vault からキーが読み込まれ、それを使用して資産が暗号化されます。
証明書にアクセスするための PowerShell コマンドレット
PowerShell を使用して Automation 証明書を作成および管理するためのコマンドレットを次の表に示します。 これらは、Az モジュールに付属しています。
| コマンドレット | 説明 |
|---|---|
| Get-AzAutomationCertificate | Runbook または DSC 構成で使用する証明書についての情報を取得します。 内部 Get-AutomationCertificate コマンドレットを使用して取得できるのは、証明書自体のみです。 |
| New-AzAutomationCertificate | 新しい証明書を Automation に作成します。 |
| Remove-AzAutomationCertificate | 証明書を Automation から削除します。 |
| Set-AzAutomationCertificate | 証明書ファイルのアップロードや .pfx ファイルのパスワードの設定など、既存の証明書のプロパティを設定します。 |
Add-AzureCertificate コマンドレットを使用して、指定したクラウド サービスのサービス証明書をアップロードすることもできます。
証明書にアクセスするための内部コマンドレット
次の表の内部コマンドレットを使用すると、Runbook の証明書にアクセスできます。 このコマンドレットには、グローバル モジュール Orchestrator.AssetManagement.Cmdlets が付属しています。 詳細については、「内部コマンドレット」を参照してください。
| 内部コマンドレット | 説明 |
|---|---|
Get-AutomationCertificate |
Runbook または DSC 構成で使用する証明書を取得します。 System.Security.Cryptography.X509Certificates.X509Certificate2 オブジェクトを返します。 |
注
Runbook または DSC 構成で、Get-AutomationCertificate の Name パラメーターに変数を使用することは避けてください。 このような変数を使用すると、デザイン時に、Runbook または DSC 構成と Automation 変数との間の依存関係の検出が複雑になる可能性があります。
証明書にアクセスするための Python 関数
次の表の関数を使用して、Python 2 および 3 Runbook の証明書にアクセスします。 Python 3 Runbook は現在プレビュー段階です。
| 機能 | 説明 |
|---|---|
automationassets.get_automation_certificate |
証明書の資産に関する情報を取得します。 |
注
資産関数にアクセスするには、お使いの Python Runbook の冒頭で automationassets モジュールをインポートする必要があります。
新しい証明書を作成する
新しい証明書を作成するときは、.cer ファイルか .pfx ファイルを Automation にアップロードします。 証明書をエクスポート可能とマークすると、Automation の証明書ストアから証明書を転送できます。 エクスポート可能ではない場合は、Runbook または DSC 構成内での署名にのみ使用できます。
注
Azure Automation では、証明書に Microsoft Enhanced RSA および AES 暗号化プロバイダーが必要です。
Azure portal で新しい証明書を作成する
- [Automation アカウント] から、左側のウィンドウで、[共有リソース] の [証明書] を選択します。
- [証明書] ページで [証明書の追加] を選択します。
- [名前] フィールドに、証明書の名前を入力します。
- .cer ファイルまたは .pfx ファイルを参照するには、[Upload a certificate file]\(証明書ファイルのアップロード\) の [ファイルの選択] を選択します。 .pfx ファイルを選択する場合は、パスワードを指定し、エクスポートを許可するかどうかを指定します。 Azure Automation ポータルを使用して証明書をアップロードしている場合、パートナー (CSP) アカウントでは失敗する可能性があります。 この問題を解決するには、回避策として PowerShell コマンドレットを使用することをお勧めします。
- [作成] を選択して、新しい証明書資産を保存します。
PowerShell で新しい証明書を作成する
次の例では、新しい Automation 証明書を作成してエクスポート可能に指定する方法について説明します。 この例では既存の .pfx ファイルをインポートします。
$certificateName = 'MyCertificate'
$PfxCertPath = '.\MyCert.pfx'
$CertificatePassword = ConvertTo-SecureString -String 'P@$$w0rd' -AsPlainText -Force
$ResourceGroup = "ResourceGroup01"

New-AzAutomationCertificate -AutomationAccountName "MyAutomationAccount" -Name $certificateName -Path $PfxCertPath -Password $CertificatePassword -Exportable -ResourceGroupName $ResourceGroup
Resource Manager テンプレートで新しい証明書を作成する
次の例では、PowerShell で Resource Manager テンプレートを使用して Automation アカウントに証明書をデプロイする方法を示します。
$AutomationAccountName = "<automation account name>"
$PfxCertPath = '<PFX cert path and filename>'
$CertificatePassword = '<password>'
$certificateName = '<certificate name>' #A name of your choosing
$ResourceGroupName = '<resource group name>' #The one that holds your automation account
$flags = [System.Security.Cryptography.X509Certificates.X509KeyStorageFlags]::Exportable `
    -bor [System.Security.Cryptography.X509Certificates.X509KeyStorageFlags]::PersistKeySet `
    -bor [System.Security.Cryptography.X509Certificates.X509KeyStorageFlags]::MachineKeySet
# Load the certificate into memory
$PfxCert = New-Object -TypeName System.Security.Cryptography.X509Certificates.X509Certificate2 -ArgumentList @($PfxCertPath, $CertificatePassword, $flags)
# Export the certificate and convert into base 64 string
$Base64Value = [System.Convert]::ToBase64String($PfxCert.Export([System.Security.Cryptography.X509Certificates.X509ContentType]::Pkcs12))
$Thumbprint = $PfxCert.Thumbprint


$json = @"
{
    '`$schema': 'https://schema.management.azure.com/schemas/2015-01-01/deploymentTemplate.json#',
    'contentVersion': '1.0.0.0',
    'resources': [
        {
            'name': '$AutomationAccountName/$certificateName',
            'type': 'Microsoft.Automation/automationAccounts/certificates',
            'apiVersion': '2015-10-31',
            'properties': {
                'base64Value': '$Base64Value',
                'thumbprint': '$Thumbprint',
                'isExportable': true
            }
        }
    ]
}
"@

$json | out-file .\template.json
New-AzResourceGroupDeployment -Name NewCert -ResourceGroupName $ResourceGroupName -TemplateFile .\template.json
証明書を取得する
証明書を取得するには、内部 Get-AutomationCertificate コマンドレットを使用します。 Get-AzAutomationCertificate コマンドレットは、証明書資産に関する情報は返しますが証明書自体を返さないので使用できません。
テキスト形式の Runbook の例
次の例では、Runbook でクラウド サービスに証明書を追加する方法を示します。 このサンプルでは、パスワードは暗号化された Automation 変数から取得されます。
$serviceName = 'MyCloudService'
$cert = Get-AutomationCertificate -Name 'MyCertificate'
$certPwd = Get-AzAutomationVariable -ResourceGroupName "ResourceGroup01" `
-AutomationAccountName "MyAutomationAccount" -Name 'MyCertPassword'
Add-AzureCertificate -ServiceName $serviceName -CertToDeploy $cert
グラフィカルな Runbook の例
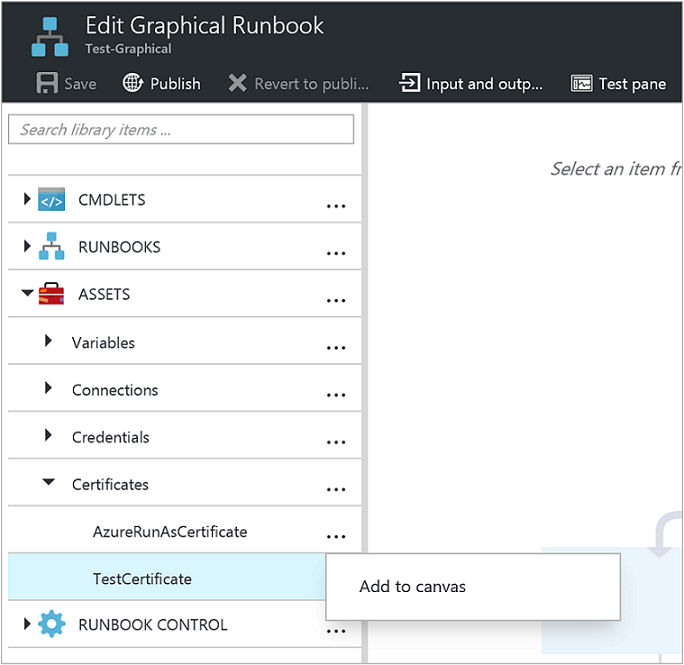
[ライブラリ] ペインで証明書を右クリックして [キャンバスに追加] を選択することにより、内部 Get-AutomationCertificate コマンドレットのアクティビティをグラフィカルな Runbook に追加します。
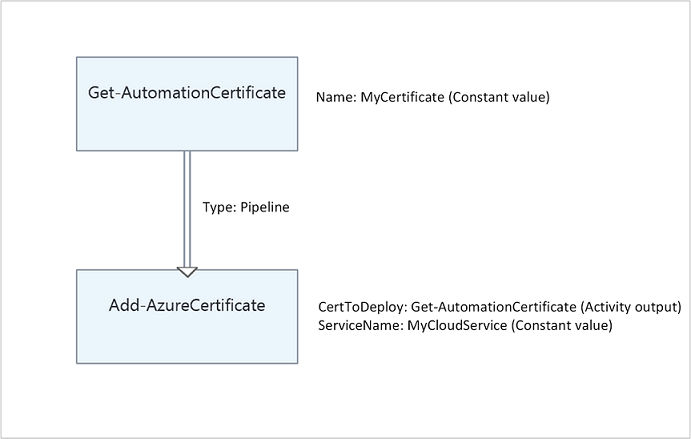
次の図は、グラフィカルな Runbook で証明書を使用する例を示したものです。
次のステップ
- 証明書へのアクセスに使用するコマンドレットの詳細については、「Azure Automation でモジュールを管理する」を参照してください。
- Runbook の一般的な情報については、「Azure Automation での Runbook の実行」を参照してください。
- DSC 構成の詳細については、「Azure Automation State Configuration の概要」を参照してください。