Note
Access to this page requires authorization. You can try signing in or changing directories.
Access to this page requires authorization. You can try changing directories.
Previous: Display markdown content
Now that we know how to present basic markdown content, let's try displaying something more meaningful by leveraging the power of Adaptive Cards. This is useful for creating forms, or for displaying more complex content.
Working with forms
You can create a card in the Command Palette with the IFormContent interface (see FormContent for the toolkit implementation). This allows you to provide the Adaptive Card JSON, and the Command Palette will render it for you. When the user submits the form, Command Palette will call the SubmitForm method on your form, with the JSON payload and inputs from the form.
Tip
Adaptive card payloads can be created using the Adaptive Card Designer. You can design your card there, and then copy the JSON payload into your extension.
- In the
Pagesdirectory, add a new class - Name the class
FormPage - Update the
FormPageclass:
internal sealed partial class FormPage : ContentPage
{
    private readonly SampleContentForm sampleForm = new();

    public override IContent[] GetContent() => [sampleForm];

    public FormPage()
    {
        Name = "Open";
        Title = "Sample Content";
        Icon = new IconInfo("\uECA5"); // Tiles
    }
}
The FormPage is a content page that displays a form (SampleContentForm) to the user. It creates an instance of SampleContentForm, which is a form (defined later) that describes the UI and logic for a user input form.
- At the bottom of file (under the
FormPageclass) add:
internal sealed partial class SampleContentForm : FormContent
{
    public SampleContentForm()
    {
        TemplateJson = $$"""
{
    "$schema": "http://adaptivecards.io/schemas/adaptive-card.json",
    "type": "AdaptiveCard",
    "version": "1.6",
    "body": [
        {
            "type": "TextBlock",
            "size": "medium",
            "weight": "bolder",
            "text": " Sample",
            "horizontalAlignment": "center",
            "wrap": true,
            "style": "heading"
        },
        {
            "type": "Input.Text",
            "label": "Name",
            "style": "text",
            "id": "SimpleVal",
            "isRequired": true,
            "errorMessage": "Name is required",
            "placeholder": "Enter your name"
        }
    ],
    "actions": [
        {
            "type": "Action.Submit",
            "title": "Submit",
            "data": {
                "id": "1234567890"
            }
        }
    ]
}
""";

    }

    public override CommandResult SubmitForm(string payload)
    {
        var formInput = JsonNode.Parse(payload)?.AsObject();
        Debug.WriteLine($"Form submitted with formInput: {formInput}");
        if (formInput == null)
        {
            return CommandResult.GoHome();
        }
        ConfirmationArgs confirmArgs = new()
        {
            PrimaryCommand = new AnonymousCommand(
                () =>
                {
                    string? name = formInput["Name"]?.ToString();
                    ToastStatusMessage t = new($"Hi {name}" ?? "No name entered");
                    t.Show();
                })
            {
                Name = "Confirm",
                 Result = CommandResult.KeepOpen(),
            },
            Title = "You can set a title for the dialog",
            Description = "Are you really sure you want to do the thing?",
        };
        return CommandResult.Confirm(confirmArgs);
    }
}
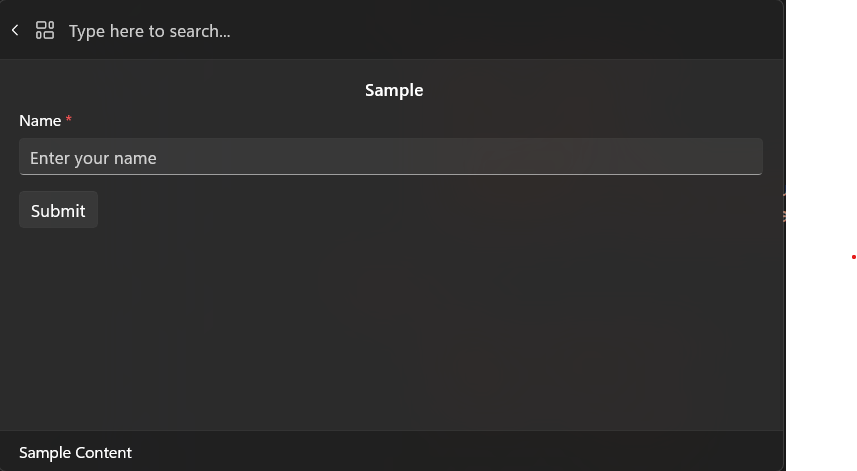
The SampleContentForm contains the form and form submission logic. The TemplateJson contains the form structure and actions. This example only contains one text input which has the id of "Name" and has one action of submitting the form. The SubmitForm handles parsing the payload; if its invalid will return the command to home and otherwise will display a confirmation dialog and a toast notification.
- Open
<ExtensionName>CommandsProvider.cs - Replace the
MarkdownPageforFormPage:
public <ExtensionName>CommandsProvider()
{
    DisplayName = "My sample extension";
    Icon = IconHelpers.FromRelativePath("Assets\\StoreLogo.png");
    _commands = [
+       new CommandItem(new FormPage()) { Title = DisplayName },
    ];
}
- Deploy your extension
- In Command Palette,
Reload
Adaptive Cards can do more complex forms, including using another json object to dynamically create custom forms. You'll first set up your form with the Adaptive Card Designer and then update your command.
- Open https://adaptivecards.io/designer/
- In the
CARD PAYLOAD EDITORreplace the json with:
{
    "$schema": "http://adaptivecards.io/schemas/adaptive-card.json",
    "type": "AdaptiveCard",
    "version": "1.6",
    "body": [
        {
            "type": "TextBlock",
            "size": "medium",
            "weight": "bolder",
            "text": " ${ParticipantInfoForm.title}",
            "horizontalAlignment": "center",
            "wrap": true,
            "style": "heading"
        },
        {
            "type": "Input.Text",
            "label": "Name",
            "style": "text",
            "id": "Name",
            "isRequired": true,
            "errorMessage": "Name is required",
            "placeholder": "Enter your name"
        },
        {
            "type": "TextBlock",
            "size": "medium",
            "weight": "bolder",
            "text": "${Survey.title} ",
            "horizontalAlignment": "center",
            "wrap": true,
            "style": "heading"
        },
        {
            "type": "Input.Toggle",
            "label": "Please accept the terms and conditions:",
            "title": "${Survey.questions[0].question}",
            "valueOn": "true",
            "valueOff": "false",
            "id": "AcceptsTerms",
            "isRequired": true,
            "errorMessage": "Accepting the terms and conditions is required"
        },
        {
            "type": "Input.Toggle",
            "label": "How do you feel about red cars?",
            "title": "${Survey.questions[1].question}",
            "valueOn": "RedCars",
            "valueOff": "NotRedCars",
            "id": "ColorPreference"
        }
    ],
    "actions": [
        {
            "type": "Action.Submit",
            "title": "Submit",
            "data": {
                "id": "1234567890"
            }
        }
    ]
}
- In the
SAMPLE DATA EDITORreplace the json with:
{
    "ParticipantInfoForm": {
        "title": "Input.Text elements"
    },
    "Survey": {
        "title": "Input Toggle",
        "questions": [
            {
                "question": "I accept the terms and conditions (True/False)"
            },
            {
                "question": "Red cars are better than other cars"
            }
        ]
    }
}
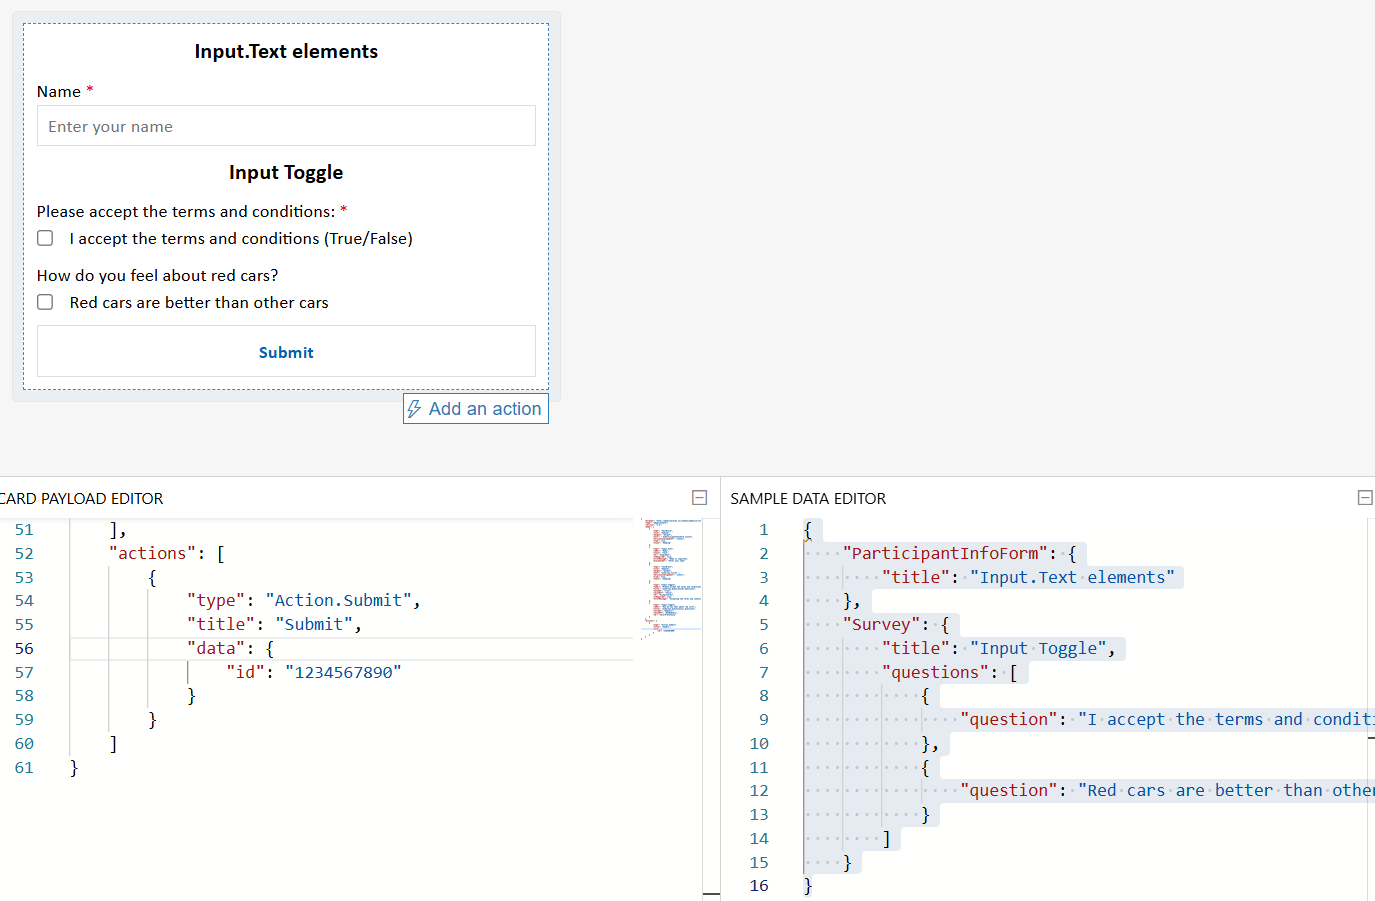
The Designer tool should look something like this:
To add this content to your extension:
- Update
TemplateJsonwithCARD PAYLOAD EDITORcontent - Under
TemplateJson, add:
        DataJson = $$"""
{
    "ParticipantInfoForm": {
        "title": "Input.Text elements"
    },
    "Survey": {
        "title": "Input Toggle",
        "questions": [
            {
                "question": "I accept the terms and conditions (True/False)"
            },
            {
                "question": "Red cars are better than other cars"
            }
        ]
    }
}
""";
- Deploy your extension
- In Command Palette,
Reload
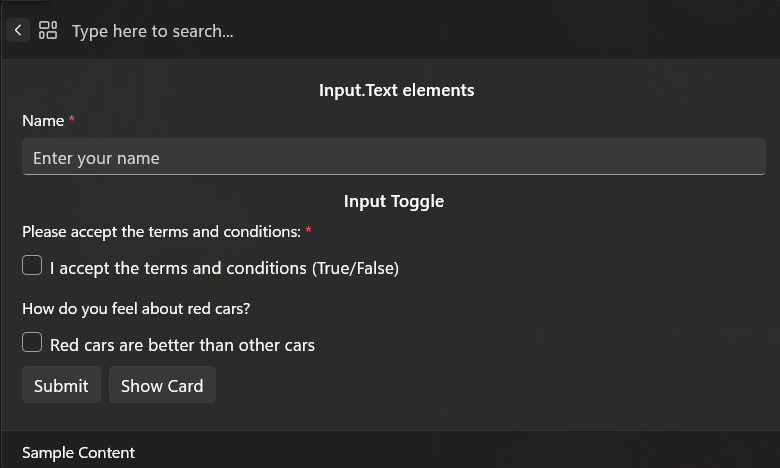
TemplateJson and DataJson work together to create dynamic, data-driven forms. TemplateJson can act as fhe Form Blueprint and DataJson as the Dynamic Content Source.
Full Sample
For a full example of using Forms and Content pages, head on over to SamplePagesExtension/Pages/SampleContentPage.cs.
Key Items
Define your form layout using the
TemplateJsonproperty of yourFormContent. This is the JSON payload from the CARD PAYLOAD EDITOR in the https://adaptivecards.io/designer/. It describes the structure and UI of your form.Optionally bind dynamic data using the
DataJsonproperty. This is the JSON from the SAMPLE DATA EDITOR in the Adaptive Card Designer. It allows you to inject dynamic values into your card using ${...} placeholders, making your forms easier to localize and maintain.Handle form submissions by implementing the
SubmitFormmethod. This method is called when the user submits the form. You’ll receive the form’s payload as a JSON string, which you can parse and use to trigger actions, show confirmation dialogs, or return navigation results.
public override CommandResult SubmitForm(string payload)
{
    var formInput = JsonNode.Parse(payload)?.AsObject();
    if (formInput == null)
    {
        return CommandResult.GoHome();
    }

    // retrieve the value of the input field with the id "name"
    var name = formInput["name"]?.AsString();

    // do something with the data

    // and eventually
    return CommandResult.GoBack();
}
Note
You can mix and match different IContent types in your extension. For example, you might use a MarkdownContent block to display a post, followed by a FormContent block to collect a reply.
Related content
Collaborate with us on GitHub
The source for this content can be found on GitHub, where you can also create and review issues and pull requests. For more information, see our contributor guide.

Windows developer