Note
Access to this page requires authorization. You can try signing in or changing directories.
Access to this page requires authorization. You can try changing directories.
In this how-to, you'll learn how to integrate OpenAI's API into your WinUI 3 / Windows App SDK desktop app. We'll build a chat-like interface that lets you generate responses to messages using OpenAI's text generation and prompting APIs:
Prerequisites
- Set up your development computer (see Start developing Windows apps).
- Familiarity with the core concepts in How to build a Hello World app using C# and WinUI / Windows App SDK - we'll build upon that how-to in this one.
- An OpenAI API key from your OpenAI developer dashboard.
- An OpenAI SDK installed in your project. Refer to the OpenAI documentation for a list of community libraries. In this how-to, we'll use the official OpenAI .NET API library.
Create a project
You create a new WinUI project in Visual Studio by following the steps in the Create and launch your first WinUI app section of the Start developing Windows apps article. For this example, enter ChatGPT_WinUI3 as the project name and ChatGPT_WinUI3 for the solution name when entering the project details in the dialog.
Set your environment variable
In order to use the OpenAI SDK, you'll need to set an environment variable with your API key. In this example, we'll use the OPENAI_API_KEY environment variable. Once you have your API key from the OpenAI developer dashboard, you can set the environment variable from the command line as follows:
setx OPENAI_API_KEY <your-api-key>
Note that this method works well for development, but you'll want to use a more secure method for production apps (for example: you could store your API key in a secure key vault that a remote service can access on behalf of your app). See Best practices for OpenAI key safety.
Install the OpenAI library
From Visual Studio's View menu, select Terminal. You should see an instance of Developer Powershell appear. Run the following command from your project's root directory to install the OpenAI .NET package:
dotnet add package OpenAI
Initialize the library
In MainWindow.xaml.cs, initialize the OpenAI library with your API key:
//...
using OpenAI;
using OpenAI.Chat;

namespace ChatGPT_WinUI3
{
    public sealed partial class MainWindow : Window
    {
        private OpenAIClient openAiService;

        public MainWindow()
        {
            this.InitializeComponent();

            var openAiKey = Environment.GetEnvironmentVariable("OPENAI_API_KEY");

            openAiService = new(openAiKey);
        }
    }
}
Build the chat UI
We'll use a StackPanel to display a list of messages, and a TextBox to let users enter new messages. Update MainWindow.xaml as follows:
<Window
    x:Class="ChatGPT_WinUI3.MainWindow"
    xmlns="http://schemas.microsoft.com/winfx/2006/xaml/presentation"
    xmlns:x="http://schemas.microsoft.com/winfx/2006/xaml"
    xmlns:local="using:ChatGPT_WinUI3"
    xmlns:d="http://schemas.microsoft.com/expression/blend/2008"
    xmlns:mc="http://schemas.openxmlformats.org/markup-compatibility/2006"
    mc:Ignorable="d">
    <Grid>
        <StackPanel Orientation="Vertical" HorizontalAlignment="Stretch">
            <ListView x:Name="ConversationList" />
            <StackPanel Orientation="Horizontal">
                <TextBox x:Name="InputTextBox" HorizontalAlignment="Stretch"/>
                <Button x:Name="SendButton" Content="Send" Click="SendButton_Click"/>
            </StackPanel>
        </StackPanel>
    </Grid>
</Window>
Implement message sending, receiving, and displaying
Add a SendButton_Click event handler to handle the sending, receiving, and display of messages:
public sealed partial class MainWindow : Window
{
    // ...

    private async void SendButton_Click(object sender, RoutedEventArgs e)
    {
        try
        {
            string userInput = InputTextBox.Text;

            if (!string.IsNullOrEmpty(userInput))
            {
                AddMessageToConversation($"User: {userInput}");
                InputTextBox.Text = string.Empty;
                var chatClient = openAiService.GetChatClient("gpt-4o"); // or another model
                var chatOptions = new ChatCompletionOptions
                {
                    MaxOutputTokenCount = 300
                };

                // Assemble the chat prompt with a system message and the user's input
                var completionResult = await chatClient.CompleteChatAsync(
                    [
                        ChatMessage.CreateSystemMessage("You are a helpful assistant."),
                        ChatMessage.CreateUserMessage(userInput)
                    ],
                    chatOptions);

                if (completionResult != null && completionResult.Value.Content.Count > 0)
                {
                    AddMessageToConversation($"GPT: {completionResult.Value.Content.First().Text}");
                }
                else
                {
                    AddMessageToConversation($"GPT: Sorry, something bad happened: {completionResult?.Value.Refusal ?? "Unknown error."}");
                }
            }
        }
        catch (Exception ex)
        {
            AddMessageToConversation($"GPT: Sorry, something bad happened: {ex.Message}");
        }
    }

    private void AddMessageToConversation(string message)
    {
        ConversationList.Items.Add(message);
        ConversationList.ScrollIntoView(ConversationList.Items[ConversationList.Items.Last()]);
    }
}
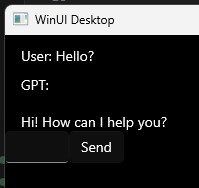
Run the app
Run the app and try chatting! You should see something like this:
Improve the chat interface
Let's make the following improvements to the chat interface:
- Add a
ScrollViewerto theStackPanelto enable scrolling. - Add a
TextBlockto display the GPT response in a way that's more visually distinct from the user's input. - Add a
ProgressBarto indicate when the app is waiting for a response from the GPT API. - Center the
StackPanelin the window, similar to ChatGPT's web interface. - Ensure that messages wrap to the next line when they reach the edge of the window.
- Make the
TextBoxlarger and responsive to theEnterkey.
Starting from the top:
Add ScrollViewer
Wrap the ListView in a ScrollViewer to enable vertical scrolling on long conversations:
        <StackPanel Orientation="Vertical" HorizontalAlignment="Stretch">
            <ScrollViewer x:Name="ConversationScrollViewer" VerticalScrollBarVisibility="Auto" MaxHeight="500">
                <ListView x:Name="ConversationList" />
            </ScrollViewer>
            <!-- ... -->
        </StackPanel>
Use TextBlock
Modify the AddMessageToConversation method to style the user's input and the GPT response differently:
    // ...
    private void AddMessageToConversation(string message)
    {
        var messageBlock = new TextBlock
        {
            Text = message,
            Margin = new Thickness(5)
        };
        if (message.StartsWith("User:"))
        {
            messageBlock.Foreground = new SolidColorBrush(Colors.LightBlue);
        }
        else
        {
            messageBlock.Foreground = new SolidColorBrush(Colors.LightGreen);
        }
        ConversationList.Items.Add(messageBlock);
        ConversationList.ScrollIntoView(ConversationList.Items.Last());
    }
Add ProgressBar
To indicate when the app is waiting for a response, add a ProgressBar to the StackPanel:
        <StackPanel Orientation="Vertical" HorizontalAlignment="Stretch">
            <ScrollViewer x:Name="ConversationScrollViewer" VerticalScrollBarVisibility="Auto" MaxHeight="500">
                <ListView x:Name="ConversationList" />
            </ScrollViewer>
            <ProgressBar x:Name="ResponseProgressBar" Height="5" IsIndeterminate="True" Visibility="Collapsed"/> <!-- new! -->
        </StackPanel>
Then, update the SendButton_Click event handler to show the ProgressBar while waiting for a response:
    private async void SendButton_Click(object sender, RoutedEventArgs e)
    {
        ResponseProgressBar.Visibility = Visibility.Visible; // new!
        string userInput = InputTextBox.Text;

        try
        {
            if (!string.IsNullOrEmpty(userInput))
            {
                AddMessageToConversation($"User: {userInput}");
                InputTextBox.Text = string.Empty;
                var chatClient = openAiService.GetChatClient("gpt-4o"); // or another model
                var chatOptions = new ChatCompletionOptions
                {
                    MaxOutputTokenCount = 300
                };

                // Assemble the chat prompt with a system message and the user's input
                var completionResult = await chatClient.CompleteChatAsync(
                    [
                        ChatMessage.CreateSystemMessage("You are a helpful assistant."),
                        ChatMessage.CreateUserMessage(userInput)
                    ],
                    chatOptions);

                if (completionResult != null && completionResult.Value.Content.Count > 0)
                {
                    AddMessageToConversation($"GPT: {completionResult.Value.Content.First().Text}");
                }
                else
                {
                    AddMessageToConversation($"GPT: Sorry, something bad happened: {completionResult?.Value.Refusal ?? "Unknown error."}");
                }
            }
        }
        catch (Exception ex)
        {
            AddMessageToConversation($"GPT: Sorry, something bad happened: {ex.Message}");
        }
        finally // new!
        {
            ResponseProgressBar.Visibility = Visibility.Collapsed; // new!
        }
    }
Center the StackPanel
To center the StackPanel and pull the messages down towards the TextBox, adjust the Grid settings in MainWindow.xaml:
    <Grid VerticalAlignment="Bottom" HorizontalAlignment="Center">
        <!-- ... -->
    </Grid>
Wrap messages
To ensure that messages wrap to the next line when they reach the edge of the window, update MainWindow.xaml to use an ItemsControl.
Replace this:
    <ScrollViewer x:Name="ConversationScrollViewer" VerticalScrollBarVisibility="Auto" MaxHeight="500">
        <ListView x:Name="ConversationList" />
    </ScrollViewer>
With this:
    <ScrollViewer x:Name="ConversationScrollViewer" VerticalScrollBarVisibility="Auto" MaxHeight="500">
        <ItemsControl x:Name="ConversationList" Width="300">
            <ItemsControl.ItemTemplate>
                <DataTemplate>
                    <TextBlock Text="{Binding Text}" TextWrapping="Wrap" Margin="5" Foreground="{Binding Color}"/>
                </DataTemplate>
            </ItemsControl.ItemTemplate>
        </ItemsControl>
    </ScrollViewer>
We'll then introduce a MessageItem class to facilitate binding and coloring:
    // ...
    public class MessageItem
    {
        public string Text { get; set; }
        public SolidColorBrush Color { get; set; }
    }
    // ...
Finally, update the AddMessageToConversation method to use the new MessageItem class:
    // ...
    private void AddMessageToConversation(string message)
    {
        var messageItem = new MessageItem
        {
            Text = message,
            Color = message.StartsWith("User:") ? new SolidColorBrush(Colors.LightBlue)
                                                : new SolidColorBrush(Colors.LightGreen)
        };
        ConversationList.Items.Add(messageItem);

        // handle scrolling
        ConversationScrollViewer.UpdateLayout();
        ConversationScrollViewer.ChangeView(null, ConversationScrollViewer.ScrollableHeight, null);
    }
    // ...
Improve the TextBox
To make the TextBox larger and responsive to the Enter key, update MainWindow.xaml as follows:
    <!-- ... -->
    <StackPanel Orientation="Vertical" Width="300">
        <TextBox x:Name="InputTextBox" HorizontalAlignment="Stretch" VerticalAlignment="Stretch" KeyDown="InputTextBox_KeyDown" TextWrapping="Wrap" MinHeight="100" MaxWidth="300"/>
        <Button x:Name="SendButton" Content="Send" Click="SendButton_Click" HorizontalAlignment="Right"/>
    </StackPanel>
    <!-- ... -->
Then, add the InputTextBox_KeyDown event handler to handle the Enter key:
    //...
    private void InputTextBox_KeyDown(object sender, KeyRoutedEventArgs e)
    {
        if (e.Key == Windows.System.VirtualKey.Enter && !string.IsNullOrWhiteSpace(InputTextBox.Text))
        {
            SendButton_Click(this, new RoutedEventArgs());
        }
    }
    //...
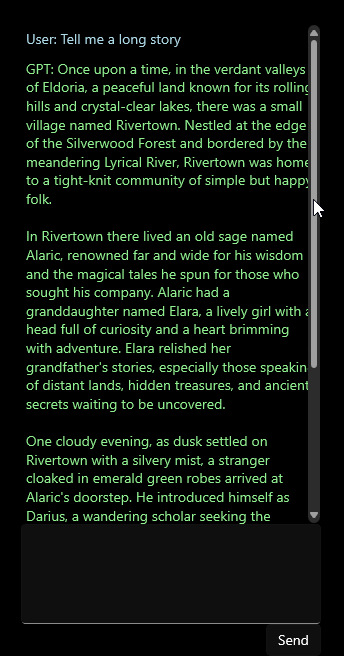
Run the improved app
Your new-and-improved chat interface should look something like this:
Recap
Here's what you accomplished in this how-to:
- You added OpenAI's API capabilities to your WinUI 3 / Windows App SDK desktop app by installing the official OpenAI library and initializing it with your API key.
- You built a chat-like interface that lets you generate responses to messages using OpenAI's text generation and prompting APIs.
- You improved the chat interface by:
- adding a
ScrollViewer, - using a
TextBlockto display the GPT response, - adding a
ProgressBarto indicate when the app is waiting for a response from the GPT API, - centering the
StackPanelin the window, - ensuring that messages wrap to the next line when they reach the edge of the window, and
- making the
TextBoxlarger, resizable, and responsive to theEnterkey.
- adding a
Full code files
The following code is a full example of the chat app with OpenAI chat completions integrated:
<?xml version="1.0" encoding="utf-8"?>
<Window
    x:Class="ChatGPT_WinUI3.MainWindow"
    xmlns="http://schemas.microsoft.com/winfx/2006/xaml/presentation"
    xmlns:x="http://schemas.microsoft.com/winfx/2006/xaml"
    xmlns:local="using:ChatGPT_WinUI3"
    xmlns:d="http://schemas.microsoft.com/expression/blend/2008"
    xmlns:mc="http://schemas.openxmlformats.org/markup-compatibility/2006"
    mc:Ignorable="d">
    <Grid VerticalAlignment="Bottom" HorizontalAlignment="Center">
        <StackPanel Orientation="Vertical" HorizontalAlignment="Center">
            <ScrollViewer x:Name="ConversationScrollViewer" VerticalScrollBarVisibility="Auto" MaxHeight="500">
                <ItemsControl x:Name="ConversationList" Width="300">
                    <ItemsControl.ItemTemplate>
                        <DataTemplate>
                            <TextBlock Text="{Binding Text}" TextWrapping="Wrap" Margin="5" Foreground="{Binding Color}"/>
                        </DataTemplate>
                    </ItemsControl.ItemTemplate>
                </ItemsControl>
            </ScrollViewer>
            <ProgressBar x:Name="ResponseProgressBar" Height="5" IsIndeterminate="True" Visibility="Collapsed"/>
            <StackPanel Orientation="Vertical" Width="300">
                <TextBox x:Name="InputTextBox" HorizontalAlignment="Stretch" VerticalAlignment="Stretch" KeyDown="InputTextBox_KeyDown" TextWrapping="Wrap" MinHeight="100" MaxWidth="300"/>
                <Button x:Name="SendButton" Content="Send" Click="SendButton_Click" HorizontalAlignment="Right"/>
            </StackPanel>
        </StackPanel>
    </Grid>
</Window>
using Microsoft.UI;
using Microsoft.UI.Xaml;
using Microsoft.UI.Xaml.Input;
using Microsoft.UI.Xaml.Media;
using System;
using System.Collections.Generic;
using System.Linq;

using OpenAI;
using OpenAI.Chat;

namespace ChatGPT_WinUI3
{
    public class MessageItem
    {
        public string Text { get; set; }
        public SolidColorBrush Color { get; set; }
    }

    public sealed partial class MainWindow : Window
    {
        private OpenAIService openAiService;

        public MainWindow()
        {
            this.InitializeComponent();

            var openAiKey = Environment.GetEnvironmentVariable("OPENAI_API_KEY");

            openAiService = new(openAiKey);
        }

        private async void SendButton_Click(object sender, RoutedEventArgs e)
        {
            ResponseProgressBar.Visibility = Visibility.Visible;
            string userInput = InputTextBox.Text;

            try
            {
                if (!string.IsNullOrEmpty(userInput))
                {
                    AddMessageToConversation($"User: {userInput}");
                    InputTextBox.Text = string.Empty;
                    var chatClient = openAiService.GetChatClient("gpt-4o"); // or another model
                    var chatOptions = new ChatCompletionOptions
                    {
                        MaxOutputTokenCount = 300
                    };

                    // Assemble the chat prompt with a system message and the user's input
                    var completionResult = await chatClient.CompleteChatAsync(
                        [
                            ChatMessage.CreateSystemMessage("You are a helpful assistant."),
                            ChatMessage.CreateUserMessage(userInput)
                        ],
                        chatOptions);

                    if (completionResult != null && completionResult.Value.Content.Count > 0)
                    {
                        AddMessageToConversation($"GPT: {completionResult.Value.Content.First().Text}");
                    }
                    else
                    {
                        AddMessageToConversation($"GPT: Sorry, something bad happened: {completionResult?.Value.Refusal ?? "Unknown error."}");
                    }
                }
            }
            catch (Exception ex)
            {
                AddMessageToConversation($"GPT: Sorry, something bad happened: {ex.Message}");
            }
            finally
            {
                ResponseProgressBar.Visibility = Visibility.Collapsed;
            }
        }

        private void AddMessageToConversation(string message)
        {
            var messageItem = new MessageItem
            {
                Text = message,
                Color = message.StartsWith("User:") ? new SolidColorBrush(Colors.LightBlue)
                                                    : new SolidColorBrush(Colors.LightGreen)
            };
            ConversationList.Items.Add(messageItem);

            // handle scrolling
            ConversationScrollViewer.UpdateLayout();
            ConversationScrollViewer.ChangeView(null, ConversationScrollViewer.ScrollableHeight, null);
        }

        private void InputTextBox_KeyDown(object sender, KeyRoutedEventArgs e)
        {
            if (e.Key == Windows.System.VirtualKey.Enter && !string.IsNullOrWhiteSpace(InputTextBox.Text))
            {
                SendButton_Click(this, new RoutedEventArgs());
            }
        }
    }
}
Related content
Collaborate with us on GitHub
The source for this content can be found on GitHub, where you can also create and review issues and pull requests. For more information, see our contributor guide.

Windows developer