Note
Access to this page requires authorization. You can try signing in or changing directories.
Access to this page requires authorization. You can try changing directories.
This topic describes the process used to test a Wireless LAN (WLAN) device to make sure that it functions correctly with Windows. These procedures use the Microsoft Windows Driver Kit (WDK) and Windows Hardware Lab Kit (Windows HLK). To comply with the WLAN Windows Hardware Certification Program, you must run all of the tests that Windows HLK identifies as being required for the device. We also recommend that you work through the tests in order by the following levels: "Basic", "Functional", "Reliability", and "Certification."
Note
For a driver to pass testing and obtain Windows Hardware Certification, you must use the latest version of the WDK to compile the driver.
Note
WLAN Windows HLK tests that use software-based access points are exclusively supported by using specific Atheros WLAN NICs. Windows HLK customers who test WLAN drivers must use a WLAN adapter installed in the AP Controller Machine to complete their submissions. Only two devices have been specifically tested at the time of Windows 8.1 release: Dlink DWA-552 and Dlink DWA-556. Additional models might have worked in the past and might continue to work, but cannot be guaranteed. If you have questions about this, please contact us at wlanndt@microsoft.com.
The tests to run depend on the capabilities of the device or system that you are testing. The tests take approximately 36-40 hours to run. These times represent fully passing results. Failures in any test or reboots due to crashes add additional time to the tests. These times can vary by platform and performance of individual machines that are used in the tests.
Windows HLK Setup for WLAN Device Testing
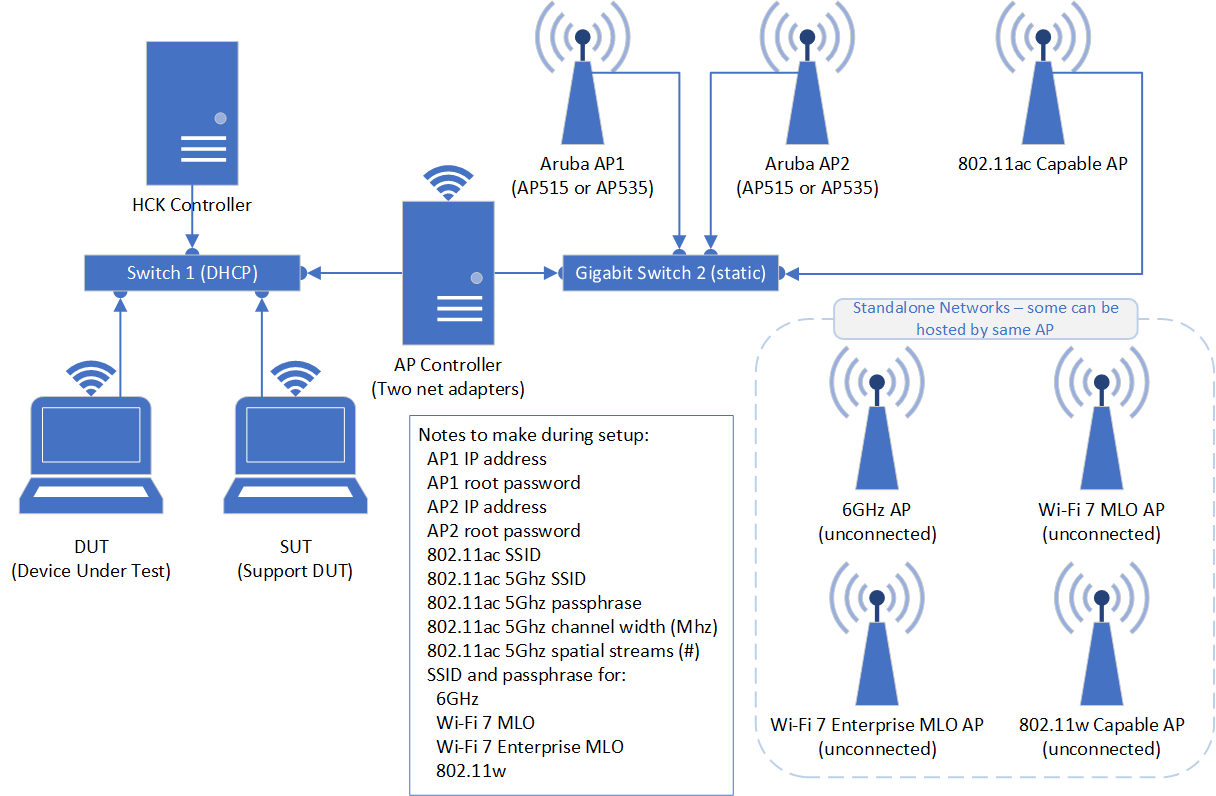
A Windows HLK setup for WLAN device testing consists of the following components:
A computer that is running Windows HLK Studio. Through this application, you can control and configure the Windows HLK Controller to send jobs to the Windows HLK clients in the Windows HLK system pool. All requirements for a WLAN Windows HLK submission are enforced when the Windows HLK test execution job is configured.
A Windows HLK Controller computer. This computer must run Windows Server. For more information see Windows HLK Prerequisites. (In many cases, this computer can be the same computer that runs Windows HLK Studio.) This component reserves Windows HLK clients in the system pool for a test job. In Figure 1 WLAN Setup, the Windows HLK Controller and Windows HLK Studio machine are represented as one machine.
A Device Under Test (DUT), which is a computer that is running the desired operating system and architecture for which you are seeking certification, and on which the device for certification is installed. You must install the Windows HLK Client on this machine.
A Support Device Under Test (SUT), which is a computer that is running the same version and processor architecture of Windows as the DUT. The SUT must also have the same WLAN device installed and be running the same driver version as the DUT.
An AP Controller, which is a machine that is running the same processor architecture of Windows as the DUT and SUT. This machine must have a compatible WLAN adapters installed (Dlink DWA-552 is recommended) and two Ethernet adapters installed, one of which must be capable of reaching 1Gbps. You must install the Windows HLK Client on this machine.
Two Aruba 515 or 535 APs. See Figure 1 WLAN Setup for configuration details and physical arrangement of the routers.
An 802.11AC capable router/access point. See Figure 1 WLAN Setup for configuration details and physical arrangements. The 802.11AC router must support at least the same number of antennas, spatial streams, and max throughput as the DUT. Using an 802.11AC router that does not support enough throughput will fail the 802.11 performance tests. You can use the 2.4Ghz side of the 802.11AC router as the AP for Wlan L1 and Device Fundamental tests. You should configure this with WPA2 Personal and an AES cipher. The defaults for these tests use an ssid of kitstestssid and a password of password.
An 802.11w-capable access point. This item is unchanged from previous WLAN Windows HLK releases and the previously used access point can be used.
A 6GHz capable access point. A network should be configured on the 6GHz band only to avoid connection on another band during testing. This access point is not needed if the DUT is not a 6GHz capable device.
A Wi-Fi 7, Multi-Link Operation capable access point. It must be configured with a Wi-Fi 7 MLO WPA3 network which can establish at least two links. It can usually be the same physical access point as the 6GHz-capable AP mentioned above. This access point is not needed if the DUT doesn't support 802.11be.
A Wi-Fi 7 Enterprise, Multi-Link Operation capable access point. It must be configured with a Wi-Fi 7 MLO WPA3 Enterprise network, supporting at least two links, using CCMP-128 encryption and PEAP. This access point is not needed if the DUT doesn't support 802.11be or Wi-Fi 7 Enterprise.
Note
Windows Vista and earlier versions of Windows are deprecated and are not supported for any role in the test configuration.
Figure 1 WLAN Setup shows the WLAN setup:
Prepare for Wireless LAN (802.11) Testing
Aruba (AP1 & AP2) Preparation:
The currently supported Aruba APs are 515 and 535 running ArubaOS Instant 8.5.0.0.
In a normal installation, Aruba APs are set up in a "swarm" with one AP designated the Controller and the rest clients. In this case, AP configuration changes are applied on the Controller and (eventually) exported to the appropriate clients. As the AP Controller system configures each AP independently, this Controller/client setup will not work for WLAN HLK testing. Instead, the APs must be converted from Managed to Standalone mode.
You can troubleshoot the tests' ability to connect to the APs using Telnet.exe to connect to both routers on the WAN IP address from the AP-Controller. If you cannot connect to either AP from the AP-Controller using the WAN IP address, the tests cannot connect and will fail.
These preparation steps do not apply to any standalone APs used for the setup, such as the 802.11 AC, Wi-Fi 6E, or Wi-Fi 7 routers. For the 802.11AC router, configure it to match the maximum bandwidth and spatial streams that your device supports.
Assign the AP a static IP
To set up a new Standalone Aruba AP, unplug it from the network, plug it's USB cable into a PC and...
Use Device Manager to determine which COM port the AP is plugged into
Start PuTTY, select Serial and enter the COM port
Power-cycle the AP
Before the boot starts there is a 2-second pause to press Return and stop the boot
Once the boot has stopped you are in a special command-mode terminal session. Use it to assign a static IP address:
apboot> factory_reset (optional)
apboot> setenv ipaddr 192.168.s.n (use Gigbit Switch 2's subnet)
apboot> setenv netmask 255.255.255.0
apboot> setenv gatewayip 192.168.s.cc (the IP of the AP Controller)
apboot> saveenv
apboot> printenv
apboot> boot (takes about 3 minutes)
Convert to Aruba Instant OS
Standalone mode is only supported by the Aruba Instant OS. When you log in the web on a non-Instant OS you will see the Access Point Provisioning page to force the upgrade:
Log into the Web interface. The default login is admin/admin or admin/serial#.
Browse to the new OS image. (Must be on the local machine.)
Select Save and Upgrade Now.
Immediately after the Upgrade Successful the AP will reboot.
Turn on Telnet and Convert to Standalone mode
Once the AP is running Instant do the final setup steps:
Log in on the Web interface. The default login is either admin/admin or, if the AP was just upgraded, admin/serial#.
If the AP was just upgraded you will see a Reset default password page. Enter the new password, click OK then log in again with your new password.
Enable Terminal access (telnet):
Configuration > System > Show Advanced Options > General > Terminal Server
Set static IP (only necessary if IP is changing)
Configuration > Access Points > Select AP's MAC > Edit (pencil) > Specify Statically
Convert to Standalone:
Maintenance > Convert
Convert one or more Access Points to > Standalone AP
Access Point to convert > Select AP's MAC from drop-down list (it's usually the only one)
Convert Do you want to Continue? > OK
Topology Configuration and Preparation:
Each line in Figure 1. WLAN Setup represents a connected Ethernet cable.
The AP Controller requires two LAN adapters. One LAN adapter (Nic 1) connects to Gigabit Switch 1, and the second lan adapter (Nic 2) connects to Gigabit Switch 2. Nic 2 MUST be a gigabit adapter and cannot be a USB Ethernet adapter. This adapter is used to measure 802.11AC performance. The IP address on Nic 1 must be assigned using DHCP. The IP address on Nic 2 must be statically assigned. This assignment method enables the tests to identify the adapters.
Do not use the same IP address space for Gigabit switch 1 and Gigabit Switch 2. They must contain IP/subnet masks that do not overlap. Further, you must use DHCP for address assignment on Gigabit Switch 1 (this can be the same network you typically use for other HLK testing) and the IP range for Gigabit Switch 1 must NOT be in the range 192.168.x.x. We suggest that you use 192.168.100.* for the addressing on gigabit switch 2.
The DUT, SUT, AP Controller, and HLK Controller need hard-wired LAN connections to gigabit switch 1. This cannot be the same switch as gigabit switch 2. A DHCP service must provide IP addresses on gigabit switch 1. If Nic 1 on the AP controller is not assigned an IP address using DHCP, tests will fail.
Each static IP connected to gigabit switch 2 must be unique.
Figure 1. WLAN Setup includes some notes to keep regarding IP addresses, SSIDs, passwords, etc. You are prompted for these values during test runs.
Both wireless adapters that are installed in the DUT and SUT must fully support Wifi-Direct. We recommend that you use the same adapter and driver in both DUT and SUT.
For devices that support 802.11AC, both the DUT and SUT must contain the same wireless adapter and driver.
AP Controller Configuration:
The AP Controller is required to have one WLAN adapter in order to pass all WLAN HLK tests.
The AP Controller requires 2 Ethernet adapters. One of these must support gigabit speeds.
The Ethernet adapter that is connected to switch 2 must be a gigabit Ethernet adapter. This requirement ensures unrestricted performance testing.
The architecture of the AP controller operating system must match the architecture of the DUT operating system (32bit for x86, 64bit for AMD64).
The AP Controller does not require a single-processor architecture. This detail is adjusted by the test automation.
HLK Pool Configuration:
After you configure the test topology, prepare the test systems for WLAN device testing using the following steps:
Set up the following machine configurations by using the previous configuration instructions:
One test device on the DUT
One test device on the SUT
One WLAN adapter on the AP Controller
Two Ethernet adapters on the AP Controller
Windows HLK Studio and Windows HLK Controller
Based on the operating system for which you are testing the device, install operating system builds on the Windows HLK clients (three test computers namely DUT, SUT and AP Controller machine) as described in the previous section.
Install HLK controller and HLK studio machine on Windows Server machine. For more information see Step 2: Install Client on the test system(s).
Install HLK clients on three test computers DUT, SUT and AP Controller. For more information see the Windows Hardware Certification Step-by-Step Guide.
On the Windows HLK Controller click Start, click All Programs, click Windows Kits, click Hardware Certification Kit, and click Windows HLK Studio.
Click Configuration and then click Machine Management.
Click Create Machine Pool.
Type the machine pool name in the New Pool field and then press Enter. The new machine pool should appear as a node under $ (Root).
Select the Default pool. The Windows HLK Client machines should be listed in the Machines list.
Press and hold the CTRL key and click each of the three defined machines to select all three machines.
Drag the three selected machines to the newly created machine pool.
In the new machine pool, right-click the three machines. Click Change Machine Status and then click Reset. The machines will change from a Not Ready state to an Initializing state and then to a Ready state. During the initialization process, devices on the machine are enumerated and cataloged. It is important for all devices to have been installed by this point.
You can configure additional pools on one Windows HLK Controller by replicating the entire topology and restarting with step 4
If you are using a debugger machine with each topology (in the case of multiple topologies), you can install separate copies of the Windows HLK Studio on additional machines so that more than one tester can share the same controller. Use separate projects for each topology/pool and only use one topology per pool.
Run Wireless LAN (802.11) tests for Certification
The following procedure demonstrates how to run the WLAN device tests:
Open the Windows HLK Studio.
On the Project tab, click Create Project and name the project.
Click the Selection tab.
Select your new machine pool in the dropdown in the upper left and click Device Manager. The list populates with the names of all the devices installed on the machines in that pool.
In the list, locate the WLAN driver under test and check the box next to it.
Note
There might be more than one WLAN driver listed. Make sure you check the one that is on the DUT. The machine name is listed in the right column.
Click the Tests tab - by default all the available certification tests applicable to the selected device will display.
You can filter the displayed list by clicking View by and then selecting additional options, such as Basic, Functional, or Reliability.
Only Certification tests are required for the certification process; however, running Basic and Functional tests provides a specific set of functionally important tests.
Select the test to run by checking the box on the left next to it. Click Run Selected. You are prompted to add any additional parameters. (You can also check the box next to multiple tests.)
Not all parameters are used for all tests. Only the parameters that are necessary for the selected test(s) are shown. You can view detailed parameter descriptions by hovering the mouse pointer over the parameter name. Many of the parameters will be derived from the topology notes mentioned above. If you press the F1 key while a test is selected, detailed information on that test and its parameters is shown.
Machine Set section is always present for Functional and Reliability tests. This section represents the machine resources that are necessary to run the tests. You must address all "!" symbols before you click OK.
Select the first test name from the list (if there is more than one).
From the Role menu, select Client - the DUT machine should already be selected and grayed out.
From the Role menu, select Support and check the box next to the SUT Machine.
From the Role menu, select AP and check the box next to the AP Machine.
Click OK to schedule. You can monitor the detailed progress of the tests in Windows HLK Manager, or simply watch as each test result displays in the Status column.
View Results and Log Files
Results and logs can be viewed through Windows HLK Manager or Windows HLK Studio.
In Windows HLK Manager, click Explorers and then click Job Monitor.
When the client machines complete test jobs, you can gather information from the Job Execution Status frame by right-clicking a job and viewing errors, job reports, or result reports. You can also click Browse Job Logs to access test results.
In HLK Studio, click the Results tab. View the Status column to monitor the results of each test. You can choose each column to sort the results. If a test passes, you will see a green checkmark; if it fails, you will see a red X. For more detailed information on viewing logs, see Step 7: View test results and log files.
Create a Package
After passing all of the necessary tests, you are ready to create an .hlkx submission package for certification.
Windows HLK Studio supports package creation, so you don't have to use a separate submission tool. The package creation feature lets you add necessary resource files to complete the certification. For detailed instructions on how to create a package, see Step 8: Create a submission package.