Note
Access to this page requires authorization. You can try signing in or changing directories.
Access to this page requires authorization. You can try changing directories.
Important
Some information in this article relates to a prereleased product which may be substantially modified before it's commercially released. Microsoft makes no warranties, expressed or implied, with respect to the information provided here.
Multitenant management in Microsoft Defender supports government cloud environments to view their tenants in other cloud environments through cross-cloud visibility. Security operations teams operating in government cloud environments can now manage their entire security operations, including tenants in other cloud environments, in a single pane of glass.
Cross-cloud visibility allows GCC High and DoD multitenant customers to view and manage tenants in Microsoft GCC and Commercial cloud environments.
Prerequisites
Cross-cloud visibility is available to government customers who have the applicable licensing requirements.
In addition, ensure that the trust multi-factor authentication (MFA) from Microsoft Entra tenants is properly configured to successfully access tenants in Microsoft Commercial cloud environments. To configure MFA, see Change inbound trust settings for MFA and device claims.
B2B collaboration settings
Follow these steps to configure B2B collaboration settings.
Home tenant settings
- Sign in to the Microsoft Entra admin center.
- Navigate to Identity > External identities > Cross-tenant access settings, then select Cross-tenant access settings.
- Select Add organization. Enter the tenant ID of the organization you want to add, then select Add.
Note
By default, a B2B inherits the default settings of your tenant.
Configure your tenant settings to the following:
- For the organization you added, select Inbound access.
- Set B2B collaboration to Block for Access and Users.
- On the Application tab, set access to Block and Applies to All applications, then select Save.
- Select B2B direct connect, set access status to Block and Applies to all users.
- On the Application tab, set access to Block and Applies to All applications, then select Save.
No other MFA Trust settings are required for the home tenant.
You then need to configure outbound access settings for the home tenant by following these steps:
- In the Cross-tenant access settings pane, select Outbound access.
- Configure B2B collaboration by setting access status to Allow.
- In the Applies to, select any depending on your requirements.
- Select External applications and set access status to Allow.
- Set the Applies to to All external applications. Select Save.
- Select B2B direct connect and set access status to Block.
- In the Applies to, select All users.
- Select External applications and set access status to Block.
- Set the Applies to to All external applications. Select Save.
Target tenant settings
- Sign in to the Microsoft Entra admin center.
- Navigate to Identity > External identities > Cross-tenant access settings, then select Cross-tenant access settings.
- Select Add organization. Enter the tenant ID of the organization you want to add, then select Add.
Configure the target tenant settings to the following:
- For the organization you added, select Inbound access.
- Set B2B collaboration to Allow for Access and Users.
- On the Application tab, set access to Allow and Applies to All applications, then select Save.
- Select B2B direct connect, set access status to Block and Applies to All users.
- On the Application tab, set access to Block and Applies to All applications, then select Save.
- Select Trust settings, then select Trust multi-factor authentication from Microsoft Entra tenants.
You then need to configure outbound access settings from the home tenant by following these steps:
- In the Cross-tenant access settings pane, select Outbound access.
- Configure B2B collaboration by setting access status to Block.
- In the Applies to, select All users.
- Select External applications and set access status to Block.
- Set the Applies to to All external applications. Select Save.
- Select B2B direct connect and set access status to Block.
- In the Applies to, select All users.
- Select External applications and set access status to Block.
- Set the Applies to to All external applications. Select Save.
Cross-cloud tenant management
To manage tenants from other Microsoft cloud environments:
Go to the Settings page in Microsoft Defender multitenant management.
Select the dropdown beside Add tenants, then select add from another cloud.
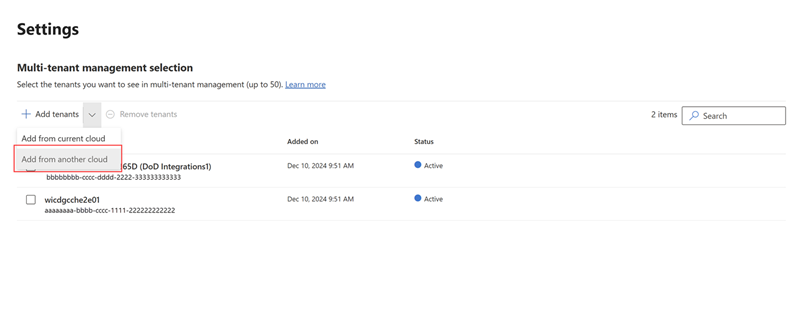
In the next pane, type the tenant ID or domain where the tenant is to add a tenant, then select Verify tenant. The verification process looks at the added tenant’s information and permissions.

Once verified, select Add tenant to complete the process.


The tenants list now includes the tenants from the other cloud environment. You can now manage these tenants as you would any other tenant in Microsoft Defender.
If you get an error during the verification process, you can:
- Check the tenant ID or domain you entered.
- Ensure you have the correct permissions to access the tenant.
To remove tenants from the list, select the tenant, then select Remove tenants.
After successfully adding tenants from other clouds, you can view these tenants in other multitenant pages like the incidents and device inventory pages.
Note
When a cross-cloud tenant is added to a distribution profile and subsequently removed from cross-cloud visibility, the tenant's name is removed from the tenant list and won’t be available for content management. This is a recognized limitation of cross-cloud visibility and is currently under review. See Troubleshooting issues for more information.