Add dynamic alphabet buttons
In this section, you build a grid displaying all the letters of the alphabet as buttons. Instead of manually creating each button, you use an approach that generates them automatically. This method streamlines your code and makes this code more maintainable and adaptable to future changes. You first build a custom datatype, GameLetter, to represent the idea of a Letter. When the user selects a letter, letter is no longer available to the user for that game. Then, you learn how to use data binding to connect your UI elements directly to your ViewModel, ensuring that your interface always reflects the current state of the game.
In the MainPage.xaml file, there's currently a single button representing the letter "A." Instead of typing a button for each letter in the alphabet, like this example:
<Button Content="A" .../>
<Button Content="B" .../>
<Button Content="C" .../>
<Button Content="D" .../>
You can generate buttons dynamically. Ideally, the letters of the game know if they have been guessed already. Having an object that contains information about the letter and if this letter is available to the user is ideal. Then there's an array of letters that you can iterate over to create each button.
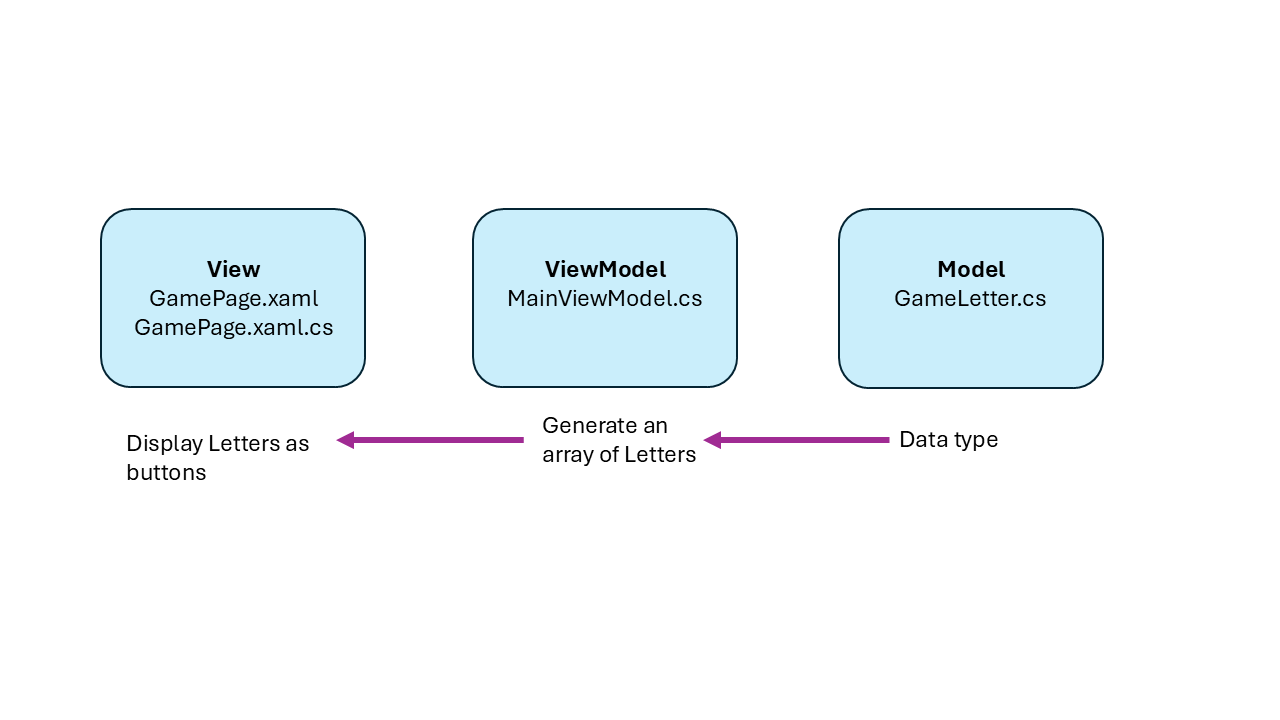
Model
This section, you build the custom datatype, GameLetter that has two properties.
In the Solution Explorer, Right click your Model folder > Add > Class
Name the file GameLetter.cs
Add to the imports:
using CommunityToolkit.Mvvm.ComponentModel;Replace the
internal class GameLetter{}with:
public partial class GameLetter : ObservableObject
{
    public char Character { get; set; }

    [ObservableProperty]
    public partial bool IsAvailable { get; set; }

    public GameLetter(char character)
    {
        this.Character = character;
        this.IsAvailable = true;
    }
}
The GameLetter class is designed to represent a single letter in the game and has two properties: Character (the letter itself) and IsAvailable (whether the letter can be guessed). The GameLetter class also inherits from ObservableObject, like the ViewModel, allowing the UI to be automatically notified and updated when this data changes.
ViewModel
The ViewModel creates the array of GameLetter objects from A to Z. It also handles when the user selects a letter as a guess; at that point it updates the View.
In the Solution Explorer, open MainViewModel.cs
Add Letter Property under
WordDisplay:[ObservableProperty] public partial List<GameLetter> Letters { get; set; }Add the creation of the letters to the top of the
MainViewModel‘s ConstructorLetters = new List<GameLetter>(); for (char letter = 'A'; letter <= 'Z'; letter++) { Letters.Add(new GameLetter(letter)); }Add a Command Handler Function under
// Command executed when a letter is guessed:[RelayCommand] public void OnLetterGuessed(char LetterValue) { // play the game with the guessed letter UpdateProperties(LetterValue); }Replace the
UpdatePropertiesto:
private void UpdateProperties(char LetterValue = '\0')
{
if (LetterValue != '\0')
{
GameLetter foundLetter = Letters.Find(letter => letter.Character == LetterValue);
if (foundLetter != null)
{
foundLetter.IsAvailable = false;
}
}
WordDisplay = string.Join(" ", _game.GuessedWord);
}
Here's the MainViewModel.cs with all updates
public partial class MainViewModel : ObservableObject
{
private readonly Game _game;
// Properties bound to the UI
[ObservableProperty]
public partial string WordDisplay { get; set; }
[ObservableProperty]
 public partial List<GameLetter> Letters { get; set; }
// Constructor initializes the game and letters
public MainViewModel()
{
Letters = new List<GameLetter>();
for (char letter = 'A'; letter <= 'Z'; letter++)
{
    Letters.Add(new GameLetter(letter));
}
_game = new Game();
StartNewGame();
}
// Starts a new game and updates the properties
public void StartNewGame()
{
UpdateProperties();
}
// Command executed when a letter is guessed
[RelayCommand]
public void OnLetterGuessed(char LetterValue)
{
    // play the game with the guessed letter
    UpdateProperties(LetterValue);
}
// Ends the game, disables letters, and shows the end game message
// Command executed when the popup close button is clicked
// Shows the end game message in a popup
// Updates the properties bound to the UI
private void UpdateProperties(char LetterValue = '\0')
{
    if (LetterValue != '\0')
    {
        GameLetter foundLetter = Letters.Find(letter => letter.Character == LetterValue);
        if (foundLetter != null)
        {
            foundLetter.IsAvailable = false;
        }
    }
    WordDisplay = string.Join(" ", _game.GuessedWord);

}
// Enables or disables the letter buttons
}
The Letters array of GameLetter objects uses the ObservableProperty attribute. By making the Letters array observable, and the UI updates automatically when these values change. In the MainViewModel's Constructor, the actual content of the Letters array is created and ready for the View to use.
The OnLetterGuessed methods use the RelayCommand, which automatically turns it into a command that can be bound to UI elements, specifically the Letter buttons that are created in the View. The RelayCommand allows the ViewModel to handle user interactions cleanly, without requiring event handlers in the code-behind. When the letter button is clicked, this action triggers this command, executing the OnLetterGuessed method.
The new UpdateProperties function now handles the case where it receives a Letter. When it does, it sets the IsAvailable property of that GameLetter to False, disabling the button.
View
To create buttons dynamically, you use a Control. In Windows app development, controls are the UI elements that display content and enable user interaction. There are over 45 controls, ranging from simple elements like buttons and text boxes to more advanced data presentation controls like the GridView and ListView. These controls adhere to the Fluent Design System principles, ensuring your app looks modern, scales well across different devices and screen sizes, and provides a consistent user experience.
In the Solution Explorer, open the GamePage.xaml file
Locate the Page element
At the end of Page element, add a new
x:Nameproperty:x:Name="ThisPage"Delete the Alphabet Buttons’ Grid
<!-- Alphabet Buttons -->
<Grid x:Name=" AlphabetButtonsGridView" Grid.Row="1" Grid.Column="1" HorizontalAlignment="Center" VerticalAlignment="Center" Margin="10,50,10,10">
    <Button Content="A" IsEnabled="True" FontSize="20"/>
</Grid>
Replace it with Grid View code:
<GridView x:Name="AlphabetButtonsGridView" Grid.Row="1" Grid.Column="1" HorizontalAlignment="Center" VerticalAlignment="Center" Margin="10,50,10,10"
  ScrollViewer.HorizontalScrollMode="Enabled"
  ScrollViewer.HorizontalScrollBarVisibility="Auto"
  ScrollViewer.VerticalScrollMode="Disabled"
  ScrollViewer.VerticalScrollBarVisibility="Hidden"
  ItemsSource="{x:Bind ViewModel.Letters}">
    <GridView.ItemsPanel>
        <ItemsPanelTemplate>
            <ItemsWrapGrid Orientation="Horizontal" MaximumRowsOrColumns="5"/>
        </ItemsPanelTemplate>
    </GridView.ItemsPanel>
    <GridView.ItemTemplate>
        <DataTemplate x:DataType="local:GameLetter">
            <Button Content="{x:Bind Character}" IsEnabled="{x:Bind IsAvailable, Mode=OneWay}" CommandParameter="{x:Bind Character}"
            Command="{Binding ViewModel.LetterGuessedCommand, ElementName=ThisPage}"/>
        </DataTemplate>
    </GridView.ItemTemplate>
</GridView>
This GridView control creates a grid of buttons that are created with dynamic data provided for ItemsSource; the ViewModel.Letters. The GridView uses an ItemsWrapGrid to arrange items, wrapping them after every five columns. Each item created is a button, defined by a DataTemplate with the Datatype being the GameLetter that you created. Each button contains a Command, which manages the clicking.
<Button>: Creates a button for each item.Content="{x: Character}": Sets the GameLetter’s Character, displaying the letter.IsEnabled="{x:Bind IsAvailable, Mode=OneWay}": Sets the GameLetter’s IsAvailable to determine if the button is enabled or disabled.CommandParameter="{x:Bind Character}": Passes the letter as a parameter when the button is clicked.Command="{Binding ViewModel.LetterGuessedCommand, ElementName=ThisPage}": Sets theLetterGuessedCommand(which in our ViewModel is calledOnLetterGuessed) to handle button click events, this command functions like an event handler.
Important
RelayCommand attribute automatically generates a command property named LetterGuessedCommand. The name of the generated command is based on the method name, which in this case is the OnLetterGuessed. The generator uses the method name and append "Command" at the end, and it strips the "On" prefix, if present. Additionally, for asynchronous methods, the "Async" suffix is also stripped before "Command" is appended.
The above code uses both x:bind and binding. The code uses Binding for the Command property because it needs to reference the ViewModel.LetterGuessedCommand through the parent page (ThisPage) using ElementName. x:Bind doesn't support ElementName, so Binding is required to access the command outside the DataTemplate's default DataContext. Inside the DataTemplate, x:Bind is used for properties like Character and IsAvailable because they belong to the templated object (GameLetter) and can be resolved directly, offering better performance and type safety.
Note
why ThisPage is needed This binding uses the ElementName property to reference the Page element named ThisPage. This allows access to the Page's ViewModel property, which contains the LetterGuessedCommand. By referencing the Page element directly, the Button can bind to a command defined in the Page's ViewModel, even though it is inside a DataTemplate with its data context set to a GameLetter object. This approach lets the Button execute a command from the main ViewModel, rather than being restricted to properties or commands within individual GameLetter objects.
Now you can Run app in Debug mode by doing the following step:
- On the title bar, click on Debug, click on Start Debugging OR on your keyboard press F5 key
The app should be playable with alphabet buttons.
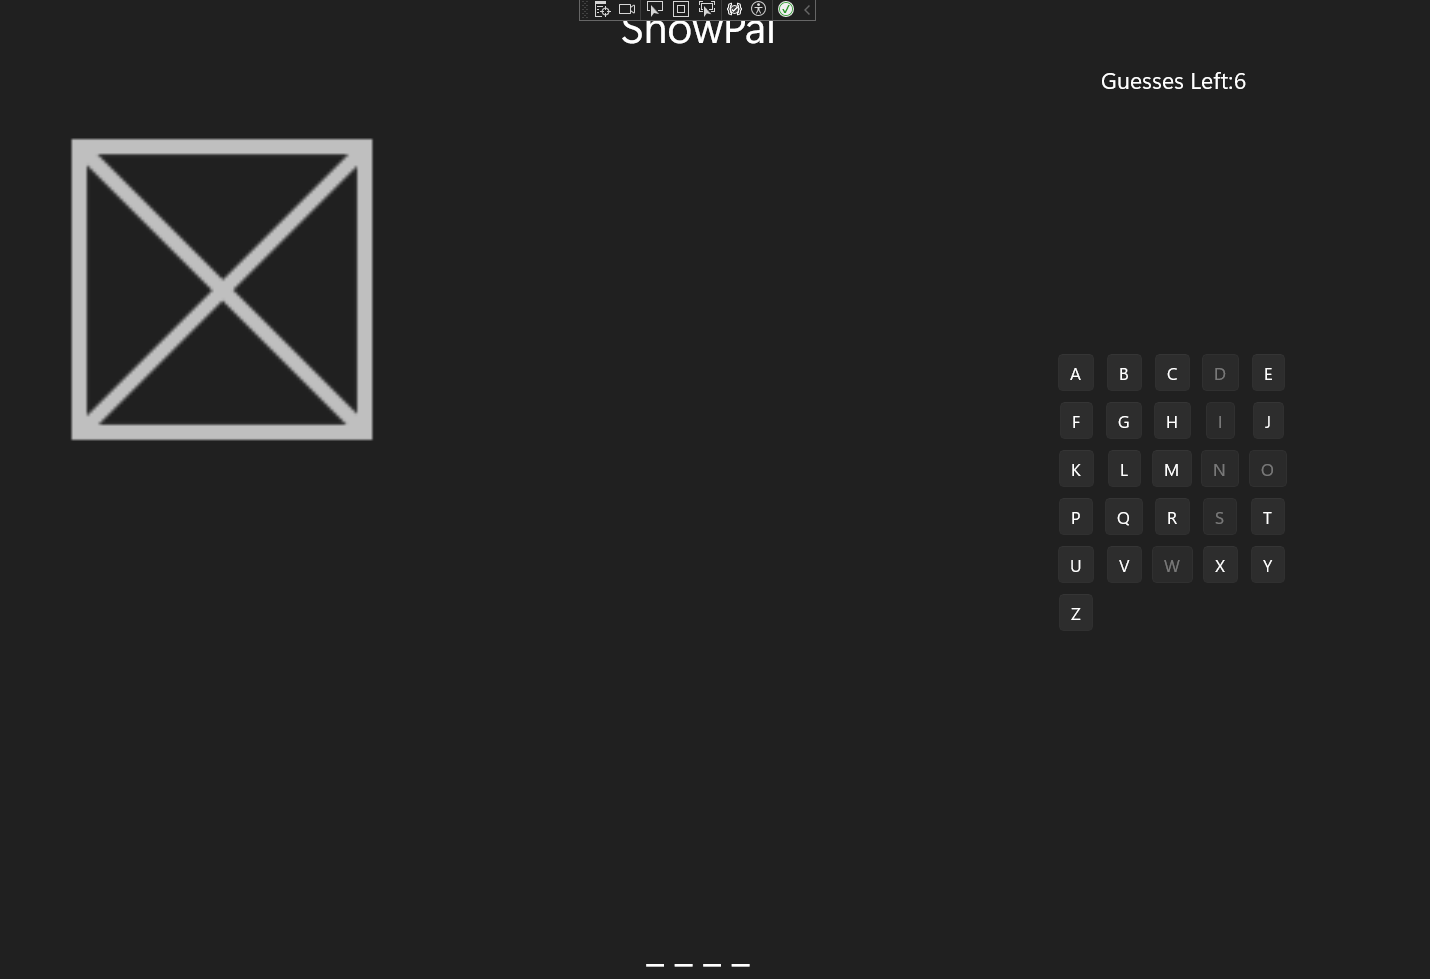
Great!
You upgraded the game with a dynamic and interactive set of alphabet buttons. By utilizing a GridView control and binding it to your game data, you created a more responsive and efficient interface. This approach not only saves you time in development but also makes your game more adaptable to changes in the future. You learned how to use the ObservableProperty attribute to make your data observable, allowing the UI to update automatically when values change. Additionally, you implemented the RelayCommand attribute to handle user interactions cleanly, without the need for traditional event handlers in the code-behind.