Build select the random word
Now that we have the base structure of our UI, we can start building out the different sections of game play. We begin by having the game select a random word from an array and create a version of the word with dashes for the user to see. We'll update the hardcoded "_ _ _ _ _ " in our GamePage.xaml (Word Display Area section) to be dynamic and update after each letter guess using data binding.
Data binding connects UI elements to data sources, enabling seamless synchronization between the user interface and underlying data. In WinUI 3, Windows App SDK, and the Community Toolkit, there are two primary ways to do data binding:
{x:Bind}:
- is faster and uses less memory because it generates special-purpose code at compile time.
- is strongly typed and will resolve the type of each step in a path at compile time; which means it will fail at compile time if the type returned doesn’t have the member.
- supports better debugging by enabling you to set breakpoints in the code files that are generated as the partial class for your page.
{Binding}:
- uses general-purpose runtime object inspection.
- is more flexible but less type-safe.
- provides runtime flexibility and supports advanced scenarios like relative source bindings and traversing the visual tree.
Tip
A common pitfall for new devs is using x:Bind and Binding interchangeably. X:Bind is the preferred method and Binding is generally used for complex binding scenarios that involve relative source bindings or traversing the visual tree.
We use both in this course.
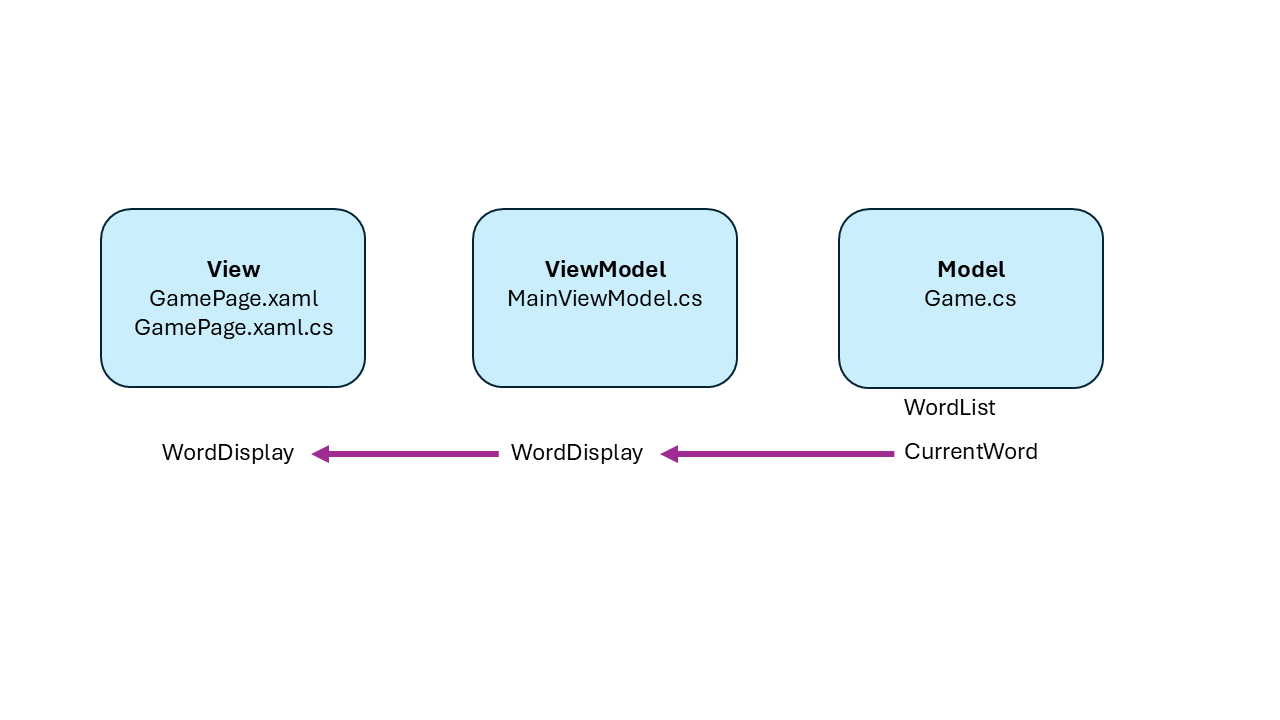
You'll create a Games.cs file that contains a list of words and will randomly choose a word for that particular game call CurrentWord. You'll create a MainViewModel.cs file as the ViewModel and will use access the CurrentWord from the Games.cs but will reference it as WordDisplay. The MainViewModel transforms the word into the empty character spaces (that is, _ _ _ _) With data binding, when WordDisplay changes in the MainViewModel, it'll automatically get reflected in the View (GamePage.xaml).
Model
First, create the Game.cs file to contain the game logic:
In the Solution Explorer, Right click the Models Folder > Add > Class
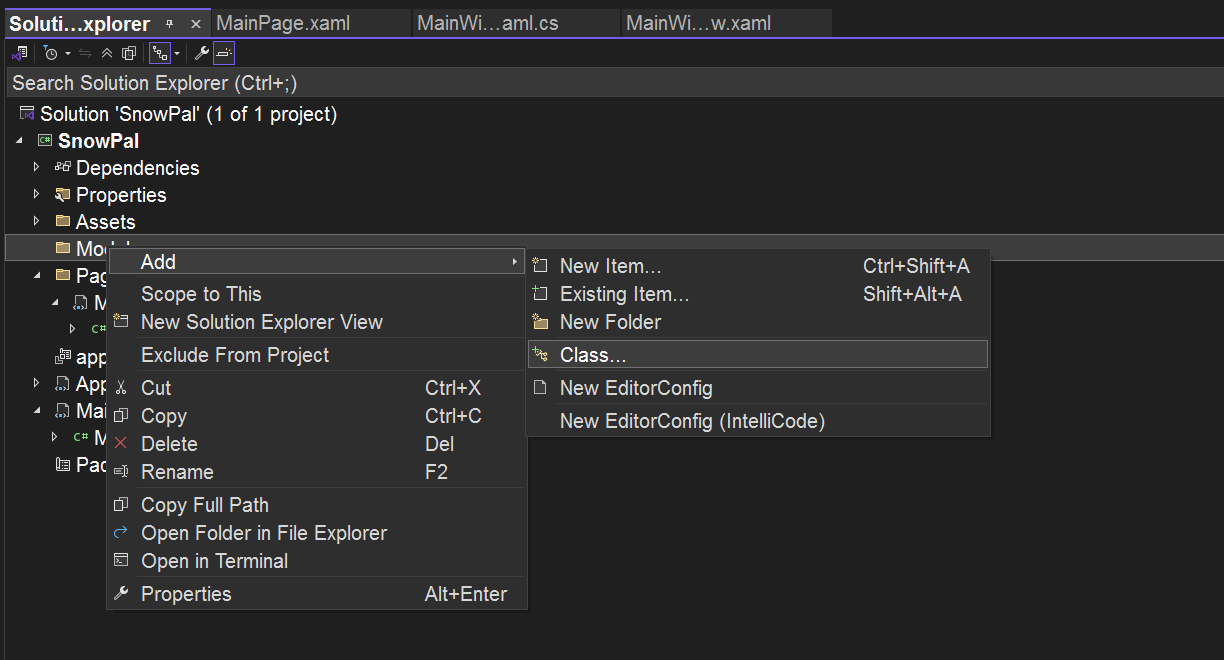
Name the folder Game.cs
Click Add
Replace
internal class Game{}with:
public class Game
{
    // List of words for the game
    private readonly List<string> _wordList = new List<string> { "WINDOWS", "VIEW", "MODEL", "TASKBAR", "XAML", "CSHARP", "DEBUGGER", "GRID", "STACKPANEL", "RANDOM" };


    // Messages for winning and losing the game

    // Properties for the current game state
    public string CurrentWord { get; private set; }
    public char[] GuessedWord { get; private set; } = [];

    public Game()
    {
        StartNewGame();
    }

    // Starts a new game by selecting a random word and resetting the game state
    public void StartNewGame()
    {
        var random = new Random();
        CurrentWord = _wordList[random.Next(_wordList.Count)];
        GuessedWord = new string('_', CurrentWord.Length).ToCharArray();

    }

    // Plays the game by guessing a letter and checking the game status


    // Returns the current guessed word as a string with spaces between letters


    // Guesses a letter and updates the guessed word and incorrect guesses count


    // Checks the game status to determine if the game is won or lost


    // Returns a winning message based on the number of guesses left


    // Returns a random losing message
}
This code provides a basic structure for the word-guessing game. Below a breakdown of its components:
_wordList: A private, read-only list of words that will be used in the game.CurrentWordandGuessedWord: Public properties to store the current word to guess and the player's progress.Game(): An empty constructor for the Game class.StartNewGame(): A method that initializes a new game by:- Selecting a random word from _wordList
- Setting CurrentWord to this random word
- Initializing GuessedWord with underscores representing unguessed letters
- The code also includes commented placeholders for more game logic
ViewModel
In the Solution Explorer, Right Click the SnowPal project > Add > Class
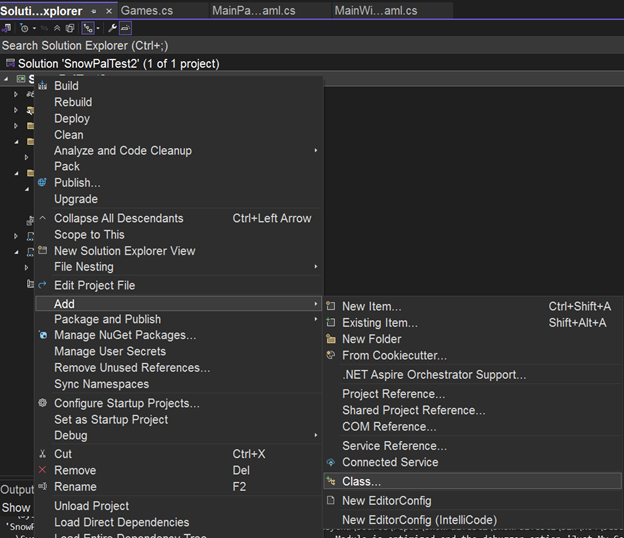
Name the folder MainViewModel.cs
Click Add
Add the following imports:
using CommunityToolkit.Mvvm.ComponentModel;
using SnowPal.Models;
Replace the
internal class MainViewModel {}with:
public partial class MainViewModel : ObservableObject
{
    private readonly Game _game;


    // Properties bound to the UI
    [ObservableProperty]
    public partial string WordDisplay { get; set; }


    // Constructor initializes the game and letters
    public MainViewModel()
    {
        _game = new Game();
        StartNewGame();
    }

    // Starts a new game and updates the properties
    public void StartNewGame()
    {

        UpdateProperties();
    }

    // Command executed when a letter is guessed


    // Ends the game, disables letters, and shows the end game message


    // Command executed when the popup close button is clicked


    // Shows the end game message in a popup


    // Updates the properties bound to the UI
    private void UpdateProperties()
    {
        WordDisplay = string.Join(" ", _game.GuessedWord);


}

    // Enables or disables the letter buttons


}
The Community Toolkit.MVVM provides two key features in this code:
- ObservableObject Base Class:
- MainViewModel inherits from ObservableObject, automatically implementing INotifyPropertyChanged. INotifyPropertyChanged is an interface in .NET that enables objects to notify subscribers when their property values change
- Using ObservableObject eliminates the need to manually write property change notification code.
- When properties like WordDisplay change (in the `UpdateProperties), the UI is automatically notified and updated.
- ObservableProperty Attribute:
- Applied to the WordDisplay property, this attribute uses source generators.
- It automatically creates the property's getter, setter, and change notification logic.
The constructor initializes the Game object and calls StartNewGame. StartNewGame then invokes UpdateProperties, which updates the UI-bound properties. Specifically, UpdateProperties transforms the GuessedWord array into a string with spaces between letters, preparing it as WordDisplay for display in the View. This process highlights the ViewModel's role in mediating between the Model and the View.
Same Code without the Community Toolkit.MVVM
The code would look something like this:
using System.ComponentModel;

public partial class MainViewModel : INotifyPropertyChanged
{
    private readonly Game _game;

    // Backing field for WordDisplay
    private string _wordDisplay;

    // Property bound to the UI
    public string WordDisplay
    {
        get => _wordDisplay;
        set
        {
            if (_wordDisplay != value)
            {
                _wordDisplay = value;
                OnPropertyChanged(nameof(WordDisplay));
            }
        }
    }

    // Constructor initializes the game and letters
    public MainViewModel()
    {
        _game = new Game();
        StartNewGame();
    }

    // Starts a new game and updates the properties
    public void StartNewGame()
    {
        UpdateProperties();
    }

    // Updates the properties bound to the UI with
    // INotifyPropertyChanged implementation
    public event PropertyChangedEventHandler PropertyChanged;

    protected void OnPropertyChanged(string propertyName)
    {
        PropertyChanged?.Invoke(this, new PropertyChangedEventArgs(propertyName));
    }
}
View
In Solution Explorer, open GamePage.xaml.cs
Add ViewModel property above the public GamePage Class:
namespace SnowPal.Pages
{
    public sealed partial class GamePage : Page
    {
        public MainViewModel ViewModel { get; } = new();

        public GamePage()
        {
            this.InitializeComponent();
        }
    }
}
This code ensures that the GamePage has access to the MainViewModel.
In Solution Explorer, open GamePage.xaml
Locate
xmlns:local="using:SnowPal.Views"in the Page’s elementReplace it with:
xmlns:local="using:SnowPal.Models"Locate
Word Display AreacommentIn the
TextBlockbelow, replace the value of theTextproperty of"_ _ _ _ _"with:"{x:Bind ViewModel.WordDisplay, Mode=OneWay}"The
{x:Bind}markup extension used here offers a performance advantage over traditional{Binding}because it's compiled at build time rather than being resolved at runtime. This compilation results in faster data binding operations. Additionally, this binding creates a reactive connection between the UI and the ViewModel. When theWordDisplayproperty in the ViewModel changes, the UI will automatically update to reflect the new value. TheMode=OneWayspecifies that changes in the source (ViewModel.WordDisplay) updates the target (the UI element), but not vice versa.Now you can Run app in Debug mode by doing the following steps:
On the title bar, Click on Debug > Start Debugging OR on your keyboard press F5 key
Debugging
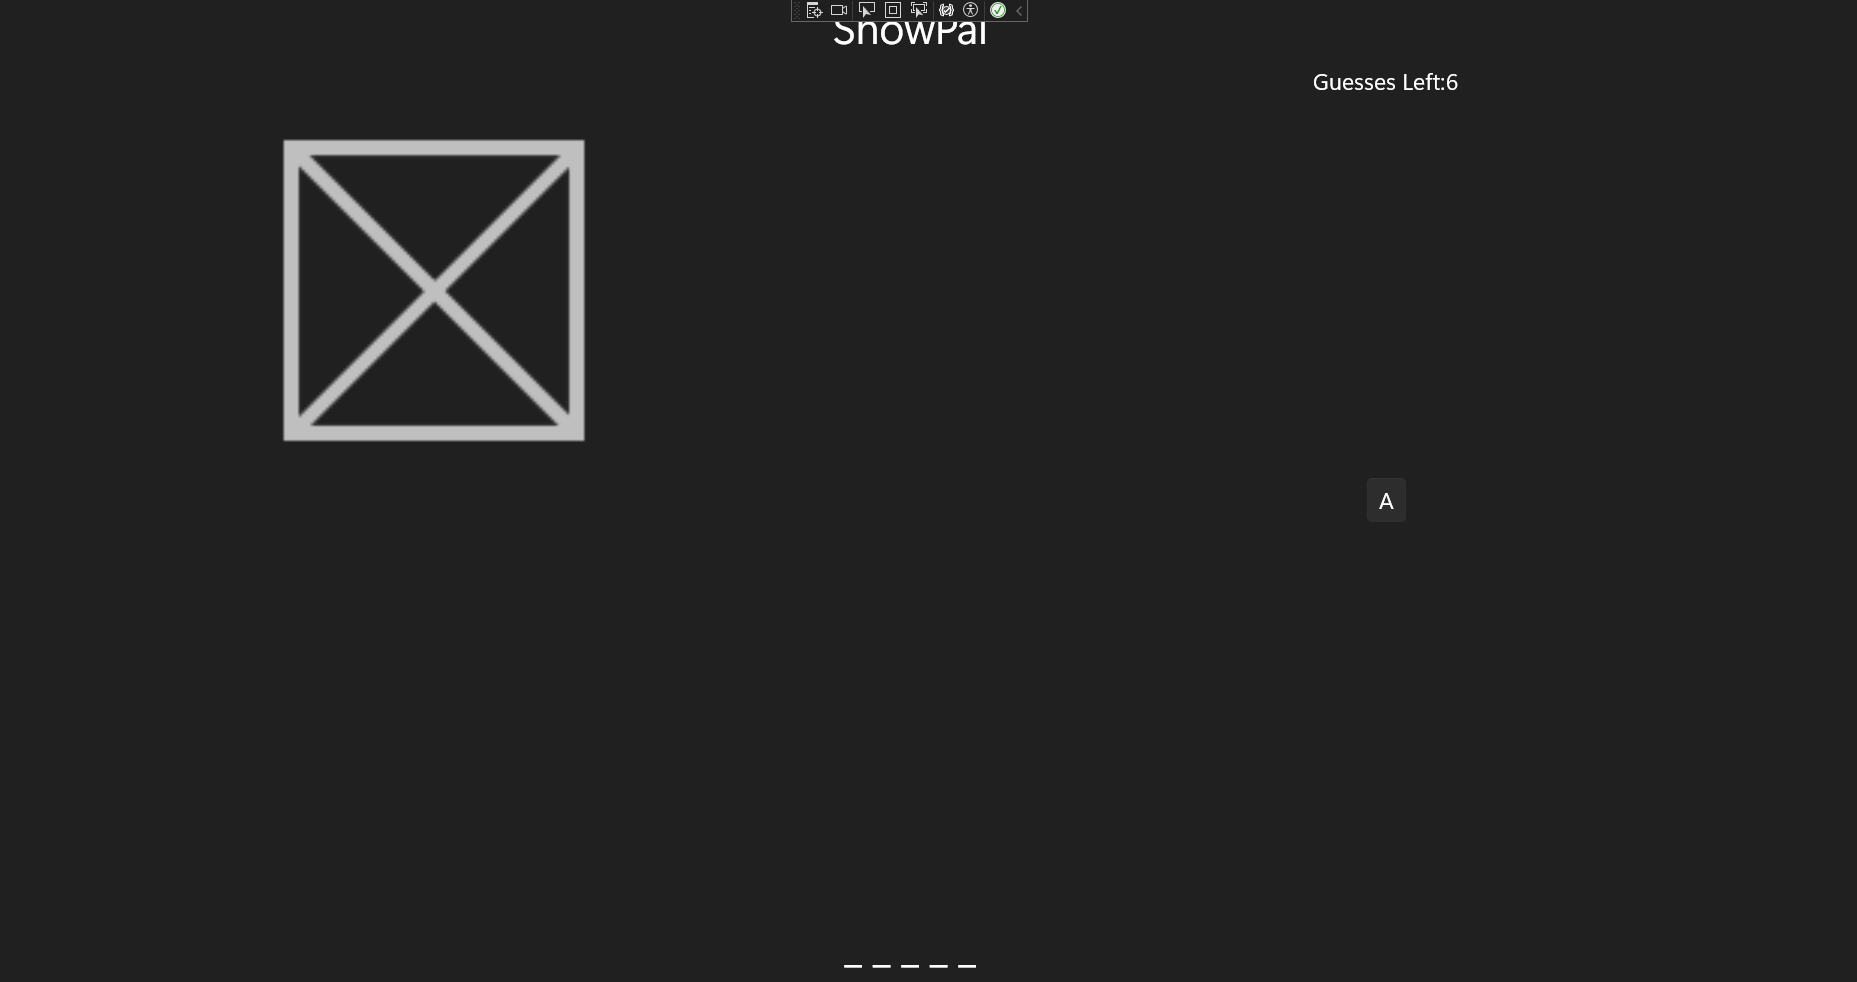
It's difficult to tell if the code worked since it looks similar to before. To see the randomly selected word during debugging:
In Solution Explorer, open Game.cs
Add to the imports:
using System.Diagnostics;At the bottom of the
StartNewGamefunction add:Debug.WriteLine("Current Word: " + CurrentWord);On the title bar, Click on Debug > Start Debugging OR on your keyboard press F5 key
Locate the Output window which typically appear at the bottom of the Visual Studio IDE, or do one of the following:
- From the Menu: Go to Debug > Windows > Output.
- Keyboard Shortcut: Press
Ctrl + Alt + O(that's a letter 'O', not zero). - Search Visual Studio: Use the Visual Studio search bar
(Ctrl+Q)and type "Output" and select the "Output" window from the results.
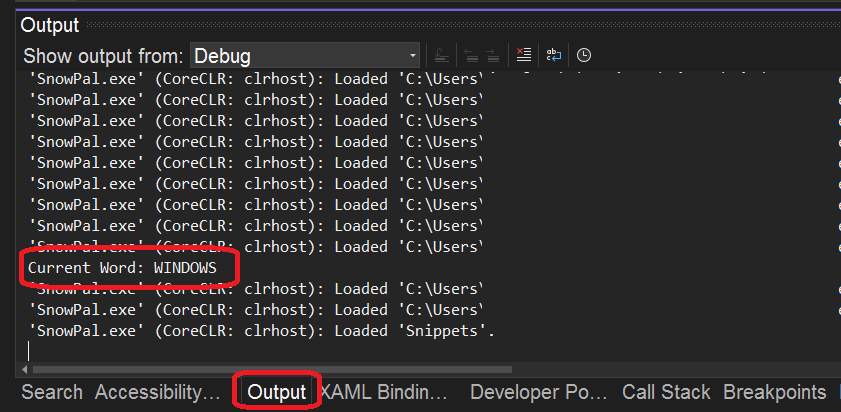
Debug.WriteLine("Current Word: " + CurrentWord); prints the value of the CurrentWord variable to the Output window in Visual Studio during debugging Adding this debug line allows you to verify which word was randomly selected at the start of each new game. This helps with debugging and ensures that the game logic is working as expected.
In this section, you set up the game's foundation by creating a Game class for managing the word list and game state, and a MainViewModel to handle data transformation. You used data binding with {x:Bind} in GamePage.xaml to dynamically link the UI's display of the word to the ViewModel's WordDisplay property. This {x:Bind} ensures that the View automatically reflects changes in the game's state, setting the stage for displaying game progress as correctly guessed letters replace the initial underscores.