Building the View
In this section, you create the structure of the View (User interface) for a SnowPal game. You begin by setting up the MainWindow and adding the game UI structure. By the end of this section, you have a basic, nonfunctional UI for the SnowPal game, which serves as the foundation for adding interactivity and game logic in subsequent steps.
XAML (Extensible Application Markup Language) files define the user interface (UI) of the application. They use an XML-based syntax to describe the layout, appearance, and behavior of UI elements. XAML elements are often nested to establish hierarchical relationships. For example, a simple XAML for a button might look like this:
<Button
    Content="Click Me"
    Click="myButton_Click"
    Width="100"
    Height="50"
    HorizontalAlignment="Center"
    VerticalAlignment="Center"/>
XAML.cs files, also called code-behind files, are associated with XAML files. These C# files provide functionality that makes the UI interactive. In MVVM patterns, developers use XAML.cs files sparingly for specific purposes like initialization, UI-specific functionality, or view-specific operations. In Code-Behind Pattern this file contains the logic and event handlers for the UI elements defined in the XAML. For example, the code-behind file for the above XAML might handle a button click event like this:
using System.Windows;
public partial class MainWindow : Window
{
    public MainWindow()
    {
        InitializeComponent();
    }

    private void myButton_Click(object sender, RoutedEventArgs e)
    {
        MessageBox.Show("Button clicked!");
    }
}
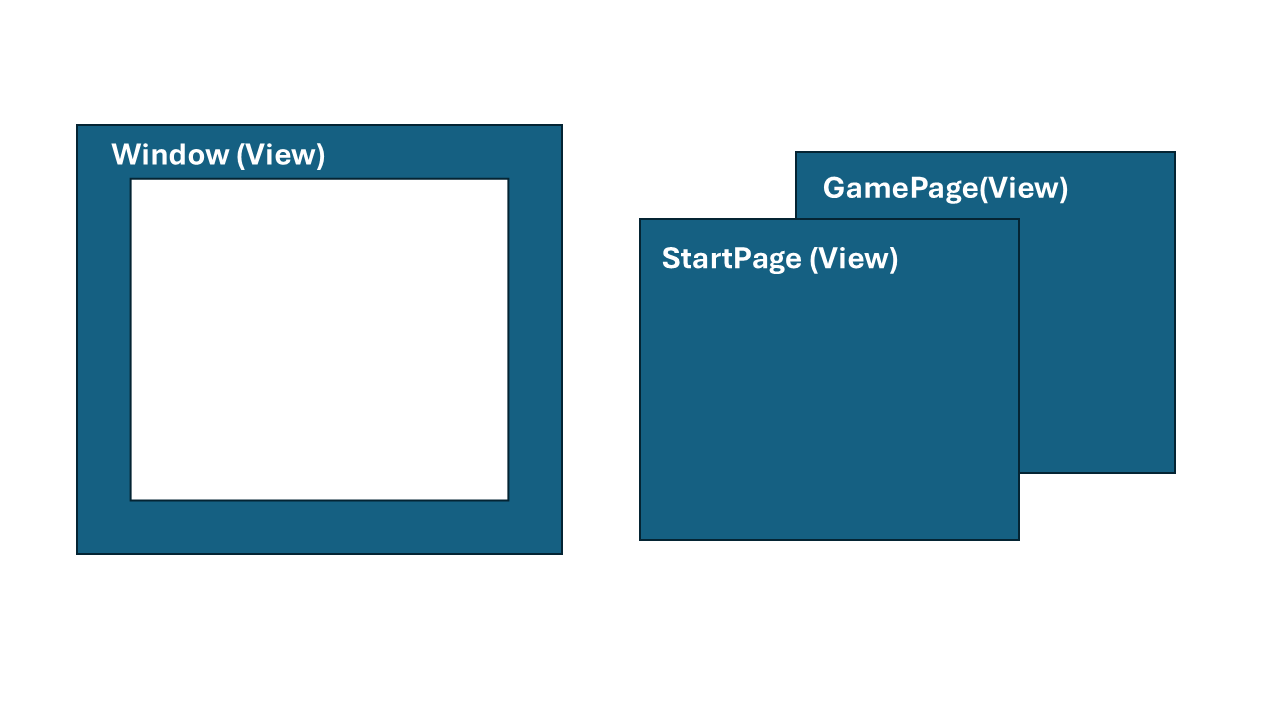
The current app only contains MainWindow.xaml files. You can think of the MainWindow.xaml files as a picture frame of your project, this window is the container. You’ll display pictures (the Page) within your frame (Window). For this project, it has two views a StartPage and a GamePage.
Note
You can use the MainWindow file to build an app, similar to the blank project that comes with the WinUI template. However, the Window element in XAML for WinUI has limitations compared to the Window element used in other Windows frameworks. Many resources and features aren't accessible when relying solely on the Window element in WinUI. For this reason, it's recommended to use Pages or Grids to structure your application instead.
Setting Up MainWindow
- In the Solution Explorer, open
MainWindow.xamlby double clicking it
Tip
Search | Code Search: You can locate files by using the Code Search, you can access it by going to the top bar under search or use the keyboard shortcut Ctrl + T. Enter the file name, in this case would be MainWindow.xaml, and it opens the file.

Delete
<StackPanel>and<Button>elementsAdd
<Frame x:Name="MainFrame" /><?xml version="1.0" encoding="utf-8"?> <Window x:Class="SnowPal.MainWindow" xmlns="http://schemas.microsoft.com/winfx/2006/xaml/presentation" xmlns:x="http://schemas.microsoft.com/winfx/2006/xaml" xmlns:local="using:SnowPal" xmlns:d="http://schemas.microsoft.com/expression/blend/2008" xmlns:mc="http://schemas.openxmlformats.org/markup-compatibility/2006" mc:Ignorable="d" Title="SnowPal"> <Frame x:Name="MainFrame" /> </Window>In the Solution Explorer, open
MainWindow.xaml.csby double clicking it- If
MainWindow.xaml.csisn't visible, click the arrow to the right ofMainWindow.xamlto showMainWindow.xaml.cs
- If
Add to the imports, located at the top of the file:
using SnowPal.Pages;Note
Visual Studio display errors because you're actively developing. If you see error, you can ignore until the end of the section or when you're asked to run the app.
Delete
myButton_Clickfunction.In the MainWindow constructor function, under the
InitializeComponent();, add to theMainFrame.Navigate(typeof(GamePage));
Your code should look like the following code:
```csharp
using SnowPal.Pages;

namespace SnowPal
{
    public sealed partial class MainWindow : Window
    {
        public MainWindow()
        {
            this.InitializeComponent();
            MainFrame.Navigate(typeof(GamePage));
        }
    }
}
```

Now the MainWindow constructor is responsible for navigating the Frame control named MainFrame to display the GamePage when the application starts.

Next to create the GamePage:
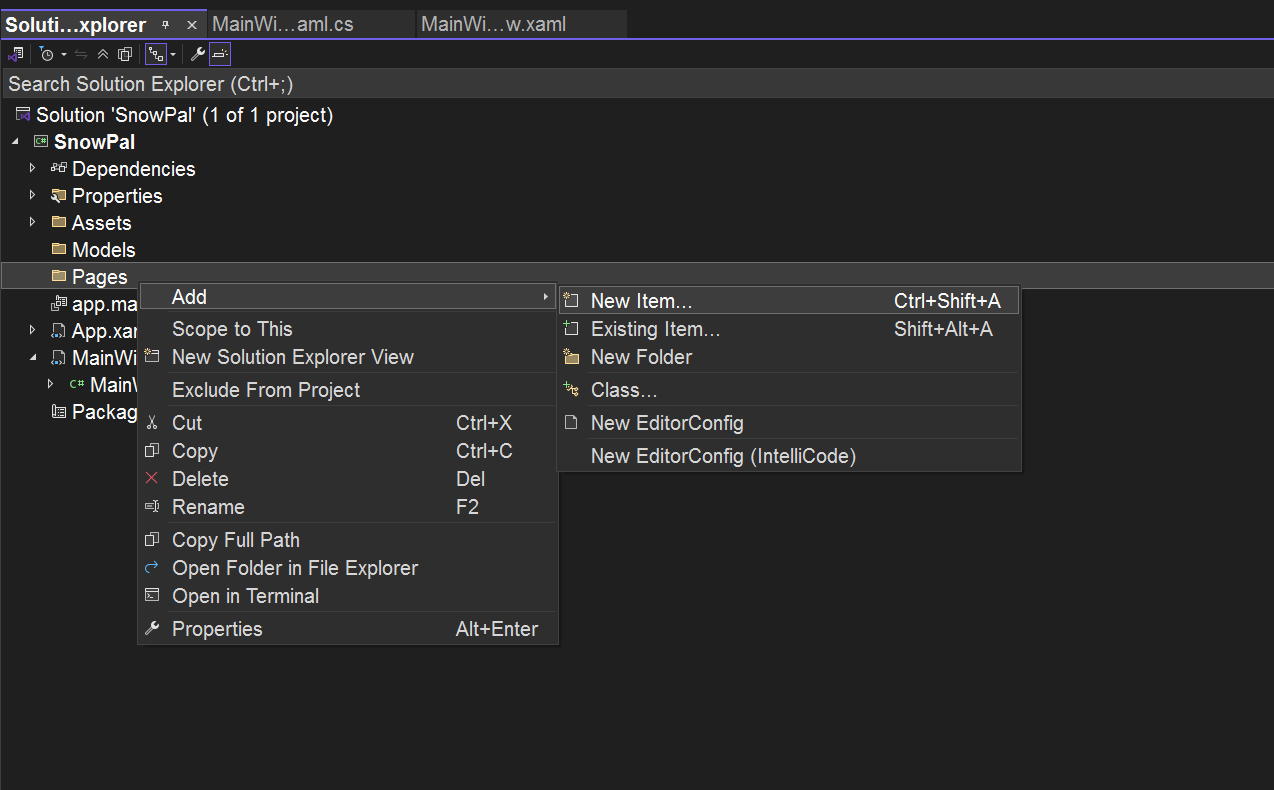
In the Solution Explorer, Right Click your new Pages Folder > Add > New Item....
In the Add New Item dialog, select WinUI in the template list on the left-side of the window.
Select the Blank Page (WinUI 3) template.
Name the file GamePage.xaml
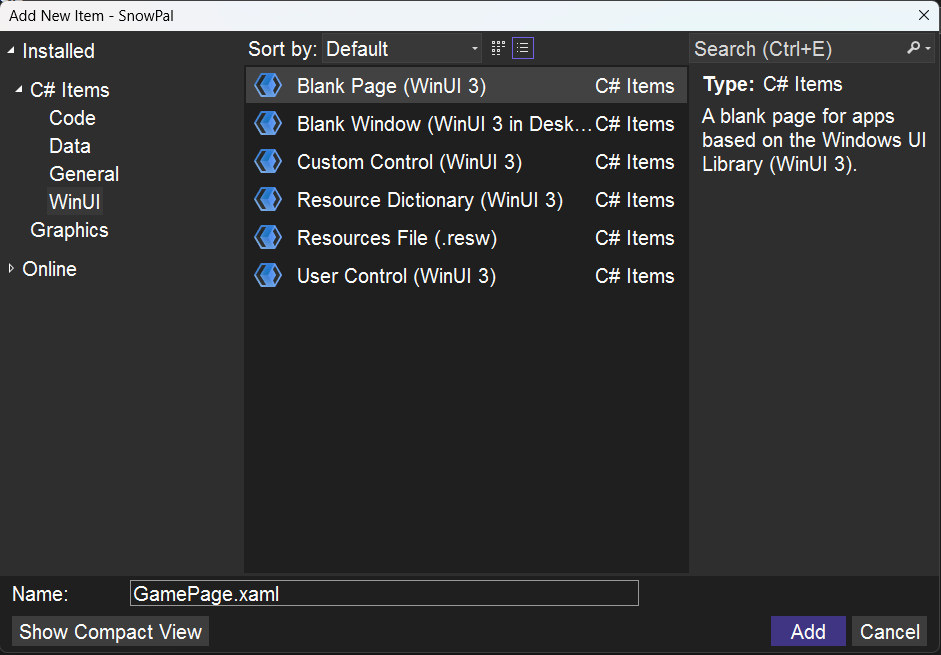
Click Add
These steps create both GamePage.xaml & GamePage.xaml.cs.
If
GamePage.xamldoesn’t auto open, In the Solution Explorer, open GamePage.xaml by double clicking itReplace the
Gridelements with the following Grid:<Grid Background="{ThemeResource ApplicationPageBackgroundThemeBrush}"> <Grid.RowDefinitions> <RowDefinition Height="Auto"/> <RowDefinition Height="*"/> <RowDefinition Height="Auto"/> <RowDefinition Height="Auto"/> </Grid.RowDefinitions> <Grid.ColumnDefinitions> <ColumnDefinition Width="50*"/> <ColumnDefinition Width="50*"/> </Grid.ColumnDefinitions> <!-- Title --> <TextBlock Text="SnowPal" Grid.ColumnSpan="2" FontSize="40" HorizontalAlignment="Center" VerticalAlignment="Top" /> <!-- Drawing --> <Image x:Name="Image" Grid.Row="1" Grid.Column="0" HorizontalAlignment="Center" VerticalAlignment="Top" Margin="10,10,10,10" Source="/Assets/Wide310x150Logo.png"/> <!-- Guesses Left Display --> <StackPanel Grid.Row="1" Grid.Column="1" Orientation="Horizontal" HorizontalAlignment="Center" VerticalAlignment="Top" Margin="10"> <TextBlock Text="Guesses Left: " FontSize="20"/> <TextBlock Text="6" FontSize="20"/> </StackPanel> <!-- Alphabet Buttons --> <Grid x:Name="AlphabetButtonsGridView" Grid.Row="1" Grid.Column="1" HorizontalAlignment="Center" VerticalAlignment="Center" Margin="10,50,10,10" > <Button Content="A" IsEnabled="True" FontSize="20"/> </Grid> <!-- Word Display Area --> <TextBlock x:Name="Word" Grid.Row="2" Grid.ColumnSpan="2" Text="_ _ _ _ _ " FontSize="40" HorizontalAlignment="Center" VerticalAlignment="Bottom" Margin="10"/> <!-- Popup for message --> </Grid>Now you can run the app in Debug mode by doing the following steps:
On the title bar, Click on Debug, Click on Start Debugging OR on your keyboard press F5 key
You should see something like this:
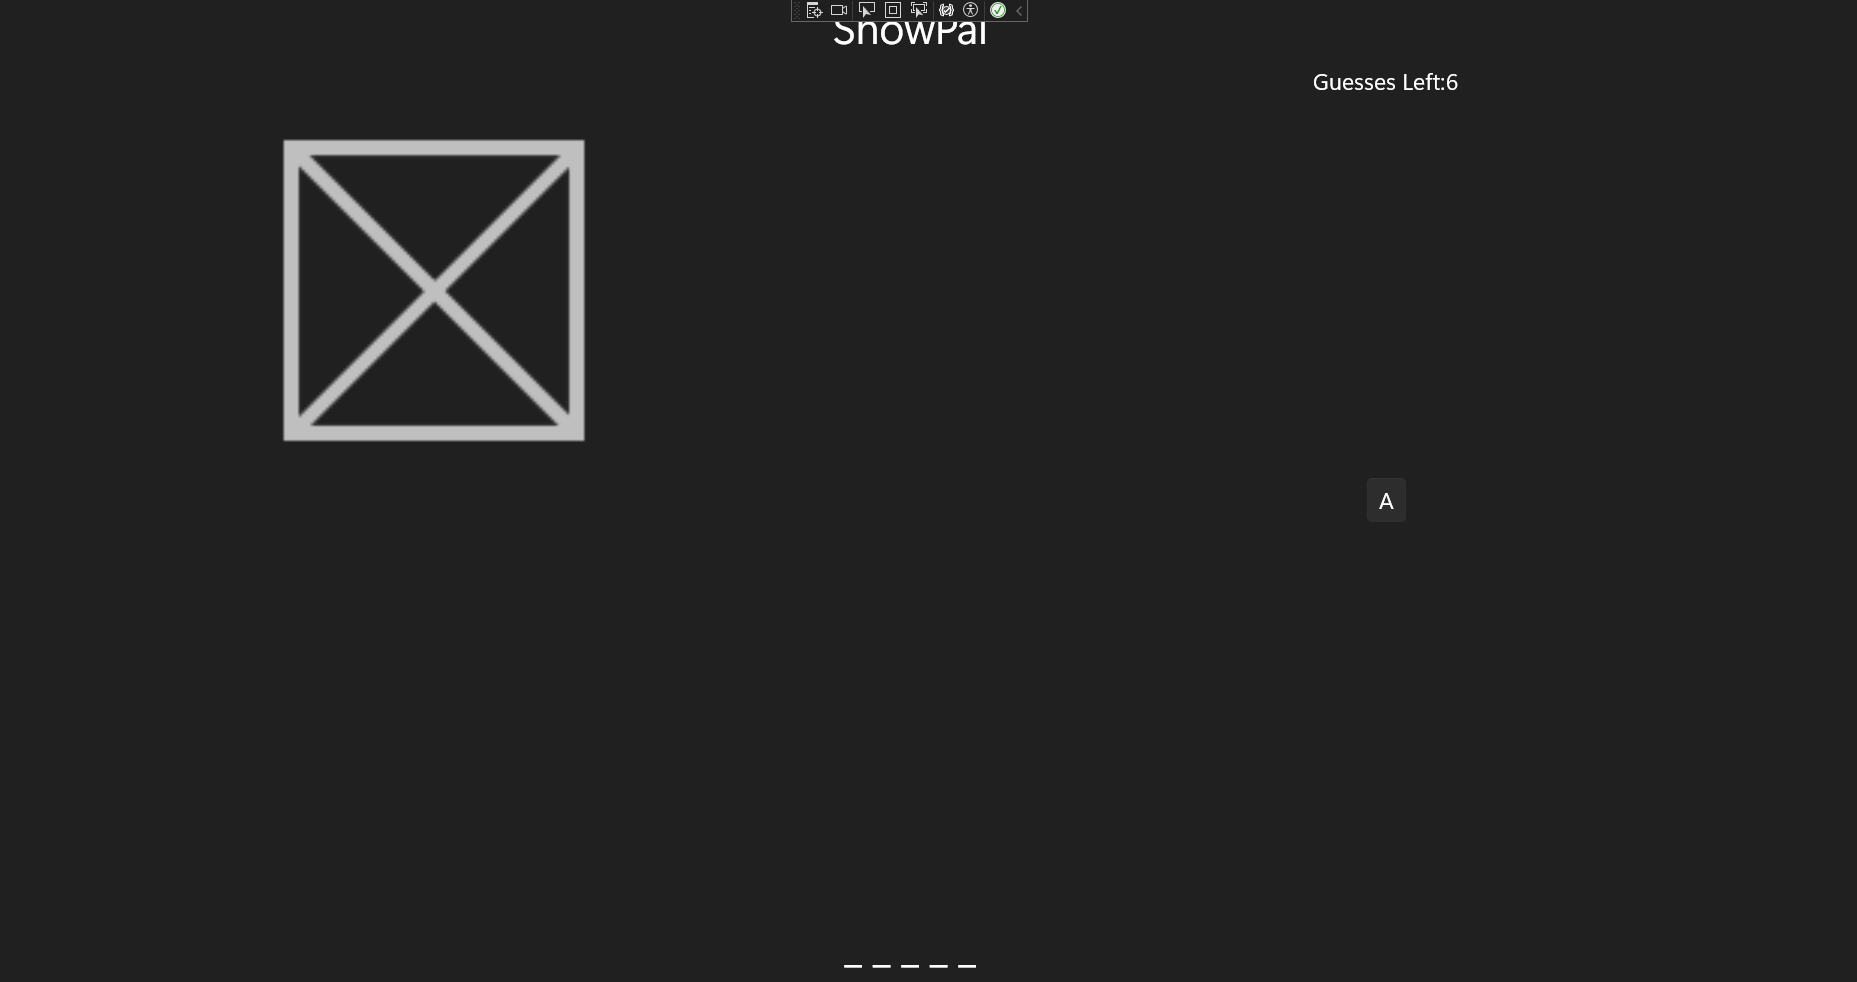
Close the app
Great! Let’s walk through the XAML code. Remember that XAML elements are often nested within one another to establish hierarchical relationships.
Below is a visual of the structure:
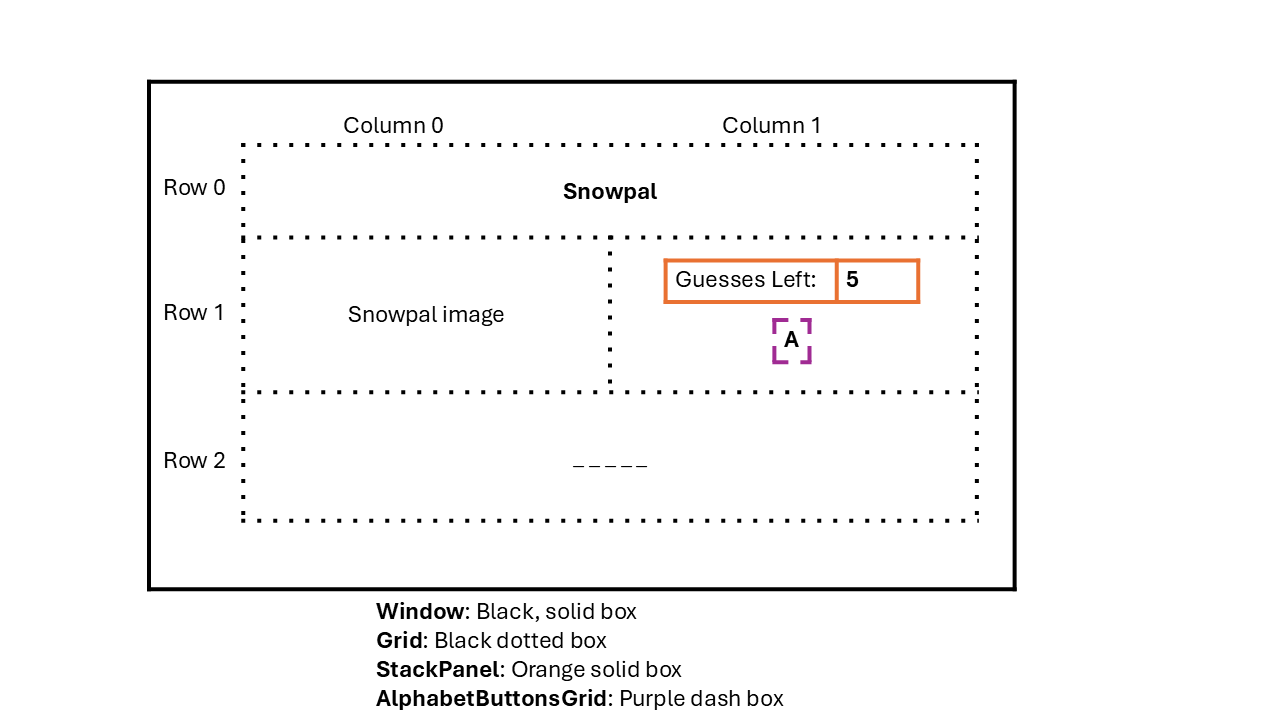
<Grid... > The Grid is a layout panel that arranges its children in a grid of rows and columns. It's a flexible layout control.
    <Grid.RowDefinitions...> Defines the rows of the grid, which there are 4 here
    <Grid.ColumnDefinitions ... > Defines the columns of the grid, which there are 2 here
    <!-- Title -->
    <TextBlock Text="SnowPal" Grid.Row="0" Grid.ColumnSpan="2"... > Displays the title of the game, "SnowPal." It's the first row  and spans both column
    <!-- Drawing -->
    <Image x:Name="Image" Grid.Row="1" Grid.Column="0"  .../> Displays the image and it's on the Second row and First column
    <!-- Guesses Left Display -->
    <StackPanel Grid.Row="1" Grid.Column="1"...>A layout panel that arranges its children in a single line, either horizontally or vertically; and it's on the second row and second column
        <TextBlock Text="Guesses Left: " .../> Displays text
        <TextBlock Text="6" .../> Displays text
    <!-- Alphabet Buttons -->
    <Grid x:Name="AlphabetButtonsGrid" Grid.Row="1" Grid.Column="1"...>Another grid, this grid doesn't have RowDefinitions nor ColumnDefinitions yet; and it's on the second row and second column
        <Button Content="A" .../> A button, but it has no functionality yet
    <!-- Word Display Area -->
    <TextBlock x:Name="Word" Grid.Row="2" Grid.ColumnSpan="2" Text="_ _ _ _ _" .../> Displays text of the word to guess with underscores representing unguessed letters; and it's on the Third row and spans the two column
    <!-- Popup for message --> Place holder for future development
</Grid>
You created the base of the user interface for a SnowPal game. You set up the main window as a container for your game views by adding a Frame control to MainWindow.xaml, supporting navigation between different pages. You then created a new GamePage.xaml file, structuring the game UI with a Grid layout that included sections for the score display, game board, and controls.