How to search and organize repository history by using GitHub
Here, we'll discuss how you can use filters, blame, cross-linking, labels, milestones, saved replies, and assignees to search and organize repository history.
Put yourself in the position of a developer who has just joined a large project. Someone just posted a new issue reporting a bug related to the web app's sidebar, and you've been assigned to fix it. You've already read through the report a few times and understand the problem being described, so now you need to figure out how to get started with the fix.
As a new team member, you're not yet familiar with the codebase. You also haven't been part of the planning discussions, code reviews, or anything else that would provide you with the context you need to start implementation. You'll first need to acquire that background knowledge to best determine the right fix.
Searching GitHub
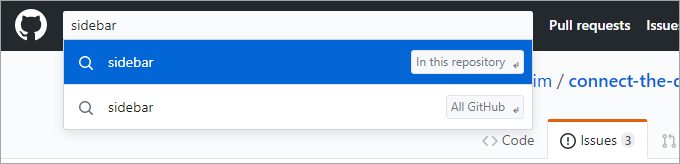
Although you weren't around for the events that led to the sidebar's implementation, many of those events live on in the project's history. Searching the project's repository for "sidebar" will give you a starting point.
There are two search methods available on GitHub: the global search at the top of the page and the scoped search available on certain repository tabs. They support the same syntax and function in the same way, but with some key differences.
Global search
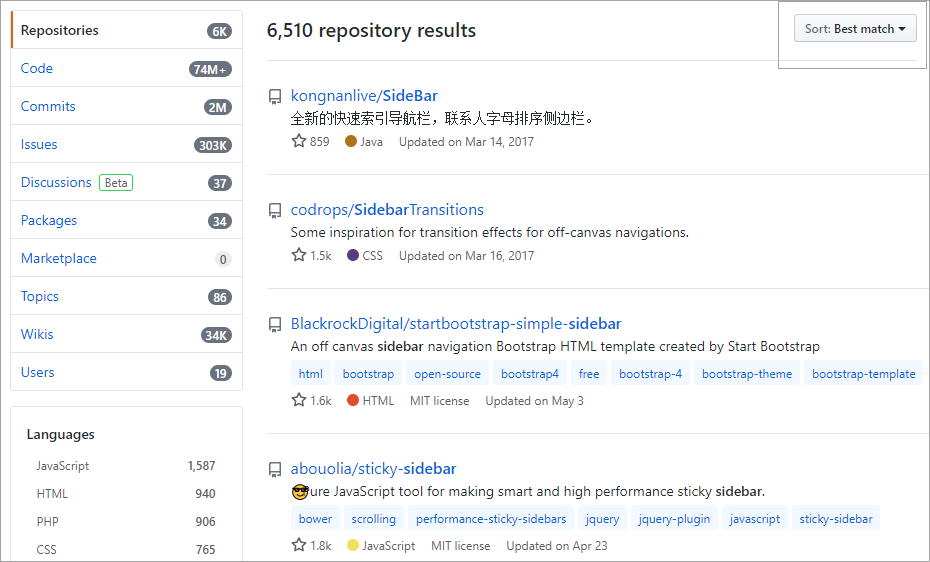
The global search lets you use the complete search syntax to search across all of GitHub.
The search results are comprehensive and include everything from code to issues to the Marketplace (and even users). This is the best way to find mentions of key terms across multiple result types and repositories.
Note
The filter clause is:pr filters out issues returned from the issues/pull requests store. Some filter clauses, such as is:pr, are only supported by certain search providers and ignored by others. For example, the code-search provider doesn't support that clause, so it will ignore it and return the same code results either way.
In our scenario, using the global search scoped to the current repository is a good way to find code and commits that mention the term "sidebar". You'll also likely get hits for issues and pull requests, although they're not as easy to filter further in the global search results view.
To craft a complex global search, try the advanced search.
Context search
Context searches are available on certain tabs, such as Issues and Pull requests. These searches are scoped into the current repository and only return results of that type. The benefit to this scoping is that it allows the user interface to expose known type-specific filters such as authors, labels, projects, and more.
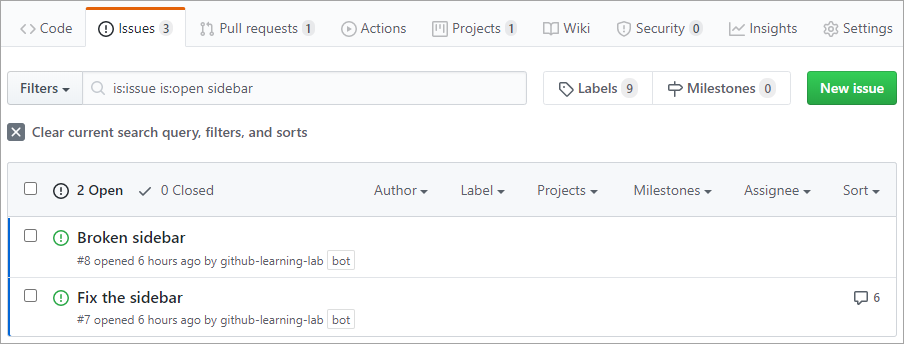
Using the context search is the preferred option when you're looking for something in the current repository. In our scenario, this is a good way to find search results mentioning "sidebar," which you could then easily refine using the filter dropdowns.
Using search filters
There are an infinite number of ways to search using the complete search syntax. However, most searches only make use of a few common filters. While these are often available from context search dropdowns, it's sometimes more convenient to type them in directly.
Here are some example filter queries:
| Query | Explanation |
|---|---|
is:open is:issue assignee:@me |
Open issues assigned to the current user (@me) |
is:closed is:pr author:contoso |
Closed pull requests created by @contoso |
is:pr sidebar in:comments |
Pull requests where "sidebar" is mentioned in the comments |
is:open is:issue label:bug -linked:pr |
Open issues labeled as bugs that do not have a linked pull request |
Learn more about Understanding the search syntax
Using Milestones
Milestones let you group issues and pull requests into shared goals, like a sprint, a product release, or a project phase. They help teams track progress and keep everyone aligned.
- Milestones can be ordered (just like projects), making it easy to set priorities and visualize which milestones are most important.
- Progress towards each milestone is tracked automatically—GitHub shows how many issues or PRs are complete and how many remain.
- Milestones are especially useful for tracking work that goes into separate releases or phases.
Create a milestone
- Navigate to the Issues tab of your repository.
- Select Milestones from the top menu.
- Click New milestone.
- Enter a title, description, and optionally a due date.
- Click Create milestone.
Assign a milestone to an issue or pull request
- Open any issue or PR.
- In the right sidebar, select Milestone.
- Choose from the list of available milestones.
You can also add milestones as a column to your GitHub Projects layout or display a milestone as a card on a GitHub Projects board. This helps visualize and manage your team’s progress directly from your project planning board.
You can filter by milestone in GitHub Projects or with advanced search queries like:
is:open is:pr milestone:"Release v1.0"
Milestones work best when used consistently across your team's planning workflow.
Labels and Milestones in Search
Labels and milestones are metadata tools that help teams organize issues and pull requests. They also improve the accuracy of search queries.
Filter by label
You can narrow down issues by filtering with the label: keyword.
For example:
is:open is:issue label:bug
This returns all open issues labeled as "bug." Labels can reflect issue type, priority, team, or workflow status.
Tip
You can combine labels with other filters for precise queries, such as:
is:pr label:"ready for review" author:@me
Filter by milestone
Milestones help you group issues and pull requests toward a target release or goal. Use the milestone: keyword in your query to return items within a specific milestone.
For example:
is:open is:issue milestone:"Sprint 1"
Note
Only open milestones will match unless you include closed ones by searching with milestone:*.
What is git blame?
Despite its ominous name, git blame is a command that displays the commit history for a file. It makes it easy for you to see who made what changes and when. This makes it much easier to track down other people who have worked on a file in order to seek out their input or participation.
Note
Some Git systems alias git praise onto git blame to avoid the implication of judgment.
Blame in GitHub
GitHub extends the basic git blame functionality with a more robust user interface.
In our scenario, there are a few ways you might get to this view. You might've found some sidebar code from the global search and selected the Blame option to see who worked on it last, or maybe you found a pull request and tracked that back to the last commit that seems related to the bug description. However you got here, the blame view is an effective way to locate a subject matter expert for the task at hand.
Cross-linking issues, commits, and more
Part of what makes GitHub great for collaborative software projects is its support for linking disparate pieces of information together. Some of this happens automatically, such as when you create a pull request from a series of commits on a branch. Other times, you can use the interface to manually link pull requests or projects to issues using the dropdown options.
Saved replies
Saved replies let you quickly respond to issues and pull requests with prewritten messages. They’re especially helpful for project maintainers who often give the same feedback or instructions.
Create or edit a saved reply
- Click your profile photo in the top right corner and select Settings.
- In the left sidebar, click Saved replies.
- Select New saved reply.
- Enter a title and your message.
- Click Save reply.
To edit or delete a saved reply, return to the Saved replies settings and use the options beside each one.
Using a saved reply
When writing a comment on an issue or pull request, you can insert a saved reply:
- Click the comment box.
- Select the Insert a saved reply icon (speech bubble with lines).
- Choose a saved reply from the list.
- Modify the text if needed, then click Comment.
Saved replies save time and help ensure consistency when responding across your project.
Here’s an updated version that includes guidance on issue templates—explaining what they are, how they differ from saved replies, and why they’re usually better for collecting structured information up front.
Issue Templates
While saved replies are useful for common responses, issue templates are a better way to make sure contributors provide all the necessary information when creating new issues.
- Issue templates prompt users to fill in specific fields or answer certain questions up front, reducing back-and-forth and ensuring you have the details you need from the start.
- Templates help maintainers avoid “lost data” by collecting structured information before an issue is even submitted.
Tip
To set up issue templates, go to your repository’s Settings > Issues > Set up templates. You can create templates for bug reports, feature requests, or anything else your project needs.
Best practice: Use issue templates to capture required details and reduce missing or incomplete information. Use saved replies for routine responses and instructions after issues or pull requests are submitted.
Adding assignees
You can assign one or more people to an issue or pull request to show who’s responsible for working on it.
Add an assignee
- Open the issue or pull request.
- In the right sidebar, click Assignees.
- Select one or more users from the dropdown.
You can also assign people directly from the list view using the checkboxes beside each issue and selecting Assign from the top bar.
Tip
Use the assignee: filter in your searches to find items assigned to yourself or others.
Example:
is:open is:issue assignee:@me
Autolinked references
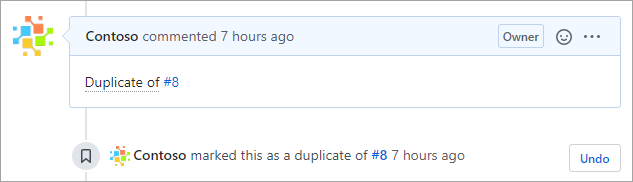
To make it even easier to cross-link different items throughout your project, GitHub offers a shorthand syntax. For example, if you leave a comment like Duplicate of #8, GitHub will recognize that #8 is an issue and create the appropriate link for you.
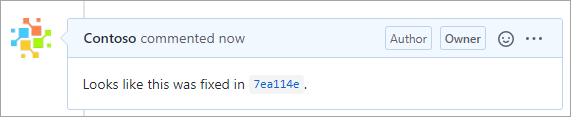
GitHub also links commits for you if you paste in the first seven or more characters of its ID.
In our scenario, these links could prove very valuable for ramping up if someone thought ahead to leave the context. For example, the sidebar's current state might have had some known issues related to a JavaScript dependency. If the issue with that dependency was discussed in another issue that didn't explicitly mention "sidebar," then it would be difficult to find. However, if someone had thought ahead to link the issue in the discussion, then it could save you a lot of time now. Keep that in mind the next time you're documenting issues and pull requests.
Learn more about Autolinked references and URLs.
Looping in users with @mention
Besides linking issues and commits, it's often helpful to associate other people with discussions. The easiest way to do this is by using an @mention. This kind of mention notifies the mentioned user so that they can participate in the discussion. It's also a good way to identify people associated with issues long after they have been closed.
