Exercise - Branch based on sentiment
In this exercise, continue working on the news monitoring app. Add a Condition action so that the workflow can branch, based on the article's sentiment. The following diagram shows a conceptual view of the app and highlights the part that you work on:

Add a Condition action
This section adds the Condition control action to your logic app workflow. In programming terms, you add an if statement that tests a condition.
In the Azure portal, return to your logic app resource and workflow from the previous exercise.
To return to the designer, on the logic app menu, under Development Tools, selects Logic app designer.
On the designer, under the Sentiment action, select the plus icon (+) > Add an action.
If you're using the RSS trigger, make sure that you select the plus icon inside the For each loop.
In the Add an action pane search box, enter condition.
From the results list, in the Control collection section, select the action named Condition.
The Condition action appears, including two branches: True and False.
Set up the condition
Now, specify the condition to test.
In the Condition action pane, select the title to rename the condition as If sentiment is positive.
On the Parameters tab, select inside the leftmost Choose a value field.
Select the expression editor option (function icon).
In the editor box, enter the following expression to reference the
sentimentproperty, and then select Add:body('Sentiment_(V3.0)')?[first('Documents')]?['DocumentSentiment']?['sentiment']"In the middle column, from the operator list, select is equal to, if not already selected.
In the rightmost Choose a value field, enter Positive.
The finished condition looks like the following example:
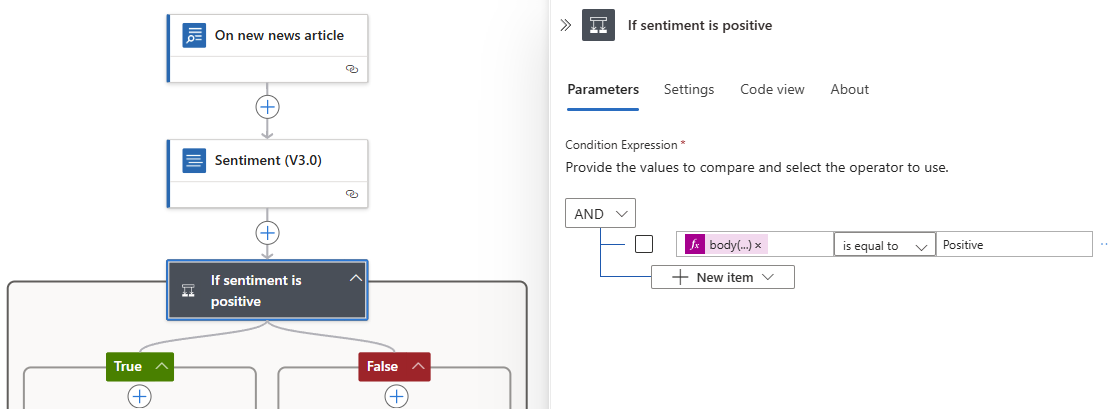
When you finish, save your workflow.
Create an Azure Storage account
When the workflow trigger receives a positive article, you want to save the article to storage. In this section, you create an Azure Storage account and blob container so that you can save articles as blobs. When you finish with this module, make sure to delete the storage account and container to avoid incurring any additional charges. At the end of this training, the Summary unit contains instructions for deleting your resources.
In the Azure portal search box, enter storage accounts, and select Storage accounts.
On the Storage accounts page toolbar, select Create.
On the Basics tab, provide the following information:
Property Value Description Subscription <Azure-subscription> Select your Azure subscription. Resource group <resource-group> Select the same resource group that you're using across this module. Storage account name <storage-account-name> The name for your storage account. This exercise uses shoetrackernewsstorage. Region <Azure-region> Select an Azure region nearest you. This example selects West US. Primary service Azure Blob Storage or Azure Data Lake Storage Gen 2 The primary storage service that you want to use. Primary workload Cloud native The workload type closest to your scenario. Performance Standard The performance level to use. Redundancy Locally-redundant storage (LRS) For this training, you need only LRS storage. On the Advanced tab, for this training, select Allow anonymous access on individual containers.
When you finish, select Review + create.
After deployment completes, select Go to resource.
Set up blob container
Now add a blob container to your storage account.
In your storage account, on the left menu, under Data storage, select Containers.
On the Containers toolbar, select + Container, and provide the following information for this example:
Property Value Description Name positivenews The name for the blob container. Anonymous access level Container (anonymous read access for containers and blobs) The access level for your container and blobs. When you finish, select Create.
Add the Azure Blob Storage action named Create blob
You previously set up the condition, but the workflow currently doesn't have an action to take if the sentiment is positive or negative. If the sentiment is positive, you want the workflow to save the article in the blob container that you created. For this task, add the Azure Blob Storage action named Create blob to the workflow.
In the If sentiment is positive condition, within the True section, select the plus icon (+) > Add an action.
In the Add an action pane search box, enter create blob.
From the results list, find Azure Blob Storage, and select the action named Create blob.
Tip
If you don't see this operation, next to the connector name, select See more.
In the connection information box that appears, provide the following connection details for your SQL Server, and leave the remaining fields empty:
Parameter Required Value Description Connection Name Yes <blob-connection-name> The name to give your connection. Authentication Type Yes Microsoft Entra ID Integrated The authentication type for accessing your storage account. Select Sign in, and confirm your Microsoft Entra ID account.
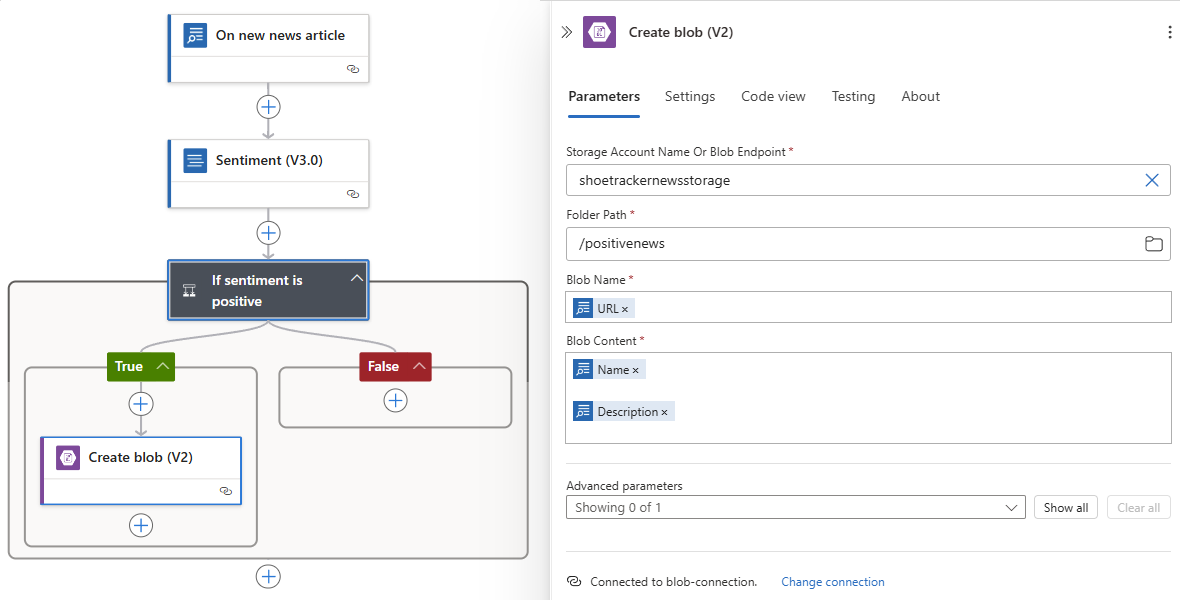
In the Create blob action, provide the following information:
Parameter Required Value Description Storage Account Name or Blob Endpoint Yes <storage-account-name-blob-endpoint> The name for your storage account or blob endpoint URL. This example uses shoetrackernewsstorage. Folder Path Yes <blob-container-name> Select the folder icon, and under Azure Blob Storage, select your blob container, which is positivenews in this example. Blob Name Yes <blob-name> The name to use for the blob. This example uses the article URL. For this exercise, follow these steps:
1. Select inside the Blob Name field.
2. Select the dynamic content list option (lightning icon).
3. From the On new news article section, select the URL trigger output.
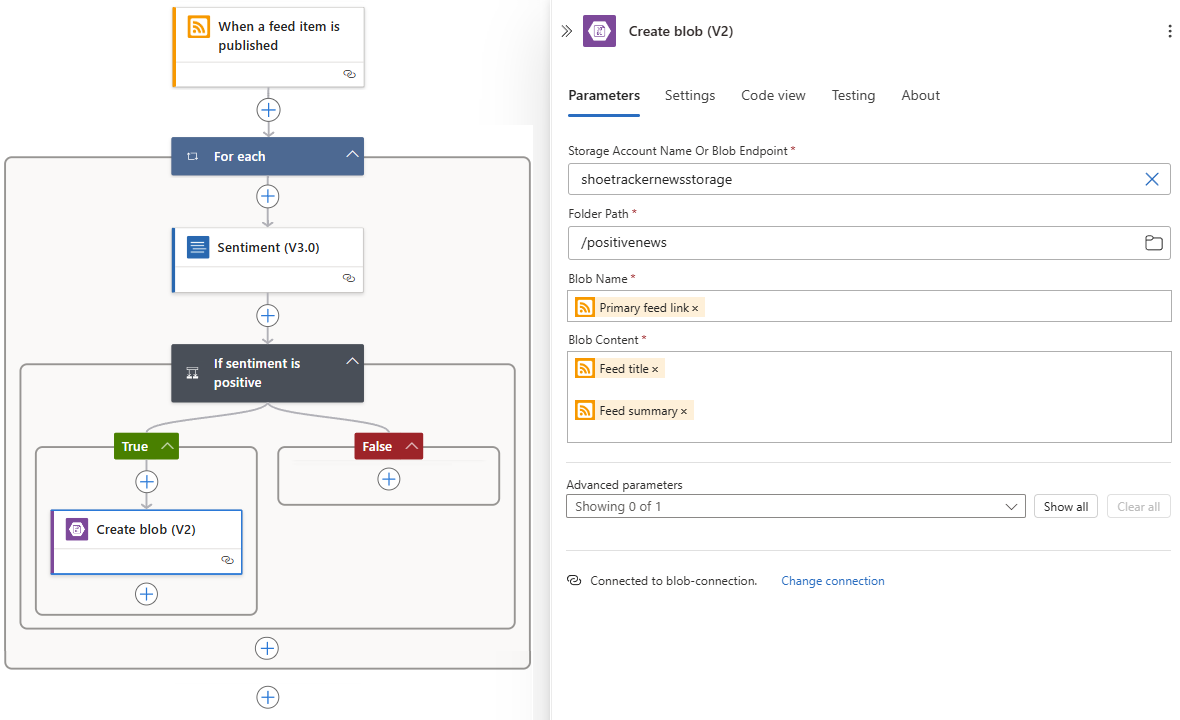
Substitution: If you're using the RSS trigger named When a feed item is published, select Primary feed link.Blob Content Yes <blob-content> The content to add. This example uses the article name and description. For this exercise, follow these steps:
1. Select inside the Blob Content field.
2. Select the dynamic content list option (lightning icon).
3. From the On new news article section, select the Name trigger output.
Substitution: If you're using the RSS trigger named When a feed item is published, select Feed title.
4. Add a blank line.
5. Select the dynamic content list option (lightning icon) again.
6. From the On new news article section, select the Description trigger output.
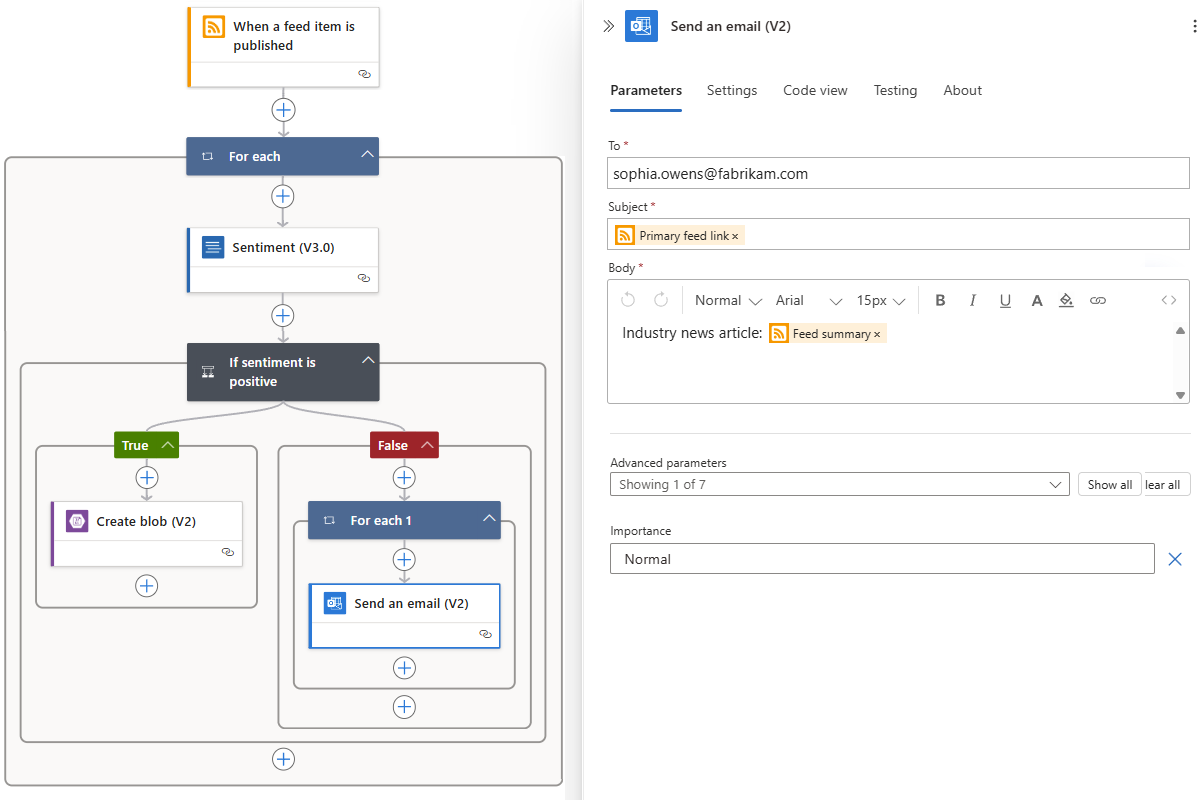
Substitution: If you're using the RSS trigger named When a feed item is published, select Feed summary.The finished action looks like the following example:
Substitution: If you're using the RSS trigger, the finished action looks like the following example:
When you finish, save your workflow.
Add the Outlook action named Send an email
Now, you want the workflow to send articles that have any other sentiment to the public relations department through email.
Under the condition action, in the False section, select the plus sign (+) > Add an action.
In the Add an action pane search box, enter send an email, and select one of the following options:
- Office 365 Outlook: Send an email: If you have a Microsoft work or school account
- Outlook.com: Send an email: If you have a Microsoft (personal) account
- Use the search terms send email or send an email to find and select a different email provider, such as SendGrid or Gmail.
Set up the Send an email action
Now, map the article data to the respective email fields.
If prompted, select Sign in, and provide your email account credentials.
Confirm that you want to grant access for Azure Logic Apps to your email account.
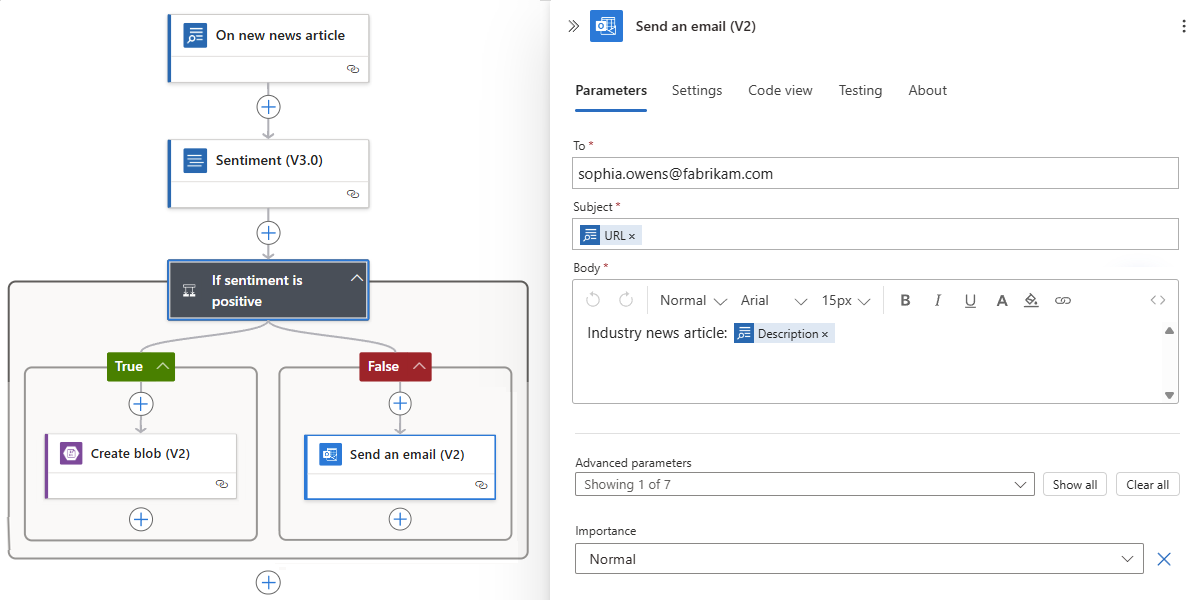
In the Send an email action, provide the following information:
Parameter Required Value Description To Yes <recipient> A valid email address for the recipient. For testing, use your own email address. Subject Yes Article from: <article-URL> 1. Select inside the Subject field, and select the dynamic content list (lightning icon).
2. In the dynamic content list, from the On a new news article section, select URL.
Substitution: If you're using the RSS trigger named When a feed item is published, select the FeedTitle output for the Subject field.Body Yes Description: <article-description> 1. Select inside the Body field, and select the dynamic content list (lightning icon).
2. In the dynamic content list, from the On a new news article section, select Description.
Substitution: If you're using the RSS trigger named When a feed item is published, select the FeedSummary output for the Body field.The finished action looks like the following example:
Substitution: If you're using the RSS trigger, the designer automatically adds a For each loop around the Send an email action, so that the finished action looks like the following example:
When you finish, save your workflow.
Test the workflow. To manually activate the trigger, on the designer toolbar, select Run > Run.
The trigger checks the Bing Search service for any news articles that contain your search text and are available at the current time.
If the trigger doesn't find a matching article, the trigger "skips" execution, which means you have to rerun the workflow again at a later time to check for any new matches.
If the trigger finds a matching article, the trigger fires and sends the content to the Sentiment action, which passes the content to the Azure AI Services API to get a sentiment ranking. The If sentiment is positive condition evaluates the sentiment and takes the corresponding action based on the outcome.
After a workflow successfully executes, review the workflow run history.
Review workflow run history
On the logic app menu, select Overview.
On the Overview page, select the Runs history tab.
Each item in the Runs history list represents a separate article description that contains the search text that you specified in the trigger.
Select the row for a successful workflow run.
The workflow's run details page opens and shows the status and time taken for each operation to run. From this view, you can also review the data that flowed through each operation.
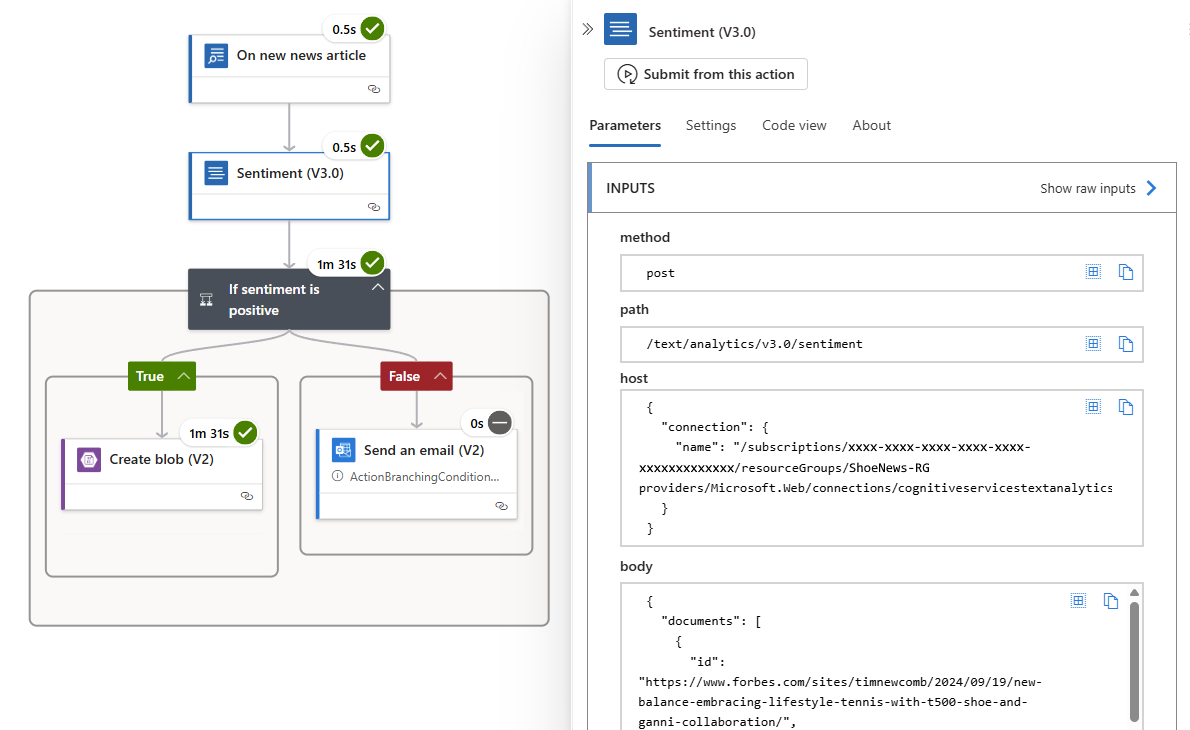
To view the action's inputs and outputs, select the Sentiment action on the run details page.
A pane opens to show the action's INPUTS and OUTPUTS sections.
For an article with a positive sentiment ranking so that the condition evaluates to true, the run details page looks like the following example:
For an article with any other sentiment ranking so that the condition evaluates to false, the run details page looks like the following example:
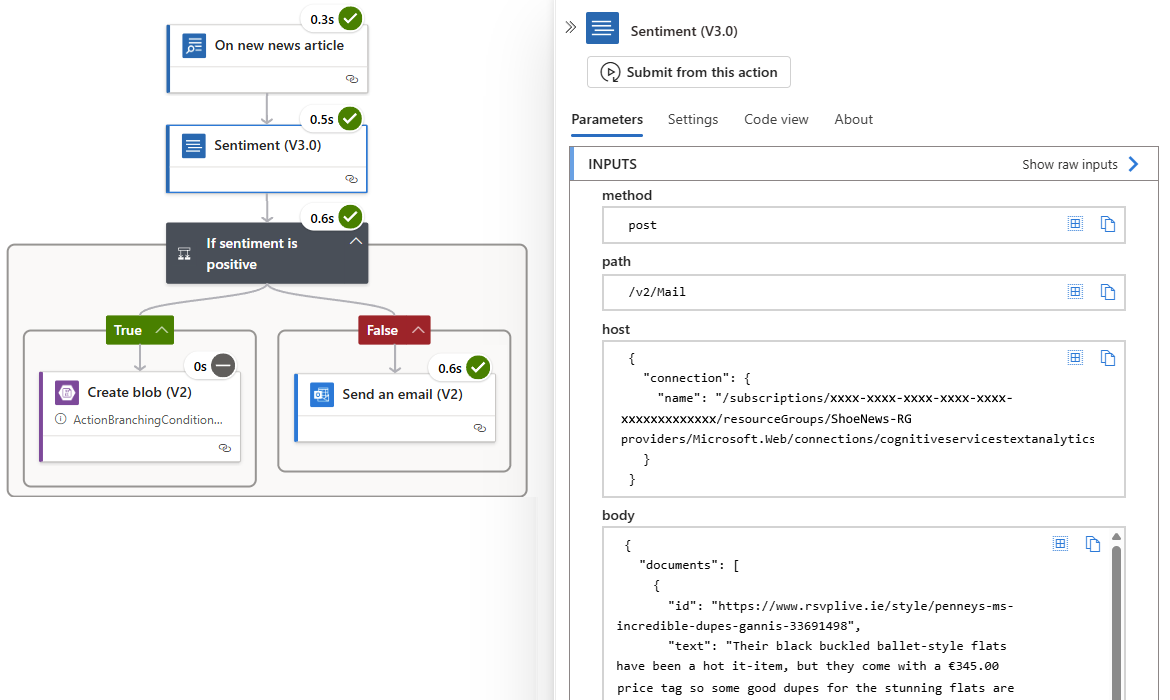
In the OUTPUTS section, in the body field, find the text content and the assigned sentiment label. To review the complete response in JSON format, select Show raw outputs.
Review a positive sentiment article
Now, we examine the blob container for any positive articles.
In the Azure portal search box, find and open your storage account.
On the storage account menu, under Data storage, select Containers.
Select positivenews to open the container.
The container's Overview page lists any blobs created by your workflow, for example:
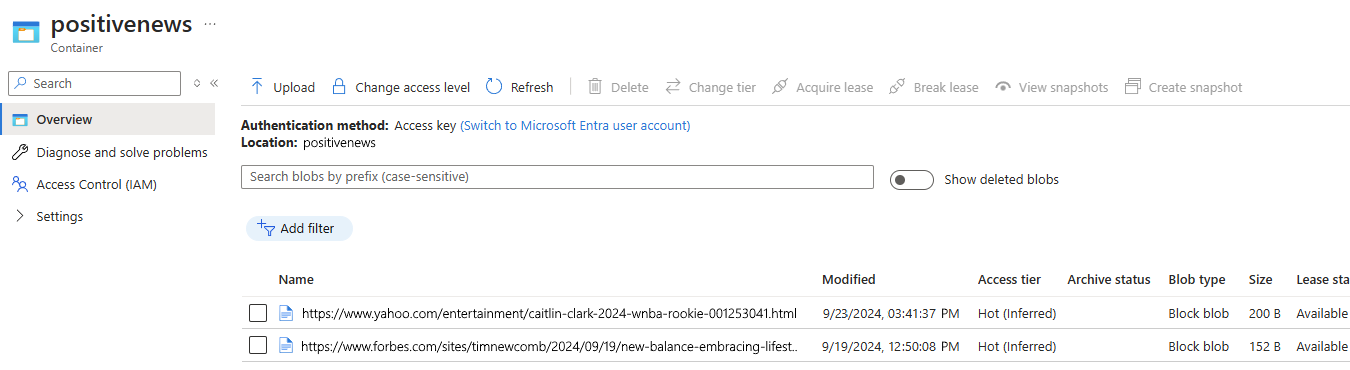
To view the blob content, select an article row, and then under the blob toolbar, select the Edit tab, for example:

Review a negative sentiment article
Finally, check your email account to see if you received any emails for negative, neutral, or mixed sentiment articles.
Sign into the email account that you provided in the Send an email action.
Review any emails that the workflow sent to your email account.
Important
If you use an Azure subscription that incurs charges, your subscription might incur a small charge when you run your workflow. The Consumption plan specifies that metering and billing apply as described:
- Built-in (in-app) operations: The first X number of executions are free. Afterwards, pay-per-execution pricing applies.
- Managed (shared) operations: Pay-per-execution pricing applies.
To minimize charges, make sure to delete your resources after you finish this module.
For more information, see the following resources:
- Trigger and action operations in the Consumption model
- Azure Logic Apps pricing. Select your region, currency, and then the Consumption Plan (Mutlitenant) tab.
The next unit provides a knowledge check on what you've learned.