Exercise - Understand environments in Power Apps
Inside of a tenant, usually at the company or organization level, are environments. An environment is a container for apps and other resources, such as data connections and flows from Microsoft Power Automate. It's a way for an organization to group items based on business requirements.

If you've followed along with this module, you've been working in a specific environment the whole time. In the upper-right corner of the Power Apps studio, you can view your current environment. Below the label "Environment," you'll see the name of the active environment. In the example below, the user is working in the environment called "PowerPagesDeveloper-...".

If you're new to Microsoft Power Apps, you might have only the default environment at this point. To see if there are other environments available, select the current environment name in the header. A Select environment panel appears on the right side of your screen, enabling you to search for and choose another environment.
Note
If you want to work with Power Apps environments, you need a Power Apps Per app plan or Power Apps Per user plan. Additionally, if you want to work with Dynamics 365 restricted tables, you must have a Power Apps for Dynamics 365 license. Refer to the summary unit of this module for links to licensing information.
Reasons to use environments
Reasons to create additional environments include:
- Separate app development by department - In a large organization, each department can work in a different environment. That way, department employees see only apps and company data that are appropriate.
- Support application lifecycle management (ALM) - Separate environments let you isolate apps in different development stages from those that are already published. Common options include environments for development, testing, and production. Additionally, a trial environment can help you gather feedback before final deployment.
- Manage data access - Each environment can have its own source of business data. Data connections can be created that are specific to an environment and can't be shared across environments.
Note
Environments are available only to app creators and Power Apps admins. When you share an app with users, they simply run the app—they don't need to know which environment it came from, as long as they have the correct permissions.
Types of environments
When you create a new environment, you can select from the following types:
- Developer - Created by users with Developer Plan licensing. Intended for use by the creator. Available without expiration as long as the user actively uses it. Developer environments include access to premium features.
- Production - Used for apps, flows, and data in a production setting. The Default environment is a Production environment.
- Trial - Supports temporary development and exploration of Microsoft Power Platform features. Designed for individual use and automatically expires after 30 days.
- Trial (subscription-based) - Allows admins to assign usage to multiple users. Suitable for multiuser, department-wide solutions and proof-of-concept testing. Has an end date that can be extended.
- Sandbox - A nonproduction environment in Microsoft Dataverse. Ideal for safe testing and development. It's isolated from production data.
Now that you have a basic understanding of environments, you can follow these steps to create one.
Create an environment
Only an admin can create environments. If you're not an admin, this section can still be helpful when discussing setup with one.
From the Power Apps maker portal, select the gear (Settings) icon near the upper-right corner and then select Admin center.
This opens a new browser tab for the Power Platform admin center. You can also go directly to https://admin.powerplatform.microsoft.com.
Select the settings wheel from the upper-left corner. Then select Admin center.

From the Power Platform admin center home screen, select the Manage tab on the left-hand navigation panel.

On the Manage screen, select Environments to see all environments in your tenant. If you only have one, it appears with the suffix "(default)". In the image, the default environment name is obscured, but the PowerPagesDeveloper environment is visible as a Developer environment.
Select + New from the command bar.

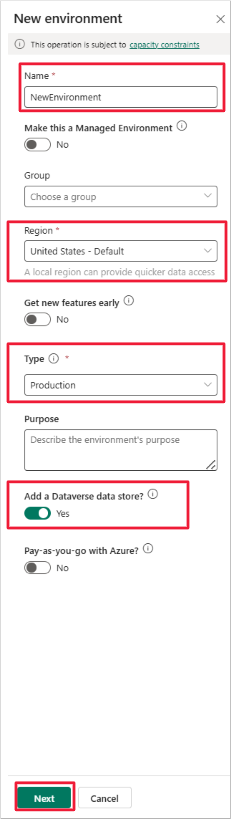
In the New environment panel, enter a name, select a region, and choose an environment type. You can optionally add Dataverse to Trial, Sandbox, or Production environments.
Toggle Add a Dataverse data store to Yes to enable Dataverse usage in the environment. If not needed, leave it set to No. Developer environments include Dataverse by default.
Admins can also choose Pay-as-you-go with Azure to link the environment to an Azure subscription and pay for services like Dataverse and Power Apps. This is optional and available only for Production and Sandbox environments.
If setting up a Developer environment for another user, use the Create on behalf toggle to assign an Owner. This lets admins create Developer environments for users in their tenant.
If you added Dataverse, select Next to configure it. Otherwise, select Save.
For Sandbox, Production, and Developer environments with Dataverse, the Add Dataverse panel appears. Select a Language and Currency—these can't be changed later. You may also enable sample apps and data. Select Save to finish.


Note
Environment creation requires at least 1 GB of available tenant capacity. If capacity is insufficient, free up space or purchase more.
It may take several minutes to prepare the database. Once completed, the new environment appears in the list.
Return to the Power Apps home page to see the new environment listed.
Manage access to an environment
By default, you can manage access in one of two roles:
- System admin - Full permissions to create and manage environments.
- Environment maker - Can view, create, and modify apps and work with Dataverse, based on permissions.
Environment admins can also create other security roles and assign users. Here's how to assign roles:
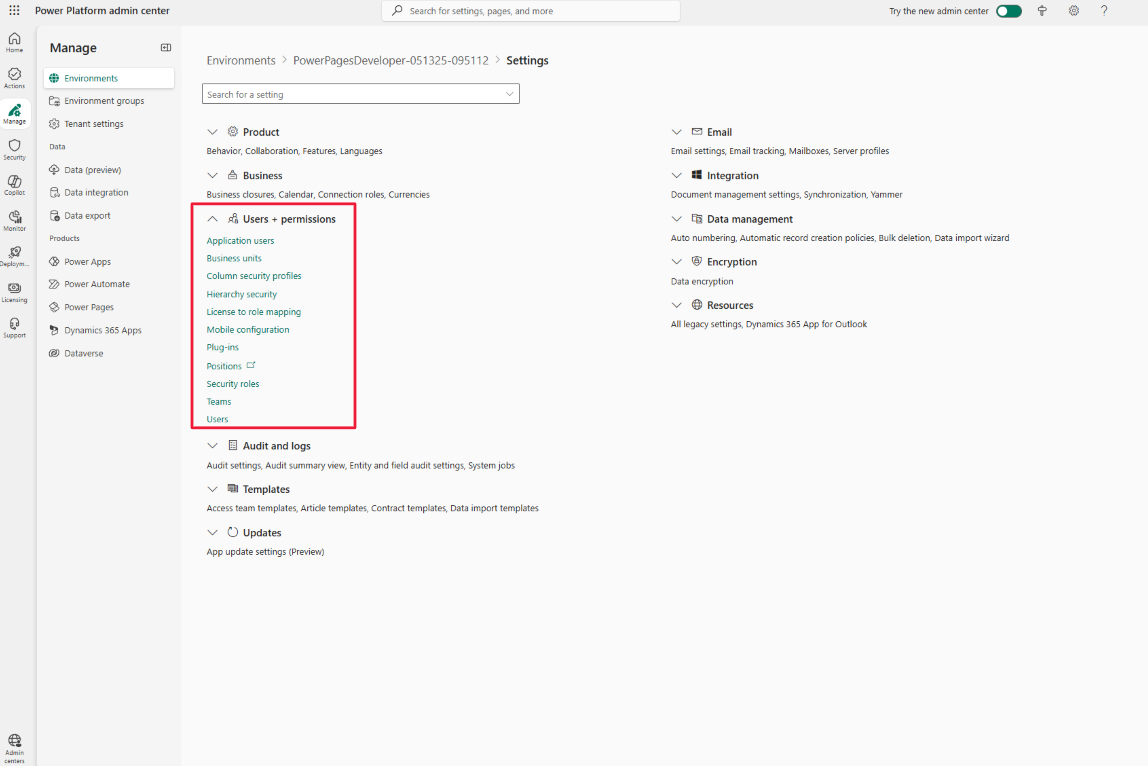
Select Manage, then Environments.
Choose your environment and select Settings.
Expand Users + permissions and select Users.
On the Users list, select Add user.
In the Add user panel, enter the name or email address of the user.
Select Add. After a moment, the Manage security roles panel appears.
Note
Users must be enabled in Microsoft Entra ID, have a valid license, and be in the appropriate security group. If errors occur, verify these prerequisites before retrying. The summary unit includes a link with more info.
In the Manage security roles panel, select a role. For this example, choose Environment Maker.
Select Save.
The Users list shows confirmation messages once the user and their roles are added.

With these steps complete, you now understand the basics of creating and managing environments in Microsoft Power Apps.