Explore model-driven app features
Model-driven apps in Power Apps provide a structured approach to building applications that focus on data and business processes. This learning unit introduces you to the essential steps for creating, designing, and sharing model-driven apps tailored to your organization's needs.
Navigating among apps, areas, and tables
As we discussed previously, a model-driven app is built out of three components, applications (apps), areas, and tables.
Apps: A collection of functionalities for accomplishing a specific type of activities, such as managing accounts and contacts. Many organizations have multiple apps available to their users. For example, a company might have a sales app for managing sales, and a service app for managing customer service requests.
Areas: Areas are subdivisions of an app and are dedicated to a specific feature. Each work area provides a targeted collection of tables for working in that area. In some cases, the same table appears in more than one area (or even more than one app). The Contact and Account tables, for example, appear in various apps and work areas. Use the work-area menu to navigate between work areas for your current app.
Tables: Represent a specific type of data, such as contacts or accounts. Each table consists of a collection of individual rows. For example, for the Contact table, each row describes a single person, and each row includes a collection of columns such as first name, family name, and email address.
Tables normally present two views:
- List view: Displays multiple records that meet a specific criterion.
- Form view: Display details for an individual record.
Let’s examine model driven applications in more detail.
Many organizations have multiple model-driven applications that they're using. Each one is used to support a different area of a business. For example, you may have a model-driven application that is used for managing assets, and another one that is used for managing events your organization hosts. When an organization has multiple model-driven applications, you can use the app-selector menu to switch between them.
Select the current app name.
Select an app on the Apps page. You only see apps for your organization.

The layout for all model-driven applications is going to be the same regardless of what the application is being used to manage. This ensures that users receive the same foundational experience regardless of the app they're working in.
In the image, we can see a typical layout of a model-driven application.
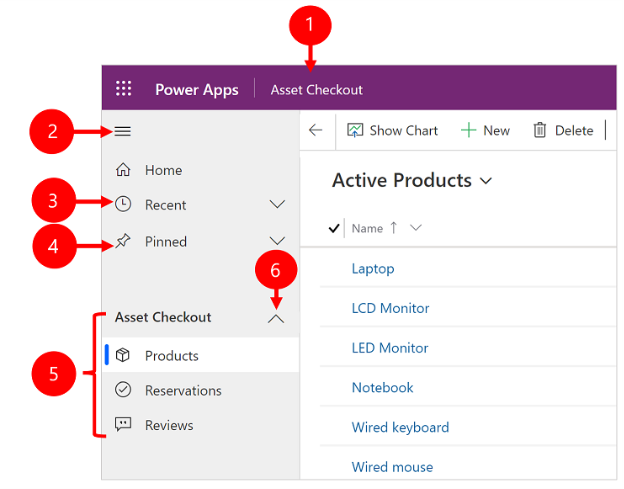
Change app: Select the current app name to change to a different app.
Collapse/expand site map: By default, the apps site map is displayed. This represents all the different tables and items that can be worked with. Sometimes, users might not want to see the sitemap. You can select the site map icon collapse the navigator to allow more room for the main part of the page. Once it collapses, select this button to expand it again.
Recent: As you're working with different records, the application keeps track of the records that you recently used. You can select a row here to open it. If you want to make a record permanently accessible, select the push-pin icon next to a record to add it to your pinned rows.
Pinned: Expand this entry to view and open your favorite pinned rows. The number of pinned rows displayed is limited to 25, with no more than 15 rows from a single table are displayed.
Page navigation: This area lists each table and dashboard page available for the current work area. Select any entry here to open the named dashboard or list view for that table.
Collapsible groups: Your app maker can enable collapsible groups.
Area switcher
Sometimes when organizations build out model-driven applications, they break it out into multiple "areas." Each area is used to perform specific types of tasks. For example, a "Sales" area would typically provide access to selling tools such as products opportunities, and orders. This is where a salesperson might spend their day. Additionally, the app might also have a “Settings” area used to modify specific settings in an application. This might be where an admin or manager spends time. Having multiple areas in a single app means that users aren't constantly switching applications. The area switcher appears at the bottom left only when a model-driven app has more than one area in the sitemap definition.
Open the menu displayed in the image to move to another work area. The current work area is named here.

Working with views
Views are used to display multiple records from a single table at one time. Usually, when you first open a table, you see the list view, which shows a list of rows belonging to that table, formatted as a table. For example, if you open the Products table, you see a list of all the products an organization might sell. Views have various different tools available to assist with finding and managing records.

- Go back: Select Go back to go back to the previous page.
- Select rows: Select one or more rows by placing a check mark in this column. Depending on where you're working, you might be able to apply a single operation to all the selected rows at once by using buttons in the command bar.
- Open a row: Select any row in the list to open its row view, which shows all the details about the row.
- Sort or filter the list: Select to sort the view by values in that column or filter by values in that column. An arrow in the heading indicates which column is being sorted and in which direction.
- Open advanced filtering panel: See which filters are applied to the current view and add or modify view filters.
- Command bar: Use the commands in the command bar to operate on rows in the list and do related actions.
- Search the view: Enter text in the search column above the list to show only those rows in the current view that contain your text.
- Jump bar and paging: Select a letter to show only those rows whose names start with that letter. If the list contains more rows than can be shown on one page, use the paging arrows at the bottom of the list to move forward and backward through the pages.
Working with forms
Forms show all the details about a single record and sometimes also provide special features for interacting with it. Usually, you open a record by selecting it in list view, but you can also open a row view by following a link from a related row. All forms essentially have the same look, feel, and layout (Which is by design), but the specific data presented in the form vary based on the needs of the individuals organization. While they may look slightly different, all forms follow the structure noted.

Tabs: Tabs on forms make it easy to group different types of information together. For example, a form being used to manage company devices might have a reservations tab, where it tracks all the different reservations for a specific item. The current tab is shown underlined.
Related: The related tab displays provide access to all the different types of records that are related to the current record. For example, an Account may have multiple contacts, quotes, orders, and invoices associated with it. The related tab provides access to those related records. This tab is a drop-down list that you can use to find other types of rows that use or reference the displayed row. When you choose a table name from the Related drop-down list, a new tab named for that table opens, showing a list of all related rows of that type. The Related tab remains available, and you can still use it to find other types of rows that reference the table.
Command bar: Use the commands in the command bar to operate on the current row or perform a task related to the row. The available commands vary based on the row type, but you can typically use the command bar to save your changes, delete the row, refresh the page, or more depending on the type of record.
Heading bar: Some records display a few especially important columns in the heading bar, opposite the row name. This is typically information that is important such as the owner of the record, or maybe the credit limit of an account or contact.
View and edit all column values: In the main body of the row view, you find all the columns related to the current tab, form view, and row type. Columns marked with a red asterisk are required.

Clickthrough demo
View this clickthrough demo to navigate through a model-driven app
Define business processes in model-driven apps
Business process flows guide users through consistent workflows, ensuring accuracy and efficiency. These flows are created using Power Automate and can be simple or complex.
- Business process flows help users focus on their tasks by automating manual steps.
- They can span multiple tables and enforce rules, such as requiring approvals before proceeding.

For more information, see Business process flows overview.