Configure vCenter Server site pairing
To complete the steps for protecting your VMware vSphere virtual machines (VMs), you now need to connect instances of VMware SRM on the protected and recovery sites, then configure a protection policy. The process of connecting VMware SRM instances is known as site pairing. You can configure site pairing from a Windows client VM, called a jump box, that is deployed on the virtual network and has access to both Azure VMware Solution private clouds.
Configure site pairing in vCenter Server
To configure site pairing, perform the following steps:
Ensure that the jump-box device has connectivity to both Azure VMware Solution private clouds.
In the jump-box VM, open a browser and connect to the private cloud vCenter Server and NSX-T Manager using credentials that you can retrieve from Identity, located in the left navigation of your Azure VMware Solution private cloud.
Note
The first time you attempt to connect to vCenter Server, you’ll use the HTML5-based client.
In the vSphere Client, select Menu, then select Site Recovery.
In the Site Recovery window, verify that the status OK displays for both vSphere Replication and Site Recovery Manager, then select Open Site Recovery.
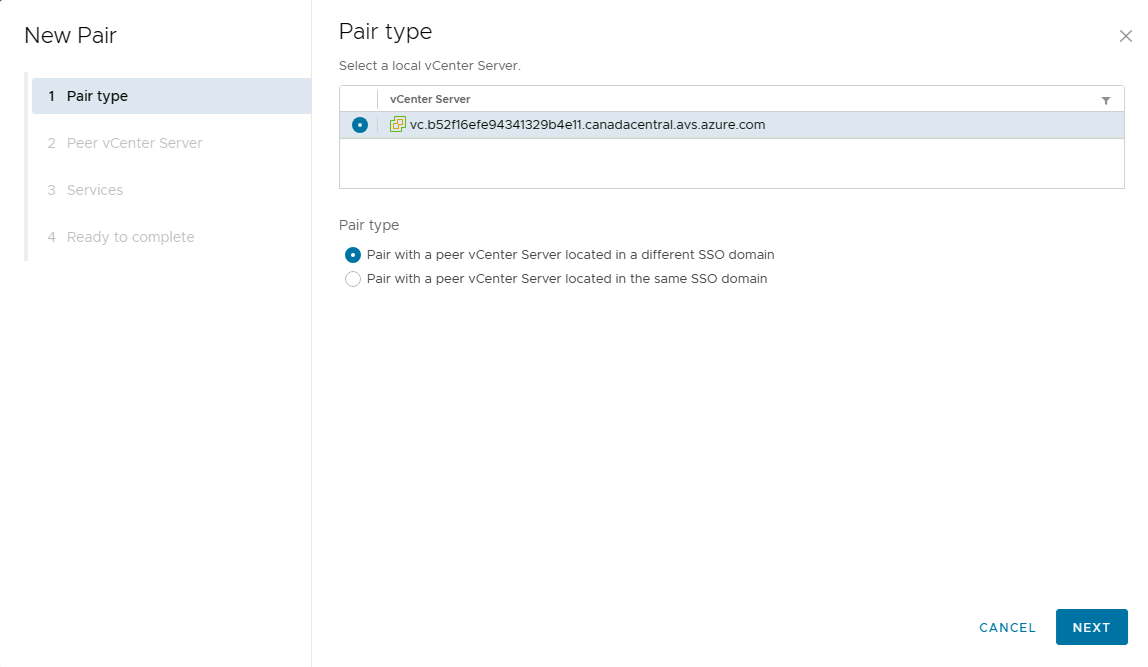
Select the New Site Pair button.
Select the first site from the list and select the Pair type accordingly. The following image example demonstrates a customer choosing Pair with a peer vCenter Server located in a different SSO domain, then selecting Next.
Enter the address of the Platform Services Controller for the Site Recovery Manager Server on the second site.
Provide the username and password, the select Find vCenter Server Instances. Once the desired vCenter Server appears, select it, then select Next.
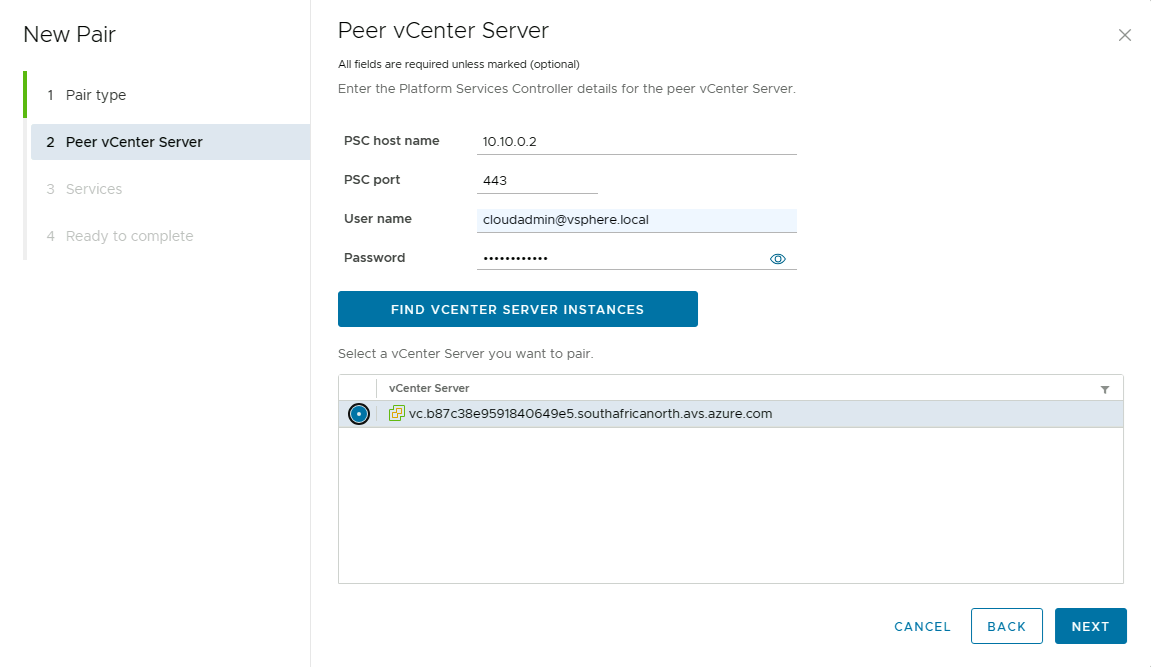


The address you provide for the Platform Services Controller must match the address used when you installed Site Recovery Manager Server on the recovery site.
Connect the Site Recovery Manager instances on the protected and recovery sites
After you configure the VMware SRM, you should connect both instances of VMware SRM on the protected and recovery sites.
Note
The following ports should be open to provide cloud-to-cloud recovery: 80, 443, 902, 1433, 1521, 1526, 5480, 8123, 9086, 31031, 32032, 8043, and 10000-10010.
Configure mappings between sites
Before you start protecting the VMs, you first need to map the objects on the protected site to the corresponding objects in the recovery site. You can map the following objects to ensure the replicated VMs have proper functionality:
Networks
VM folders
Compute resources
Storage policy mappings
Note
To enable bidirectional protection and reprotect, configure reverse mappings to map the objects on the recovery site back to their corresponding objects on the protected site.

By configuring mappings, you can ensure that the VMs have access to all resources available at the recovery site. If you don’t create the proper mapping, then you’ve to configure these settings for every VM individually.
Configure replication on the VMs
Before you can create protection groups, you must configure replication on the VM that you want to protect. When you configure replication settings, you can select multiple point-in-time instances that are converted to snapshots during recovery.
Use the following procedure to configure replication for the VM:
In the vSphere client or the vSphere web client, select Site Recovery, then select Open Site Recovery.
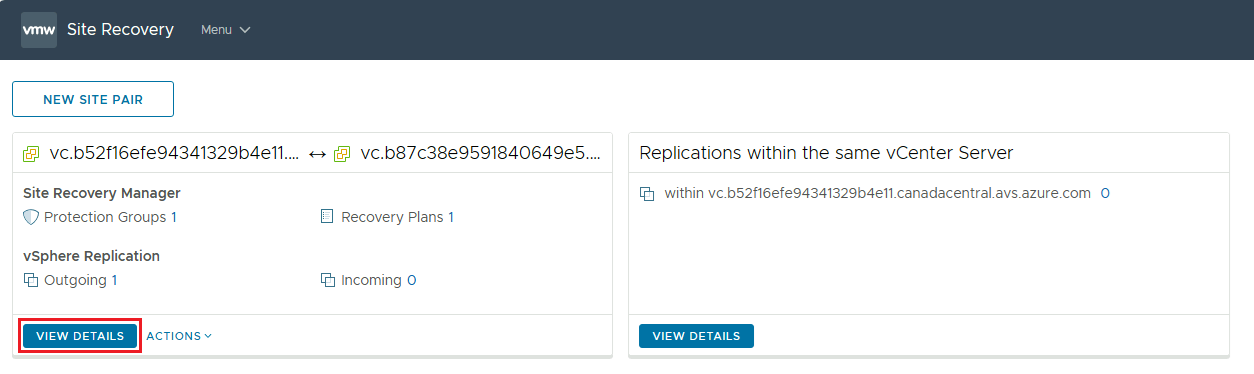
On the Site Recovery home tab, select a site pair, then select View Details.
Note
You might be prompted to sign in with cloudadmin credentials.
Select the Replication tab, then select New.
On the Target site page, ensure that you select a target site, and optionally, select a vSphere Replication Server to manage the replication.
On the Virtual machines page, select one or multiple VMs that you want to protect, then select Next.
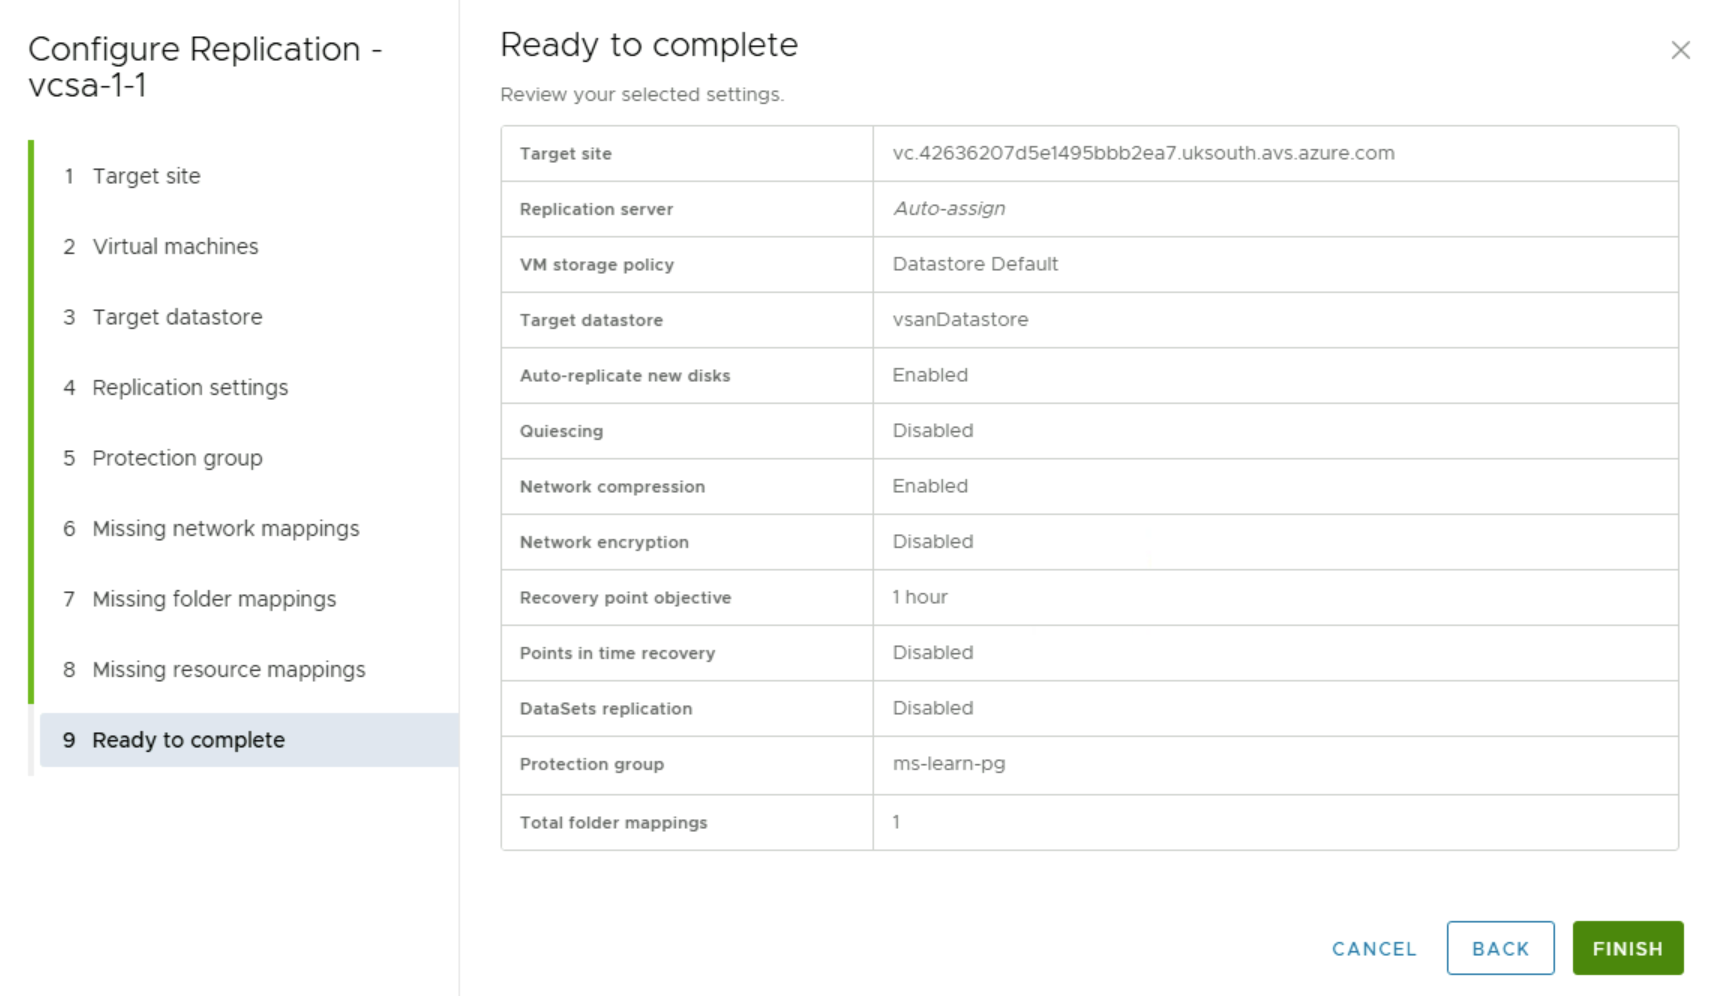
On the Target datastore page, configure the protected VM’s Disk format and VM storage policy, then select Next.
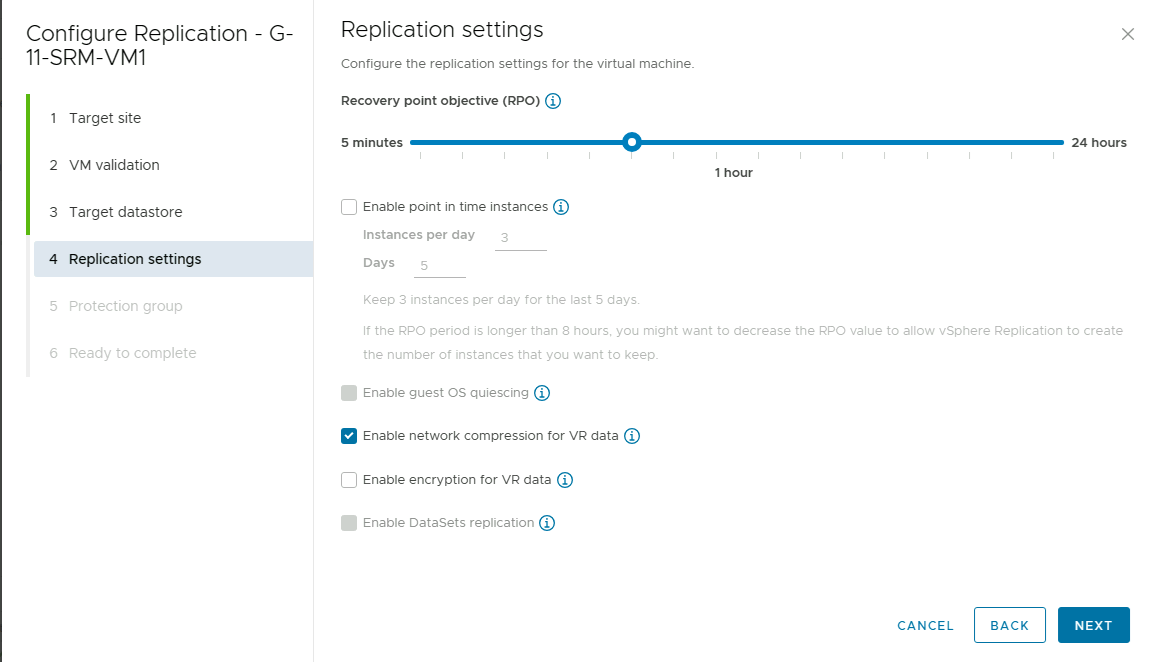
On the Replication settings page, under Recovery point objective (RPO), select Enable network compression for VR data, then select Next.
On the Protection group tab, add the VMs to an existing or a new protection group. Alternately, you can choose not to add the VMs to any protection group at this stage. Select Next.
On the Ready to complete page, review your settings, then select Finish.
Note
You can configure replications for powered-off VMs, but the data synchronization begins when the VM is powered on. While the source VM is powered off, the replication displays a Not active status.


Create and manage protection groups
You can create a protection group containing multiple VMs that VMware SRM protects collectively. Protection groups are included in the recovery plan that specifies how VMware SRM recovers the VMs contained in the protection group.
You must assign the VMs that are part of the replication plan to an existing resource pool, folder, and network on the recovery site. You can configure these settings in the inventory mappings or individually for every VM in the protection groups.
VMware Site Recovery Manager creates placeholder VMs on the recovery site, then applies the inventory mappings to each VM in the group. vSphere Replication then synchronizes the disk files of the replication target VM according to the recovery point objective that you set when you configured vSphere Replication on the VM.
Use the following procedure to create vSphere Replication protection groups:
In the vSphere Client or the vSphere web client, select Site Recovery, then select Open Site Recovery.
On the Site Recovery home tab, select a site pair, then select View Details.
Note
You might be prompted to sign in with cloudadmin credentials.
Select the Protection Groups tab, then select New Protection Group to create a protection group.
On the Name and direction page, enter a name and description for the protection group, select a direction, then select Next.
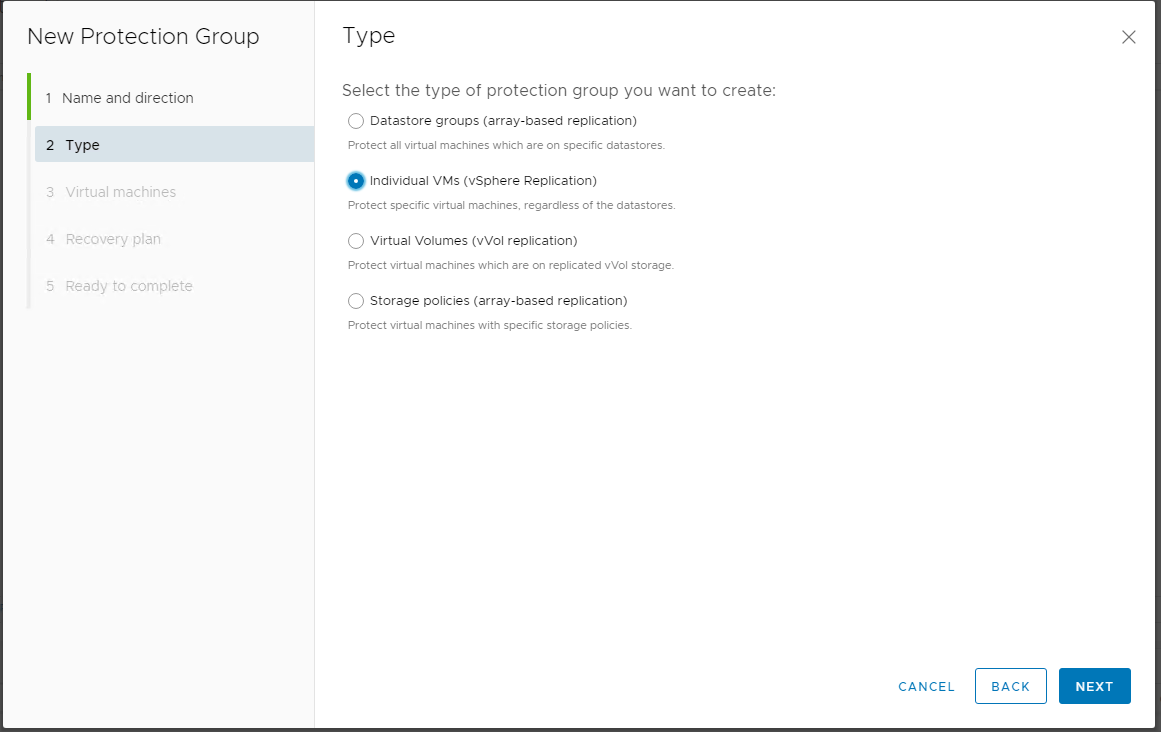
On the Protection group type pane, select Individual VMs (vSphere Replication), then select Next.
Select VMs from the list to add to the protection group, then select Next.
Note
Only VMs that you configure for vSphere Replication and that aren’t already in a protection group are in the list.
On the Recovery plan page, you can optionally add the protection group to a recovery plan by selecting one of the options listed in the following table.
Option Description Add to existing recovery plan Adds the protection group to an existing recovery plan. Add to new recovery plan Adds the protection group to a new recovery plan. If you select this option, you must enter a recovery plan name. Do not add to recovery plan now Select this option if you don’t want to add the protection group to a recovery plan. Review your settings and select Finish.
Create, test, and run recovery plans
Recovery plans control every step of the recovery process. They control the sequence in which VMware SRM powers VMs on and off. You can create a recovery plan that contains one or multiple protection groups. You can also include a protection group in multiple recovery plans which enables you to choose between recovery plans and then decide how to recover the VM.
Use the following procedure to create a recovery plan:
In the vSphere Client or the vSphere web client, select Site Recovery, then select Open Site Recovery.
On the Site Recovery home tab, select a site pair, then select View Details.
Note
You might be prompted to sign in with cloudadmin credentials.
Select the Recovery Plans tab, then select New Recovery Plan to create a recovery plan.
On the Name and direction page, enter the name and description of the recovery plan, select the direction of the replication, then select Next.
On the Protection Groups page, select Protection groups for individual VMs or datastore groups, select one of the previously created protection groups, then select Next.
On the Test Networks page, select the networks to use while running tests on this plan, then select Next.
On the Ready to complete page, review the settings, then select Finish.
Testing the recovery plan
After you created a recovery plan, you can test or run the recovery plan. When you test the recovery plan, the source VM continues to operate in the source Azure VMware Solution, and a replica of that VM is created in the recovery site in the test network.
Use the following procedure to test the recovery plan:
- Select the recovery plan, then select Test.
- On the Confirmation options page, ensure that you select the Replicate recent changes to recovery site check box, then select Next.
- On the Ready to complete page, review the selected settings, then select Finish.
After a successful test, don’t forget to clean up the test environment.
Run the recovery plan
When you select to run the replication plan, you initiate a planned migration. Planned migration is the orderly migration of VMs from the protected site to the recovery site. Planned migration prevents data loss when migrating workloads in an orderly fashion. For planned migration to succeed, both sites must be running and fully functional. Then, if the protected site fails, you can initiate disaster recovery to recover the failed VMs. VMware SRM orchestrates the recovery process with the replication mechanisms to minimize data loss and system downtime.
Use the following procedure to run a recovery plan:
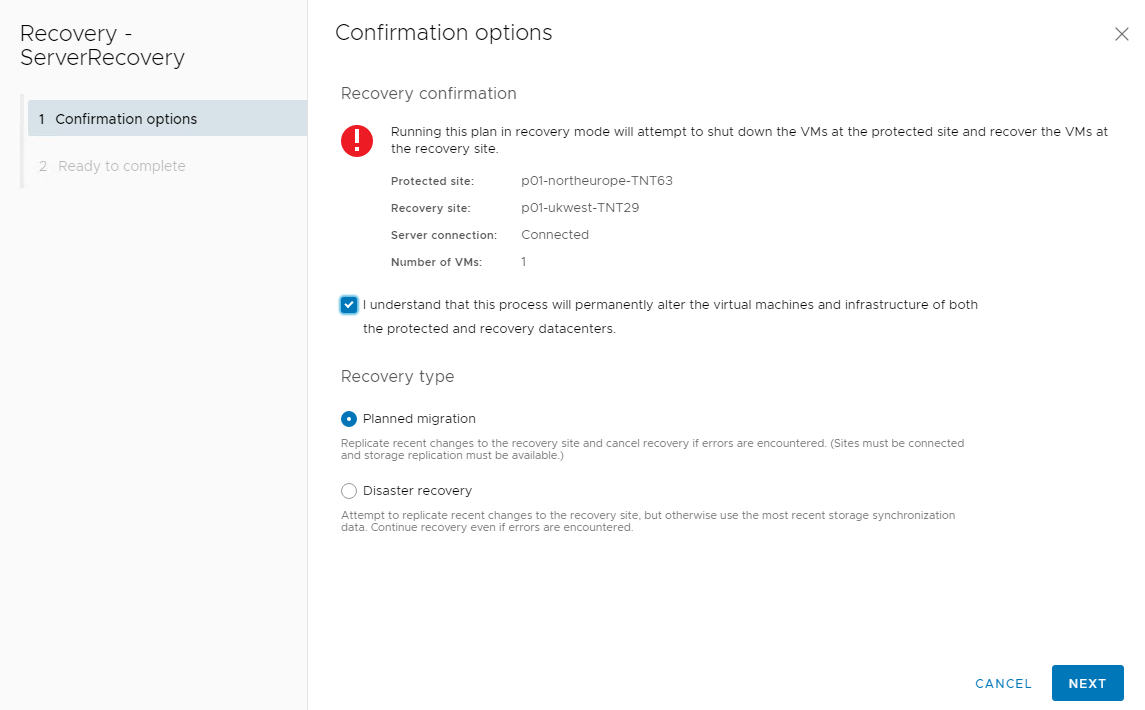
Select the recovery plan, then select Run.
On the Confirmation options page, select the I understand that this process will permanently alter the virtual machines and infrastructure of both the protected and recovery datacenters check box.
Choose between the recovery types Planned migration or Disaster Recovery, then select Next.
On the Ready to complete page, review your selected settings, then select Finish.
Other supported third-party Disaster Recovery solutions
In addition to Site Recovery Manager (SRM), there are third-party Disaster Recovery solutions that customers can use for Azure VMware Solution, such as Zerto and JetStream.
Zerto
Zerto is a disaster recovery solution designed to minimize downtime of virtual machines (VMs) should a disaster occur. The Zerto platform is built on the foundation of Continuous Data Protection (CDP) that enables minimal or close to no data loss. The platform provides the level of protection wanted for many business-critical and mission-critical enterprise applications. Zerto also automates and orchestrates failover and failback to ensure minimal downtime in a disaster.
Core components of the Zerto platform
| Component | Description |
|---|---|
| Zerto Virtual Manager (ZVM) | Management application for Zerto implemented as a Windows service installed on a Windows VM. The private cloud administrator installs and manages the Windows VM. The ZVM enables Day 0 and Day 2 disaster recovery configuration. |
| Virtual Replication appliance (vRA) | Linux VM is used to handle data replication from the source to the replication target. One instance of vRA is installed per ESXi host, delivering a true scale architecture that grows and shrinks along with the private cloud's hosts. The vRA manages data replication to and from protected VMs to its local or remote target, storing the data in the journal. |
| Zerto ESXi host driver | Installed on each VMware ESXi host configured for Zerto disaster recovery. The host driver intercepts a vSphere VM's IO and sends the replication data to the chosen vRA for that host. The vRA is then responsible for replicating the VM's data to one or more disaster recovery targets. |
| ZertoCloud Appliance (ZCA) | Windows VM only used when Zerto is used to recover vSphere VMs as Azure Native IaaS VMs. The ZCA is composed of: - ZVM: A Windows service that hosts the UI and integrates with the native APIs of Azure for management and orchestration. - VRA: A Windows service that replicates the data from or to Azure. The ZCA integrates natively with the platform it gets deployed on, allowing you to use Azure Blob storage withing a storage account on Microsoft Azure. As a result, it ensures the most cost-efficient deployment on each of these platforms. |
| Virtual Protection Group (VPG) | Logical group of VMs created on the ZVM. Zerto allows configuring disaster recovery, Backup, and Mobility policies on a VPG. This mechanism enables a consistent set of policies to be applied to a group of VMs. |
Supported Zerto scenarios
You can use Zerto with Azure VMware Solution in the following three scenarios:
Scenario 1: On-premises VMware vSphere to Azure VMware Solution disaster recovery in this scenario.
In this scenario, the primary site is an on-premises vSphere-based environment. The disaster recovery site is an Azure VMware Solution private cloud.

Scenario 2: Azure VMware Solution to Azure VMware Solution cloud disaster recovery.
In this scenario, the primary site is an Azure VMware Solution private cloud in one Azure Region. The disaster recovery site is an Azure VMware Solution private cloud in a different Azure Region.

Scenario 3: Azure VMware Solution to Azure VMs cloud disaster recovery.
In this scenario, the primary site is an Azure VMware Solution private cloud in one Azure Region. Azure Blobs and Azure VMs (Hyper-V based) are used in times of Disaster.

JetStream
JetStream disaster recovery (DR) is a cloud-native disaster recovery solution designed to minimize downtime of virtual machines (VMs) should a disaster occur. Instances of JetStream DR are deployed at both the protected and recovery sites.
JetStream is built on the foundation of Continuous Data Protection (CDP), which enables minimal or close to no data loss. JetStream DR provides the level of protection wanted for business and mission-critical applications. It also enables cost-effective DR by using minimal resources at the DR site and using cost-effective cloud storage, such as Azure Blob Storage.
Core components of the JetStream DR solution
| Items | Description |
|---|---|
| JetStream Management Server Virtual Appliance (MSA) | MSA enables both Day 0 and Day 2 configuration, such as primary sites, protection domains, and recovering VMs. The MSA is deployed from an OVA file on a vSphere node by the cloud admin. The MSA collects and maintains statistics relevant to VM protection and implements a vCenter Server plugin that allows you to manage JetStream DR natively with the vSphere Client. The MSA doesn't handle replication data of protected VMs. |
| JetStream DR Virtual Appliance (DRVA) | Linux-based virtual machine appliance receives protected VMs replication data from the source ESXi host. It maintains the replication log and manages the transfer of the VMs and their data to the object store such as Azure Blob Storage. Depending upon the number of protected VMs and the amount of VM data to replicate, the private cloud admin can create one or more DRVA instances. |
| JetStream ESXi host components (IO Filter packages) | JetStream software installed on each ESXi host configured for JetStream DR. The host driver intercepts the vSphere VMs I/O and sends the replication data to the DRVA. The IO filters also monitor relevant events, such as vMotion, Storage vMotion, snapshots, etc. |
| JetStream Protected Domain | Logical group of VMs that are protected together using the same policies and runbook. The data for all VMs in a protection domain is stored in the same Azure Blob container instance. A single DRVA instance handles replication to remote DR storage for all VMs in a protected domain. |
| Azure Blob Storage containers | The protected VM replicated data is stored in Azure Blobs. JetStream software creates one Azure Blob container instance for each JetStream Protected Domain. |
JetStream scenarios on Azure VMware Solution
You can use JetStream DR with Azure VMware Solution for the following two scenarios.
Scenario 1: On-premises VMware vSphere to Azure VMware Solution DR.
In this scenario, the primary site is your on-premises VMware vSphere environment and the DR site is an Azure VMware Solution private cloud.

Scenario 2: Azure VMware Solution to Azure VMware Solution DR.
In this scenario, the primary site is an Azure VMware Solution private cloud in one Azure region. The disaster recovery site is an Azure VMware Solution private cloud in a different Azure region.
