Exercise - Create custom tables
In this unit, you learn how to:
Create a Dataverse solution
Create a custom table in Dataverse
Here, you'll create the table and columns needed to store the booking request information.
Create a solution
Follow these steps to create a new solution.
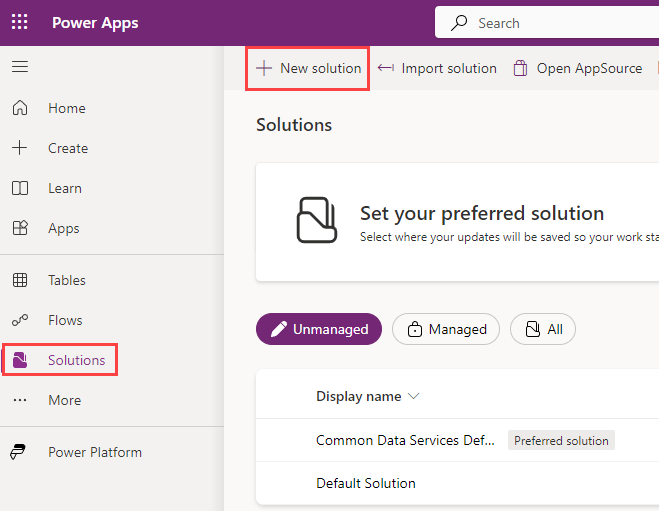
Navigate to the Power Apps maker portal.
Select your Environment.
In the left navigation pane, select Solutions, and select + New solution
Enter
Bookingsfor Display name.Select + New publisher.
Enter
Contosofor Display name.Enter
contosofor Name.Enter
contosofor Prefix.Select Save.
Select the Contoso (contoso) publisher.
Select Create.
Select Back to solutions in the top-left of the screen.

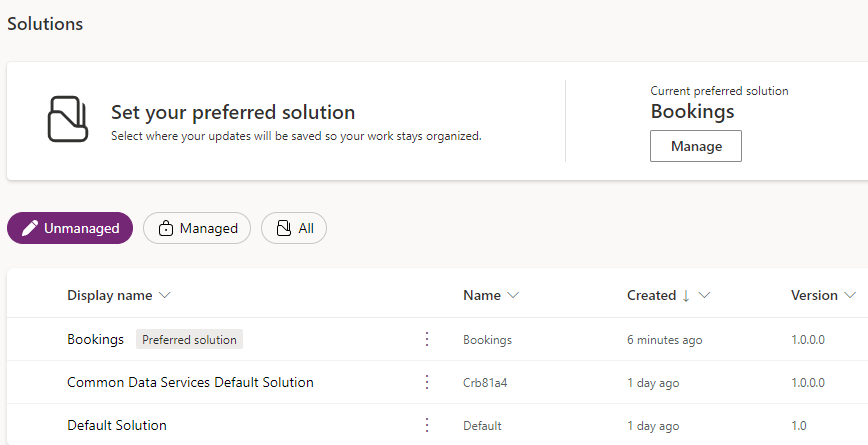
Set the preferred solution
All objects are automatically added to the preferred solution.
Under Solutions in the Maker portal, select Manage for Set your preferred solution.
Select Bookings (contoso) and select Apply.

Create the Real Estate Properties custom table
Follow these steps to create a new custom table in Dataverse for Real Estate Properties.
In the left navigation pane, select Tables, then select + New table from the top menu on the Tables screen.
From the + New table menu, select Table (advanced properties).
In the New table pane that opens, set the Display name to
Real Estate Property.Select the Primary column tab at the top of the New table pane and set the Display name for the Primary column to Property Name.
Select save at the bottom of the pane, and after saving, you'll be redirected to the Real Estate Property table properties.
Select + New from the top menu and choose Column under Schema to create a new table column.
In the New column pane, enter the following values, and then select Save:
Display name:
Asking PriceData type: Currency
Let's add another column in the columns and data pane; again, select the + New button to add a new column.
In the New column pane, enter the following values, and then select Save:
Display name:
StreetData type: Single line of text (this value is the default)
Add a column in the columns and data pane; select the + New button to add a new column.
In the New column pane, enter the following values, and then select Save:
Display name:
CityData type: Single line of text (this value is the default)
Add another column to the Real Estate Property table.
In the New column pane, enter the following values:
Display name:
BedroomsData type: Choice
Select + New choice under Sync this choice with to create a new choice list:
In the New choice pane that opens, set the Display name to
Bedrooms.Under Choices you see two entry fields titled Label and Value. Enter 1 for the first Label. Power Apps assigns a Value automatically but you can change the value to 1 as well.
Select + New choice and make 2 the new entry for Label and 2 for Value.
Select + New choice and make 3 the new entry for Label and 3 for Value.
Select + New choice and make 4 the new entry for Label and 4 for Value.
Select + New choice and make 5 the new entry for Label and 5 for Value.
Select Save to create the choice list.
After saving the choice list, select the drop-down under Sync this choice with and choose the Bedrooms choice list, then Save the column.
Select the + New button to add a new column.
In the New column pane, enter the following values:
Display name:
BathroomsData type: Choice
Under Sync with global choice? select No to create a local choice list specifically for this column and add the following choices:
Under Choices you see two entry fields titled Label and Value. Enter 1 under the label. Power Apps assigns a value automatically but you can change it to 1.
Select + New choice and make 2 the new entry for Label and 2 for Value.
Select + New choice and make 3 the new entry for Label and 3 for Value.
Select + New choice and make 4 the new entry for Label and 4 for Value.
Select + New choice and make 5 the new entry for Label and 5 for Value.
Select Save.
Add another column by selecting the + New button again.
In the New column pane, enter the following values, and then select Save:
Display name:
ClientData type: Lookup
Related Table:
Contact
At the bottom of the pane, select Create.
Under Real Estate Property columns and data, enter the following test data to build a table record:
Property Name:
1100 High VillasAsking Price:
250,000Bathrooms:
3Bedrooms:
2City:
RedmondStreet:
Main AvenueClient: Select any contact. If your Contact table has no entries, there will not be a client to select.
Create the Bookings table
Follow these steps to create a new custom table in Dataverse for Real Estate Property Bookings.
In the left navigation pane, select Tables, select + New table, and then select Table (advanced properties).
Name the table
Booking Request.Select the Primary column tab, name it
Booking Name, then select Save to create the table.Add a column to the table by selecting the + New button.
In the New column pane, enter the following values, and then select Save:
Display name:
PropertyData type: Lookup
Related Table:
Real Estate Property
Add another column by selecting the + New button again.
In the New column pane, enter the following values, and then select Save:
Display name:
Viewer NameData type: Single line of text
Add another column by selecting the + New button again.
In the New column pane, enter the following values, and then select Save:
Display name:
Viewer EmailData type: Single line of text
Format: Email
Add another column by selecting the + New button again.
In the New column pane, enter the following values, and then select Save:
Display name:
Booking DateData type: Date and time
Add another column by selecting the + New button again.
In the New column pane, enter the following values, and then select Save:
Display name:
NotesData type: Multiple lines of text
Now add one last column to the Booking Request table.
In the New column pane, enter the following values:
Display name:
DecisionData type: Choice
Select No under Sync with a global choice? to create a local choice list:
Under Choices you see two entry fields titled Label and Value. Enter
Undecidedunder the label. Power Apps assigns a value automatically, but you can change it to 1.Select + New choice and make
Acceptedthe new entry for Label and 2 for Value.Select + New choice and make
Declinedthe new entry for Label and 3 for Value.Designate Undecided as the Default choice.
Select Save.
You should now have all tables and their appropriate columns that will be used in the next units.