Build a basic desktop flow by using Record with Copilot
Up until now, this module was focused on building and working with cloud flows. While cloud flows are powerful, and support various different use cases, there are scenarios when a cloud flow may not be the best option. For example, you may want to create a flow that automatically enters an invoice into a legacy invoicing application. To accomplish these types of tasks, you create a desktop flow. Historically, building desktop flows required ample knowledge of the different actions available.
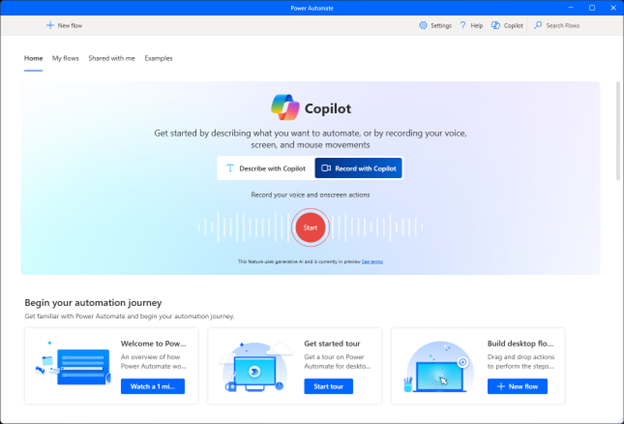
Building desktop flows is now easier with Record with Copilot, also known as the AI Recorder, in Power Automate desktop. This feature lets you build desktop automations by sharing your screen and describing the task you want to automate, as if you were explaining it to someone else. Record with Copilot captures your voice, mouse, and keyboard inputs during the recording. Then, it processes them and converts them into a desktop flow. You can review, edit, and save the flow before running it. Watch the video on the page listed for more information.
How to build automations with the AI Recorder
Creating a desktop flow with Record with Copilot is a straightforward process that combines narration and demonstration to capture the steps of your task. By following these steps, you can record your workflow, generate an automated flow, and refine it to meet your needs. Let’s walk through the process step-by-step.
Open Record with Copilot: Begin by launching Power Automate Desktop. From the main interface, select Record with Copilot and then select Start to initiate the recording process.
Review the Welcome screen: Once the tool opens, you see a welcome screen with helpful tips to guide you through the recording process. Take a moment to read these tips, as they provide useful advice for creating a clear and effective recording. When ready, select Next to proceed.
Choose recording settings: If you’re working with multiple monitors, select the one you want to record. Additionally, choose the microphone and speaker settings for narration. These settings ensure that both your actions and voice instructions are captured during the recording.
Listen to recording tips: Before starting the recording, you hear final tips to help ensure a smooth process. These tips might include reminders to narrate your actions clearly or avoid unnecessary movements. Once you feel prepared, select Record to begin.
Record the Process: As the recording begins, demonstrate the task you want to automate while narrating each step. Be as detailed and clear as possible to help the system understand your workflow.
Finish: When you complete the task, select Done to stop the recording. The system analyzes your inputs, including your actions and narration, and automatically generates a desktop flow based on what you recorded.
Review and customize: Once the flow is generated, open it in the designer to review the steps. Make any necessary edits to refine the automation, such as adjusting conditions or adding error handling. When you’re satisfied, save the flow and test it by running the automation.
By following these steps, you can efficiently create a desktop flow using Record with Copilot. This process not only simplifies automation but also ensures that your workflows are accurately captured and tailored to your specific needs.
Tip
Close unnecessary applications and ensure your screen is free of sensitive information before recording.
When recording with Record with Copilot, your narration and actions are critical for accurate automation. For that reason, it's recommended that you follow these guidelines:
- Speak clearly and describe each step as if teaching someone.
- Perform actions slowly and wait for screens to load fully.
- Use both mouse and keyboard interactions to ensure all steps are captured.
Additionally, to maximize the effectiveness of Record with Copilot, consider the following best practices:
- Plan your process: Outline the steps you want to automate before starting the recording.
- Be precise: Provide detailed explanations and avoid skipping steps.
- Test and refine: After generating the flow, test it thoroughly and make necessary adjustments in the flow designer.
- Handle sensitive data carefully: Ensure no confidential information is displayed during recording.
By following these steps and tips, you can create efficient and accurate desktop flows using Record with Copilot.
