Note
Access to this page requires authorization. You can try signing in or changing directories.
Access to this page requires authorization. You can try changing directories.
Note
The new and improved Power Platform admin center is now generally available. We're currently updating the documentation to reflect these changes, so check back to ensure that you're getting the latest updates.
[This article is prerelease documentation and is subject to change.]
Data masking helps protect sensitive information during customer interactions and prevents data leaks. Data masking, also known as de-identification or obfuscation, replaces sensitive data with masked strings. The masked strings ensure that the original, unmasked values remain hidden. Only authorized users can read the unmasked values—one record at a time. In the context of customer interactions, frontline support users are prevented from exposing sensitive information like credit card numbers, social security numbers, or any personal data.
Important
- This is a preview feature.
- Preview features aren't meant for production use and might have restricted functionality. These features are available before an official release so that customers can get early access and provide feedback.
How does masking work?
You create masking rules to set how sensitive information should be masked.
These rules use regular expressions to identify specific patterns, for example a credit card number, social security number, and email address.
These patterns are detected and the sensitive columns are replaced with masked characters when the row is retrieved.
Create masking rules
Get a predefined set of masking rules, to start, or you can create your own.
Create a solution: Create a solution in Power Apps.
Create a new component: Create objects in a solution.
Select the Security menu option and choose Secured masking rule.
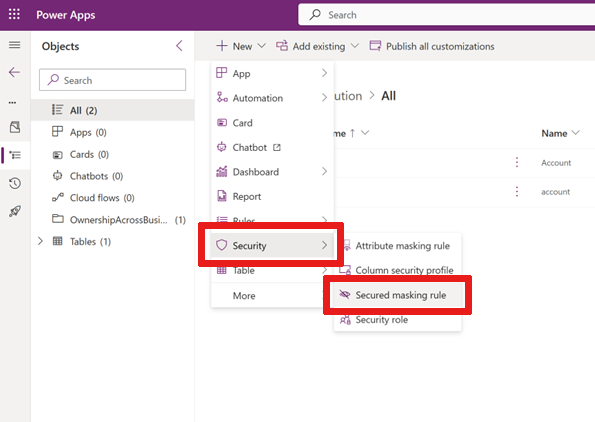
The New Masking Rule form appears.
In this form, enter a rule Name in this format:
prefix_namewhereprefixcan beCLS_orNew_.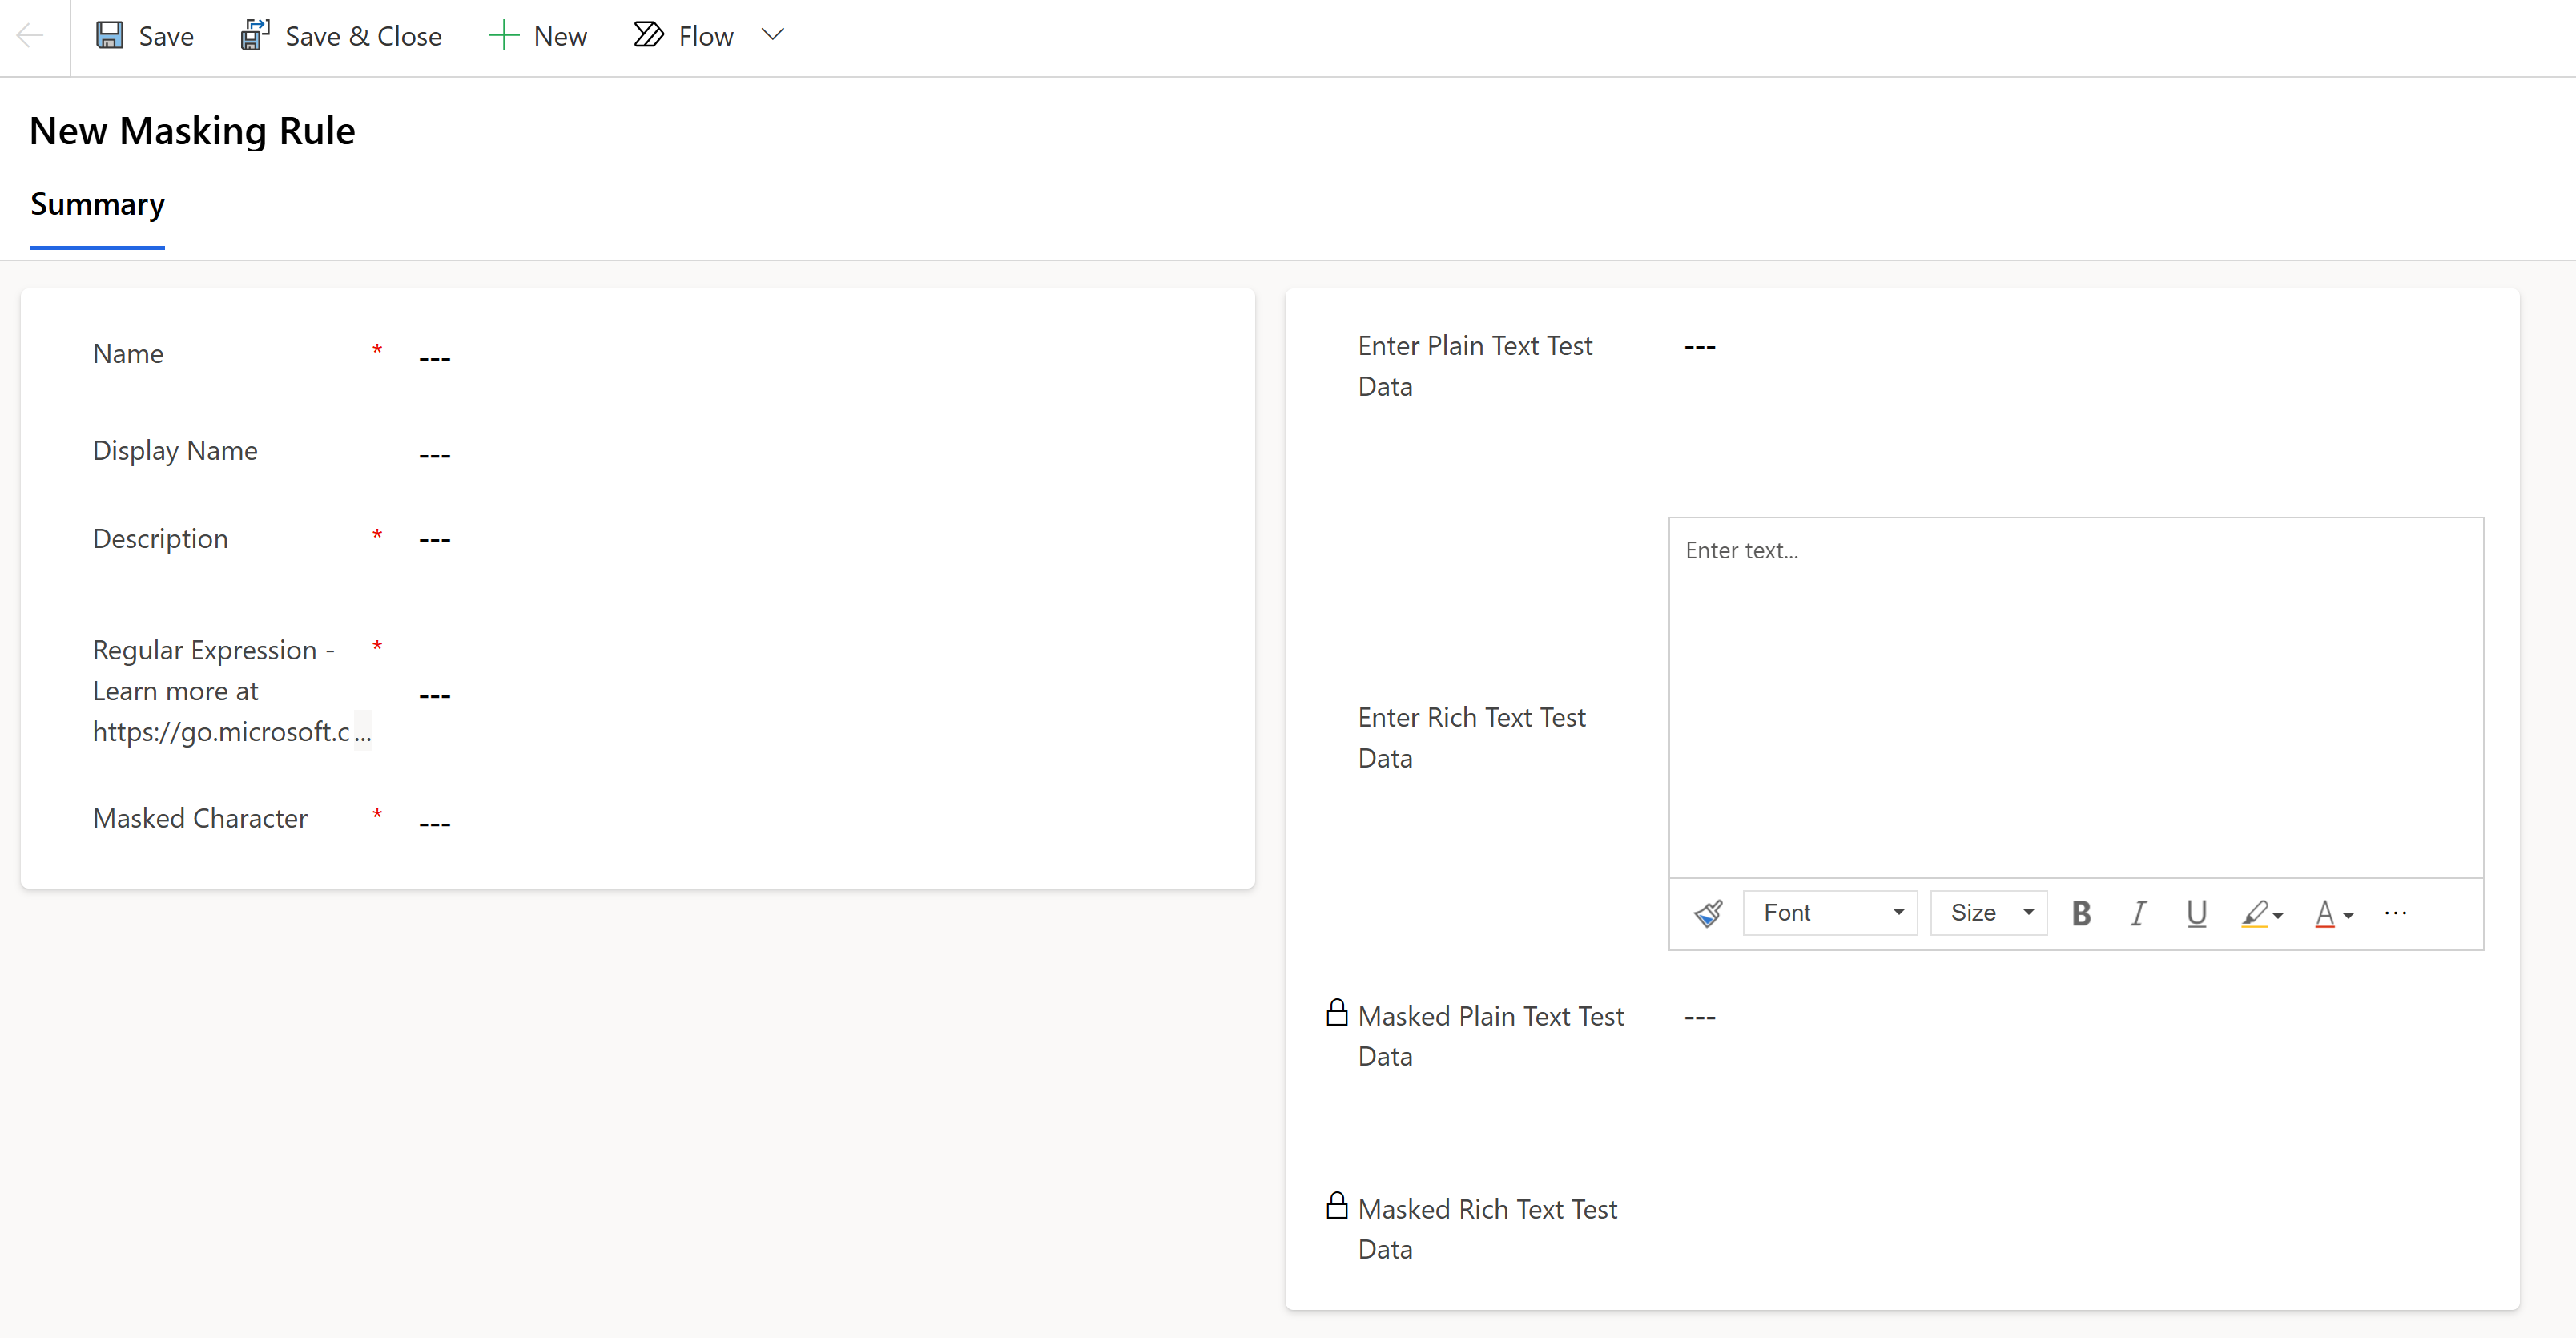
Enter a Display Name and Description.
Enter a Regular Expression, chosen from the Regular Expression Language.
For example, to mask the first five digits of a social security number, use:
\d(?=\d{2}-\d{2}-\d{4}|\d-\d{2}-\d{4}|-\d{2}-\d{4}|\d-\d{4}|-\d{4})Note
Your regular expression can have multiple masking rules separated by a pipe
|.Example:
\d(?=\d{2}-\d{2}-\d{4}|\d-\d{2}-\d{4}|-\d{2}-\d{4}|\d-\d{4}|-\d{4})| \S+@\S+\.\S+|[STFGM]\d{4}|(?:4[0-9]{12}(?:[0-9]{3})?|[25][1-7][0-9]{14}|6(?:011|5[0-9][0-9])[0-9]{12}|3[47][0-9]{13}|3(?:0[0-5]|[68][0-9])[0-9]{11}|(?:2131|1800|35\d{3})\d{11})Enter a Masked Character, for example
#.Enter an original value in the Enter Plain Text Test Data column, such as a social security number, or email address.
Enter an original value in the Enter Rich Text Test Data column, such as a social security number, or email address (for testing Text Data type with Rich text format columns).
Note
For Rich text columns, the raw value of the column needs to be taken into account when defining the Regular Expression. You can view the raw value using the Web API to query the table columns with rich text. For example,
https://<environment url>/api/data/v9.2/maskingrules(<id>)?$select=richtestdata(result)
"richtestdata": "<div class="ck-content" data-wrapper="true" dir="ltr" style="--ck-image-style-spacing: 1.5em; --ck-inline-image-style-spacing: calc(var(--ck-image-style-spacing) / 2); --ck-color-selector-caption-background: hsl(0, 0%, 97%); --ck-color-selector-caption-text: hsl(0, 0%, 20%); font-family: Segoe UI; font-size: 11pt;"><p style="margin: 0;">123-45-789<//p><//div>"

Select Save.
Masked Plain Text test data, and Masked Rich Text test data display on the screen.
Your masked values might be masked like this:
| Regular expression | Original values | Masked values |
|---|---|---|
\d(?=\d{2}-\d{2}-\d{4}\|\d-\d{2}-\d{4}\|-\d{2}-\d{4}l\d-\d{4}\|-\d{4}) |
SSN 123-45-6789 |
SSN ###-##-6789 |
[STFGM]\d{4} |
AccountNbr S1234567z |
AccountNbr #567z |
(?:4[0-9]{12}(?:[0-9]{3})?\|[25][1-7][0-9]{14}\|6[?:011\|5[0-9][0-9]](0-9){12}\|3[47][0-9]{13}\|3[?:0[0-5]\|[68][0-9]](0-9){11}\|(?:2131\|1800\|35\d{3})\d{11}) |
MasterCard 5678912345678912 |
MasterCard # |
(?:4[0-9]{12}(?:[0-9]{3})?\|[25][1-7][0-9]{14}\|6[?:011\|5[0-9][0-9]](0-9){12}\|3[47][0-9]{13}\|3[?:0[0-5]\|[68][0-9]](0-9){11}\|(?:2131\|1800\|35\d{3})\d{11}) |
Visa 4567891234567891 |
Visa # |
\S+@\S+\.\S+ |
Email name@sample.com |
Email # |
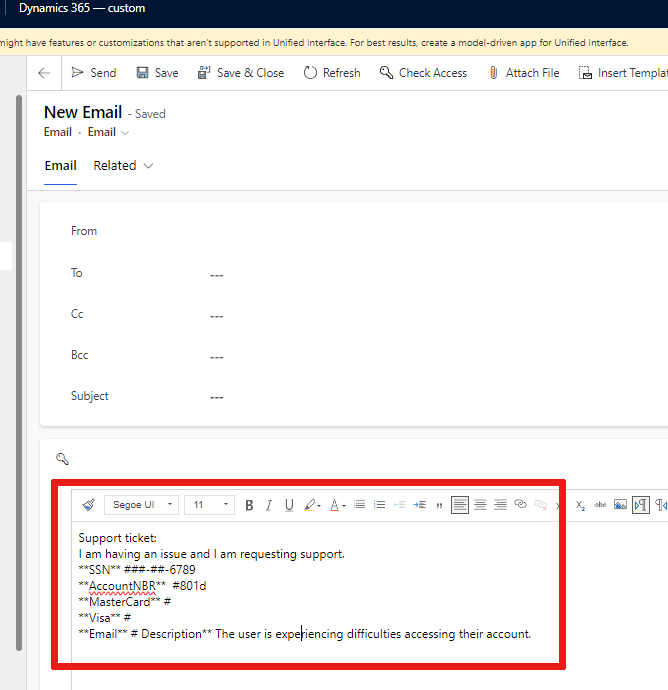
When a customer sends you an email with sensitive data and the email has this masking rule, only the masked values display in the body of the email:
Manage masking rules
Get the list of masking rules
Go to the Power Apps portal.
Select the environment where you want to display the list of masking rules.
Select Tables and choose the All filter.
Enter masking rule in the search bar.
Select the line Table Masking Rule with Name maskingrule.
A list of masking rules is displayed. You can expand the list by selecting the + more dropdown.
Add a masking rule to a secured column
Go to the Power Apps.
Select the managed environment where you want to add a masking rule to a column.
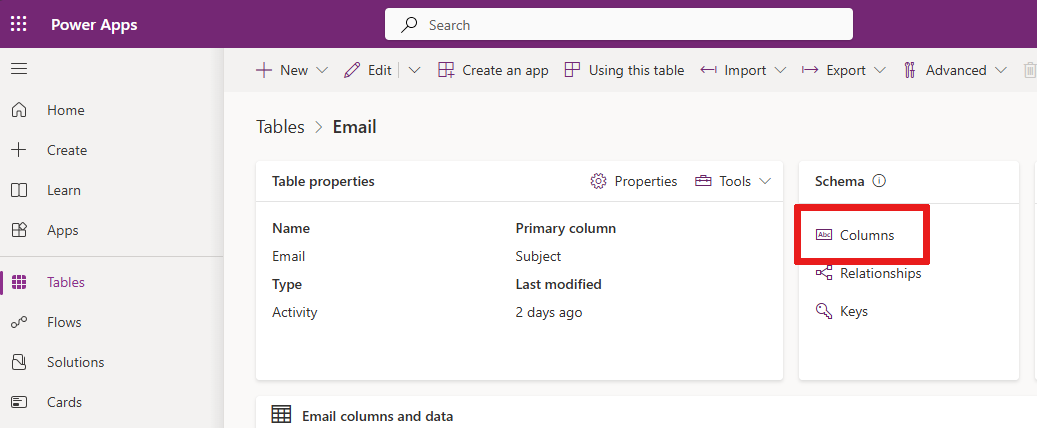
Select Tables from the navigation menu and choose your preferred table with a secured column.
Select Columns under the Schema section.
Select a column to open and edit it. The Edit column pane displays.
Expand Advanced options.
Check Enable column security if the box isn't checked.
Select the Masking rule dropdown.
Select a masking rule.
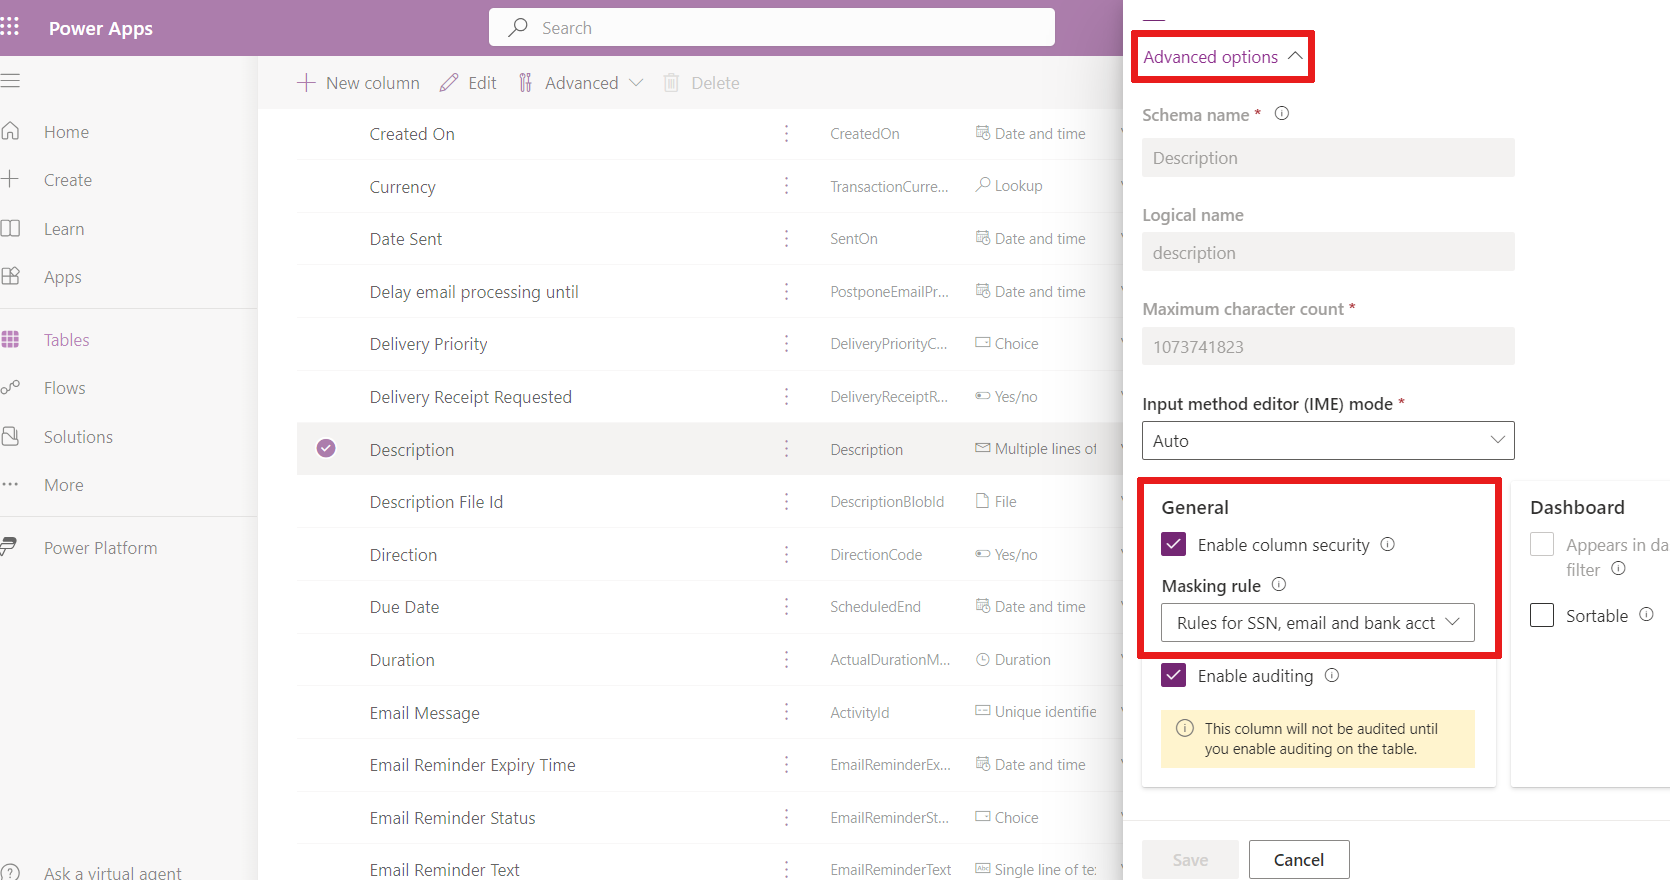
Select Save.


Note
Data types for masking rules:
- Text (single-line and multi-line)
- Number
Grant permissions to a secured column with a masking rule
Permissions to read masked columns are granted using the Column security profiles.
Users or Teams groups can be granted access through column security:
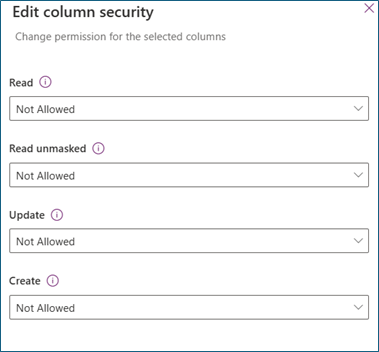
Read
Allowed: Read secured column is allowed. Masked values are shown if masking rule is applied to the column.
Read unmasked
Not Allowed: When Read is allowed and Read unmasked isn't allowed, masked values are shown. Learn more about viewing unmasked data
One Record: Users are allowed to read unmasked values. Unmasked values are only returned when you request one record at a time. These values should be allowed for users who manage and maintain secured columns.
All records: Users are allowed to retrieve and read multiple records with unmasked values. This setting is highly privileged. Read unmasked should only be allowed for backend services that require unmasked values for backend processing.
Update
Allowed: Users are allowed to update records.
Create
Allowed: Users are allowed to create records.
Note
System and application users with Read and Read unmasked permissions get masked values by default. To read unmasked values, go to options for viewing masked columns.
View all columns that have a masking rule
You can get a list of all secured columns from all tables with masking rules.
Go to the Power Apps portal.
Select the environment where you want to view all the columns with masking rule.
Select Tables and choose the All filter.
Enter attributemaskingrule in the search bar.
Select the AttributMaskingRule table.
A list of columns with masking rules is displayed. You can expand the list by selecting the + more dropdown.
How are masked columns displayed?
If you have permission to Read unmasked columns, you see masked values by default here:
| Column type | Masked columns returned with masked values? |
|---|---|
| Grid | Always |
| Form | Always |
| Copilot | Always |
| Excel report | Always |
Note
Audit log shows masked values in the before-and-after update events. Grant reading audit logs to only authorized users.
Options for viewing masked columns
When a column security is configured to allow reading unmasked data, a developer can write code that is able to show unmasked data using the UnMaskedData optional parameter. Learn how to retrieve unmasked data
Reading unmasked values on the form
Users who were granted permission to read unmasked fields will see a button to read the unmasked values on the form.
![]()
To read the unmasked values, select the "Read" icon (icon image).
All read unmasked value requests are audited.
Creating and updating unmasked values on the form
When you create a new record, you enter the sensitive field as unmasked values. After you save, the form automatically refreshes, and the sensitive field is immediately masked.
To update the field, you will need the allowed read unmasked and allowed update permissions.
Select the read unmasked field button to get the unmasked value, then update the field and save.
Audit logs on masked fields
All create and update record events will show the before and after values as masked values.

Read unmasked value is also logged.

Known limitations/Not supported
Reading unmasked values on a form
Masked values are displayed on the detail area of a main form.
Creating and updating unmasked values on the form
When you create a new record, you enter the sensitive column as unmasked values. After you save, the form automatically refreshes, and the sensitive column is immediately masked. You can update the column but make sure that you enter the unmasked values.
Embedded images in rich text data
If you're using rich text format in a large text area, like an email body and you accept embedded images, the masking rules continue to be applied to the image making it unreadable.