Note
Access to this page requires authorization. You can try signing in or changing directories.
Access to this page requires authorization. You can try changing directories.
Business isn't confined to a single region or a language. A single website can display content in multiple languages to reach customers around the world. The content of your website can be translated into multiple languages while maintaining a single content hierarchy.

To enable multiple languages for a website, follow these steps:
Enable languages in a Microsoft Dataverse environment.
Note
Make sure that the process to enable a language on Dataverse completes before continuing to the next step. It may take an hour or more to provision the languages.
In the Portals Management app
Go to Website > Websites.
Select the website to add language support to.
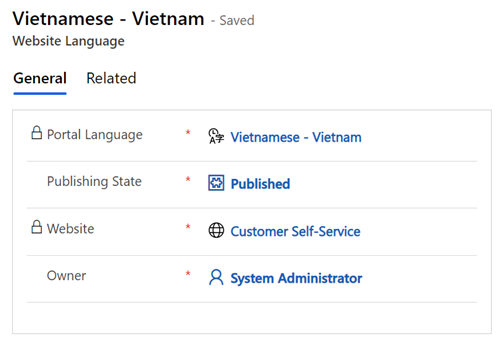
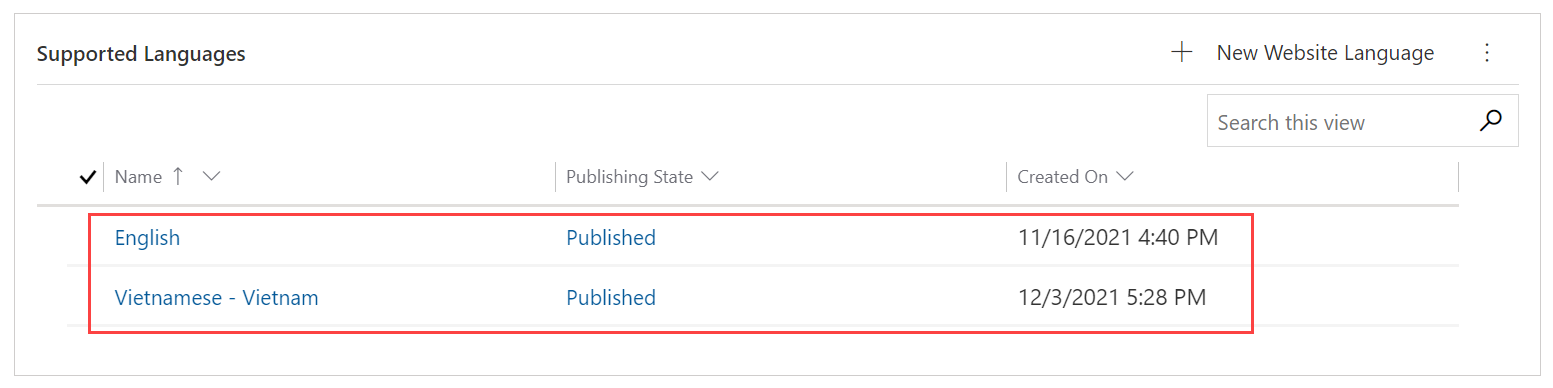
In the Supported Languages section under the General tab, select New Website Language.
Fill in the form, including Portal Language (a lookup of languages that are activated in the organization and are supported by portals) and Publishing State.
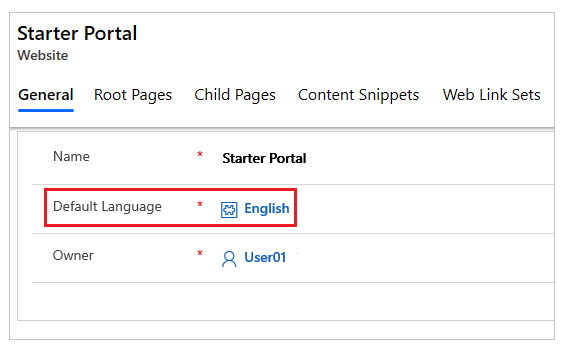
You can set the default language of your website by changing the Default Language lookup to one of the enabled website languages.
Note
- If you activate new languages after the website has been provisioned, you can import the metadata translations to get the metadata translated for the newly activated languages.
- You will also need to update the language text for any custom labels on Dataverse tables and columns to appear on forms and lists on portal web pages.
Supported languages
The following table shows all the languages currently available out of the box. This list can be found by going to the Portals Management app, in the Content section and then select Portal Languages. The display name of a language can be changed after selecting the language to change from this page.
| Name | Language Code | LCID | Portal Display Name |
|---|---|---|---|
| Basque - Basque | eu-ES | 1069 | euskara |
| Bulgarian - Bulgaria | bg-BG | 1026 | български |
| Catalan - Catalan | ca-ES | 1027 | català |
| Chinese - China | zh-CN | 2052 | 中文(中国) |
| Chinese - Hong Kong SAR | zh-HK | 3076 | 中文(香港特別行政區) |
| Chinese - Traditional | zh-TW | 1028 | 中文(台灣) |
| Croatian - Croatia | hr-HR | 1050 | hrvatski |
| Czech - Czech Republic | cs-CZ | 1029 | čeština |
| Danish - Denmark | da-DK | 1030 | dansk |
| Dutch - Netherlands | nl-NL | 1043 | Nederlands |
| English | en-US | 1033 | English |
| Estonian - Estonia | et-EE | 1061 | eesti |
| Finnish - Finland | fi-FI | 1035 | suomi |
| French - France | fr-FR | 1036 | français |
| Galician - Spain | gl-ES | 1110 | galego |
| German - Germany | de-DE | 1031 | Deutsch |
| Greek - Greece | el-GR | 1032 | Ελληνικά |
| Hindi - India | hi-IN | 1081 | हिंदी |
| Hungarian - Hungary | hu-HU | 1038 | magyar |
| Indonesian - Indonesia | id-ID | 1057 | Bahasa Indonesia |
| Italian - Italy | it-IT | 1040 | italiano |
| Japanese - Japan | ja-JP | 1041 | 日本語 |
| Kazakh - Kazakhstan | kk-KZ | 1087 | қазақ тілі |
| Korean - Korea | ko-KR | 1042 | 한국어 |
| Latvian - Latvia | lv-LV | 1062 | latviešu |
| Lithuanian - Lithuania | lt-LT | 1063 | lietuvių |
| Malay - Malaysia | ms-MY | 1086 | Bahasa Melayu |
| Norwegian (Bokmål) - Norway | nb-NO | 1044 | norsk bokmål |
| Polish - Poland | pl-PL | 1045 | polski |
| Portuguese - Brazil | pt-BR | 1046 | português (Brasil) |
| Portuguese - Portugal | pt-PT | 2070 | português (Portugal) |
| Romanian - Romania | ro-RO | 1048 | română |
| Russian - Russia | ru-RU | 1049 | русский |
| Serbian (Cyrillic) - Serbia | sr-Cyrl-CS | 3098 | српски |
| Serbian (Latin) - Serbia | sr-Latn-CS | 2074 | srpski |
| Slovak - Slovakia | sk-SK | 1051 | slovenčina |
| Slovenian - Slovenia | sl-SI | 1060 | slovenščina |
| Spanish (Traditional Sort) - Spain | es-ES | 3082 | español |
| Swedish - Sweden | sv-SE | 1053 | svenska |
| Thai - Thailand | th-TH | 1054 | ไทย |
| Turkish - Türkiye | tr-TR | 1055 | Türkçe |
| Ukrainian - Ukraine | uk-UA | 1058 | українська |
| Vietnamese - Vietnam | vi-VN | 1066 | Tiếng Việt |
Add custom language
This section explains how to enable support for additional languages beyond those provided by Dataverse, allowing you to customize your website's language options.
Note
- System messages, like platform dialogs and error messages, aren't translated into custom languages. System messages use the base language selected when creating a new language.
- This is supported only for the standard data model (SDM).
If you want to add custom languages, follow these steps:
Go to Power Pages home and select the environment where the site is located.
Select the site and select Edit to open the studio.
Select More Items (…) to open the Portal Management App.
In the Supported Languages sub grid, select New Website Language.
Select the search icon in the Portal Language lookup.
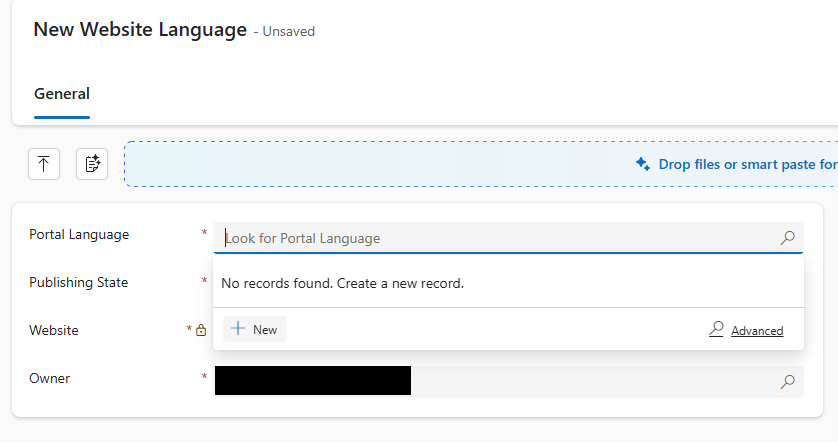
Select New.
Select the Discard changes button.
Enter the details for the new language.
Note
- Enter the Dataverse LCID in the Dynamics 365 language field, and the Power Pages LCID in the LCID field.
- Dynamics 365 language must be one of the 43 languages supported by Pages, such as 1033 for English.

Select Save & Close.
Select the recently created language in the Portal Language field.
Set the Publishing State to Published.
Select Save & Close.
Note
As we create our own custom language, Dataverse isn't a default translation. You need to create your own content snippets.
Create content in multiple languages
This section explains how to add localized content to your website, enabling it to display information in multiple languages for a global audience.
Add an existing and supported language
Open the Portal Management app.
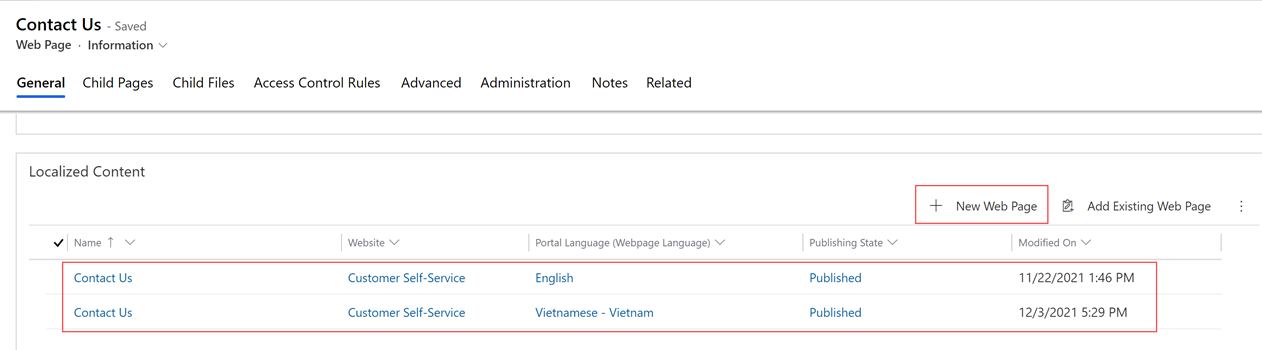
Go to Website > Content > Web Pages to see a list of content. For each webpage, there will be a parent version of the page and a child version of the page for each language activated for the website.
To add a new localization of the page, go to a base page and scroll down to Localized Content.
Select + New Web Page on to create a lookup for the localized version.
Note
The configuration fields on the home page of a content page is not inherited to the existing content pages. They are used only in creation of new content pages. You must update the content page configurations individually.
Knowledge articles will only be displayed if they've been translated into the language the user sets the website to be displayed in. However, forums and blogs allow for more control over how they're presented in other languages. Specifying a language for a forum or blog is optional. If a language isn't specified, the forum or blog will be displayed in the primary language of the organization. If you want the forum or blog specific to a language, you must create it and assign the language to it.
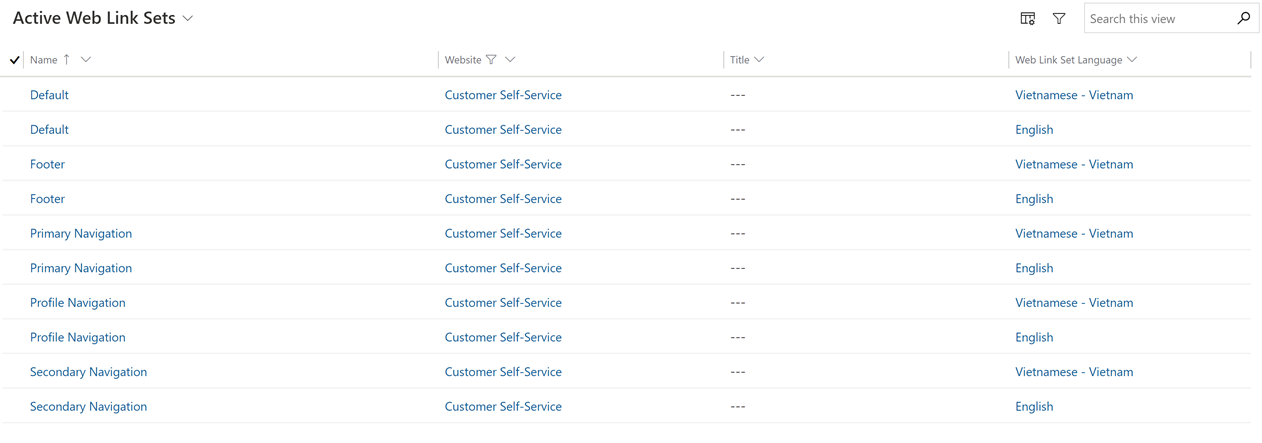
Web link sets are the navigation links at the top of the portal. In the Portal Management app, go to Content > Web Link Sets to update the translated text of the menu items. When a language is active for the website, a new set of links is created for the newly activated language.
Create content snippet for custom language
To create a content snippet, you first add a site setting. Follow these steps to add the site setting:
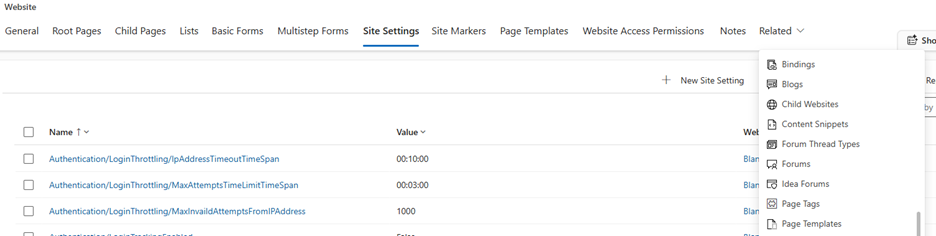
- Select the Site Settings tab.
- Add
Site/EnableContentSnippetTranslationForFormsand set its value totrue.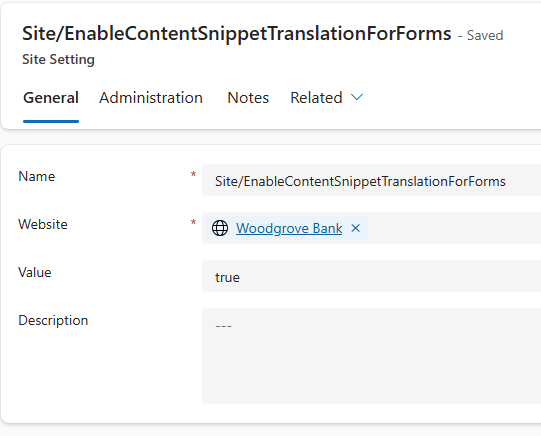
- Select Save and Close.
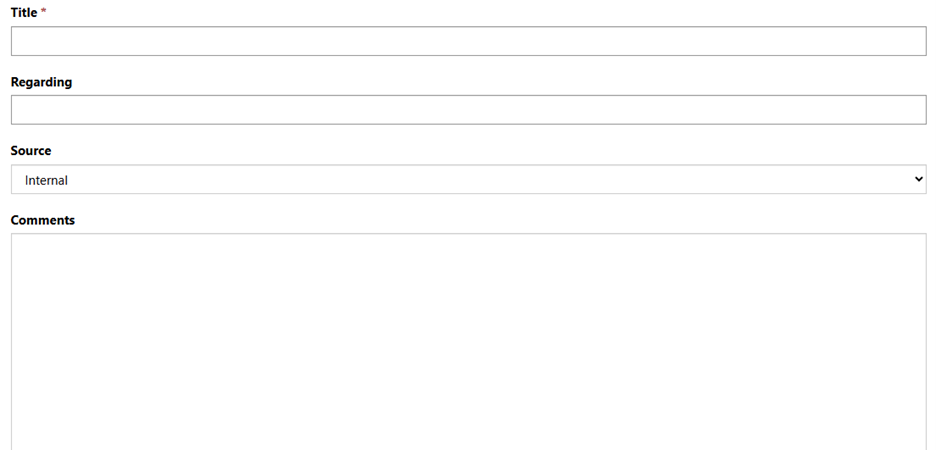
To add a content snippet, set the translation. For example, update the Title, Regarding, Source, and Comments label translations to Welsh.
- Select Content Snippet from the Related drop down.
- Select New Content Snippet.
- Provide the name, such as Feedback Form. This name is used later.
- Enter the value in JSON format for each label. For example:
{
"Title":"Teitl",
"Regarding":"ynghylch",
"Source":"ffynhonnell",
"Comments":"sylw"
}
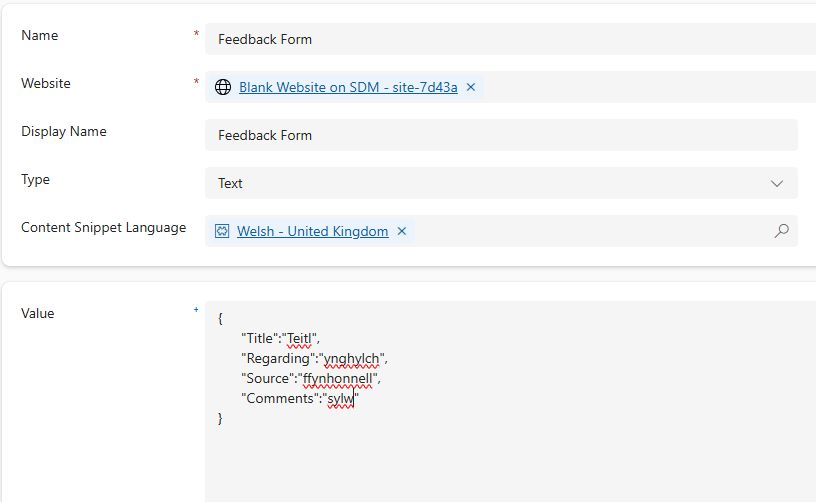
- Select Save & Close.
- Select the Basic Forms tab. You can follow the same steps for multi-step forms and lists.
- Select the form with the labels you want to translate.
- After the selected form opens, select the Basic Form Metadata tab.
- Select New Basic Form Metadata.
- Select Type as Attribute.
- Select the field where the label needs to be translated.
- Enter the value in the label for English (United States) in this format:
[[ContentSnippet.{<content-snippet-name>}.<fieldName>]]. For example,[[ContentSnippet.{Feedback Form}.Title]] - Select Save & Close.
- Repeat the same steps for other fields.
- Clear the cache, and launch the site.
View website in a different language
Once the languages have been enabled, by default, users will see a drop-down on the web pages, which will allow them to switch the currently viewed content to different enabled website languages.
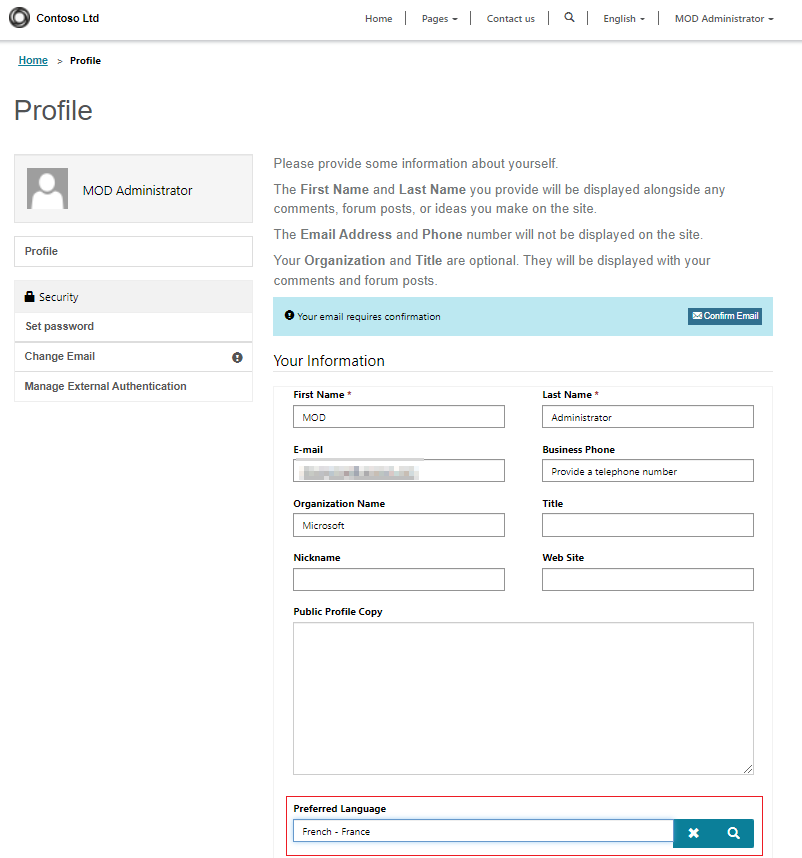
Configure user's default language
To avoid choosing the language from the drop-down each time, website users can set the default language by entering it in the Preferred Language field within the user profile section.
Note
You will need to configure table permissions on the website language table (adx_portallanguage) to allow read and append access linked to the default authenticated user web role to allow for users to choose their default language.