Note
Access to this page requires authorization. You can try signing in or changing directories.
Access to this page requires authorization. You can try changing directories.
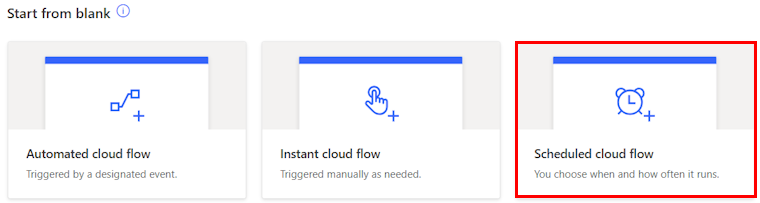
If you're creating a cloud flow without Copilot, you can choose from three cloud flow types depending on what you want to automate:
- Automated cloud flow: Create an automation that's triggered by an event such as the arrival of an email from a specific person, or a mention of your company in social media.
- Instant cloud flow: Start an automation with the selection of a button.
- Scheduled cloud flow: Start a scheduled automation such as daily data upload to SharePoint or a database.
Learn more about the types of cloud flows, when to use them, examples, and benefits in Types of cloud flows.
Create your flow without Copilot if you prefer a more hands-on approach to building your flows, or don't have access to Copilot.
Create a cloud flow without Copilot
The main steps to create a cloud flow without Copilot are the same for any of the cloud flow types. This section uses a scheduled cloud flow as an example. Each screen in the create process guides you with instructions.
Sign in to Power Automate.
On the navigation menu to the left, select Create.
Under Start from blank, select Scheduled cloud flow.
In the Flow name field, enter a name for your flow. The name used in this tutorial is Newsletter.
In the Starting field, select the calendar icon and then select 6/1/25 at 12:00 AM.
In the Repeat every field, enter 1, and then select Month from the dropdown menu.
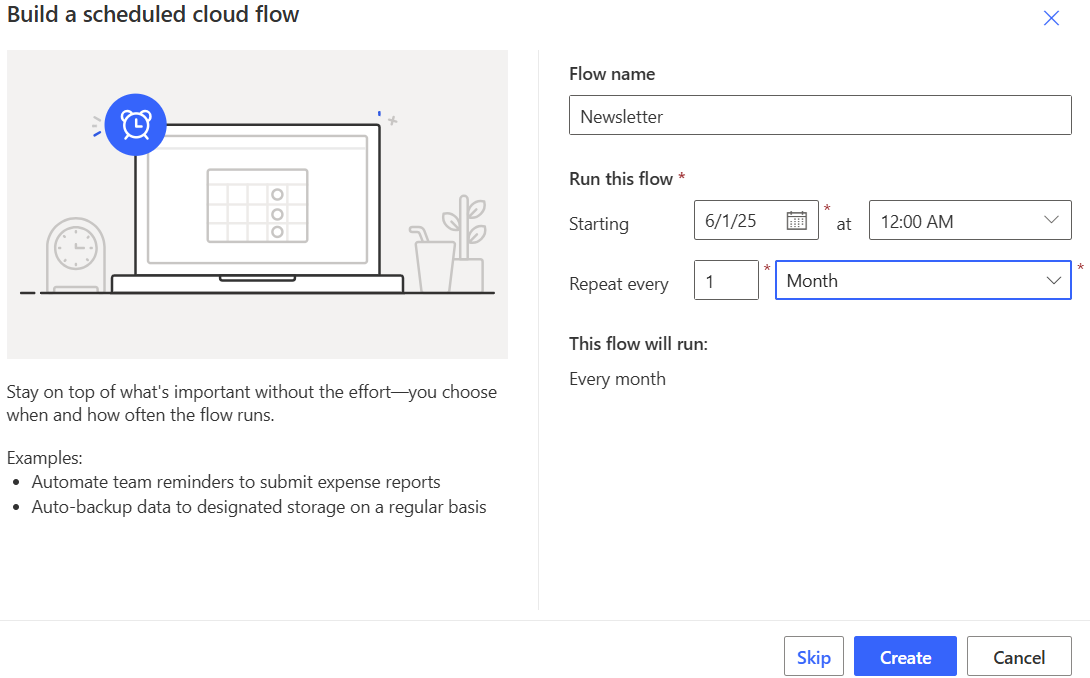
Select Create.
The designer opens with the Recurrence trigger. Now you need to add an action. A trigger is an event that starts a cloud flow. Actions are the events you want the flow to do after the trigger event takes place.
Configure your cloud flow
Complete creating your cloud flow in the designer. Power Automate provides two designers for you to choose from: the new designer and the classic designer. The new designer is the default experience, but you can switch to the classic designer. The steps are similar in both designers. Learn more and get examples in Identify differences between the new designer and the classic designer.
Select the location for your new action in your cloud flow:
- New designer: Below the Recurrence trigger, select (+).
- Classic designer: Select + New step.
Add an action to your cloud flow:
- New designer: In the Add an action search field, type Send an email (V2) and then select the Send an email (V2) action under Microsoft 365 Outlook.
- Classic designer: In the Choose an operation search field, type Send an email (V2) and then select the Send an email (V2) Microsoft 365 Outlook action.
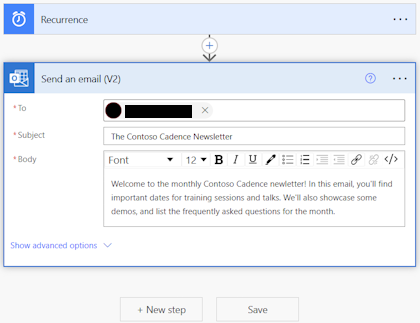
Enter the following information:
In the To field, enter your email address.
If you were doing this in a real life scenario, you would enter the email of the person you want to send the newsletter to. In this example, you're sending it to yourself so that you can get the email sent by your cloud flow when you run it later. You can also send it to multiple people in the To field.
In the Subject field, enter The Contoso Cadence Newsletter.
In the Body field, copy and paste the following text:
Welcome to the monthly Contoso Cadence newsletter! In this email, you'll find important dates for training sessions and talks. We'll also showcase demos, and list the frequently asked questions for the month.New designer: Select (<<) in the upper-right corner of the panel to collapse the configuration pane.
This flow consists of the Recurrence trigger and Send an email (V2) action that contain the parameters you set in this procedure.
New designer Classic designer 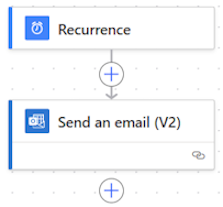
Save your cloud flow by selecting Save on the command bar.
A green message appears below the Power Automate title bar indicating that your flow is now saved.
Once you save your flow, we recommend that you test it.