Note
Access to this page requires authorization. You can try signing in or changing directories.
Access to this page requires authorization. You can try changing directories.
Setting up an online meeting is a core experience for an Outlook user, and it's easy to create a Teams meeting with Outlook. However, creating an online meeting in Outlook with a non-Microsoft service can be cumbersome. By implementing this feature, service providers can streamline the online meeting creation and joining experience for their Outlook add-in users.
In this article, you'll learn how to set up your Outlook add-in to enable users to organize and join a meeting using your online-meeting service. Throughout this article, we'll use a fictional online-meeting service provider, "Contoso".
Important
This feature is supported in Outlook on the web, Windows (new and classic), Mac, Android, and iOS with a Microsoft 365 subscription.
Set up your environment
Complete the Outlook quick start in which you create an add-in project with the Yeoman generator for Office Add-ins.
Configure the manifest
The steps for configuring the manifest depend on which type of manifest you selected in the quick start.
Note
Add-ins that use the unified manifest for Microsoft 365 aren't directly supported in Outlook on Mac and on mobile devices. To run this type of add-in on Mac and on mobile platforms, the add-in must first be published to AppSource then deployed in the Microsoft 365 Admin Center. For more information, see the "Client and platform support" section of Office Add-ins with the unified app manifest for Microsoft 365.
Open the manifest.json file.
Find the first object in the
"authorization.permissions.resourceSpecific"array and set its"name"property to"MailboxItem.ReadWrite.User". It should look like this when you're done.{ "name": "MailboxItem.ReadWrite.User", "type": "Delegated" }In the
"validDomains"array, change the URL to"https://contoso.com", which is the URL of the fictional online meeting provider. The array should look like this when you're done."validDomains": [ "https://contoso.com" ],Add the following object to the
"extensions.runtimes"array. Note the following about this code.- The
"minVersion"of the Mailbox requirement set is set to"1.3"so the runtime won't launch on platforms and Office versions where this feature isn't supported. - The
"id"of the runtime is set to the descriptive name"online_meeting_runtime". - The
"code.page"property is set to the URL of UI-less HTML file that will load the function command. - The
"lifetime"property is set to"short"which means that the runtime starts up when the function command button is selected and shuts down when the function completes. (In certain rare cases, the runtime shuts down before the handler completes. See Runtimes in Office Add-ins.) - There's an action to run a function named
"insertContosoMeeting". You'll create this function in a later step.
{ "requirements": { "capabilities": [ { "name": "Mailbox", "minVersion": "1.3" } ], "formFactors": [ "desktop" ] }, "id": "online_meeting_runtime", "type": "general", "code": { "page": "https://contoso.com/commands.html" }, "lifetime": "short", "actions": [ { "id": "insertContosoMeeting", "type": "executeFunction", "displayName": "insertContosoMeeting" } ] }- The
Replace the
"extensions.ribbons"array with the following. Note the following about this markup.- The
"minVersion"of the Mailbox requirement set is set to"1.3"so the the ribbon customizations won't appear on platforms and Office versions where this feature is not supported. - The
"contexts"array specifies that the ribbon is available only in the meeting details organizer window. - There will be a custom control group on the default ribbon tab (of the meeting details organizer window) labelled Contoso meeting.
- The group will have a button labelled Add meeting.
- The button's
"actionId"has been set to"insertContosoMeeting", which matches the"id"of the action you created in the previous step.
"ribbons": [ { "requirements": { "capabilities": [ { "name": "Mailbox", "minVersion": "1.3" } ], "scopes": [ "mail" ], "formFactors": [ "desktop" ] }, "contexts": [ "meetingDetailsOrganizer" ], "tabs": [ { "builtInTabId": "TabDefault", "groups": [ { "id": "apptComposeGroup", "label": "Contoso meeting", "controls": [ { "id": "insertMeetingButton", "type": "button", "label": "Add meeting", "icons": [ { "size": 16, "url": "icon-16.png" }, { "size": 32, "url": "icon-32.png" }, { "size": 64, "url": "icon-64_02.png" }, { "size": 80, "url": "icon-80.png" } ], "supertip": { "title": "Add a Contoso meeting", "description": "Add a Contoso meeting to this appointment." }, "actionId": "insertContosoMeeting", } ] } ] } ] } ]- The
Add mobile support
Open the manifest.json file.
In the
"extensions.ribbons.requirements.formFactors"array, add"mobile"as an item. When you're finished, the array should look like the following.
"formFactors": [
    "desktop",
    "mobile"
]
- In the
"extensions.ribbons.contexts"array, addonlineMeetingDetailsOrganizeras an item. When you're finished, the array should look like the following.
"contexts": [
    "meetingDetailsOrganizer",
    "onlineMeetingDetailsOrganizer"
],
- In the
"extensions.ribbons.tabs"array, find the tab with the"builtInTabId"of"TabDefault". Add a child"customMobileRibbonGroups"array to it (as a peer of the existing"groups"property). When you're finished, the"tabs"array should look like the following:
"tabs": [
    {
        "builtInTabId": "TabDefault",
        "groups": [
            <-- non-mobile group objects omitted -->
        ],
        "customMobileRibbonGroups": [
            {
                "id": "mobileApptComposeGroup",
                "label": "Contoso Meeting",
                "controls": [
                    {
                        "id": "mobileInsertMeetingButton",
                        "label": "Add meeting",
                        "type": "mobileButton",
                        "actionId": "insertContosoMeeting",
                        "icons": [
                            {
                                "scale": 1,
                                "size": 25,
                               "url": "https://contoso.com/assets/icon-25.png"
                            },
                            {
                                "scale": 1,
                                "size": 32,
                                "url": "https://contoso.com/assets/icon-32.png"
                            },
                            {
                                "scale": 1,
                                "size": 48,
                                "url": "https://contoso.com/assets/icon-48.png"
                            },
                            {
                                "scale": 2,
                                "size": 25,
                                "url": "https://contoso.com/assets/icon-25.png"
                            },
                            {
                                "scale": 2,
                                "size": 32,
                                "url": "https://contoso.com/assets/icon-32.png"
                            },
                            {
                                "scale": 2,
                                "size": 48,
                                "url": "https://contoso.com/assets/icon-48.png"
                            },
                            {
                                "scale": 3,
                                "size": 25,
                                "url": "https://contoso.com/assets/icon-25.png"
                            },
                            {
                                "scale": 3,
                                "size": 32,
                                "url": "https://contoso.com/assets/icon-32.png"
                            },
                            {
                                "scale": 3,
                                "size": 48,
                                "url": "https://contoso.com/assets/icon-48.png"
                            }
                        ]
                    }
                ]
            }
        ]
    }
]
Tip
To learn more about manifests for Outlook add-ins, see Office Add-in manifests and Add support for add-in commands in Outlook on mobile devices.
Implement adding online meeting details
In this section, learn how your add-in script can update a user's meeting to include online meeting details. The following applies to all supported platforms.
From the same quick start project, open the file ./src/commands/commands.js in your code editor.
Replace the entire content of the commands.js file with the following JavaScript.
// 1. How to construct online meeting details.
// Not shown: How to get the meeting organizer's ID and other details from your service.
const newBody = '<br>' +
    '<a href="https://contoso.com/meeting?id=123456789" target="_blank">Join Contoso meeting</a>' +
    '<br><br>' +
    'Phone Dial-in: +1(123)456-7890' +
    '<br><br>' +
    'Meeting ID: 123 456 789' +
    '<br><br>' +
    'Want to test your video connection?' +
    '<br><br>' +
    '<a href="https://contoso.com/testmeeting" target="_blank">Join test meeting</a>' +
    '<br><br>';

let mailboxItem;

// Office is ready.
Office.onReady(function () {
        mailboxItem = Office.context.mailbox.item;
    }
);

// 2. How to define and register a function command named `insertContosoMeeting` (referenced in the manifest)
//    to update the meeting body with the online meeting details.
function insertContosoMeeting(event) {
    // Get HTML body from the client.
    mailboxItem.body.getAsync("html",
        { asyncContext: event },
        function (getBodyResult) {
            if (getBodyResult.status === Office.AsyncResultStatus.Succeeded) {
                updateBody(getBodyResult.asyncContext, getBodyResult.value);
            } else {
                console.error("Failed to get HTML body.");
                getBodyResult.asyncContext.completed({ allowEvent: false });
            }
        }
    );
}
// Register the function.
Office.actions.associate("insertContosoMeeting", insertContosoMeeting);

// 3. How to implement a supporting function `updateBody`
//    that appends the online meeting details to the current body of the meeting.
function updateBody(event, existingBody) {
    // Append new body to the existing body.
    mailboxItem.body.setAsync(existingBody + newBody,
        { asyncContext: event, coercionType: "html" },
        function (setBodyResult) {
            if (setBodyResult.status === Office.AsyncResultStatus.Succeeded) {
                setBodyResult.asyncContext.completed({ allowEvent: true });
            } else {
                console.error("Failed to set HTML body.");
                setBodyResult.asyncContext.completed({ allowEvent: false });
            }
        }
    );
}
Test and validate your add-in
Follow the usual guidance to test and validate your add-in, then sideload the manifest in Outlook on the web, on Windows (new or classic), or on Mac. If your add-in also supports mobile, restart Outlook on your Android or iOS device after sideloading. Once the add-in is sideloaded, create a new meeting and verify that the Microsoft Teams or Skype toggle is replaced with your own.
Create meeting UI
As a meeting organizer, you should see screens similar to the following three images when you create a meeting.


Join meeting UI
As a meeting attendee, you should see a screen similar to the following image when you view the meeting.

Important
The Join button is only supported in Outlook on the web, on Mac, on Android, on iOS, and in new Outlook on Windows. If you only see a meeting link, but don't see the Join button in a supported client, it may be that the online-meeting template for your service isn't registered on our servers. See the Register your online-meeting template section for details.
Register your online-meeting template
Registering your online-meeting add-in is optional. It only applies if you want to surface the Join button in meetings, in addition to the meeting link. Once you've published your online-meeting add-in and would like to register it, create a GitHub issue using the following guidance. We'll contact you to coordinate a registration timeline.
Important
- The Join button is only supported in Outlook on the web, on Mac, on Android, on iOS, and in new Outlook on Windows.
- Only online-meeting add-ins published to AppSource can be registered. Line-of-business add-ins aren't supported.
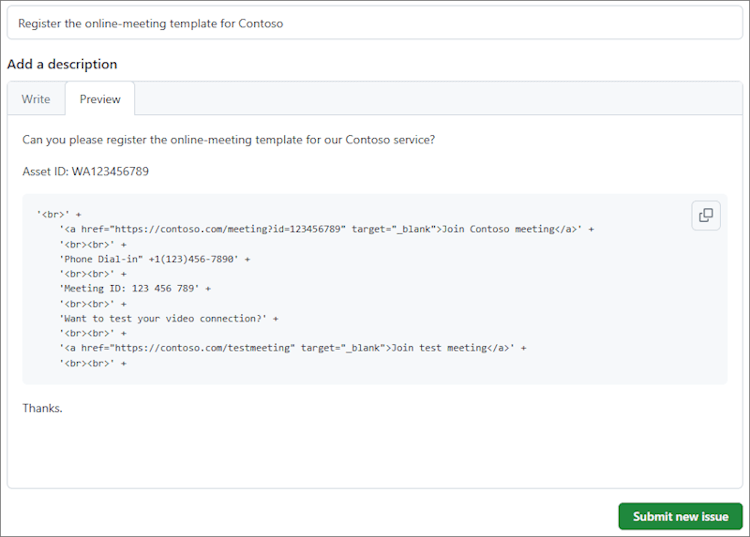
- Create a new GitHub issue.
- Set the Title of the new issue to "Outlook: Register the online-meeting template for my-service", replacing
my-servicewith your service name. - In the issue body, replace the existing text with the following:
- The asset ID of your published add-in.
- The string you set in the
newBodyor similar variable from the Implement adding online meeting details section earlier in this article.
- Click Submit new issue.
Automatically provide post-meeting resources and updates to attendees
After a meeting ends, the organizer and attendees often need access to important resources such as video recordings or meeting transcripts. If available, your online-meeting add-in can automatically update the meeting invite with these resources, making them easily accessible to all participants.
This section outlines how to use the Microsoft Graph API to update a calendar item with post-meeting resources. The updated content of a meeting will be reflected in the calendars of the organizer and the attendees. Additionally, an update will be sent to the attendees.
This implementation requires the following:
- An access token to make Microsoft Graph API calls. For guidance, see Use the Microsoft Graph REST API from an Outlook add-in.
- An indicator to your add-in when a meeting scheduled with your online-meeting add-in has ended.
- Access to a meeting's Exchange ID and the ID assigned by the add-in.
- Access to the necessary resources that will be added to the meeting.
- Access to the meeting instance created by the organizer. Changes must be made to the organizer's meeting instance to propagate to the attendees' meeting instance.
- When a meeting ends, configure your add-in to fetch the resources that will be added to the meeting object.
- Use the Microsoft Graph API to get the organizer's meeting instance. Ensure that the
bodyproperty is included in the request. For information on the API, see Get event. - Update the body of the meeting with the applicable meeting resources. For information on the API, see Update event.
Important
When making changes to the body property of a meeting, make sure to preserve the online meeting blob. Removing the meeting blob from the body disables the online-meeting functionality.
Once the meeting resources have been added to the meeting, an update is sent to the attendees. The changes are also reflected in the calendar instances of the organizer and the attendees.
The following is an example of how to update the meeting body with a link to a video recording.
const options = {
    authProvider,
};

const client = Client.init(options);

// Get the body of the meeting.
const currentEvent = await client.api('/users/{organizerId}/events/{meetingId}')
    .select('body')
    .get();

const existingBody = currentEvent.body.content;

// Update the body with a link to a video recording.
const meetingResources = `
<br><br>
<h2>Meeting summary</h2>
<p>The team discussed monthly sales targets for Fabrikam. Current market conditions were discussed. A follow-up meeting will be scheduled to finalize revenue goals for the quarter.</p>
<a href="https://contoso.com/recording/123456789" target="_blank">View recording</a>
`;

const updatedBody = existingBody + meetingResources;

const updatedEvent = {
  body: {
    contentType: 'html',
    content: updatedBody
  }
};

// Update the event with the new body content.
await client.api('/users/{organizerId}/events/{meetingId}')
    .update(updatedEvent);
Available APIs
The following APIs are available for this feature.
- Appointment Organizer APIs
- Office.context.mailbox.item.body (Body.getAsync, Body.setAsync)
- Office.context.mailbox.item.end (Time)
- Office.context.mailbox.item.loadCustomPropertiesAsync (CustomProperties)
- Office.context.mailbox.item.location (Location)
- Office.context.mailbox.item.optionalAttendees (Recipients)
- Office.context.mailbox.item.requiredAttendees (Recipients)
- Office.context.mailbox.item.start (Time)
- Office.context.mailbox.item.subject (Subject)
- Office.context.roamingSettings (RoamingSettings)
- Handle auth flow
Restrictions
Several restrictions apply.
- Applicable only to online-meeting service providers.
- Only admin-installed add-ins will appear on the meeting compose screen, replacing the default Teams or Skype option. User-installed add-ins won't activate.
- The add-in icon should be in grayscale using hex code
#919191or its equivalent in other color formats. - Only one function command is supported in Appointment Organizer (compose) mode.
- The add-in should update the meeting details in the appointment form within the one-minute timeout period. However, any time spent in a dialog box the add-in opened for authentication, for example, is excluded from the timeout period.
See also
Collaborate with us on GitHub
The source for this content can be found on GitHub, where you can also create and review issues and pull requests. For more information, see our contributor guide.
Office Add-ins