Note
Access to this page requires authorization. You can try signing in or changing directories.
Access to this page requires authorization. You can try changing directories.
The Azure AI Bot Service facilitates the development of agents that can access online resources requiring user authentication. Your agent doesn't need to manage authentication tokens because Azure does it for you. Azure uses OAuth 2.0 to generate a token based on each user's credentials. Your agent uses the token generated by Azure to access those resources. In this way, the user doesn't have to provide ID and password to the agent to access a secured resource but only to a trusted identity provider.
Important
Web Chat and Direct Line considerations: You need to use Direct Line with enhanced authentication enabled to mitigate security risks when connecting to an agent using the Web Chat control. For more information, see Direct Line enhanced authentication.
To setup OAuth on agent, register an Azure Bot if you haven't done so already.
Important
Whenever you register an agent in Azure, the agent gets assigned an Microsoft Entra ID application. However, this application secures channel-to-bot access. You need an additional Microsoft Entra ID application for each external secured resource you want the agent to access on behalf of the user.
Microsoft Entra ID identity service
The Microsoft Entra ID is a cloud identity service that allows you to build applications that securely sign in users using industry standard protocols like OAuth 2.0.
You can use one of these three identity services:
- Microsoft identity platform (v2.0): Also known as the Azure Active Directory v2 endpoint, which is an evolution of the Azure AD platform (v1.0).
- Federated Credentials: Also known as AAD v2 with Federated Credentials.
- Certificates: Also known as AAD v2 with Certificates.
These allow you to build applications that sign in to all Microsoft identity providers and get tokens to call Microsoft APIs, such as Microsoft Graph, or other APIs that developers have built.
Create the Microsoft Entra ID identity provider
This section shows how to create an Microsoft Entra ID identity provider that uses OAuth 2.0 to authenticate the agent for Graph.
Tip
You'll need to create and register the Microsoft Entra ID application in a tenant in which you can consent to delegate permissions requested by an application.
Open the Microsoft Entra ID panel in the Azure portal. If you aren't in the correct tenant, select Switch directory to switch to the correct tenant. (For information on how to create a tenant, see Access the portal and create a tenant.)
Open the App registrations panel.
Setup App Registration
For Teams SSO open the existing App Registration for the Agent/Azure Bot.
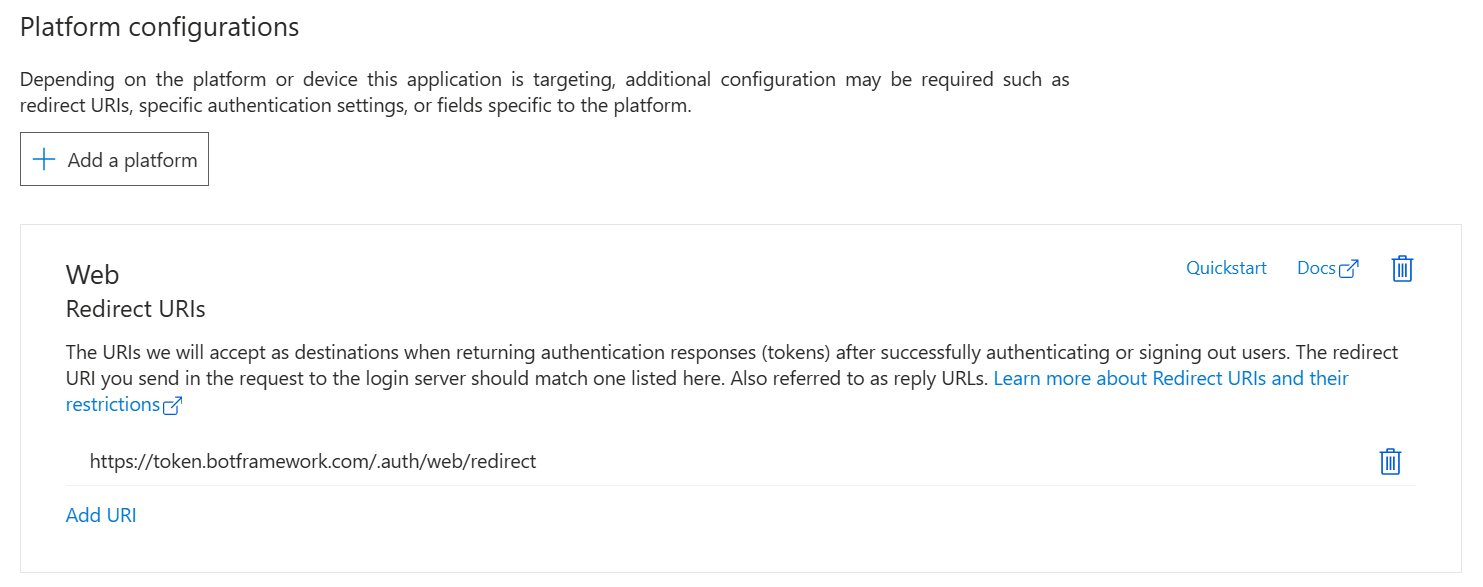
- On the Authentication pane if you don't see a Web platform, selct + Add a platform.
Select Web
Enter the Redirect URI from the table in the next step.
Click Configure
- On the Authentication pane if you don't see a Web platform, selct + Add a platform.
For other channels or OAuth
In the App registrations panel, select New registration.
Fill in the required fields and create the app registration.
Name your application.
Select the Supported account types for your application. Select Single Tenant.
For the Redirect URI, select Web and set the URL to one of the supported OAuth redirect URLs.
Data residency Cloud OAuth URL OAuth Redirect URL None Public https://token.botframework.com https://token.botframework.com/.auth/web/redirect Europe Public https://europe.token.botframework.com https://europe.token.botframework.com/.auth/web/redirect United States Public https://unitedstates.token.botframework.com https://unitedstates.token.botframework.com/.auth/web/redirect India Public https://india.token.botframework.com https://india.token.botframework.com/.auth/web/redirect None Azure Government https://token.botframework.azure.us https://token.botframework.azure.us/.auth/web/redirect None Azure operated by 21Vianet https://token.botframework.azure.cn https://token.botframework.azure.cn/.auth/web/redirect Select Register.
- Once created, Azure displays the Overview page for the app.
- Record the Application (client) ID value. You use this value later as the client ID when you create the connection string and register the Microsoft Entra ID provider with the agent registration.
- Record the Directory (tenant) ID value. You use this value to register this provider application with your bot.
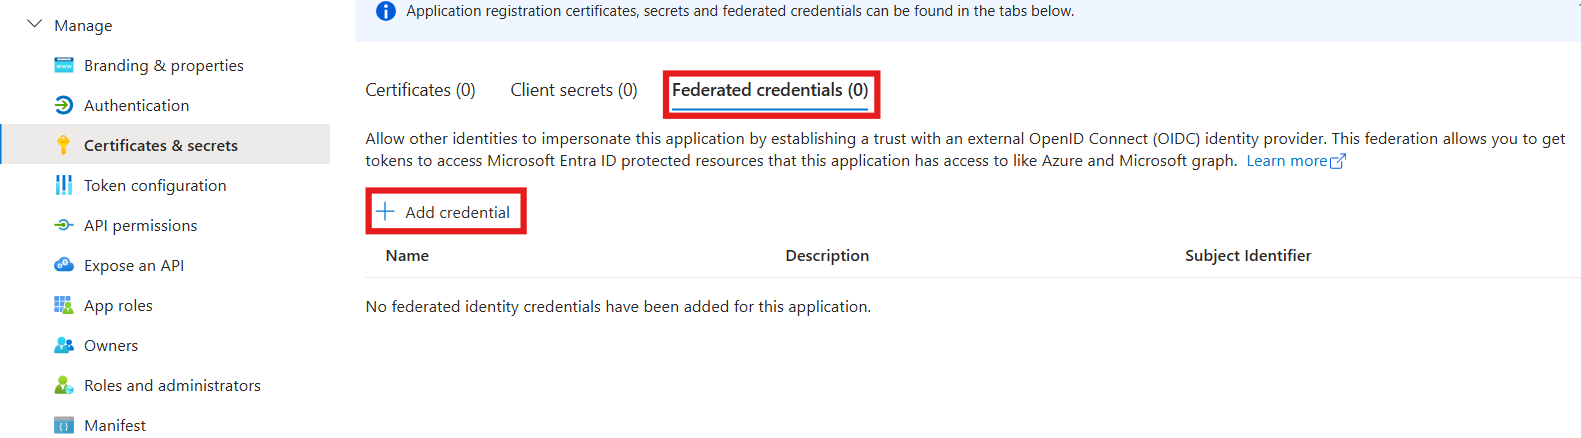
In the navigation pane, select Certificates & secrets to add credentials for your application.
Under Federated Credentials, select Add Credentials.
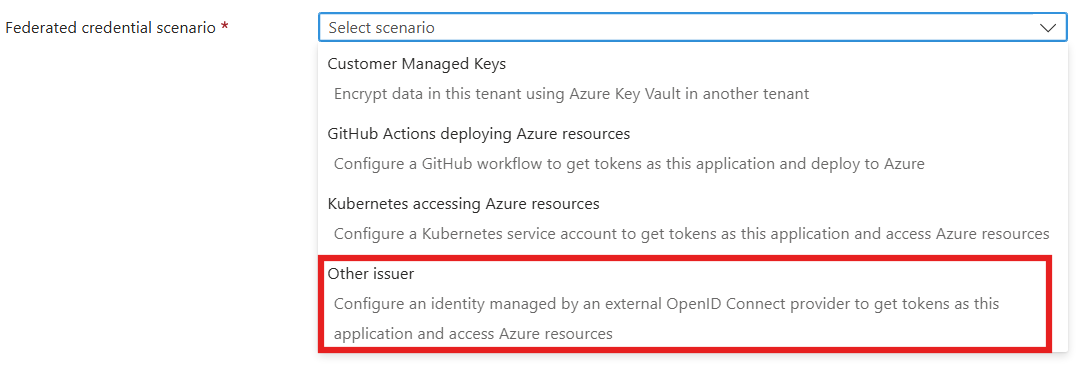
On Add Credentials page, Choose the Federated credential scenario to Other Issuer
Enter values in the required fields and review and update settings
Provide information under Connect your account.
Issuer :
https://login.microsoftonline.com/{customer-tenant-ID}/v2.0Subject Identifier :
/eid1/c/pub/t/{base64 encoded customer tenant ID}/a/{base64 encoded 1-P app client ID}/{unique-identifier-for-projected-identity}The following table contains Base64url encoded byte-array representation of supported First party application IDs. Use this value which represents our First party app.
Encoded Value Description 9ExAW52n_ky4ZiS_jhpJIQ Base64url encoded of Bot Service Token Store ND1y8_Vv60yhSNmdzSUR_A Base64url encoded of Bot Framework Dev Portal The following table contains Base64url encoded byte-array representation of some supported tenant IDs. Use the value which represents tenant of your app.
Encoded Value Description v4j5cvGGr0GRqy180BHbRw Base64url encoded MSIT tenant ID (aaaabbbb-0000-cccc-1111-dddd2222eeee) PwFflyR_6Een06vEdSvzRg Base64url encoded PME tenant ID (bbbbcccc-1111-dddd-2222-eeee3333ffff) 6q7FzcUVtk2wefyt0lBdwg Base64url encoded Torus tenant ID (ccccdddd-2222-eeee-3333-ffff4444aaaa) IRngM2RNjE-gVVva_9XjPQ Base64url encoded AME tenant ID (ddddeeee-3333-ffff-4444-aaaa5555bbbb) The Primary Identity service owners calculate it once and provide it to their consumers.
Unique-identifier-for-projected-identity: A Unique Identifier, of your choosing, that is used in the OAuth Connection Setting on the Azure Bot.
Name: Name of your choice, eg. "agent oauth"
Audience: api://AzureADTokenExchange (Use Cloud specific values)
Provide information under Credential details.
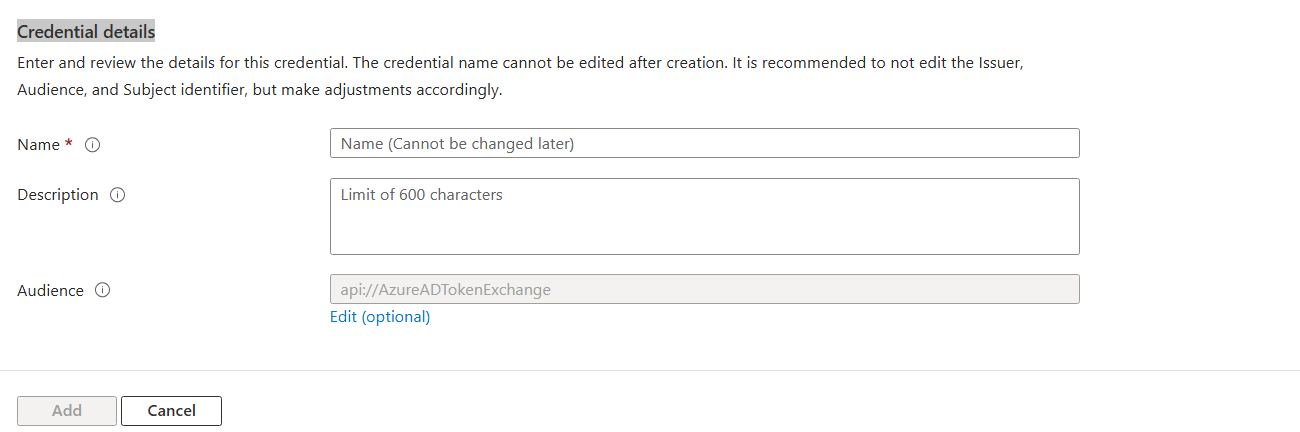
Select Add to add the credential.
Expose API endpoint
Click Expose an API in the left rail
- For an Azure Bot Service Bot: The default
api://{appid}is suitable. - For a Teams bot: This format is REQUIRED
api://botid-{appid}
- For an Azure Bot Service Bot: The default
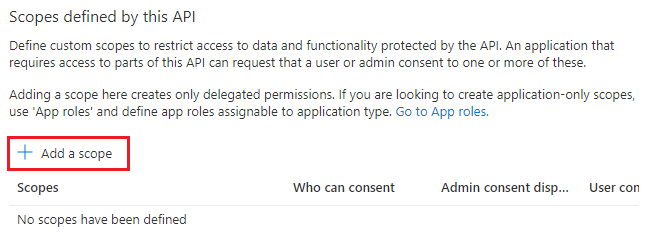
Add a Scope
Select + Add a scope in the Scopes defined by this API section.
Enter the details for configuring scope.
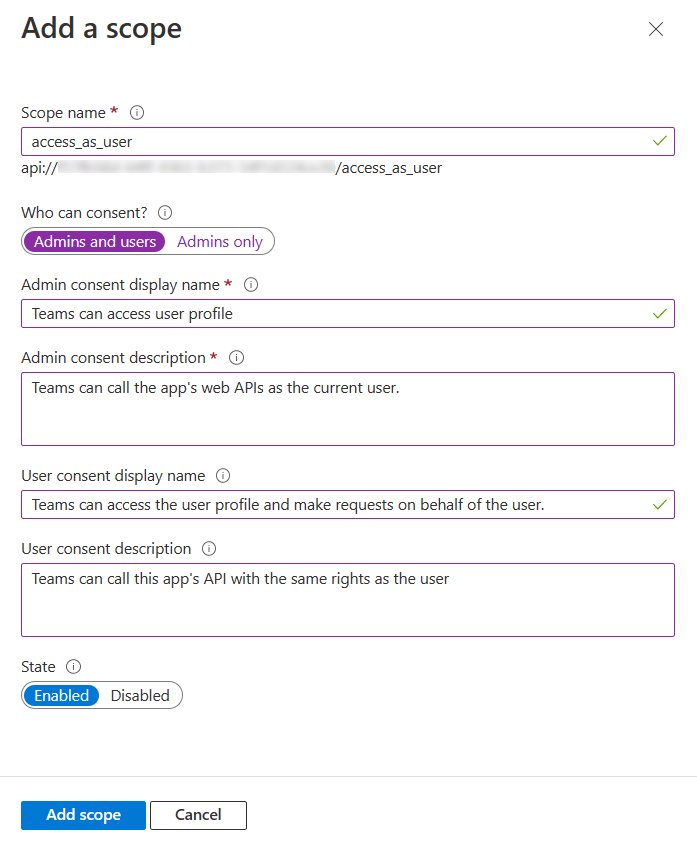
Enter the scope name
defaultScopesSelect the user who can give consent for this scope. The default option is Admins only.
Enter the Admin consent display name.
Enter the description for admin consent.
Enter the User consent display name.
Enter the user consent description.
Select the Enabled option for state.
Select Add scope.
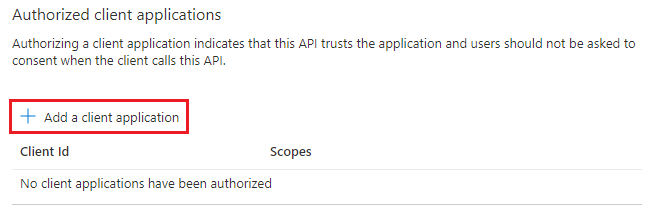
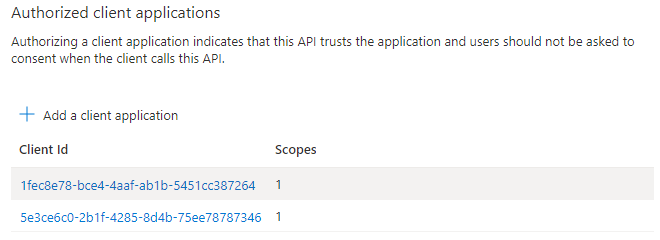
For Teams only, configure an authorized client application
Select + Add a client application.
Enter the appropriate Microsoft 365 client ID for the applications that you want to authorize for your app’s web application.
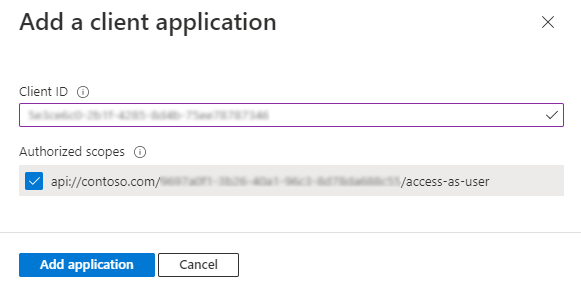
Select one of the following client IDs:
client ID to use App type to authorize 1fec8e78-bce4-4aaf-ab1b-5451cc387264 Teams mobile or desktop application 5e3ce6c0-2b1f-4285-8d4b-75ee78787346 Teams web application 4765445b-32c6-49b0-83e6-1d93765276ca Microsoft 365 web application 0ec893e0-5785-4de6-99da-4ed124e5296c Microsoft 365 desktop application d3590ed6-52b3-4102-aeff-aad2292ab01c Microsoft 365 mobile application/Outlook desktop application bc59ab01-8403-45c6-8796-ac3ef710b3e3 Outlook web application 27922004-5251-4030-b22d-91ecd9a37ea4 Outlook mobile application Select the application ID URI you created for your app in Authorized scopes to add the scope to the web API you exposed.
Select Add application.
In the navigation pane, select API permissions to open the API permissions panel. It's a best practice to explicitly set the API permissions for the app.
Select Add a permission to show the Request API permissions pane.
For this sample, select Microsoft APIs and Microsoft Graph.
Choose Delegated permissions and make sure the permissions you need are selected. This sample requires theses permissions.
Note: Any permission marked as ADMIN CONSENT REQUIRED will require both a user and a tenant admin to login, so for your agent tend to stay away from these.
- User.Read
Select Add permissions. (The first time a user accesses this app through the agent, they need to grant consent.)
You now have a OAuth application configured.
Note
You'll assign the Application (client) ID, when you create the connection string and register the identity provider with the agent registration. See next section.
Create an OAuth Connection on the Azure Bot
The next step is to register your identity provider with your agent.
Note
Single Tenant Entra Application is only supported for AAD v2 with Federated Credentials service provider. Support for multi-tenant apps will be added in future.
Open your bot's Azure Bot resource page in the Azure portal.
Select Settings, then Configuration.
Select the OAuth Connection Settings button near the bottom of the page.
Fill in the form as follows:
Name. Enter a name for your connection. You use it in your agent code.
Service Provider. Select AAD v2 with Federated Credentials to display service provider specific fields.
Client id. Enter the application (client) ID you recorded for your Microsoft Entra ID identity provider(Only Single Tenant Supported).
Unique Identifier. Enter the unique identifier you recorded for your Microsoft Entra ID identity provider while creating federated credentials.
Token Exchange URL. For Teams SSO, enter the api endpoint created earlier:
api://botid-{appId}. Otherwise leave blank.Tenant ID. Enter the directory (tenant) ID that you recorded earlier for your Microsoft Entra ID app or
commondepending on the supported account types selected when you created the Azure DD app. To decide which value to assign, follow these criteria:- When creating the Microsoft Entra ID app, if you selected Accounts in this organizational directory only (Microsoft only - Single tenant), enter the tenant ID you recorded earlier for the Microsoft Entra ID app.
- However, if you selected Accounts in any organizational directory (Any Microsoft Entra ID directory - Multi tenant and personal Microsoft accounts e.g. Xbox, Outlook.com) or Accounts in any organizational directory(Microsoft Entra ID directory - Multi tenant), enter
commoninstead of a tenant ID. Otherwise, the Microsoft Entra ID app verifies through the tenant whose ID was selected and exclude personal Microsoft accounts.
This is the tenant associated with the users who can be authenticated. For more information, see Tenancy in Microsoft Entra ID.
For Scopes, enter the names of the permission you chose from the application registration. For testing purposes, you can just enter:
User.Read.- If you need to use this token for OBO to another service (an exchangeable toke), use
api://botid-{{appId}}/defaultScopes.
- If you need to use this token for OBO to another service (an exchangeable toke), use
Note: For Microsoft Entra ID, Scopes field takes a case-sensitive, space-separated list of values.
Select Save.
Test your connection
- Select on the connection entry to open the connection you created.
- Select Test Connection at the top of the Service Provider Connection Setting pane.
- The first time, this should open a new browser tab listing the permissions your app is requesting and prompt you to accept.
- Select Accept.
- This should then redirect you to a Test Connection to your-connection-name Succeeded page, where
your-connection-succeededis your specific connection name. - For exchangeable tokens only
- Copy the the JWT token
- Decode the token using https://jwt.io/
- The
audclaim value should begin withapi://