Note
Access to this page requires authorization. You can try signing in or changing directories.
Access to this page requires authorization. You can try changing directories.
In this quickstart, you create a Terraform configuration that declares a Microsoft Entra security group and a managed service identity (MSI), representing a Microsoft Graph resource and an Azure resource respectively. You then add the MSI as an owner of the group. Finally, you deploy the Terraform configuration using a signed-in user.
Important
The msgraph provider for Terraform is currently in PREVIEW.
See the Supplemental Terms of Use for Microsoft Azure Previews for legal terms that apply to Azure features that are in beta, preview, or otherwise not yet released into general availability.
Prerequisites
- Install and configure Terraform
- Install the Microsoft Terraform VS Code Extension
- Install and configure Microsoft Graph for PowerShell
- Have a Microsoft Entra role that assigns you permissions to create a security group. Users have this permission by default. However, admins can turn off this default in which case you need to be assigned at least the Groups Administrator role.
Add a Microsoft Graph application group
Note
The sample code for this article is located in the MSGraph Terraform GitHub repo.
See more articles and sample code showing how to use Terraform to manage Azure resources
Create a directory in which to test the sample Terraform code and make it the current directory.
Create a file called
providers.tfand insert the following code:
terraform {
  required_providers {
    msgraph = {
      source = "microsoft/msgraph"
    }
  }
}

provider "msgraph" {
}
- Create a file named
main.tfand insert the following code:
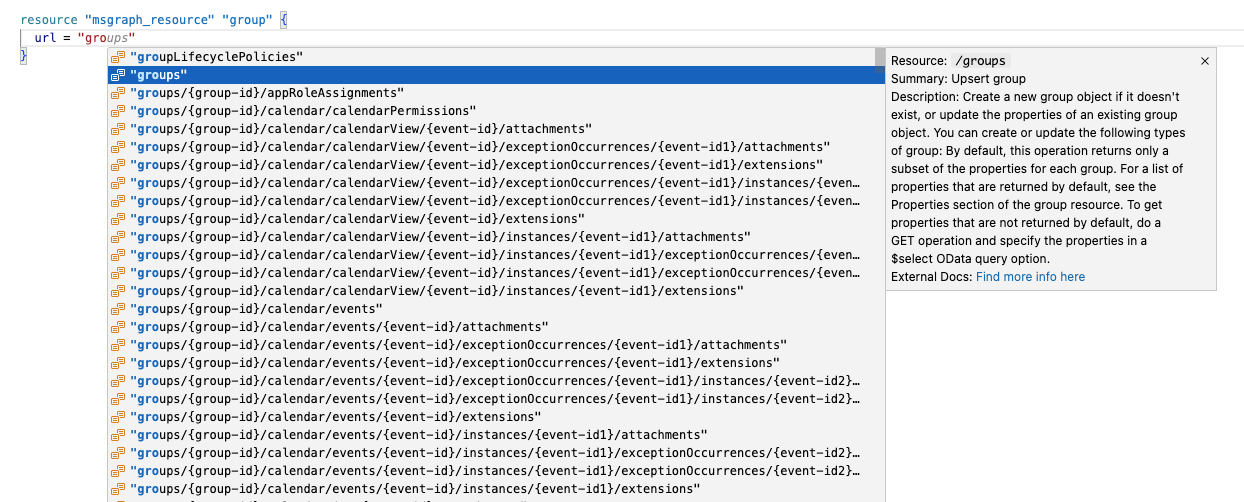
resource "msgraph_resource" "group" {
  url = "groups"
  body = {
    displayName     = "My Group"
    mailEnabled     = false
    mailNickname    = "mygroup"
    securityEnabled = true
  }
}
When you hit [CTRL + SPACE] after typing url = , a list of resource types is displayed. Continue typing groups until you can select groups from the available options.
Tip
If you don't see the intellisense options in VS Code, make sure you installed the Terraform extension as specified in Prerequisites. If you installed the extension, give the extension some time to start after opening your Terraform configuration.
You can also use the api_version property to specify the API version. Always select v1.0 unless it's unavailable or the resource properties you need are only available in beta. For this quickstart, we do not set the version since it defaults to v1.0.
Add a managed identity resource
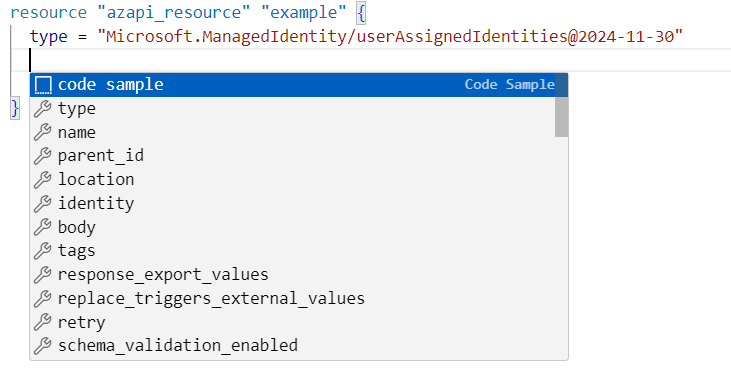
VS Code with the AzAPI extension simplifies development by providing code samples, such as a sample that creates a managed identity. In main.tf, type create an azapi_resource called managedidentity and specify the type as Microsoft.ManagedIdentity/userAssignedIdentities@2024-11-30. Hit [ENTER] then press [CTRL] and [SPACE] together to see an option code sample (you may need to hit the arrow keys to get to this option). Press [ENTER].
- Your resource should now look like this:
resource "azapi_resource" "managedidentity" {
  type                      = "Microsoft.ManagedIdentity/userAssignedIdentities@2024-11-30"
  parent_id                 = "The id of the Microsoft.Resources/resourceGroups@2020-06-01 resource"
  name                      = "The name of the resource"
  location                  = "location"
  schema_validation_enabled = false
  response_export_values    = ["*"]
}
We will fix this after we define the resource group.
- Go into your
providers.tffile and update the code as follows:
terraform {
  required_providers {
    msgraph = {
      source = "microsoft/msgraph"
    }
    azapi = {
      source = "Azure/azapi"
      version = "~>2.0"
    }
    random = {
      source  = "hashicorp/random"
      version = "~>3.0"
    }
  }
}

provider "msgraph" {
}

provider "azapi" {
}
The random provider helps us in our later step of creating a resource group.
- Create a new file
variables.tfand insert the following code:
variable "resource_group_location" {
  type        = string
  default     = "swedencentral"
  description = "Location of the resource group."
}

variable "resource_group_name_prefix" {
  type        = string
  default     = "rg"
  description = "Prefix of the resource group name that's combined with a random ID so name is unique in your Azure subscription."
}
- In your
main.tfadd the following code:
# Create a resource group with a random name.
resource "random_pet" "rg_name" {
  prefix = var.resource_group_name_prefix
}

resource "azapi_resource" "rg" {
  type     = "Microsoft.Resources/resourceGroups@2020-06-01"
  location = var.resource_group_location
  name     = random_pet.rg_name.id
}
- Also in your
main.tfmodify the existingmanagedidentityresource to look like this:
resource "azapi_resource" "managedidentity" {
  type      = "Microsoft.ManagedIdentity/userAssignedIdentities@2024-11-30"
  parent_id = azapi_resource.rg.id
  location  = var.resource_group_location
  name      = "myManagedIdentity"
  response_export_values = {
    principal_id = "properties.principalId"
  }
}
- Create a file
outputs.tfand insert the following code:
output "resource_group_name" {
  value = azapi_resource.rg.name
}

output "group_id" {
  value = msgraph_resource.group.id
}
Make the managed identity an owner of the group resource
Now we will create a new msgraph_resource to make our managed identity the owner of the group.
Add to main.tf the following code:
resource "msgraph_resource" "group_owner" {
  url =  "groups/${msgraph_resource.group.id}/owners/$ref"
  body = {
    "@odata.id" = "https://graph.microsoft.com/v1.0/servicePrincipals/${azapi_resource.managedidentity.output.principal_id}"
  }
}
HashiCorp Configuration language (HCL) enables us to specify expressions within strings, which is how we pass in the group ID and output from the managed identity resource. Now we've made an implicit reference to the managed identity's principal ID by inserting resource.azapi_resource.managedidentity.output.principal_id as the value of the array.
Note
The azapi and msgraph providers both utilize response_exports_values to store user-specified outputs. In this case we configured response_exports_values in the managedidentity resource as a map, but you can also configure it as a list. For more info on how to query values, refer to the guide on the Terraform registry.
Your main.tf file should now look like this:
resource "msgraph_resource" "application" {
  url = "groups"
  body = {
    displayName     = "My Group"
    mailEnabled     = false
    mailNickname    = "mygroup"
    securityEnabled = true
    owners = [resource.azapi_resource.managedidentity.id]
  }
}

# Create a resource group with a random name.
resource "random_pet" "rg_name" {
  prefix = var.resource_group_name_prefix
}

resource "azapi_resource" "rg" {
  type     = "Microsoft.Resources/resourceGroups@2020-06-01"
  location = var.resource_group_location
  name     = random_pet.rg_name.id
}

resource "azapi_resource" "managedidentity" {
  type = "Microsoft.ManagedIdentity/userAssignedIdentities@2024-11-30"
  location = var.resource_group_location
  name = "myManagedIdentity"
  response_export_values = {
    principal_id = "properties.principalId"
  }
}

resource "msgraph_resource" "group_owner" {
  url =  "groups/${msgraph_resource.group.id}/owners/$ref"
  body = {
    "@odata.id" = "https://graph.microsoft.com/v1.0/servicePrincipals/${azapi_resource.managedidentity.output.principal_id}"
  }
}
Now we are ready to deploy our code!
Authenticate
If you haven't yet, make sure you've authenticated to Azure.
Also make sure you've authenticated to Microsoft Graph PowerShell:
Connect-MgGraph
Initialize Terraform
Run terraform init to initialize the Terraform deployment. This command downloads the Azure provider required to manage your Azure resources.
terraform init -upgrade
Key points:
- The
-upgradeparameter upgrades the necessary provider plugins to the newest version that complies with the configuration's version constraints.
Create a Terraform execution plan
Run terraform plan to create an execution plan.
terraform plan -out main.tfplan
Key points:
- The
terraform plancommand creates an execution plan, but doesn't execute it. Instead, it determines what actions are necessary to create the configuration specified in your configuration files. This pattern allows you to verify whether the execution plan matches your expectations before making any changes to actual resources. - The optional
-outparameter allows you to specify an output file for the plan. Using the-outparameter ensures that the plan you reviewed is exactly what is applied.
Apply a Terraform execution plan
Run terraform apply to apply the execution plan to your cloud infrastructure.
terraform apply main.tfplan
Key points:
- The example
terraform applycommand assumes you previously ranterraform plan -out main.tfplan. - If you specified a different filename for the
-outparameter, use that same filename in the call toterraform apply. - If you didn't use the
-outparameter, callterraform applywithout any parameters.
Note
Due to replication delays, adding the managed service identity (MSI) as an owner of the Microsoft Entra group may cause the deployment to fail. Wait a little and then deploy the same Terraform configuration again.
Verify the results
Azure
Get the Azure resource group name.
$resource_group_name=$(terraform output -raw resource_group_name)Run Get-AzResourceGroup to display the resource group.
Get-AzResourceGroup -Name $resource_group_nameIf successful, your results should look like this:
{
  "id": "/subscriptions/00000000-0000-0000-0000-000000000000/resourceGroups/rg-crisp-panda",
  "location": "swedencentral",
  "managedBy": null,
  "name": "rg-crisp-panda",
  "properties": {
    "provisioningState": "Succeeded"
  },
  "tags": null,
  "type": "Microsoft.Resources/resourceGroups"
}
Microsoft Graph
Get the Group ID.
$group_id=$(terraform output -raw group_id)Run Get-MgGroup to display the application group.
Get-MgGroup -GroupId $group_idIf successful, your results should look like this:
DisplayName Id                                   MailNickname Description GroupTypes
----------- --                                   ------------ ----------- ----------
My Group    00000000-0000-0000-0000-000000000000 mygroup                  {}
Clean up resources
When you no longer need the resources created via Terraform, do the following steps:
Run terraform plan and specify the
destroyflag.terraform plan -destroy -out main.destroy.tfplanKey points:
- The
terraform plancommand creates an execution plan, but doesn't execute it. Instead, it determines what actions are necessary to create the configuration specified in your configuration files. This pattern allows you to verify whether the execution plan matches your expectations before making any changes to actual resources. - The optional
-outparameter allows you to specify an output file for the plan. Using the-outparameter ensures that the plan you reviewed is exactly what is applied.
- The
Run terraform apply to apply the execution plan.
terraform apply main.destroy.tfplan
Next step
- Understand Terraform, its uses, and structure and syntax of Terraform files.
- Explore Learn modules for Terraform on Azure.