Note
Access to this page requires authorization. You can try signing in or changing directories.
Access to this page requires authorization. You can try changing directories.
Microsoft OneLake can be used with Snowflake for storage and access of Apache Iceberg tables.
Follow this guide to use Snowflake on Azure to:
- write Iceberg tables directly to OneLake
- read virtual Iceberg tables converted from the Delta Lake format
Important
This feature is in preview.
Before getting started, follow the pre-requisite steps shown below.
Prerequisite
To use Snowflake on Azure to write or read Iceberg tables with OneLake, your Snowflake account's identity in Entra ID needs to be able to communicate with Fabric. Enable the Fabric tenant-level settings that allow service principals to call Fabric APIs and to call OneLake APIs.
Write an Iceberg table to OneLake using Snowflake on Azure
If you use Snowflake on Azure, you can write Iceberg tables to OneLake by following these steps:
Make sure your Fabric capacity is in the same Azure location as your Snowflake instance.
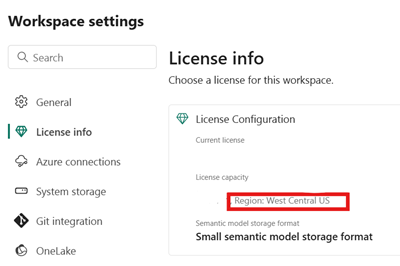
Identify the location of the Fabric capacity associated with your Fabric lakehouse. Open the settings of the Fabric workspace that contains your lakehouse.
In the bottom-left corner of your Snowflake on Azure account interface, check the Azure region of the Snowflake account.
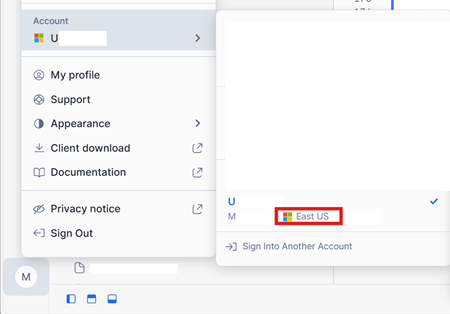
If these regions are different, you need to use a different Fabric capacity in the same region as your Snowflake account.
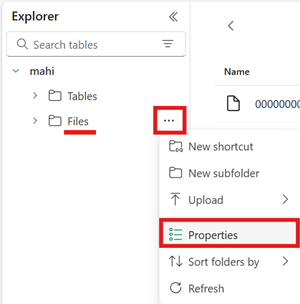
Open the menu for the Files area of your lakehouse, select Properties, and copy the URL (the HTTPS path) of that folder.
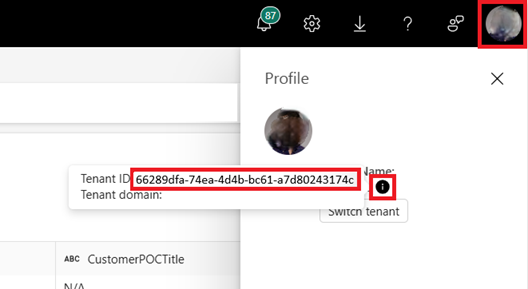
Identify your Fabric tenant ID. Select your user profile in the top-right corner of the Fabric UI, and hover over the info bubble next to your Tenant Name. Copy the Tenant ID.
In Snowflake, set up your
EXTERNAL VOLUMEusing the path to theFilesfolder in your lakehouse. More info on setting up Snowflake external volumes can be found here.Note
Snowflake requires the URL scheme to be
azure://, so be sure to change the path fromhttps://toazure://.CREATE OR REPLACE EXTERNAL VOLUME onelake_write_exvol STORAGE_LOCATIONS = ( ( NAME = 'onelake_write_exvol' STORAGE_PROVIDER = 'AZURE' STORAGE_BASE_URL = 'azure://<path_to_lakehouse>/Files/icebergtables' AZURE_TENANT_ID = '<Tenant_ID>' ) );In this sample, any tables created using this external volume are stored in the Fabric lakehouse, within the
Files/icebergtablesfolder.Now that your external volume is created, run the following command to retrieve the consent URL and name of the application that Snowflake uses to write to OneLake. This application is used by any other external volume in your Snowflake account.
DESC EXTERNAL VOLUME onelake_write_exvol;The output of this command returns the
AZURE_CONSENT_URLandAZURE_MULTI_TENANT_APP_NAMEproperties. Take note of both values. The Azure multitenant app name looks like<name>_<number>, but you only need to capture the<name>portion.Open the consent URL from the previous step in a new browser tab, if you haven't done this previously. If you would like to proceed, consent to the required application permissions, if prompted. You may be redirected to the main Snowflake website.
Back in Fabric, open your workspace and select Manage access, then Add people or groups. Grant the application used by your Snowflake external volume the permissions needed to write data to lakehouses in your workspace. We recommend granting the Contributor role.
Back in Snowflake, use your new external volume to create an Iceberg table.
CREATE OR REPLACE ICEBERG TABLE MYDATABASE.PUBLIC.Inventory (
    InventoryId int,
    ItemName STRING
)
EXTERNAL_VOLUME = 'onelake_write_exvol'
CATALOG = 'SNOWFLAKE'
BASE_LOCATION = 'Inventory/';
After running this statement, a new Iceberg table folder named Inventory has been created within the folder path defined in the external volume.
Add some data to your Iceberg table.
INSERT INTO MYDATABASE.PUBLIC.Inventory
VALUES
(123456,'Amatriciana');
Finally, in the Tables area of the same lakehouse, you can create a OneLake shortcut to your Iceberg table. Through that shortcut, your Iceberg table appears as a Delta Lake table for consumption across Fabric workloads.
Read a virtual Iceberg table from OneLake using Snowflake on Azure
To use Snowflake on Azure to read a virtual Iceberg table based on a Delta Lake table in Fabric, follow these steps.
Follow the guide to confirm your Delta Lake table has converted successfully to Iceberg, and take note of the path to the data item containing your table, as well as your table's most recent
*.metadata.jsonfile.Identify your Fabric tenant ID. Select your user profile in the top-right corner of the Fabric UI, and hover over the info bubble next to your Tenant Name. Copy the Tenant ID.
In Snowflake, set up your
EXTERNAL VOLUMEusing the path to theTablesfolder of the data item that contains your table. More info on setting up Snowflake external volumes can be found here.CREATE OR REPLACE EXTERNAL VOLUME onelake_read_exvol STORAGE_LOCATIONS = ( ( NAME = 'onelake_read_exvol' STORAGE_PROVIDER = 'AZURE' STORAGE_BASE_URL = 'azure://<path_to_data_item>/Tables/' AZURE_TENANT_ID = '<Tenant_ID>' ) ) ALLOW_WRITES = false;Note
Snowflake requires the URL scheme to be
azure://, so be sure to changehttps://toazure://.Replace
<path_to_data_item>with the path to your data item, such ashttps://onelake.dfs.fabric.microsoft.com/83896315-c5ba-4777-8d1c-e4ab3a7016bc/a95f62fa-2826-49f8-b561-a163ba537828.Now that your external volume is created, run the following command to retrieve the consent URL and name of the application that Snowflake uses to write to OneLake. This application is used by any other external volume in your Snowflake account.
DESC EXTERNAL VOLUME onelake_read_exvol;The output of this command returns the
AZURE_CONSENT_URLandAZURE_MULTI_TENANT_APP_NAMEproperties. Take note of both values. The Azure multitenant app name looks like<name>_<number>, but you only need to capture the<name>portion.Open the consent URL from the previous step in a new browser tab, if you haven't done this previously. If you would like to proceed, consent to the required application permissions, if prompted. You may be redirected to the main Snowflake website.
Back in Fabric, open your workspace and select Manage access, then Add people or groups. Grant the application used by your Snowflake external volume the permissions needed to read data from data items in your workspace.
Tip
You may instead choose to grant permissions at the data item level, if you wish. Learn more about OneLake data access.
Create the
CATALOG INTEGRATIONobject in Snowflake, if you haven't done this previously. This is required by Snowflake to reference existing Iceberg tables in storage.CREATE CATALOG INTEGRATION onelake_catalog_integration CATALOG_SOURCE = OBJECT_STORE TABLE_FORMAT = ICEBERG ENABLED = TRUE;Back in Snowflake, create an Iceberg table referencing the latest metadata file for the virtualized Iceberg table in OneLake.
CREATE OR REPLACE ICEBERG TABLE MYDATABASE.PUBLIC.<TABLE_NAME>
EXTERNAL_VOLUME = 'onelake_read_exvol'
CATALOG = onelake_catalog_integration
METADATA_FILE_PATH = '<metadata_file_path>';
Note
Replace
<TABLE_NAME>with your table name, and<metadata_file_path>with your Iceberg table's metadata file path, such asdbo/MyTable/metadata/321.metadata.json.After running this statement, you now have a reference to your virtualized Iceberg table that you can now query using Snowflake.
Query your virtualized Iceberg table by running the following statement.
SELECT TOP 10 * FROM MYDATABASE.PUBLIC.<TABLE_NAME>;
Troubleshooting
See the troubleshooting and limitations and considerations sections of our documentation of OneLake table format virtualization and conversion between Delta Lake and Apache Iceberg table formats.