Note
Access to this page requires authorization. You can try signing in or changing directories.
Access to this page requires authorization. You can try changing directories.
You can integrate Microsoft Entra with AWS S3 using the Service Principal Name (SPN) approach. This integration enables seamless, secure access to S3 buckets using Microsoft Entra credentials, simplifying identity management and enhancing security.
Key benefits
Unified identity management: Use Microsoft Entra credentials to access Amazon S3. No need to manage AWS IAM users.
OIDC-based authentication: Uses OpenID Connect for secure authentication with AWS IAM roles.
Auditing support: Full traceability through AWS CloudTrail to monitor role assumptions.
Seamless integration: Designed to integrate with existing AWS deployments with minimal configuration changes.
Architecture
The Entra-AWS integration is built on a federated identity model that uses OpenID Connect (OIDC) to enable secure, temporary access to AWS resources. The architecture consists of the following three main components that work together to establish trust, authenticate users, and authorize access to Amazon S3 from Microsoft Fabric:
- A Service Principal (SPN) registered in Microsoft Entra.
- An OIDC trust relationship between AWS and Microsoft Entra.
- A Fabric connection that uses temporary credentials from AWS Security Token Service (STS).
In the following sections you'll configure Microsoft Entra ID, AWS IAM, and Microsoft Fabric for secure access to Amazon S3 using the service principal-based integration. This setup establishes the necessary trust relationships and connection details required for the integration to work.
Note
Only key or secret authentication is supported for S3-compatible sources; Entra-based OAuth, Service Principal, and RoleArn are not supported.
Configure Microsoft Entra ID
Step1: Register a Microsoft Entra application
Sign in to Azure portal and navigate to Microsoft Entra ID.
From the left-hand menu, expand Manage > App registrations > New registration. Fill out the following details:
Name: Enter a name for your application such as S3AccessServicePrincipal.
Redirect URL: Leave it blank or set to
https://localhostif necessary.Select Register to register your application.
Note
It's recommended to use a unique Service Principal per AWS role for enhanced security
Step2: Create a client secret
Open the Microsoft Entra application you created above.
From the left-hand menu, expand Manage > Certificates and secrets > New client secret to add a new secret
Note down the generated secret and its expiration date
Step3: Get the application details
Client Secret: Get this value from the previous step
*Tenant ID: From the Azure portal, navigate to Microsoft Entra ID and open the Overview tab and get the Tenant ID value.
From the Azure portal, navigate to Microsoft Entra ID. From the left-hand navigation, expand the Manage tab and open Enterprise applications. Search for the application you created in the previous step. Copy the following values
Application ID (also known as Client ID)
Object ID
Note
These values are from Microsoft Entra ID > Enterprise applications tab and NOT from Microsoft Entra ID > App registrations tab.
The following screenshot shows you how to get the application/client ID and object ID.

AWS IAM configuration
Step 1: Create OIDC identity provider
Sign into the AWS IAM portal.
Navigate to AWS IAM → Identity providers → Add provider
Select Provider type as Open ID Connect
Provider URL:
https://sts.windows.net/<your-tenant-id>Audience:
https://analysis.windows.net/powerbi/connector/AmazonS3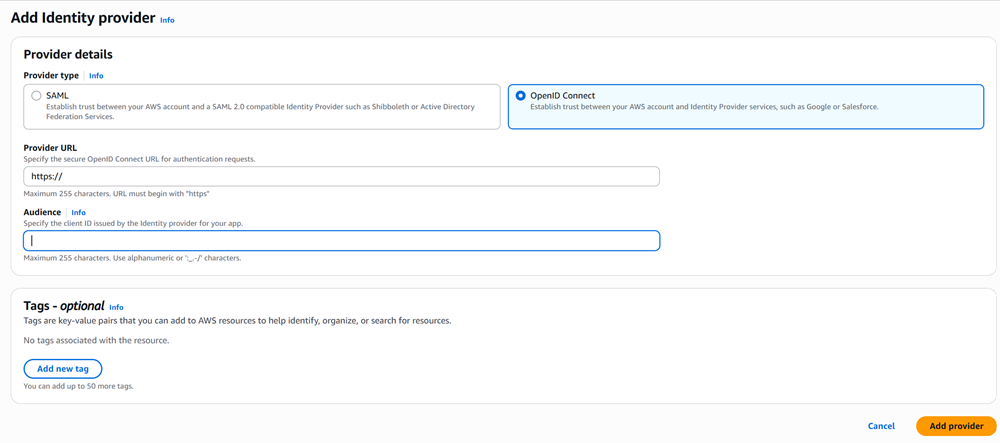

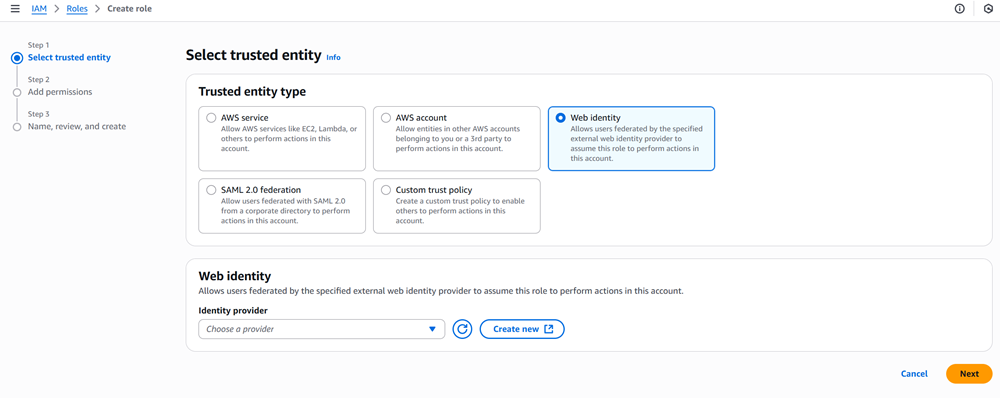
Step 2: Create IAM roles
Navigate to AWS IAM → Roles → Create Role
Trusted entity type: Web identity
Identity provider: Select the Open ID Connect provider created in Step 1
Audience:
https://analysis.windows.net/powerbi/connector/AmazonS3Assign appropriate S3 access policies to the role
Ensure that the Trust policy has the service principal as one of the conditions
{
  "Version": "2012-10-17",
  "Statement": [
    {
      "Effect": "Allow",
      "Principal": {
        "Federated": "arn:aws:iam::<aws-account>:oidc-provider/sts.windows.net/<tenant-id>/" // (1)
      },
      "Action": "sts:AssumeRoleWithWebIdentity",// (2)
      "Condition": {
        "StringEquals": {
          "sts.windows.net/<tenant-id>/:sub": "<Object ID of the SPN that will assume this role>", // (3)
          "sts.windows.net/<tenant-id>/:aud": "https://analysis.windows.net/powerbi/connector/AmazonS3" // (4)
        }
      }
    }
  ]
}
Description of key fields:
Principal.Federated – Specifies the external identity provider(OIDC from Microsoft Entra ID).
Action – Grants permission to assume the role using a web identity token.
Condition > :sub – Limits which Microsoft Entra ID service can assume the role. This is the Object ID that you noted in Step3: Get the application details
Condition > :aud – Ensures the request is from Power BI's S3 connector.

Create an S3 connection in Fabric
Use Microsoft Fabric OneLake's shortcut creation interface to create the shortcut as described in the create an S3 shortcut article. Follow the same steps, but set RoleARN to the Amazon Resource Name (ARN) for the IAM role, and set the Authentication Kind to Service Principal and fill in the following details:
Tenant ID: Tenant ID of the Microsoft Entra application
Service principal client ID: The Application ID you got in the previous step.
Service principal key: The client secret of the Microsoft Entra application
Security recommendations
Use a separate service principal per AWS role for better isolation and auditability
Rotate secrets periodically and store them securely
Monitor AWS CloudTrail for STS-related activity
Current limitations
This feature currently supports only the service principal-based approach; OAuth and Workspace Identity aren't yet supported.
Access to S3 buckets behind a firewall via on-premises data gateway isn't currently supported with service principal or OAuth.