Note
Access to this page requires authorization. You can try signing in or changing directories.
Access to this page requires authorization. You can try changing directories.
The document provides a step-by-step guide for integrating Darwinbox with Microsoft Entra ID. The steps include establishing a connection, configuring attribute mapping, testing account provisioning, configuring account access rules, and monitoring provisioning. Use this integration to configure cloud-native users directly in Microsoft Entra ID. This integration allows IT admins to automate business processes using Microsoft Entra ID Governance Lifecycle Workflows.
For detailed guidance on how to integrate your Darwinbox environment, reference the Darwinbox guide here.
Follow these high-level steps for configuring the app integration with Microsoft Entra ID in the Darwinbox Portal.
Create single-tenant app registration
In this step, you'll create a single-tenant application in Microsoft Entra ID and assign it the required permissions. This allows Darwinbox to use the application's client credentials to create a provisioning job and securely send user data to your Microsoft Entra ID tenant.
Go to the Microsoft Entra admin center, select App Registrations, and then select New registration. Create a single-tenant app as shown below.

Add the following three Microsoft Graph application permissions to let Darwinbox create the provisioning job: Application.ReadWrite.OwnedBy, send user data SyncrhonizationData-User.Upload.OwnedBy, and review the provisioning logs ProvisioningLog.Read.All.

Create a client secret and provide the credentials to Darwinbox as specified in their guide.
Configure connectors in Darwinbox Studio
- Open Darwinbox studio and navigate to Connector Library.
- Search for Microsoft. Install the Microsoft parent app connector and the Microsoft Entra child app connector.

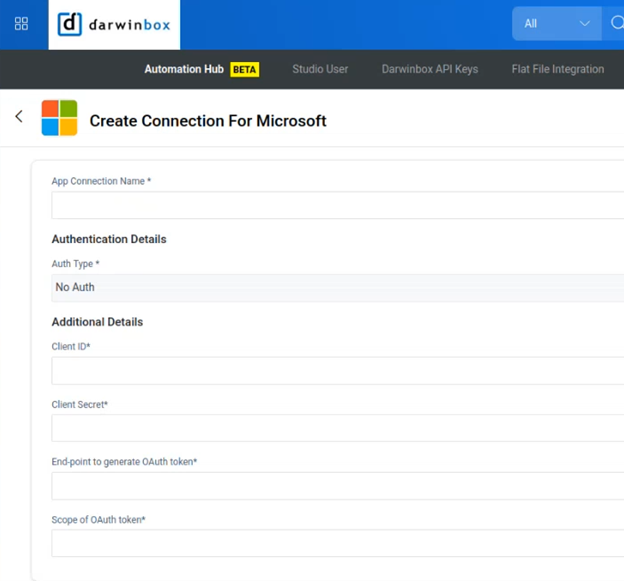
- Open the Microsoft app and configure connection parameters obtained from step 1. Provide Client ID, Client Secret and OAuth Token endpoint details. The connectivity information specified here is used by Darwinbox to create a provisioning app in your Microsoft Entra ID tenant.
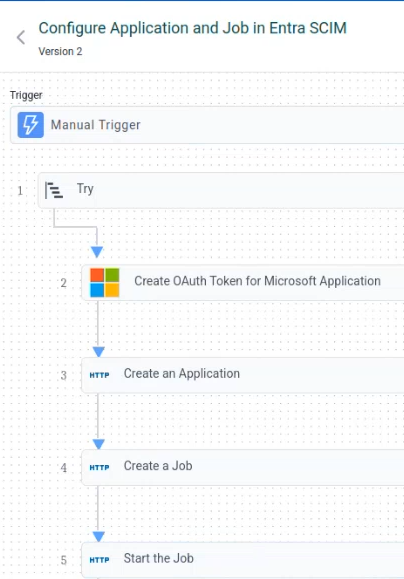
- Manually trigger the recipe task Configure application and Job in Microsoft Entra SCIM. This creates the API-driven provisioning job that Darwinbox uses to send user information.
- In Microsoft Entra admin center, browse to Enterprise Applications and open the provisioning app created by Darwinbox.
- Copy the Service Principal Id/Object ID from the Overview blade.
- Open the Provisioning blade of this app, and go to the Overview section’s View technical information.
- Copy the Provisioning Job ID.
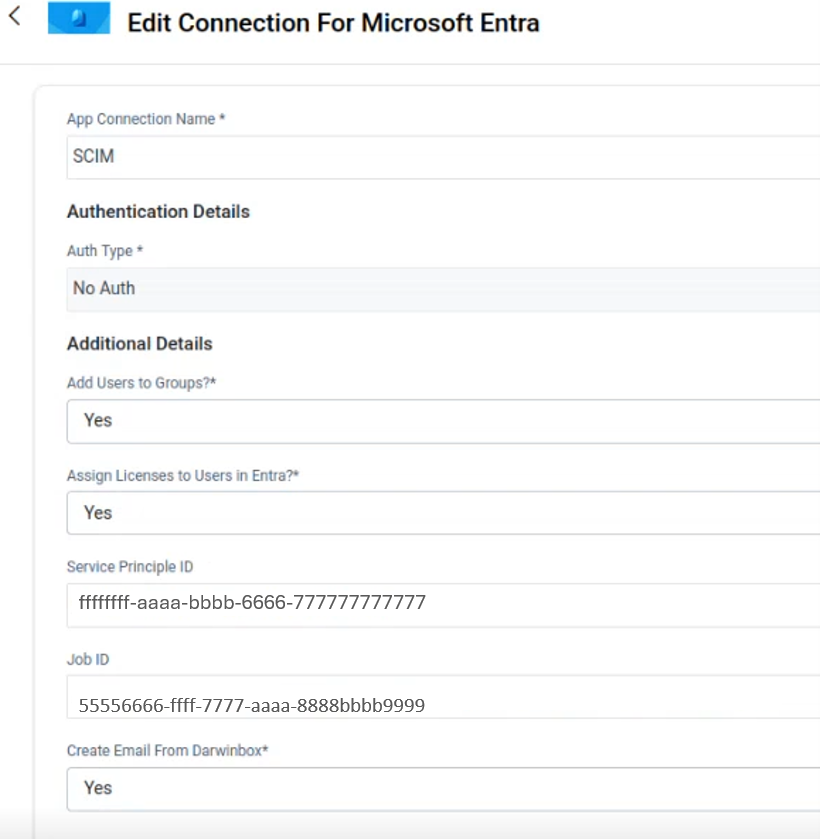
- In Darwinbox Studio, open the Microsoft Entra app and configure connection details, specifically entering the ServicePrincipalID and Provisioning Job ID.


Configure attribute mapping in Darwinbox and Entra ID
Map Darwinbox attributes to Entra ID SCIM attributes
Refer to the Darwinbox integration guide and create the following three CSV files that will be used as input in the Darwinbox recipes.
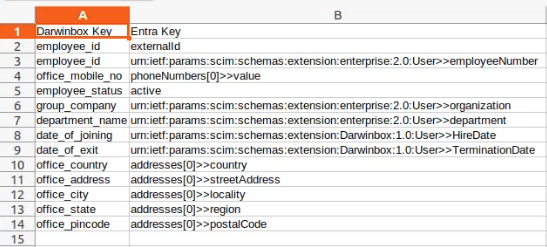
CSV file that maps Darwinbox attributes to Entra ID SCIM attributes. This file is used as input in the Darwinbox recipes.
CSV file that instructs which domain should be used for email ID creation based on either group company name or department.
CSV file that instructs how groups and licenses should be assigned (Optional).

Add Darwinbox custom attributes to Entra provisioning job
Refer to the steps documented here to introduce the following custom Darwinbox SCIM attributes in the Entra provisioning job.
- urn:ietf:params:scim:schemas:extension:Darwinbox:1.0:User:UsageLocation
- urn:ietf:params:scim:schemas:extension:Darwinbox:1.0:User:EmployeeType
- urn:ietf:params:scim:schemas:extension:Darwinbox:1.0:User:HireDate
- urn:ietf:params:scim:schemas:extension:Darwinbox:1.0:User:TerminationDate
Review and update the Microsoft Entra ID API-driven provisioning job attribute mapping. Ensure that your mapping includes employeeHireDate and employeeLeaveDateTime attributes so you can configure Joiner-Mover-Leaver Lifecycle Workflows.

Set up Darwinbox automations for user provisioning
Once you’ve configured the connector, Darwinbox has multiple recipes in place to manage the Joiner-Mover-Leaver lifecycle of your employees.

Configure the recipes based on your needs to enable the creation, updating, and deletion of user accounts in your Microsoft Entra ID tenant.
Monitor provisioning
To monitor the status of your provisioning events, go to the provisioning logs or use the provisioning workbook.
Manage Joiner-Mover-Leaver lifecycle workflows
Extend your HR-driven provisioning process to automate business processes and security controls for new hires, employment changes, and termination. With Microsoft Entra ID Governance Lifecycle Workflows, configure Joiner-Mover-Leaver workflows such as the following:
- “X” days before the new hire joins, send an email to the manager, add the user to groups, and generate a temporary access pass for first-time login.
- When there's a change in the user’s department, job title, or group membership, launch a custom task.
- On the last day of work, send an email to the manager, and remove the user from groups and license assignments.
- “X” days after termination, delete user from Microsoft Entra ID.
Related content
To learn how to monitor the status of your provisioning events, see User provisioning logs in Microsoft Entra ID.