Note
Access to this page requires authorization. You can try signing in or changing directories.
Access to this page requires authorization. You can try changing directories.
[This article is prerelease documentation and is subject to change.]
As an administrator, you can configure the Opportunity Research Agent in Dynamics 365 Sales to help sales professionals gain insights and recommendations for the opportunities they're working on. The agent automatically gathers information from various sources, providing a streamlined research experience, stakeholder and competitor intelligence, and actionable risk mitigation strategies. Learn more in Opportunity Research Agent overview.
Important
- This is a preview feature.
- Preview features aren’t meant for production use and might have restricted functionality. These features are subject to supplemental terms of use, and are available before an official release so that customers can get early access and provide feedback.
Step 1: Plan your implementation
As the agent consumes capacity, it's important to plan and configure it to handle the right opportunities. Here are some considerations to keep in mind before you set up the Opportunity Research Agent:
Determine the products that you want the Opportunity Research Agent to handle. The products should be handled by a single sales team. If your company sells multiple products through different sales teams, pick one product line.
Determine the segment of opportunities that you want the Opportunity Research Agent to handle. For example, you might want it to handle only the opportunities that are Hot and with an estimated revenue of $100,000 or more.
Identify the sellers who will work on the opportunities segment that the agent will research on. You need to configure server-side synchronization for the mailboxes of these sellers to allow the agent to access their emails and meetings related to the opportunities.
The agent uses the machine learning model in predictive opportunity scoring for risk assessment. If you didn't configure scoring in your environment, it's configured automatically when you start the agent.
Step 2: Configure prerequisites
Modify Data policies and allow the following connectors:
Connector Why is it required? Knowledge source with public websites and data The agent needs it to access public data for enrichment. Microsoft Copilot Studio Copilot Studio is the core platform for building and deploying the agent. Knowledge source with SharePoint or OneDrive Required only if the agent is configured to use internal documents on SharePoint or OneDrive for enrichment. Knowledge source with documents Required only if the agent is configured to use internal documents for enrichment. Learn more in Manage data policies.
If you're using a custom security role for your sales team that'll be using the agent, ensure that the role has
Basic-levelReadaccess to the following entities to view the research insights:- Opportunity Research Result (msdyn_OpportunityResearchResult)
- Opportunity Research Indicator (msdyn_OpportunityResearchIndicator)
- Opportunity Research Agent Trigger (OpportunityResearchAgentTrigger)
- Opportunity Research User Interactions (OpportunityResearchUserInteractions)
- Sales Agent Configuration v2 (prvReadmsdyn_salesagentconfigurationv2)
- Sales Agent Profile (prvReadmsdyn_salesagentprofile)
Turn on AI prompts feature in Power Platform and Copilot Studio. Learn more in Enable AI prompts in Power Platform and Copilot Studio.
Configure server-side synchronization
After you identify the sellers who work on the segment of opportunities that the agent will research on, you must configure server-side synchronization for their mailboxes. This step is required to allow the agent to access emails and meetings related to the opportunities from the sellers' mailboxes.
To configure server-side synchronization:
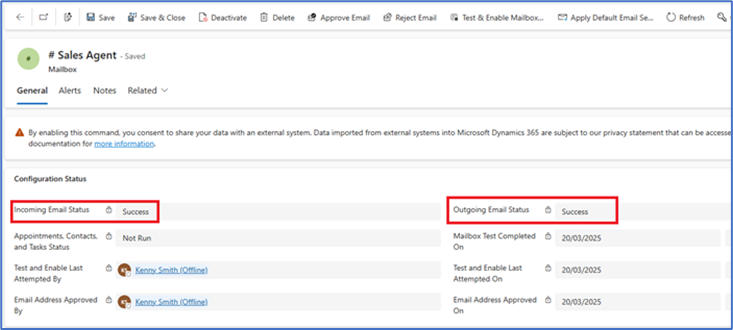
Configure mailboxes of sellers who own the opportunities and approve their mailboxes. When the configuration is successful, the Incoming Email Status and Outgoing Email Status for the mailbox are set to Success.
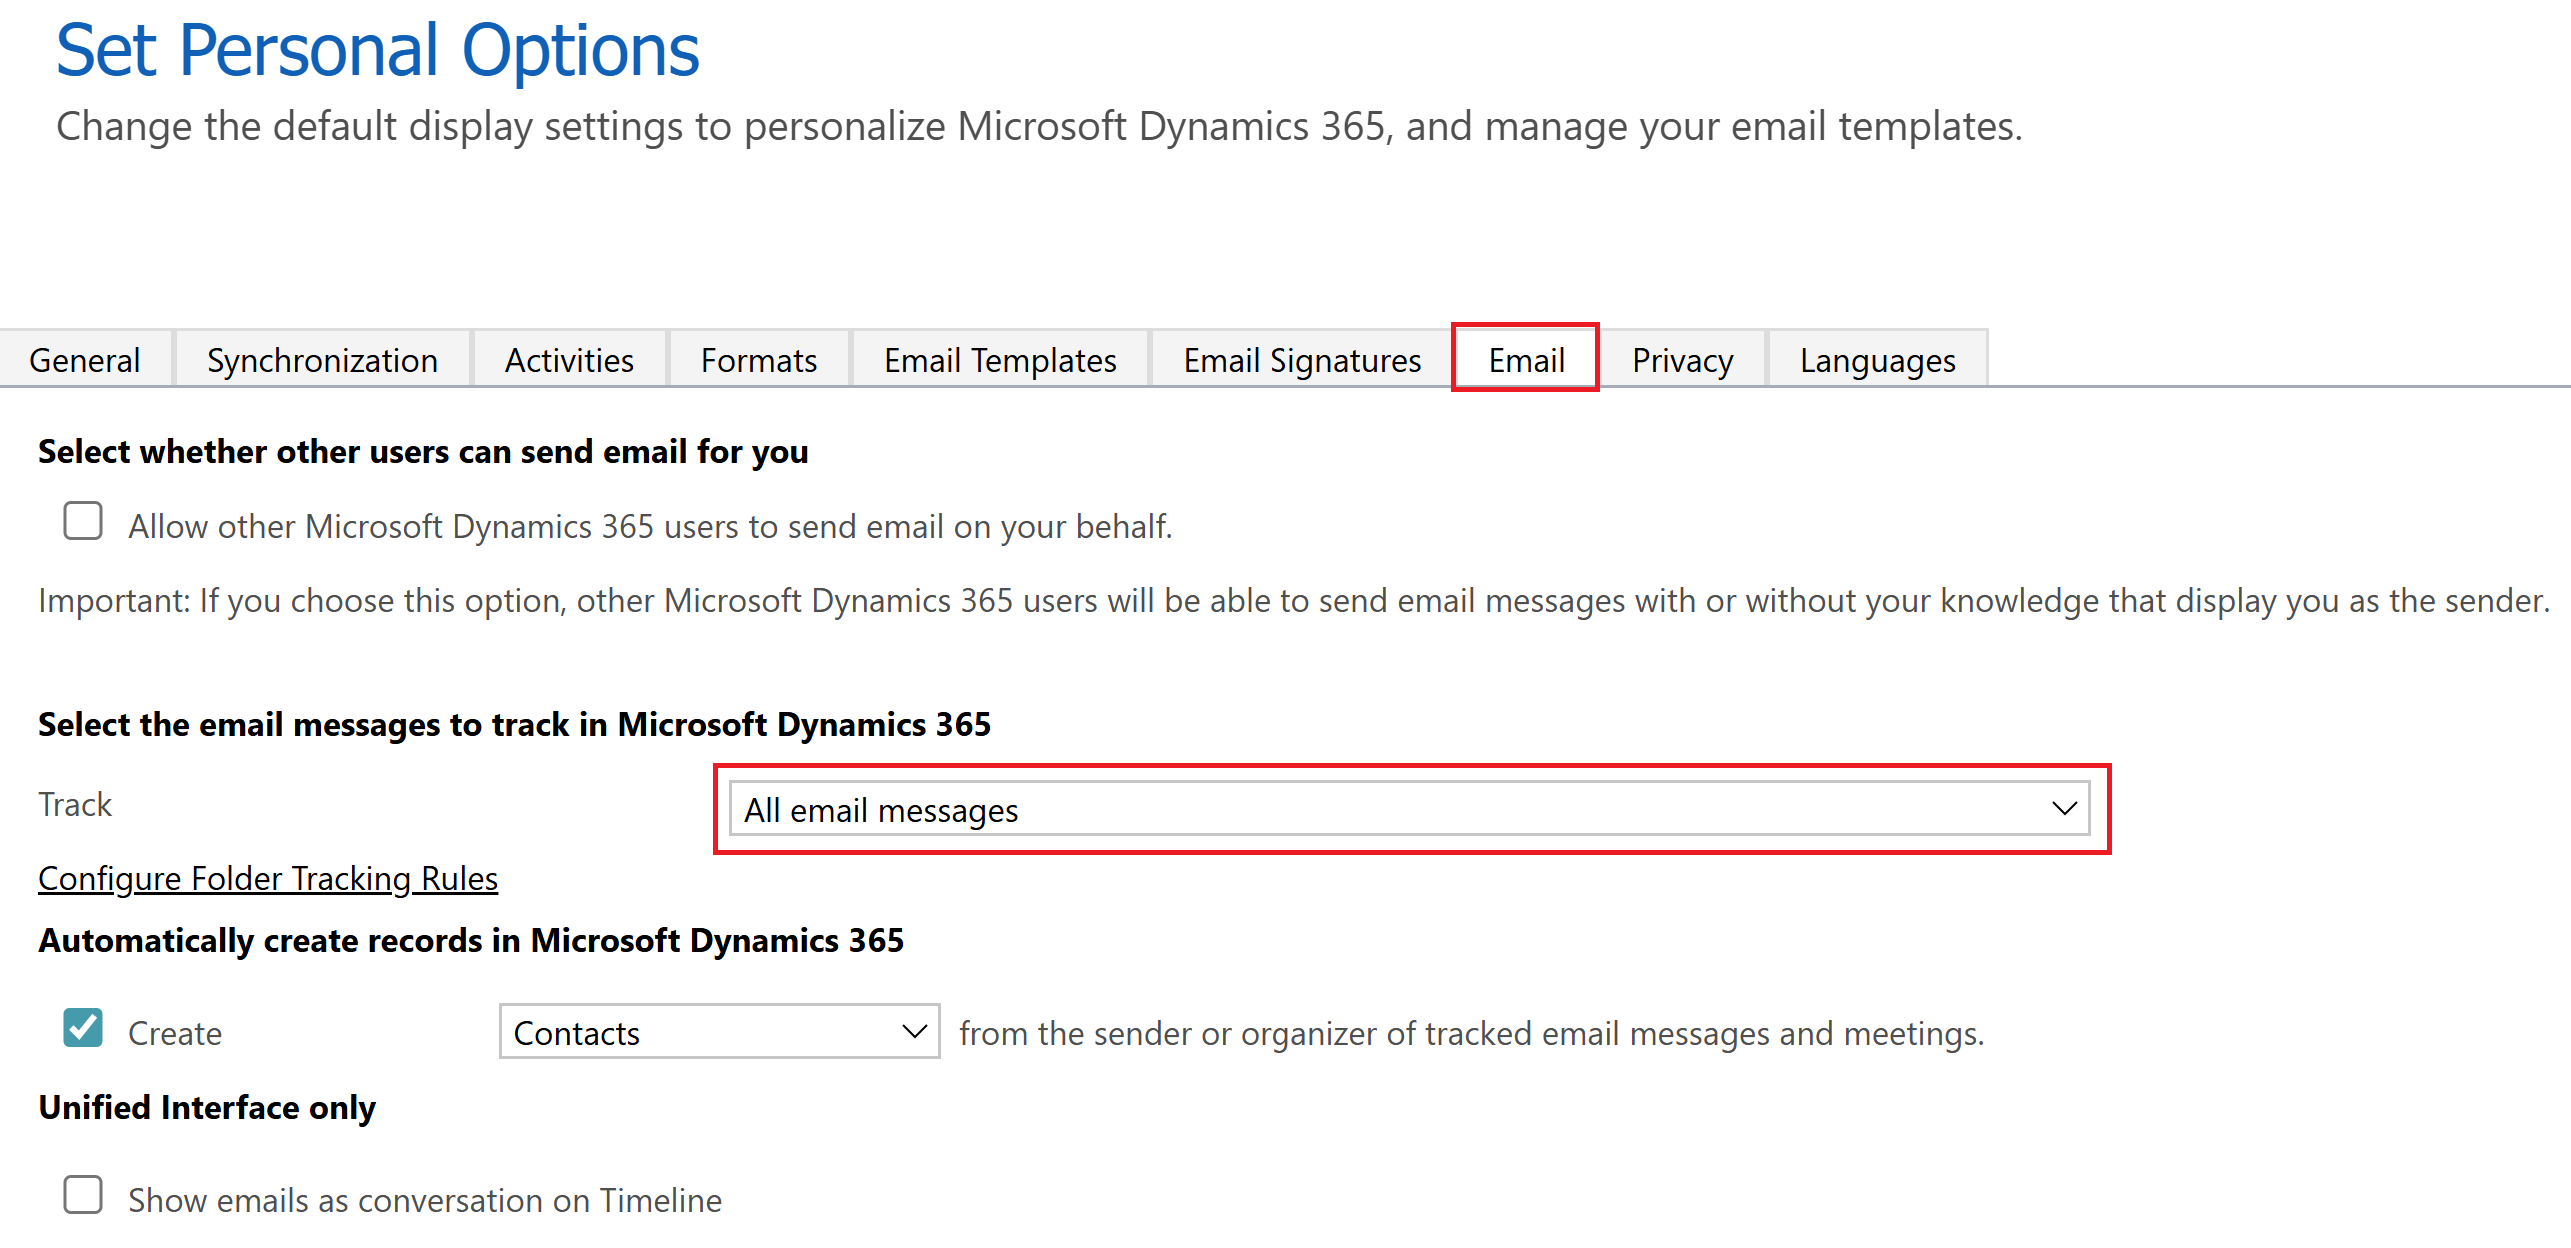
Make sure that the personalization option for emails is set to All email messages in the sellers personalization settings. By default, this option is set to Email messages in response to Dynamics 365 email. Perform ONE of the following actions:
Notify the sellers to set this option from Settings > Personalization settings > Emails > Track > All email messages in Dynamics 365 Sales.
Use the User Settings Utility in XRMToolBox to select multiple sellers and set the
Track email messagessetting to All email messages.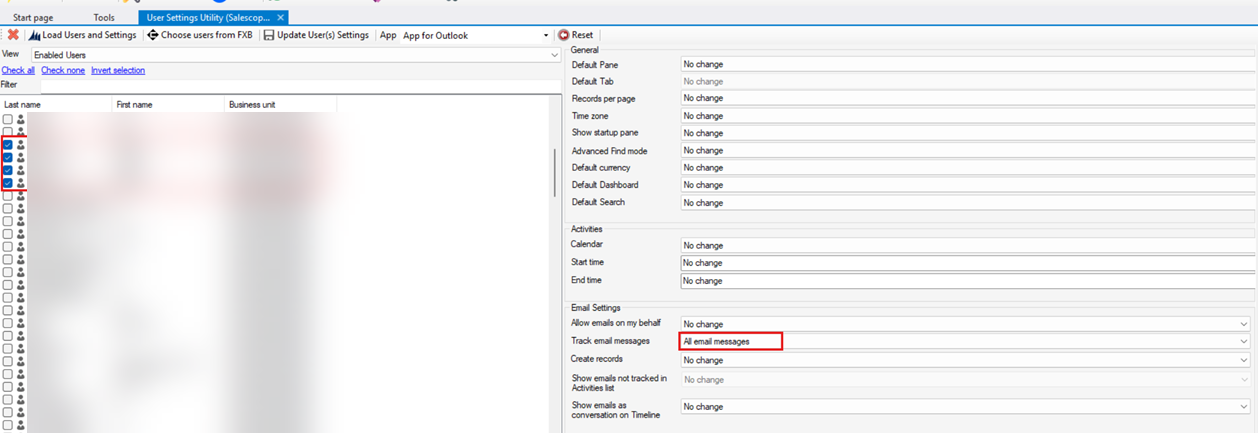
Step 3: Verify prerequisites
In the Sales Hub app, go to Change area in the lower-left corner of the page and select App Settings.
Go to General Settings > Dynamics 365 AI hub.
Select Create and manage agents under Agent manager.
On the AI agents page, select Prerequisites and ensure that all prerequisites are met.
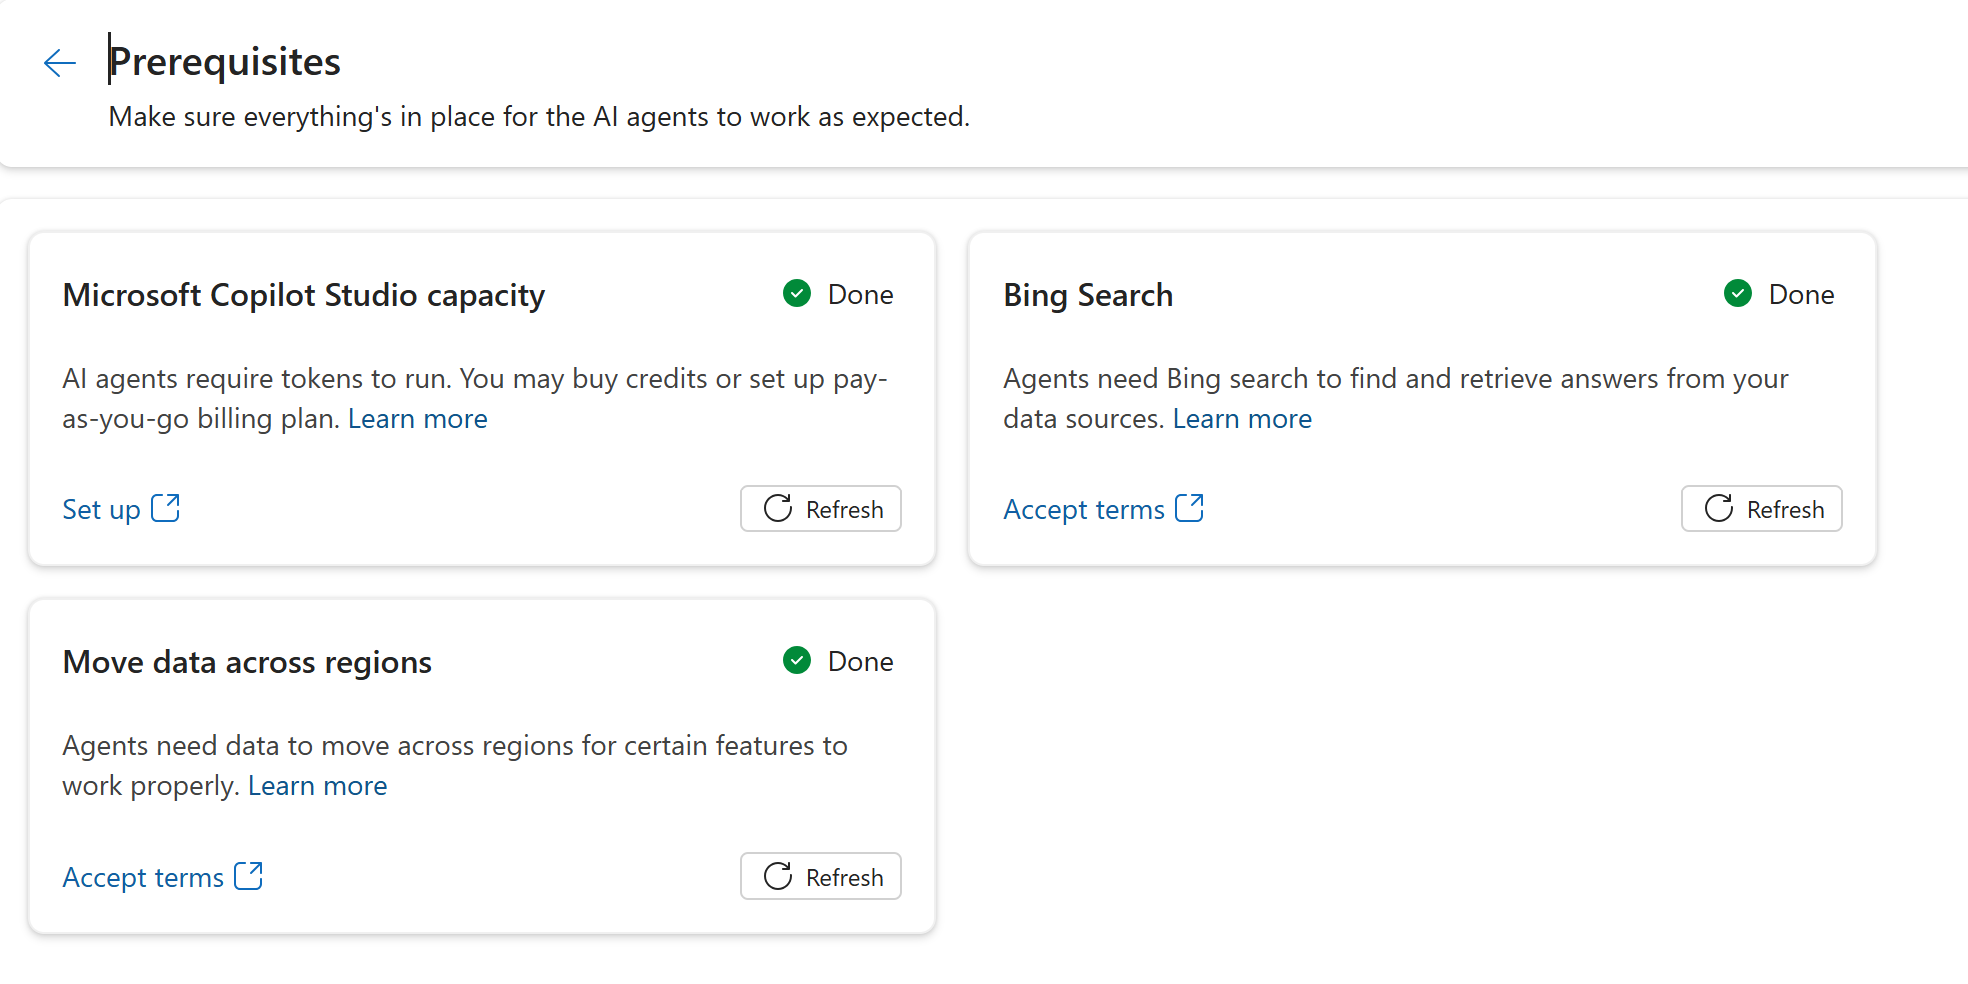
If any of them isn't marked as Done, select the appropriate call-to-action to complete the prerequisite:
- Microsoft Copilot Studio capacity: Select Set up to open the Power Platform admin center and set up capacity. Learn more in Manage Copilot Studio messages and capacity.
- Bing search: Select Accept terms to open the Power Platform admin center and allow Bing search under Generative AI features > Bing search.
- Move data across regions: Select Accept terms to open the Power Platform admin center and allow data movement under Generative AI features > Move data across regions.
After all the prerequisites are met, select Create and then select Choose under Opportunity Research Agent. The Opportunity Research Agent settings page opens.
Scroll down to the Prerequisites section and confirm that server-side synchronization is configured for the mailboxes of sellers who will use the agent. The agent can't verify this configuration automatically. So, select Mark as done only if it's configured as described in the Configure server-side synchronization section.
Step 4: Configure the agent
After verifying the prerequisites, define the agent and company profile, selection criteria for opportunities, refresh frequency, fields for importance and risk assessment, and knowledge sources for generating research insights.
Configure agent and company profile
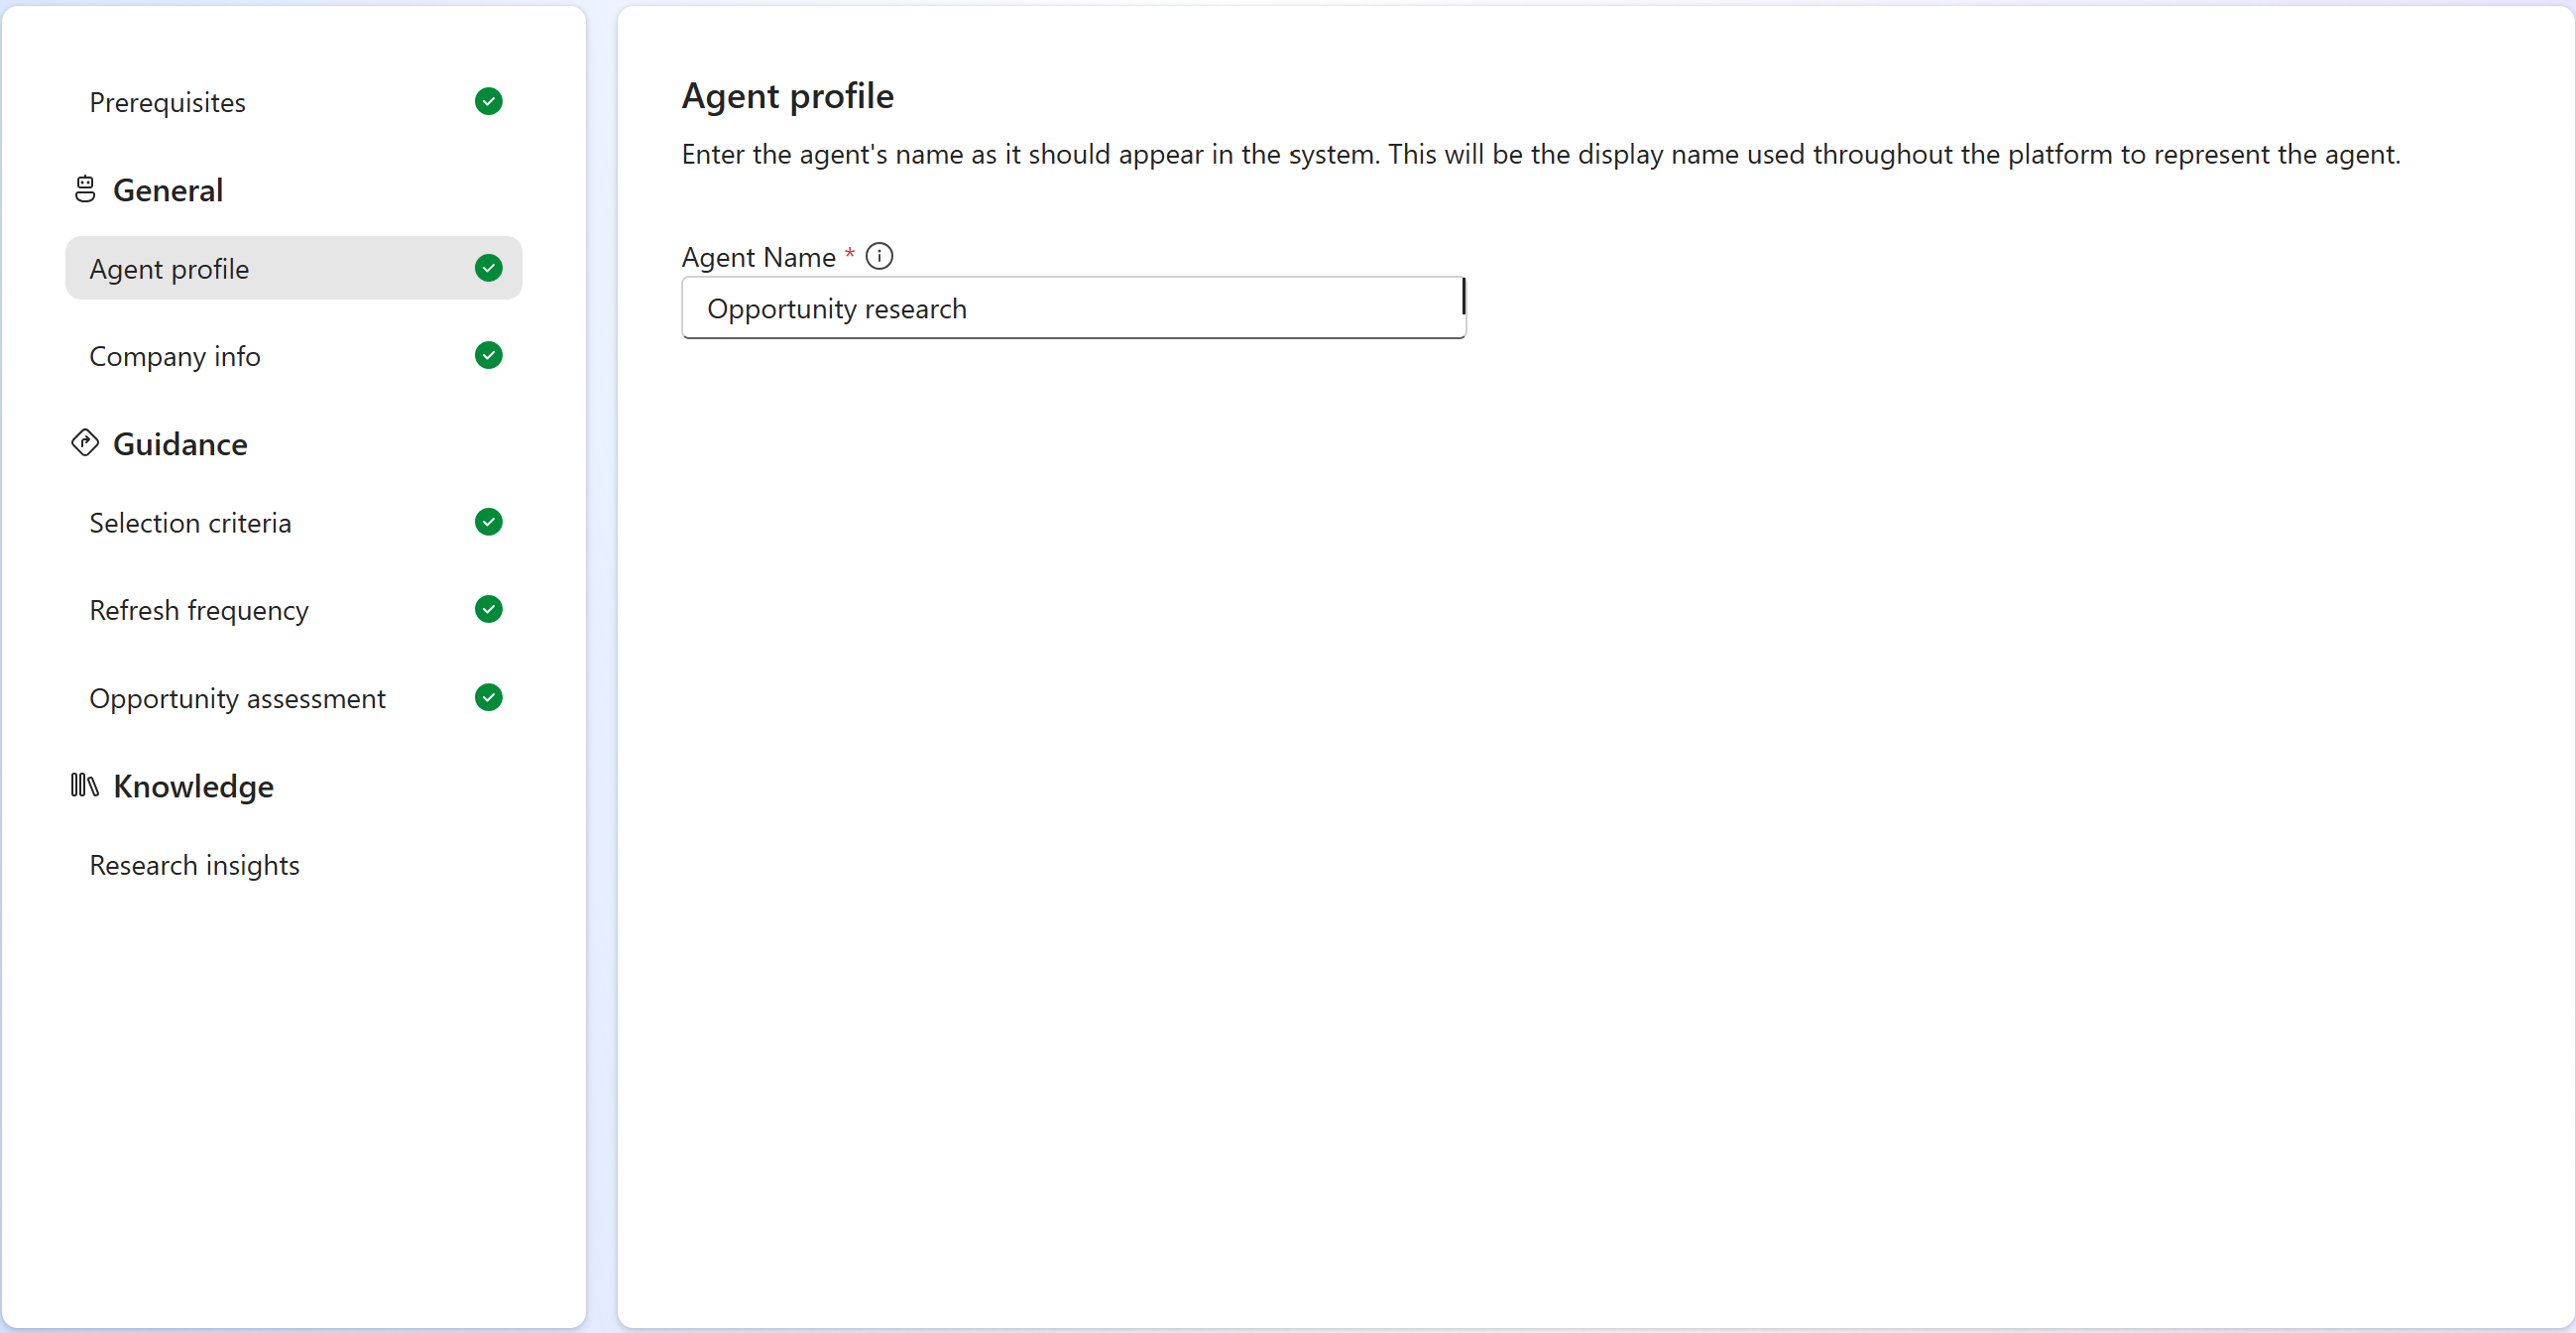
In the Agent profile tab, enter a meaningful name for the agent, such as "Opportunity Research Agent for Microsoft 365". This name is used to identify the agent in Dynamics 365 Sales and Copilot Studio.
In the Company info tab, enter the following information:
- Enter your company name and website URL.
- Enter the value proposition of the products associated with the opportunities that the agent will handle. Providing a clear value proposition helps the agent focus its account research on the most relevant information. Instead of returning broad or generic insights about a company, the agent uses the value proposition to tailor its research and deliver insights that are specific to your product and its effect for the customer. For example, if the agent is handling opportunities related to a coffee machine, you can specify "Our smart vending machine offers a variety of premium blends, customizable to your taste, with zero wait time, and minimal maintenance." instead of "We sell coffee machines to businesses."
Configure selection criteria for opportunities
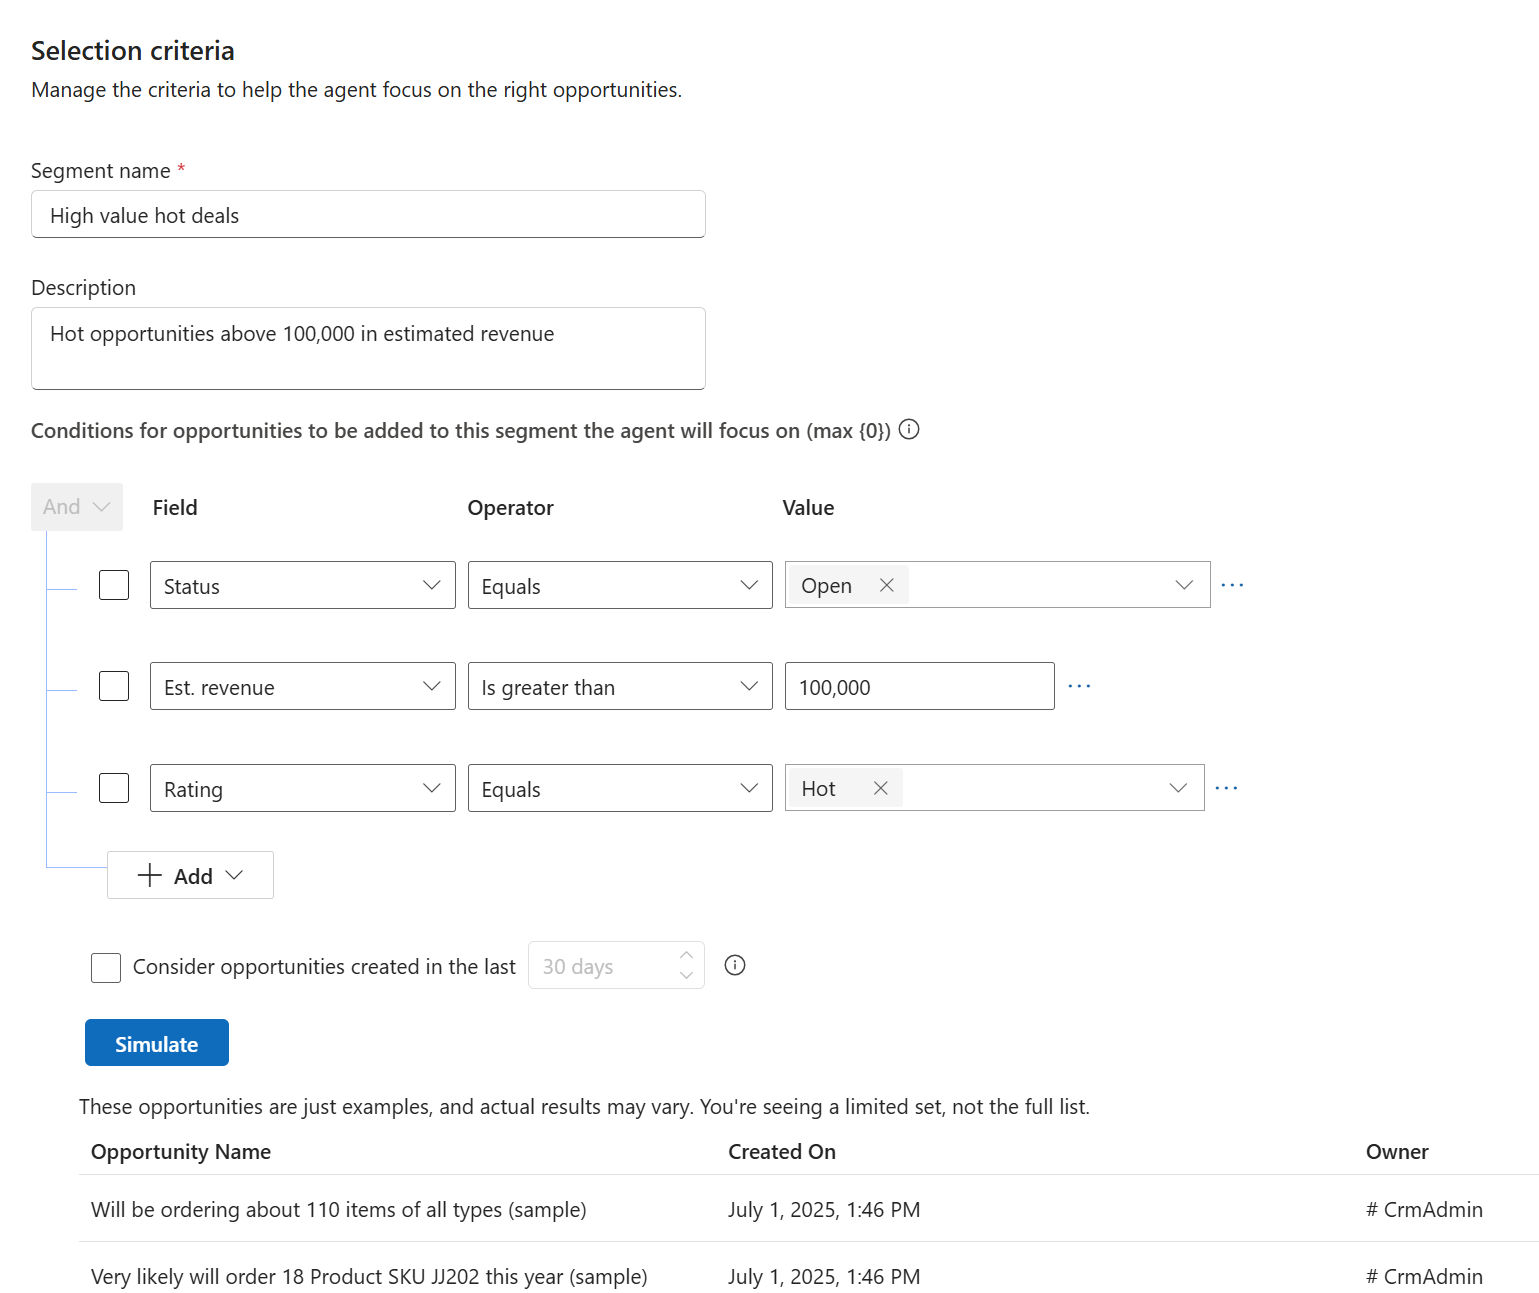
In the Selection criteria tab, specify the following information:
Segment name: Enter a name for the segment that the agent will handle, such as Microsoft 365 Opportunities. The agent doesn't use the segmentation feature in Dynamics 365 Sales. The segment name is only used to identify the opportunities that the agent will handle.
Description: Enter a description for the segment, such as Opportunities related to Microsoft 365 products.
Filter conditions: Define the filter conditions for the segment. Opportunities that are open and match these conditions will be handled by the agent. For example, to handle only the opportunities that are Hot and of high value, you can specify the following conditions:
- Rating equals Hot.
- Est. revenue greater than or equal to $100,000.
- Status equals Open.
By default, the agent only considers new opportunities created after the agent is turned on. If you want the agent to also research on opportunities created before it was enabled, select the Consider opportunities created in the last checkbox and specify the number of days for the look back period.
Select Simulate to view a set of opportunities that match the filter conditions. This isn't the full list, but it helps you verify that the agent is picking the right opportunities.
Configure refresh frequency
In the Refresh frequency tab, specify how frequently you want the agent to refresh the research data for the opportunities. The frequency is set to Medium by default, which is ideal for most businesses. You can refresh the research data more or less often based on how quickly your market and competitive landscape change and the available Copilot Studio capacity.
- High: Data is refreshed every day. This option is ideal for businesses that always need the latest information, but it consumes more capacity.
- Medium: Data is refreshed every three days. This option is suitable for businesses that need regular updates but don't require daily insights. It balances performance and data accuracy.
- Low: Data is refreshed every seven days. This option consumes the least capacity and is suitable for businesses that don't need frequent updates and want to save capacity.
Configure fields for importance and risk assessment
In the Opportunity assessment tab, specify the fields that the agent should use as a factor to assess the importance and risk of the opportunities. The agent also uses many other factors to calculate the importance and risk of the opportunities.
- Monetary value: Select the field that represents the monetary value of the opportunity, such as Est. revenue. This field determines the importance of the opportunity.
- Estimated close date: Select the field that represents the estimated close date of the opportunity, such as Est. close date. This field helps the agent assess the urgency of the opportunity and identify potential risks.
Configure knowledge for generating account insights
By default, the agent generates research insights for your accounts from public web sources. However, you can configure more knowledge sources, both from your internal knowledge base and external websites, to help the agent generate more relevant and reliable insights. Learn about the best practices for configuring knowledge sources.
In the Research insights section, go to Company insights > Knowledge sources for insight.
Note
If the Sales Qualification Agent and Opportunity Research Agent are in the same environment, they share the same knowledge sources for account insights. The knowledge sources that you add to or remove from one of the agents is reflected in the other agent as well. If you see knowledge sources already, it's possible that those are configured for the Sales Qualification Agent. Don't remove them unless you want to remove them from both the agents.
Select Add or Manage to add or manage knowledge sources for account insights. The D365 Sales Agent - Research agent's Knowledge page opens in Copilot Studio.
Add the knowledge sources that you refer to while researching accounts, such as specific websites, internal documents, or knowledge bases. The agent uses this information to provide account context and insights about the opportunities.
When you upload files from SharePoint in Copilot Studio, select the SharePoint option in the Featured section. The SharePoint option under the Upload file section isn't supported. Selecting this option blocks the agent from processing the leads. The following screenshot shows the correct option to select in Copilot Studio: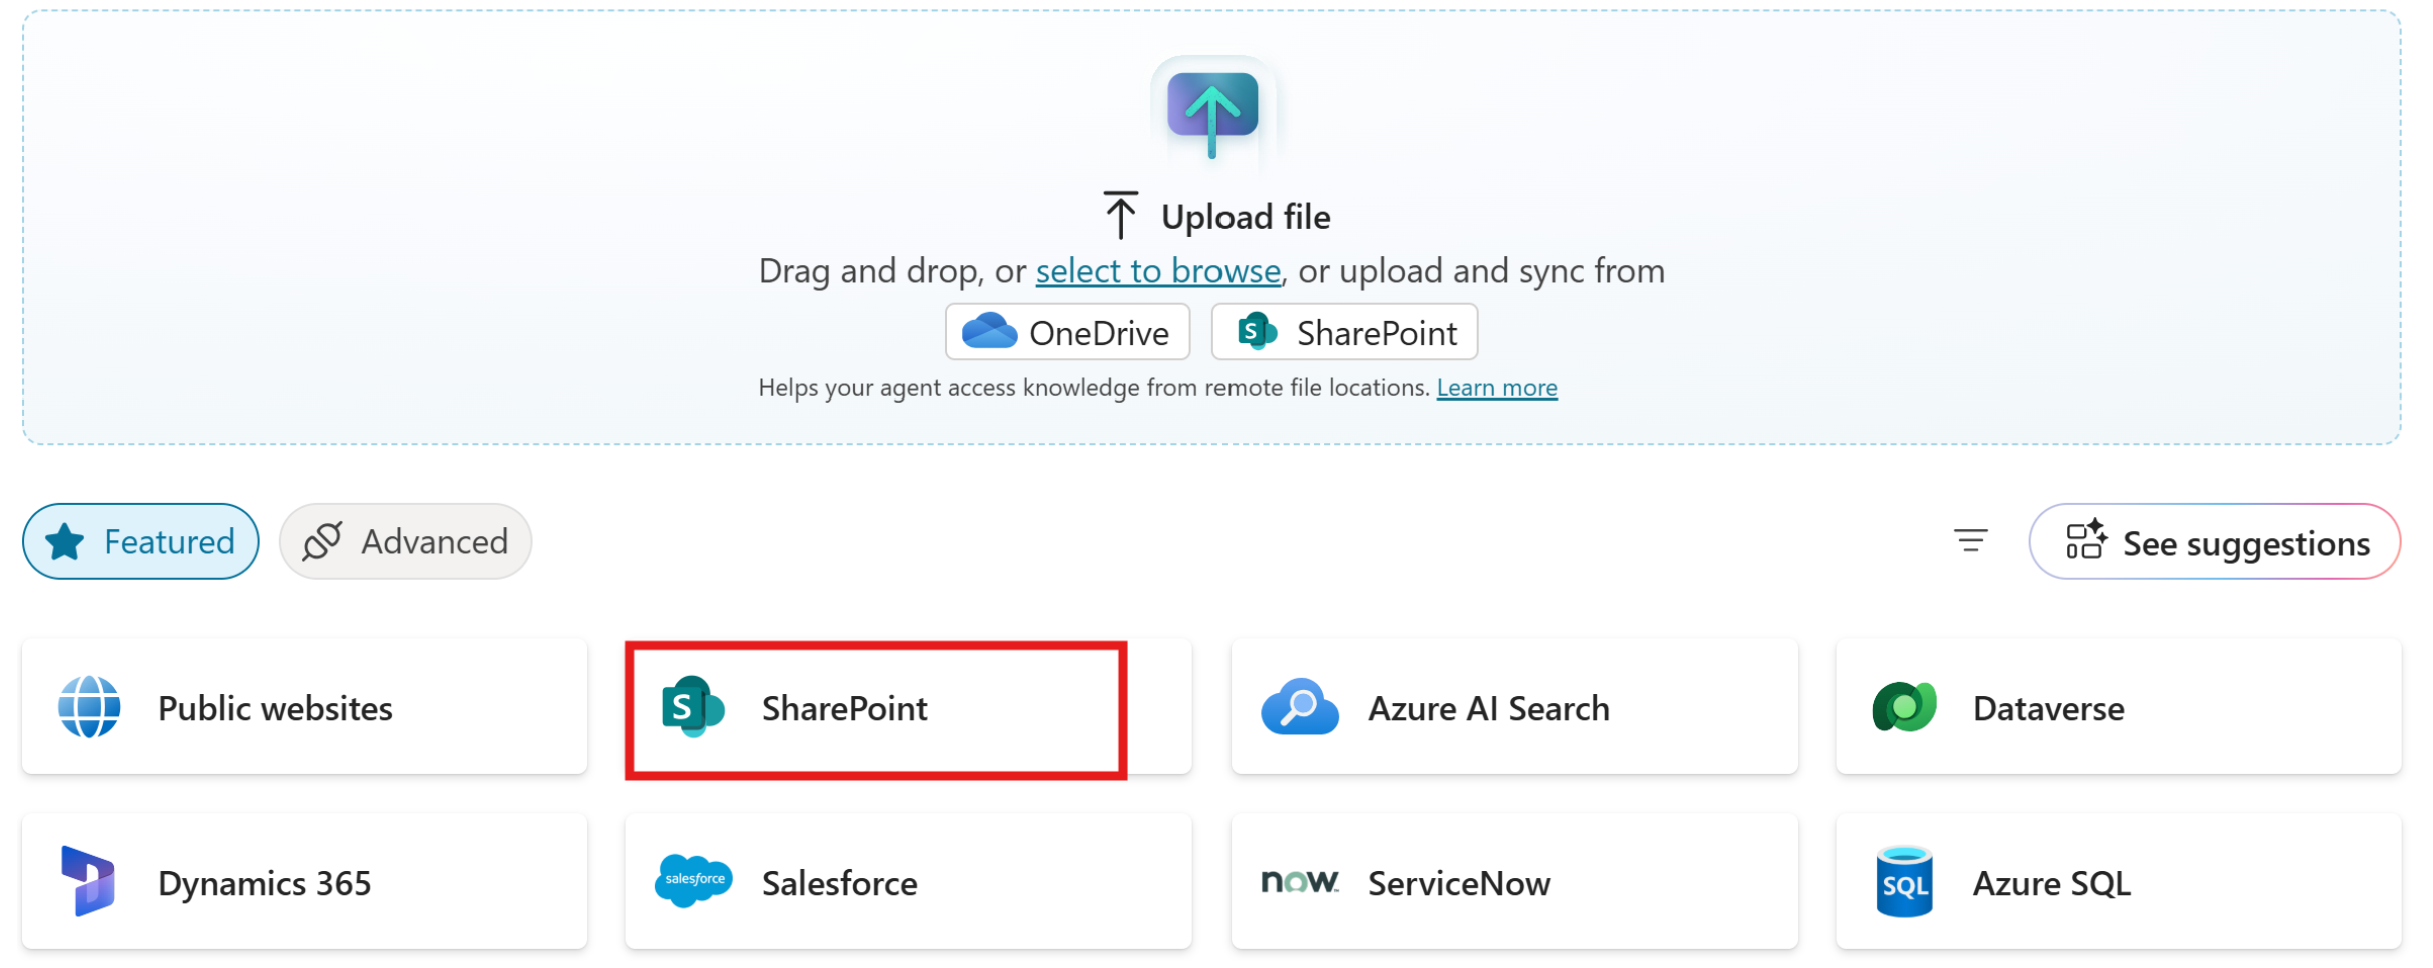
Learn more about the best practices for configuring knowledge sources.
After you add the knowledge sources in Copilot Studio, return to the Opportunity Research Agent settings page in Dynamics 365 Sales. At this point, you can test the agent's output based on the knowledge sources you added.
- Scroll up to the How this works section and copy the test snippet under Step 2.
- Open Copilot Studio and paste the json snippet in the Test your agent chat window of the D365 Sales Agent - Research agent.
- Modify the companyName and accountDomain values in the snippet to one of your accounts and select Send.
- Review the agent's response to ensure it's using the knowledge sources you added.
In Copilot Studio, select Publish to publish the changes to the Research agent.
Configure knowledge for generating competitor insights
By default, the agent generates research insights for your competitors from public web sources. However, you can configure additional knowledge sources such as battle cards, positioning briefs that show competitive advantages, and product comparisons. The agent uses this information to provide competitive intelligence and help sellers understand the competitive landscape. Learn more about the best practices for configuring knowledge sources.
Note
You can only upload slide decks or documents as knowledge sources for competitor insights.
In the Research insights section, go to Competitor insights.
Under Key competitors, select + Competitor to add competitors for the product line that the agent will work on. The agent first looks for competitors in the opportunity and customer conversations and then uses the competitors that you specify here.
Select Add or Manage to add or remove knowledge sources for competitor insights. The D365 Sales Agent - Competitors agent's Knowledge page opens in Copilot Studio.
Select Add knowledge and then select Upload file.
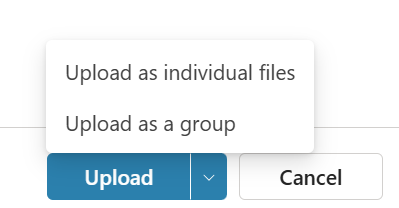
Select the documents. You can group similar documents into a group to help the agent understand the context better. For example, you can group all documents related to a specific competitor. Select Upload > Upload as a group to upload the documents as a group.
You can also group individual documents into a single group after uploading them. Select a document in the Knowledge page and select Create file group to create a group and add the document to it.
Best practices for configuring knowledge sources
Consider the following best practices while configuring knowledge sources for the Opportunity Research Agent:
- Keep descriptions specific. Adding descriptions such as “Dataverse table with Assets Under Management by client” is more helpful than just “Finance table”.
- Limit public sites. Too many broad domains dilute relevance; add the few that best match your industry.
- Review security. The agent will only present data that the signed-in seller is permitted to access.
- Monitor capacity. Large files and frequent refreshes consume AI credits; track usage in Power Platform admin center.
- With curated knowledge sources, the agent becomes a best researcher that understands your organization and surfaces the insights your sellers value most.
Step 5: Start or stop the agent
Start the agent only after you have configured all the settings and verified that they're correct. The agent will begin processing the opportunities that match the selection criteria right after you start it.
Select Start agent on the Opportunity Research Agent settings page. The agent is started and its status is set to On on the AI agents page. The agent starts processing the opportunities that match the selection criteria and generates research insights based on the configured knowledge sources. This process might take some time, depending on the number of opportunities and the complexity of the knowledge sources.