Note
Access to this page requires authorization. You can try signing in or changing directories.
Access to this page requires authorization. You can try changing directories.
Applies to: Dynamics 365 Field Service
Service reports play a critical role in summarizing the work completed by technicians, including tasks performed, parts used, and the customer's signature. You can streamline the experience in Dynamics 365 Field Service by implementing a customizable reporting solution. This article provides step-by-step guidance on how to install, customize, and deploy a customizable sample reporting solution using the Power Apps component framework (PCF). By following these instructions, administrators can enable technicians to generate professional service reports directly from the Field Service mobile or web app, even in offline scenarios.
This article shows you how you can implement a sample reporting solution with a custom control and apply relevant customizations so that service technicians can generate service reports that summarize their work in Dynamics 365 Field Service.
Service reports can contain details such as tasks completed, and products or parts used during the service. Technicians can capture their customer's signature on the report and then save it to the timeline of the relevant bookings. Technicians can also deliver the generated service reports to the customer as a PDF file. Technicians also have access to the report even without internet connectivity.
Service reports are available in the mobile app and web app. For a guided walkthrough, check out the following video.
Install the reporting solution
Note
If you installed an earlier version of the reporting solution, uninstall it before installing this new solution to avoid conflicts.
Import and try the sample reporting solution as-is in a sandbox environment
Download ReportingSolution_managed.zip.
Import the reporting solution into your environment. The import installs a reporting form, a command for the command bar, and includes a sample report. We recommend importing the solution as a managed solution.
Find the Field Service Mobile app module in your list of Dynamics 365 apps and select the ellipsis (…) > Open in App Designer.
In the navigation, select the Bookings form.
On the right side pane, select the ellipsis (…) for the Reporting form and select Add.
This step enables the Reporting form for the Bookable Resource Booking entity.
Select Save & Publish.
Test the sample reports.
If you like the sample solution, you can further customize the report to meet your specific business needs using the source code and templates that the package includes.
Customize the reporting solution before installation in a sandbox environment
Download the source code for the sample service report (PCF) from Dynamics-365-FastTrack-Implementation-Assets
Use your favorite IDE to edit the PCF control. Modify this control to change the layout, add branding, updated data, or other updates necessary to meet your reporting requirements.
Read the Extend the control section for more details.
After completing the modifications, run the
msbuild /t:build /restorecommand from the control's root folder.This step helps make sure that all necessary packages are downloaded and build the projects to generate both unmanaged and managed solutions for import under the \solutions\FieldServiceReporting\Solution\bin\Debug directory.
Import the reporting solution into your development environment.
Open your app module in App Designer, and then enable the Reporting form for the Bookable Resource Booking entity.
Test and follow your organization's application lifecycle management practices to import the solution to a non-development environment.
Extend the control
This solution uses the Power Apps component framework (PCF) control. Install the following components:
-
Choose the Add to PATH option.
-
Tip
Use the Visual Studio Code extension.
Learn more about how to create and deploy code components using Microsoft Power Platform CLI at Create and build a code component - Power Apps.
Basic code customizations
The first step is to change the name of the PCF control by changing the name from ReportPreview to anything else in these files:
ControlManifest.Input.xmlindex.tscss/viewer.css
To change the report visuals, you probably just have to modify these two files:
ReportPreview/SampleReport.tsxReportPreview/styles.ts
SampleReport.tsx contains the code that renders the report view. It's what shows on the reporting form and gets converted to a PDF when the use saves the report.
You can add CSS to the report PDF by modifying styles.ts. If you want to change how the report is rendered in the app/browser without affecting the final PDF that is generated, you can make CSS changes to ReportPreview/viewer.css.
To view your changes locally, run npm install and npm start in the PCF control's root folder.
To build the control and deploy it into an org, increment the version number in ControlManifest.Input.xml, build, and import the control.
Add data from other entities to the report
You can also fetch any other data you want and add it to the report. Whatever entities you want to use must also be enabled for offline.
The general steps for adding custom data to the report:
- Define your new data type (
ReportPreview/models/ReportViewerModel.ts) - Add custom query to fetch data (
ReportPreview/DataProviders/GetReportData.ts) - Pass the data to the report (
index.ts) - Display and style the data on the report (
ReportPreview/SampleReport/SampleReport.tsx)
For example, to add data from the Account entity, start by defining your data type in ReportPreview/models/ReportViewerModel.ts:
export class Account {
    name: string;
    email: string;
    phone: string;
    // add any other fields you would like to include
}
Extend the report properties by adding an entry to ReportViewerProps:
export interface ReportViewerProps {
    account: Account;  <--- (add your new data type here)
    booking: Booking;
    serviceInfo: ServiceInfo;
    ...
}
Now, you can add a query in the GetReportData.ts file to fetch this data. There are many examples already there to refer to. There's also tons of documentation on Microsoft Learn on fetching data using the web API
Skip this step to preview how the report looks.
Now, pass the data to the report by calling your query in index.ts:
public getDataFetchPromises(): Promise<any>[] {
        let dataGetter = new GetReportData(this._context);

        const updateAccountData = dataGetter.getAccountData().then(
            (account) => {
                this.props.account = account;                               <--- Trigger the data fetch
                this.renderReportViewer(this.props);
            }
        );

        const updateBookingData = dataGetter.getBookingData().then(
            (booking) => {
                this.props.booking = booking;
                this.renderReportViewer(this.props);
            }
        );
        return [updateAccountData, updateBookingData ... ]
}
Add a default value for the account to the props:
this.props = {
    account: undefined,
    booking: undefined,
    products: [],
    ...
}
Now the data should be available in SampleReport.tsx for you to display. You can display it in any way you see fit, but can also use some of the helper functions available:
<FieldInfo name="Account name" value={account?.name}></FieldInfo>
Run npm start to see how the report looks or build and import it into your org. There are comments throughout the files with instructions so that you can do even more, such as download and use more font types, add images, and so on.
Note
The report is available offline if the data it uses is included in your offline profile. If the report is pulling data from the typical work order, the offline profile is already set up. If you're pulling other entities, make sure that they're included in your offline profile so they can be downloaded to the device and available for the report.
Add custom font
In some cases, you need a custom font for the PDF file, or to handle special characters for certain languages. We can do that by adding a custom font for jsPDF.
Edit the ReportPreview\helpers\pdfPrinter.js file.
        //Use an online tool to create a base64 content of a custom font file
        const customFont = 'BASE64 CONTENT';

        // Adding a custom font
        pdf.addFileToVFS("customFont.ttf", customFont);
        pdf.addFont("customFont.ttf", "customFontName", "normal");
        pdf.setFont("customFontName", "normal");

        // Note: 'customFontName' should match the font used on the generated HTML report (see reportPreview/styles.ts)
Navigate to timeline
After a report is saved, the app generates a notification that will navigate users to the timeline tab. The app navigates the user to the tab named fstab_Timeline. You can change this navigation by modifying common/Constants.ts in the PCF control or renaming the tab in the organization's customizations.
Enable technicians to generate service reports
When you're ready, integrate the customized reporting solution into your production environment for use in Dynamics 365 Field Service as a custom Power Apps component framework control. Follow the same steps as for importing the solution to your sandbox environment.
Generate service reports
Technicians can create service reports in both the mobile app and the web app.
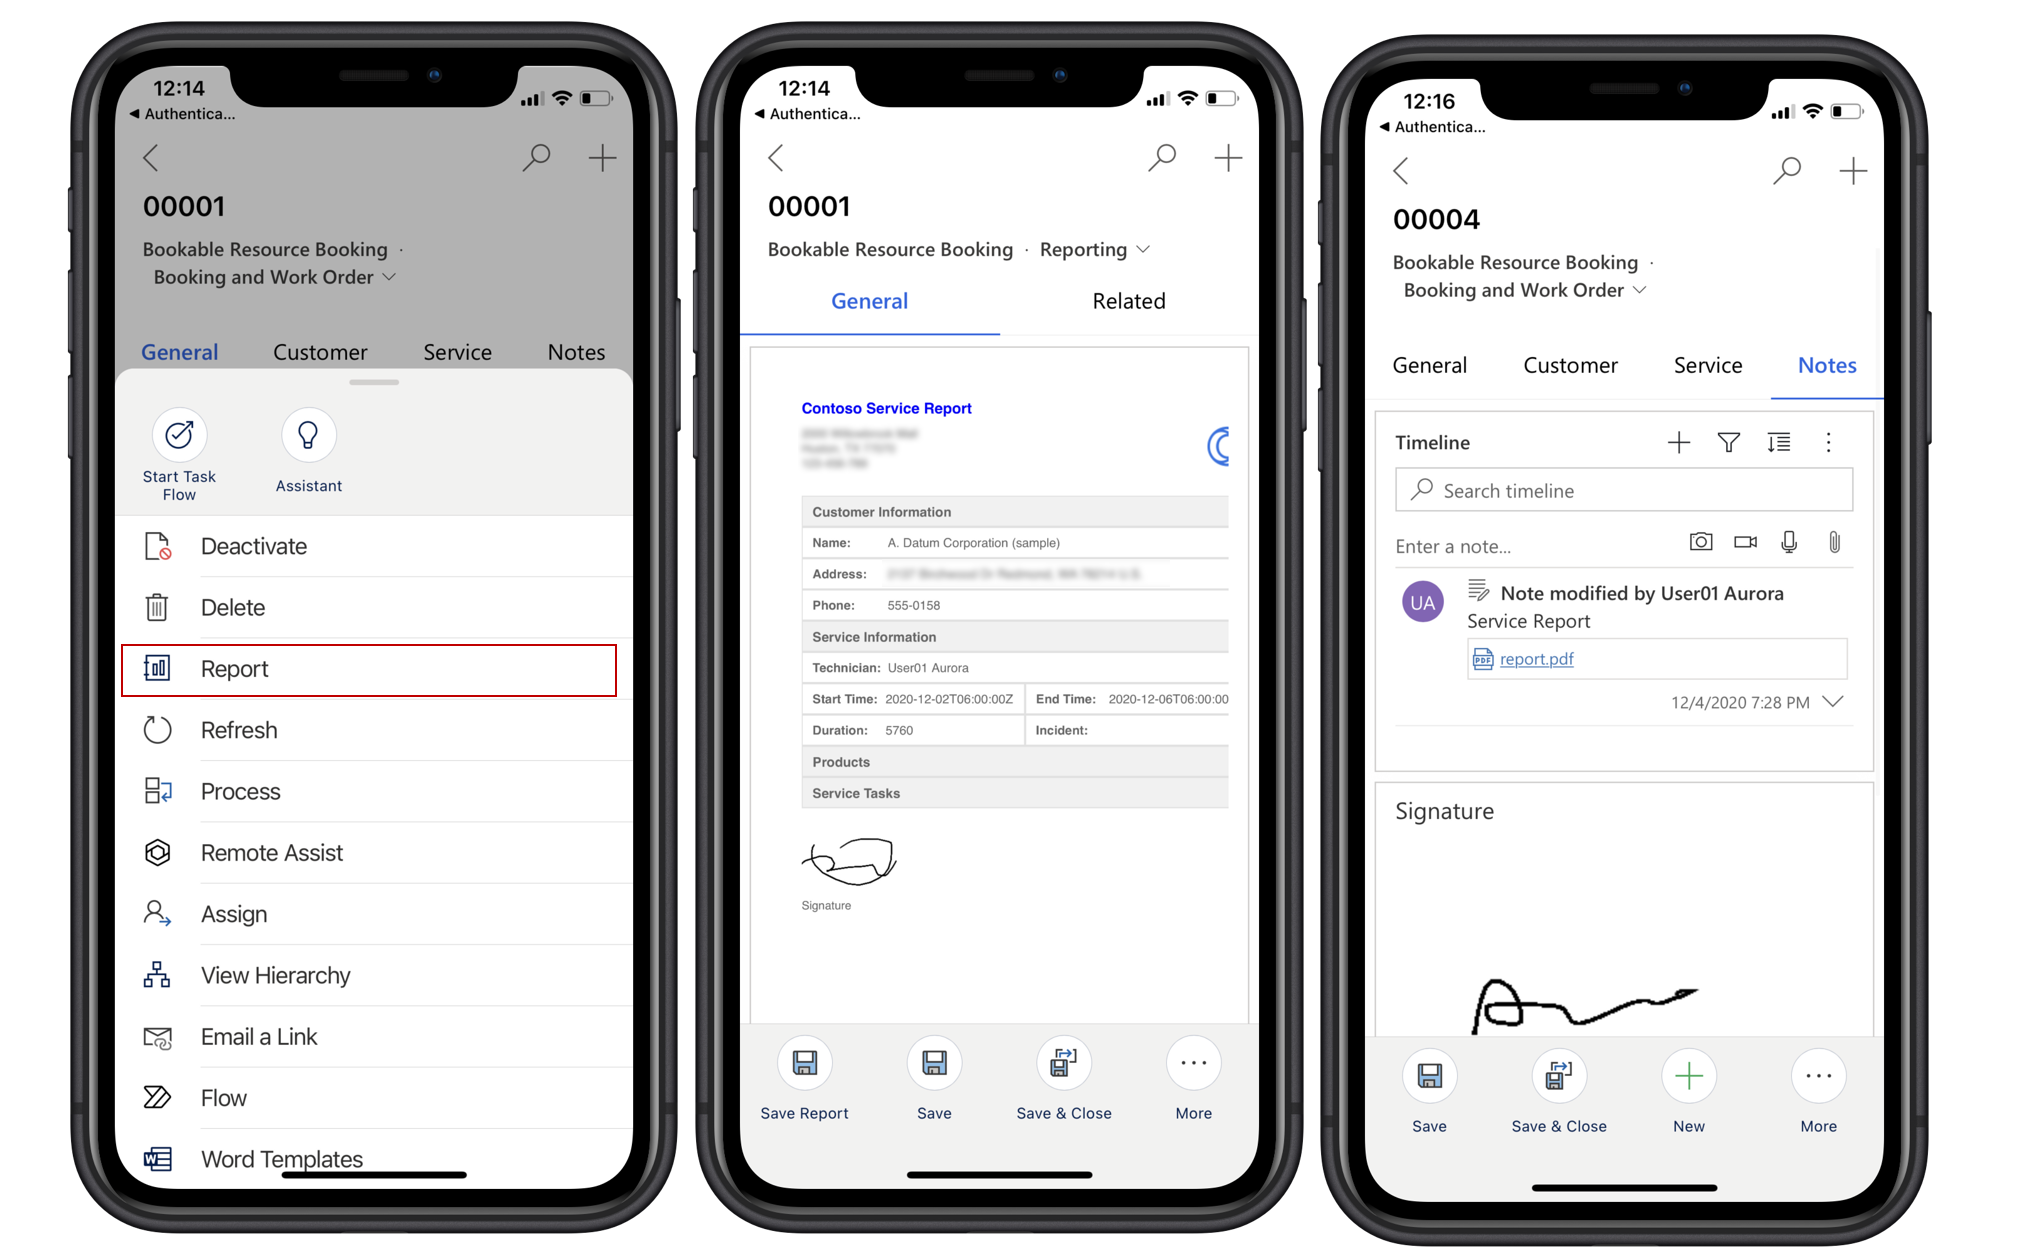
In the Field Service mobile app
Open a booking in the Field Service mobile app.
Go to More > Report.
Capture a signature if necessary and select Confirm.
To save the report, select More > Save to Timeline.
In the web app
Administrators and dispatchers can also generate reports when viewing a booking in the Field Service web application.
Open a booking in the Field Service web app.
In the command bar, select Report.
To save the report, select Save to Timeline in the command bar.
Note
At this point, the reporting solution, including the sample report and the code is provided as-is, and it's considered a custom control by Microsoft. Microsoft doesn't provide support for it.