Note
Access to this page requires authorization. You can try signing in or changing directories.
Access to this page requires authorization. You can try changing directories.
Important
This section explains the old domain authentication for outbound marketing. For an updated version based on Customer Insights - Journeys, see Authenticate your domains (new version).
Domain authentication is important for two reasons:
- For marketing email messages, domain authentication enables recipient email servers to confirm that the from-address shown on each of your messages belongs to your organization. Authentication also confirms that your organization approves Dynamics 365 Customer Insights - Journeys to send messages on its behalf. Messages that fail this test are increasingly likely to get filtered away as spam, which can dramatically impact your deliverability.
- For externally hosted forms, domain authentication confirms that you own the domain, establishing an enhanced trust relationship with your domain. The enhanced trust relationship enables embedded marketing forms to be prefilled with data for known contacts.
The primary purpose of email-domain authentication is to detect forged messages and domains, and thereby prevent spam, phishing, and other fraudulent activity. A method called DomainKeys Identified Mail (DKIM) helps make these authentications possible. Domain authentication is implemented through the internet DNS system, and is based on public/private key encryption and signatures.
When you error check or go live with a marketing email message, the verification system requires that the message uses a from-address that specifies an authenticated domain that's registered and confirmed for your organization. You get a warning if you try to send a message that has a from-address from an unregistered domain. You get an error if you try to send a message that uses a from-address from a domain that belongs to another organization. You can ignore the warning (but your deliverability is probably low), but you can't go live with the error.
To learn more about email marketing and deliverability, see Best practices for email marketing. To learn more about embedded forms and pre-filling, see Integrate with landing pages on external websites.
Note
When you install Customer Insights - Journeys features, the installation includes a wizard to authenticate domains for both Customer Insights - Journeys and outbound marketing. To learn how to use the Customer Insights - Journeys domain authentication wizard, see the Customer Insights - Journeys domain authentication article. If you don't install real-time marketing, follow the setup described in this article to authenticate domains for use in outbound marketing features.
The default authenticated domain
By default, all new Customer Insights - Journeys installations come with a preauthenticated sending domain that ends in -dyn365mktg.com. With the preauthenticated domain, you can begin sending authenticated emails right away. This domain is designed only for testing or demo purposes as it doesn't have an email reputation and isn't connected to your organization. We recommend that you authenticate your own actual sending domains right away so your authenticated messages show a from address that recipients recognize as coming from your organization. When you authenticate your own domain, you can manage your sending reputation and improve brand recognition and deliverability results.
When a user creates a new email, the From address is automatically set to the email address registered for that user's Customer Insights - Journeys user account. However, if that email address uses a domain that isn't yet authenticated with DKIM, the initial From address is modified to use an authenticated domain (email addresses use the form account-name*@*domain-name). The resulting From address still shows the account-name of the user creating the message, but now shows a DKIM-authenticated domain-name that's registered for your Customer Insights - Journeys instance (for example, MyName@contoso-dyn365mktg.com). This change provides the deliverability benefit, but the address probably isn't a valid return address. Users can overrule this by editing the From address after creating the message, but this change lowers message deliverability.
Which domains to authenticate
Set up as many authenticated domains as you need to cover all the from-addresses you use in your marketing emails, plus all domains and subdomains where you want to support embedded forms with pre-fill enabled.
- When you're authenticating a domain for email, use the full domain name as it appears in your email return addresses. Email addresses take the form <MailAccount>@<domain>, so if your email address is
lamar.ferrari@contoso.com, then the domain you need to authenticate iscontoso.com(notwww.contoso.comor any other subdomain). - When you authenticate a domain to support pre-filled forms, you must authenticate each subdomain individually. So if you have forms on
contoso.com,www.contoso.com, andevents.contoso.com, set up a separate domain-authentication record for each of them and specify the full subdomain each time.
Important
To use form pre-filling, the page hosting the form must be served over HTTPS (not HTTP).
Note
All new instances and trials automatically authenticate their instance domain with DKIM and set that domain as the default sending domain for your instance. Therefore, you usually see at least one authenticated domain already set up for all new instances.
Authenticate a domain
To set up Customer Insights - Journeys and the DNS to authenticate marketing email messages and embedded forms for a given domain, follow these steps:
Go to Settings > Email marketing > Domain authentication. A list of existing authenticated domains opens.
Select New on the command bar to add a new domain.
A new authenticated domain record opens. Make the following settings:
- Domain name: Enter the name of the domain you want to authenticate. This domain must belong to your organization, and you must be able to access it through your DNS provider.
- Enable for email sending: Select this check box to authenticate email for this domain by using DKIM.
- Enable for forms hosting: Select this check box to authenticate marketing forms embedded on this domain for the purpose of supporting pre-fill for known contacts. This check box also enables page personalization on this domain.
Select Save from the command bar. Customer Insights - Journeys saves the new record and generates a set of authentication keys for your specified domain. The page reloads to show the new keys. The following keys are provided:
- Ownership authentication key: Proves that your organization owns the domain.
- Email authentication keys for DKIM: Prove that Customer Insights - Journeys is authorized to send messages that show your organization's domain name in the from-address.
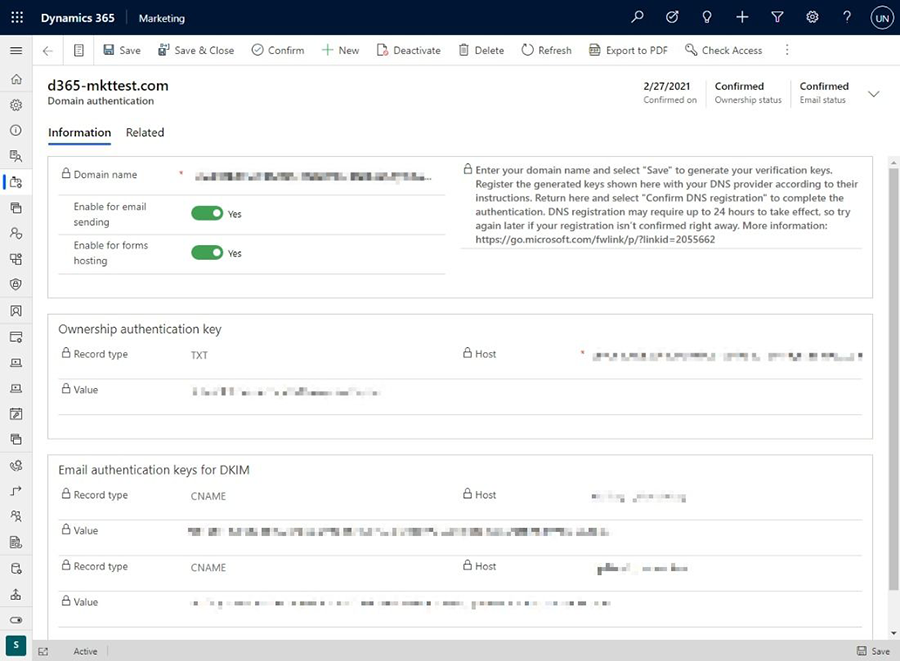
Contact your DNS provider and tell them you'd like to create some DNS records for domain authentication and DKIM. They'll typically provide you with an online form where you can create DNS records by submitting the Host and Value values for each authentication key generated by Customer Insights - Journeys, or they may instead ask you to send them these values in an email. The procedure varies by DNS provider, so be sure to follow their instructions.
Note
The "ownership authentication key" should be added to the root of your domain. The Host that you use can differ depending on your DNS provider. Some DNS providers require you to use the full domain name as a Host, while others (like AzureDNS and GoDaddy) require an @ sign.
When you finish setting up the DNS records with your provider, return to your authenticated-domain record in Customer Insights - Journeys and select Confirm DNS registration on the command bar. Customer Insights - Journeys checks to make sure the values are correctly set up and active in the DNS system. If you get a success message, then everything is working and you're done. DNS registration might require up to 24 hours to take effect, so try again later if your registration isn't confirmed right away.
Envelope-from domain
If you want to go further with the domain authentication process, you should look at Envelope-from domain feature. Every email has two From addresses. The first one (described in RFC5322) is the main From address, or, simply, the “friendly from” address. The second From address (RFC5321), is a so-called Envelope From address, or “Return-Path” address.
To ensure good deliverability, the domains that you use for sending should be aligned. Alignment of domains means that the SPF and DKIM domains match the From address, at least partially. For SPF alignment, the From and Envelope-from domains must match. For DKIM alignment, the d-parameter of the DKIM (DKIM domain) must align with the From domain.
To set up the Envelope-from feature for your domain, go to Settings > Email marketing > Domain authentications. Select +New, then on the New domain authentication form, enable the Enable custom Envelope-from domain option. The Envelope-from feature requires you to set up one additional DNS record for your domain.
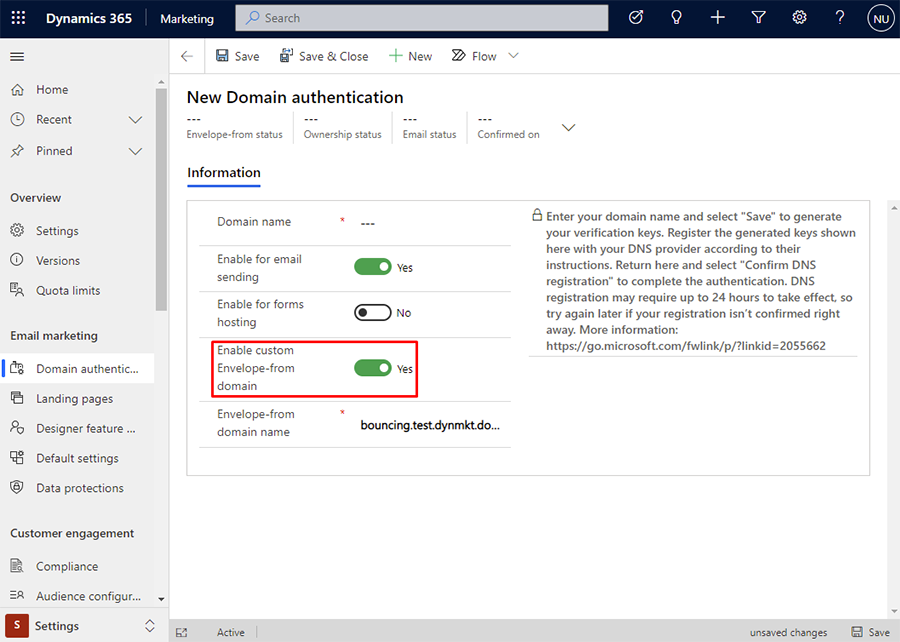
The Envelope-from domain name is generated automatically for the domain you enter during the domain authentication process when you enable the feature. If you want to customize the Envelope-from domain name, you must meet the following requirements:
- The Envelope-from field should not be empty.
- The Envelope-from domain should be a subdomain of a domain you have entered.
- The Envelope-from domain should start with “bouncing”.
- No dots are allowed in the subdomain name.
- Only plain letters and numbers are allowed (no symbols).
You will see an error message if one of the requirements is not met.
Examples of Envelope-from domains
Your domain is: test.dynmkt.com
- Default Envelope-from domain:
bouncing.test.dynmkt.com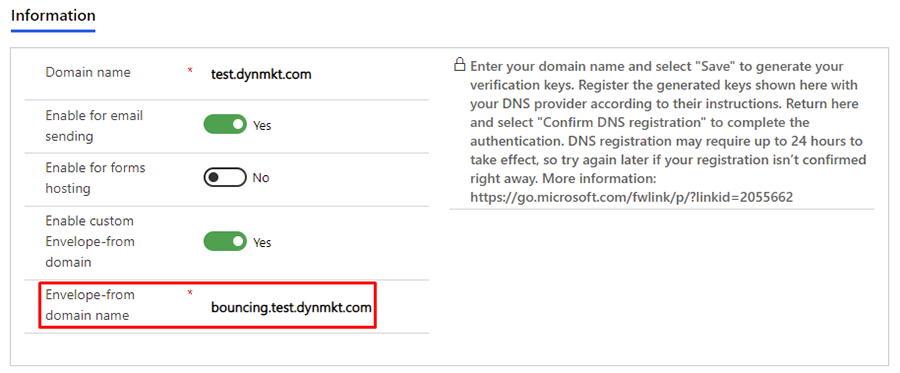
- Custom Envelope-from domain example:
bouncingcustom.test.dynmkt.com
The Envelope-from domain can't be one of the following domains:
bouncing.custom.test.dynmkt.com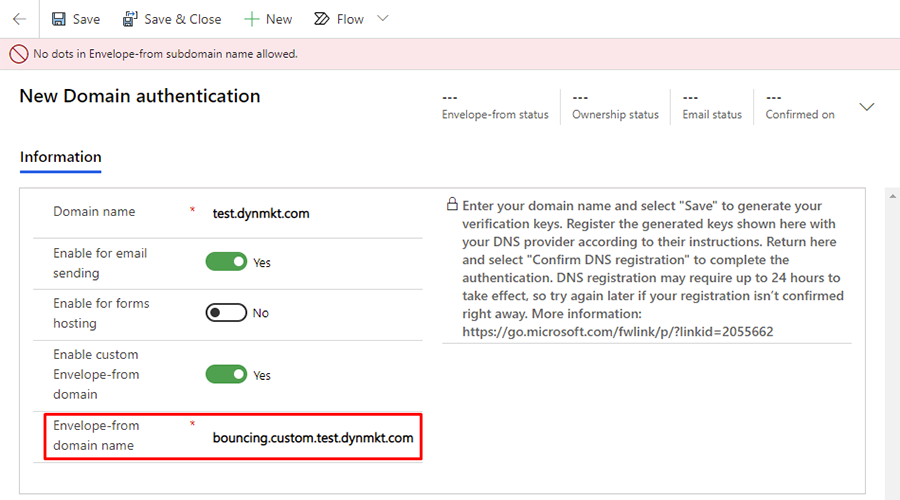
test.dynmkt.com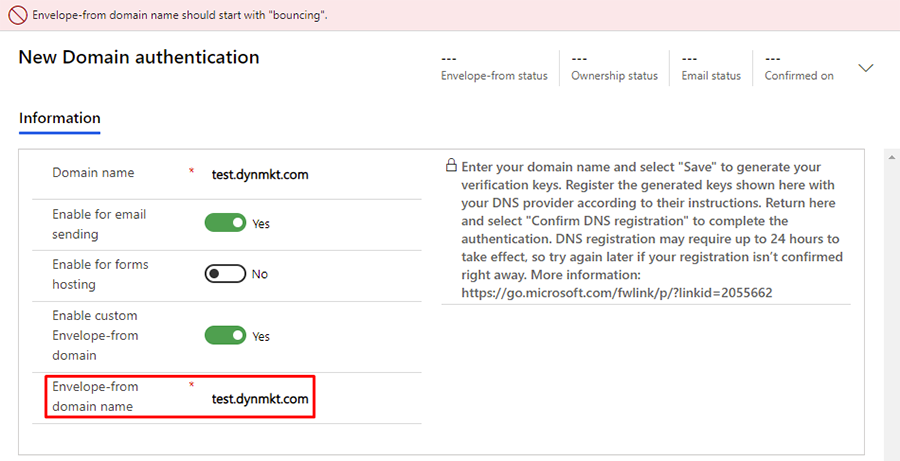
bouncing##.test.dynmkt.com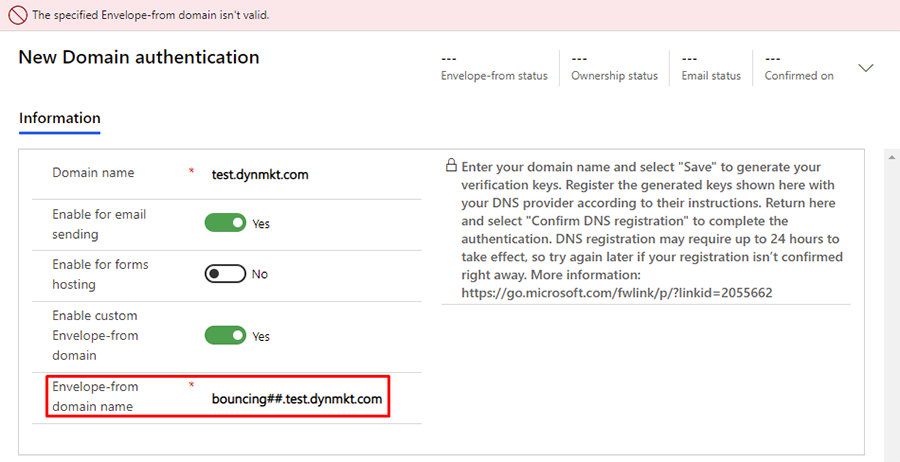
bouncing.test.notdynmkt.com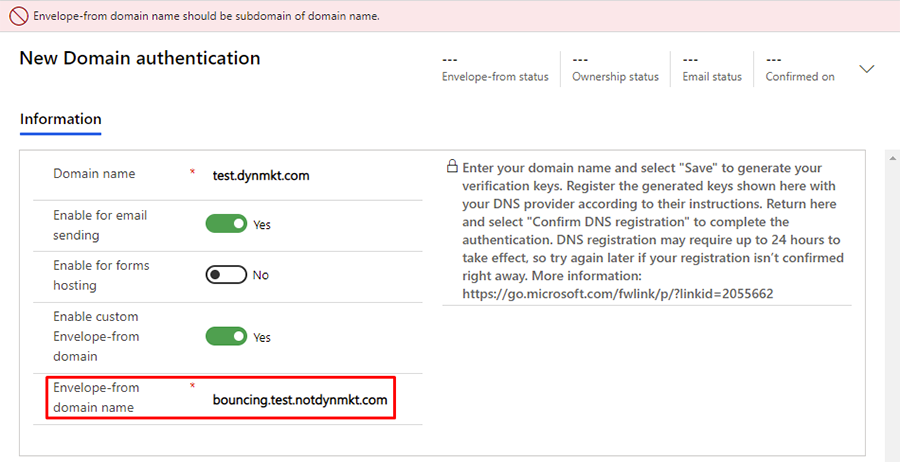
Create a CNAME record
After you enter the Envelope-from domain, select Save. The portal generates the appropriate DNS record values. You can find the record values in the Envelope-from key section.
Next, create another CNAME record to validate your Envelope-from domain. Contact your DNS provider and tell them you'd like to create another CNAME DNS record with the value taken from the Envelope-from key section.
After you create the DNS record, wait at least 30 minutes before proceeding to the final step. DNS servers need some time to populate newly created DNS records.
When the DNS record update completes, select Refresh and then Confirm. If you set up everything properly, the status of your domain in top right corner changes to Confirmed, as shown in the following image.

After your domain’s Envelope-from status is confirmed, your Envelope-from sending domain adheres to your Envelope-from settings every time you use the specified From domain when sending emails in Customer Insights - Journeys.
Note
If you use another domain that doesn't have an Envelope-from domain set, Customer Insights - Journeys uses the default Envelope-from domain provided by the system.
Example DNS records for domain contoso.com
This example is valid if you're adding DNS records into the root domain contoso.com.
TXT record
TXT name: @
TXT value: d365mktkey=abc123abc123abc123abc123
CNAME record 1
Host name or Alias: eurkey1._domainkey
Points to address: eurkey1contosocom.marketing.dynamics.com
CNAME record 2
Host name or Alias: eurkey2._domainkey
Points to address: eurkey2contosocom.marketing.dynamics.com
CNAME record 3 (Envelope-from)
Host name or Alias: bouncing
Points to address: nam.pb-dynmktg.com
Example DNS records for subdomain promo.contoso.com
TXT record
TXT name: promo
TXT value: d365mktkey=abc234abc234abc234abc234
CNAME record 1
Host name or Alias: eurkey1._domainkey.promo
Points to address: eurkey1promocontosocom.marketing.dynamics.com
CNAME record 2
Host name or Alias: eurkey2._domainkey.promo
Points to address: eurkey2promocontosocom.marketing.dynamics.com
CNAME record 3 (Envelope-from)
Host name or Alias: bouncingpromo
Points to address: nam.pb-dynmktg.com
DNS confirmation statuses
As you set up an authenticated domain, you can track the progress of all its statuses: Envelope-from status, Ownership status, and Email status. Each status reports as one of the following values:
| Status | Description |
|---|---|
| Waiting to confirm | The system generates the keys and waits for you to register them with your DNS provider. Return here to confirm the keys by selecting Confirm DNS registration on the command bar. |
| Confirmed | The authentication keys are registered with DNS and confirmed in Customer Insights - Journeys. This domain is ready to use. |
| Canceled | The registration is canceled. |
| Not requested | You didn't request this type of authentication. |
| Confirming DNS registration | Customer Insights - Journeys is working to confirm the registration with DNS. |
| Keys not found on DNS | Customer Insights - Journeys successfully checked for the keys in the DNS system, but didn't find them. This status might mean that your key registrations are still being implemented by the DNS (allow up to 24 hours). It could also mean that you didn't register the keys or that something went wrong while entering them. You can check again by selecting Confirm DNS registration on the command bar. If problems persist after 24 hours, contact Microsoft Support and your DNS provider for assistance. |
| Internal error (record not found) | An internal error occurred while confirming the DNS registration. Contact Microsoft Support for assistance. |
| Internal error (query failed) | An internal error occurred while confirming the DNS registration. Contact Microsoft Support for assistance. |
| Internal error | An internal error occurred while confirming the DNS registration. Contact Microsoft Support for assistance. |
Prevent sending emails from unauthorized domains
To benefit from DKIM, the from-address for each message you send must show a domain that you authenticated for DKIM. Microsoft is dedicated to helping customers achieve maximum email deliverability, so we added a few features to help make sure you don't overlook or inadvertently work around your DKIM setup:
- The error check for email messages shows a warning if you try to go live with an email message that has a from-address not associated with any of your DKIM domains.
- We recommend that you set a default sending domain that is authenticated for DKIM. When you set this domain, the from-address for all of your email messages automatically adjusts to show your selected default domain (if it initially uses a non-authenticated domain) each time you create a new email message or change the user shown in the From field. For more information, see Default marketing settings and Set sender and receiver options.
- All new instances and trials automatically authenticate the instance domain with DKIM and set that domain as the default sending domain for your instance.