Note
Access to this page requires authorization. You can try signing in or changing directories.
Access to this page requires authorization. You can try changing directories.
Managing workspaces effectively ensures that teams and groups have the right access to specific capabilities such as capacity, plugins, or promptbooks.
As someone with an authorized role, you can create new workspaces, configure them by assigning access and permissions, and fine-tune settings such as owner roles and plugin configurations.
Once a workspace is set up, you can continue optimizing it by assigning or switching capacities and monitoring usage.
Before you begin
Only those with an owner role (and supported roles) can manage workspaces.
You need to be security admin or have one of the following roles to create workspaces for your organization:
- Billing Admin
- Intune Administrator
- Purview Compliance Administrator
- Microsoft Entra Compliance Administrator
- Purview organization management
- Purview Data Governance Administrator
The admins need to also be an Azure subscription owner to attach a capacity to the workspace. A workspace is powered by a capacity resource (SCUs).
Important
Microsoft recommends that you use roles with the fewest permissions. Using lower permissioned accounts helps improve security for your organization. Global Administrator is a highly privileged role that should be limited to emergency scenarios when you can't use an existing role.
Permissions needed for multi-workspaces operations
| Action | Minimum Permissions Required |
|---|---|
| Creating or duplicating a workspace | Global/Security admin |
| Setting or switching workspace capacity reference | Global/Security admin, Workspace owner, and Capacity write |
| Switching workspaces | Security operator, Contributor |
| Accessing Manage Workspaces page | Global/Security admin, Workspace owner |
| Configuring workspace-scoped plugin and file settings | Global/Security admin, Workspace owner |
| Configuring workspace-scoped product/model toggles | Global/Security admin, Workspace owner |
| Adding / removing workspace-scoped members | Global/Security admin, Workspace owner |
| Creating a capacity | Global/Security admin, Workspace owner, and Capacity write |
| Setting Microsoft products preferred workspace for agents | Global/Security Admin, Microsoft Intune Administrator, or Workspace Owner |
Create a workspace
If you have provisioned Security Copilot prior to the availability of this feature, an initial workspace was created for you in the background.
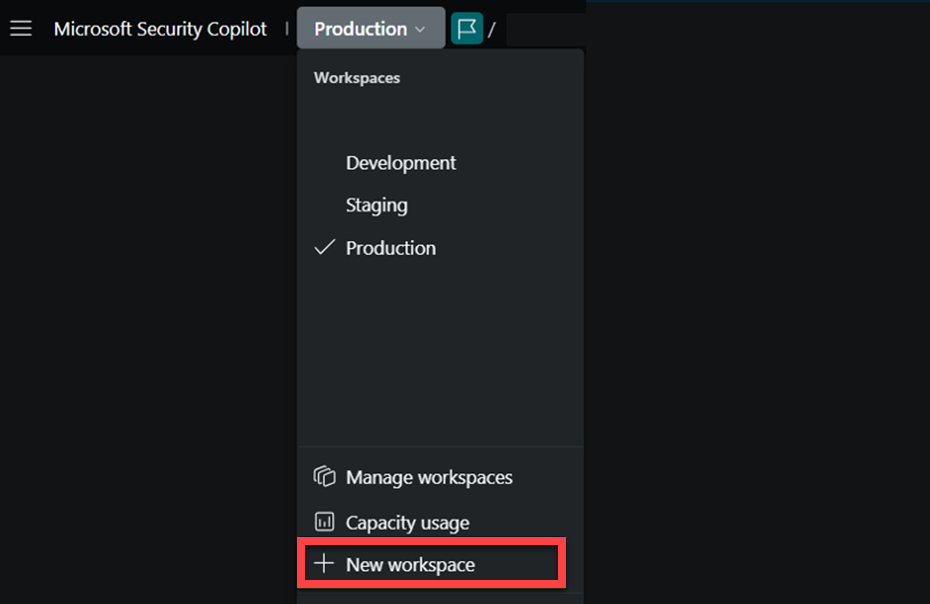
There are several entry points for you to create a new workspace:
From the breadcrumb of the portal
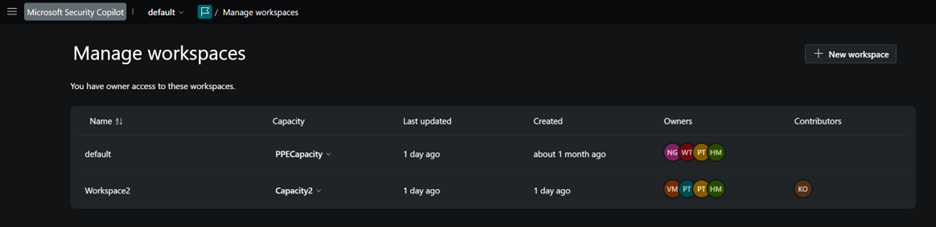
From the Manage workspaces section of the Owner settings page
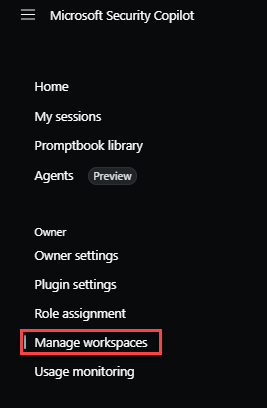
From any of the entry points, select New workspace.
Set up the workspace:
Specify a name for the workspace (this must be a unique name within the tenant), create or select an existing capacity, select the data storage location, and define your data sharing preferences. These choices are all specific to this workspace and can be different from your initial setup selections.Note
Capacity resources can only be used in one workspace at a time, so it's likely you need to create a new capacity.
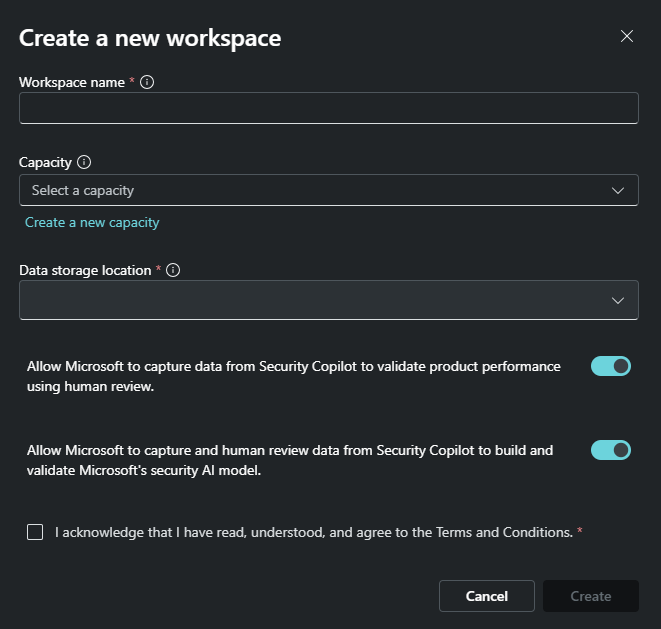
Confirm that you acknowledge and agree to the terms and conditions, then select Create.
Configure a workspace
Each workspace can be configured with unique settings and permissions, allowing you to tailor the environment to meet the specific needs of your team. This includes assigning roles, managing access, deploying agents, and setting up plugins and promptbooks that are relevant to the workspace.
Owners will be able to configure settings for the workspace once it is created.
Note
Currently, multi-workspaces provides limited support for agents.
Assign a workspace for agents
As an administrator, if you choose to use multiple workspaces, you can select which workspace to use for each of the integrated Microsoft Security Copilot agents. This will define which workspace the agent traffic goes to.
Warning
If you choose to switch the assigned workspace for Microsoft Security Copilot agents, you need to turn off any scheduled or automatic agent triggers before switching the preferred workspace. Set up the agents again in the new workspace to continue using them. New agents you set up won’t have access to previous workspace-specific data such as feedback or memories.
Required role
You need to be an Azure Owner for the capacity resource to associate capacity to Security Copilot.
Important
Microsoft recommends that you use roles with the fewest permissions. Using lower permissioned accounts helps improve security for your organization. Global Administrator is a highly privileged role that should be limited to emergency scenarios when you can't use an existing role.
Other supported roles include:
- Billing Admin
- Intune Administrator
- Purview Compliance Administrator
- Microsoft Entra Compliance Administrator
- Purview organization management
- Purview Data Governance Administrator
This configuration is a global setting for each tenant in your organization. Interactions from embedded experiences are routed to the default workspace (which is the oldest workspace). Admins will need to ensure that the appropriate users are assigned access to the selected workspace or they will encounter an error when trying to do work from the embedded experiences or the standalone portal.
If an administrator doesn't assign a workspace for the integrated Microsoft Security Copilot agents, Security Copilot will continue to route all traffic to the assigned default workspace for the tenant.
Take the following steps to assign a workspace to Microsoft Security Copilot agents:
Sign in to Security Copilot (https://securitycopilot.microsoft.com).
Select the home menu icon.
Navigate to the Owner settings > Workspaces for Microsoft Security Copilot agents.
For each product, designate the workspace where all agent traffic will be routed to.
Assign access and permissions
Assigning a user, group, Entra ID role, or managed identity to an Owner or Contributor role will now apply specifically to the workspace that is being configured.
Note
When a user is added as an owner or contributor to a workspace, it may take up to 5 minutes for the new workspace to appear in their workspace list.
Owner settings
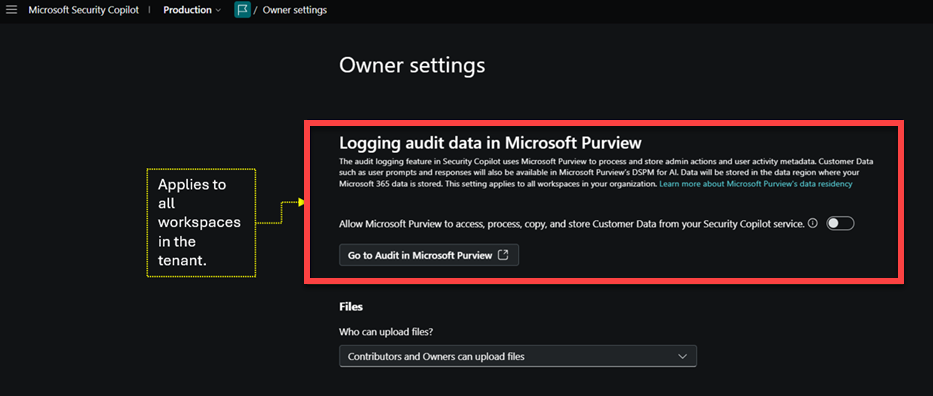
Decisions and configurations within owner settings will now apply specifically to the workspace that is being configured, with one exception: Audit Logging enablement can only be changed by Security Admins and applies to all workspaces.
Plugin settings
Decisions about plugin permissions will now apply specifically to the workspace you are configuring.
Working with workspaces
Owners will be able to view, navigate between and manage capacity allocations.
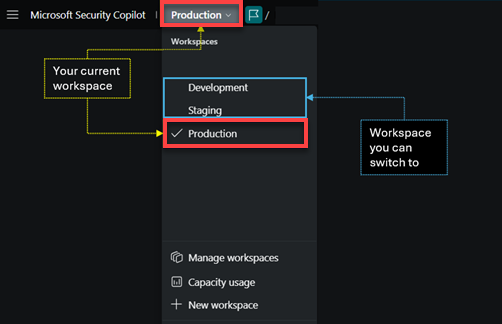
Navigate between workspaces
Owners and contributors who are part of multiple workspaces can use the workspace switcher from the breadcrumb. The workspace name shown in the breadcrumb is your current workspace.
Assign and switch capacities
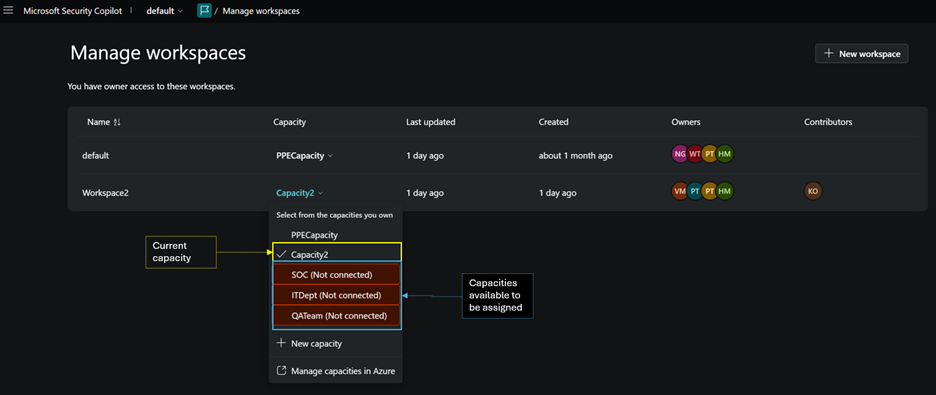
Workspace Owners can assign available capacity resources or switch which capacities are assigned specific workspaces from the Manage Workspaces page.
Note
Owners will need to also be an Azure Contributor for the capacity resource to be able to assign it to a workspace.
Monitor usage
Owners can access the usage monitoring dashboard through the breadcrumb.
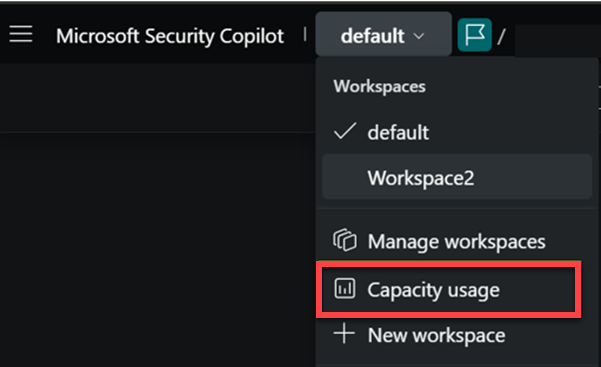
For more information, see Manage usage of security compute units.