Note
Access to this page requires authorization. You can try signing in or changing directories.
Access to this page requires authorization. You can try changing directories.
This section walks you through setting up People Skills for the first time in your organization. After initial setup is complete, admins can edit their skill library or share settings using the steps in the Manage your skills library page.
Here is a video walkthrough of the People Skills setup and various admin options available:
Admin roles required for setup
The following roles have permission to set up People Skills:
- AI administrator
- Knowledge administrator
For more information, see assigning roles.
Quick setup with out-of-the-box skill library
Most organizations can quickly set up skills using our out-of-the-box People Skills library of over 16,000+ skills. If you prefer to curate your own library by importing custom skills, refer to the next section Advanced setup.
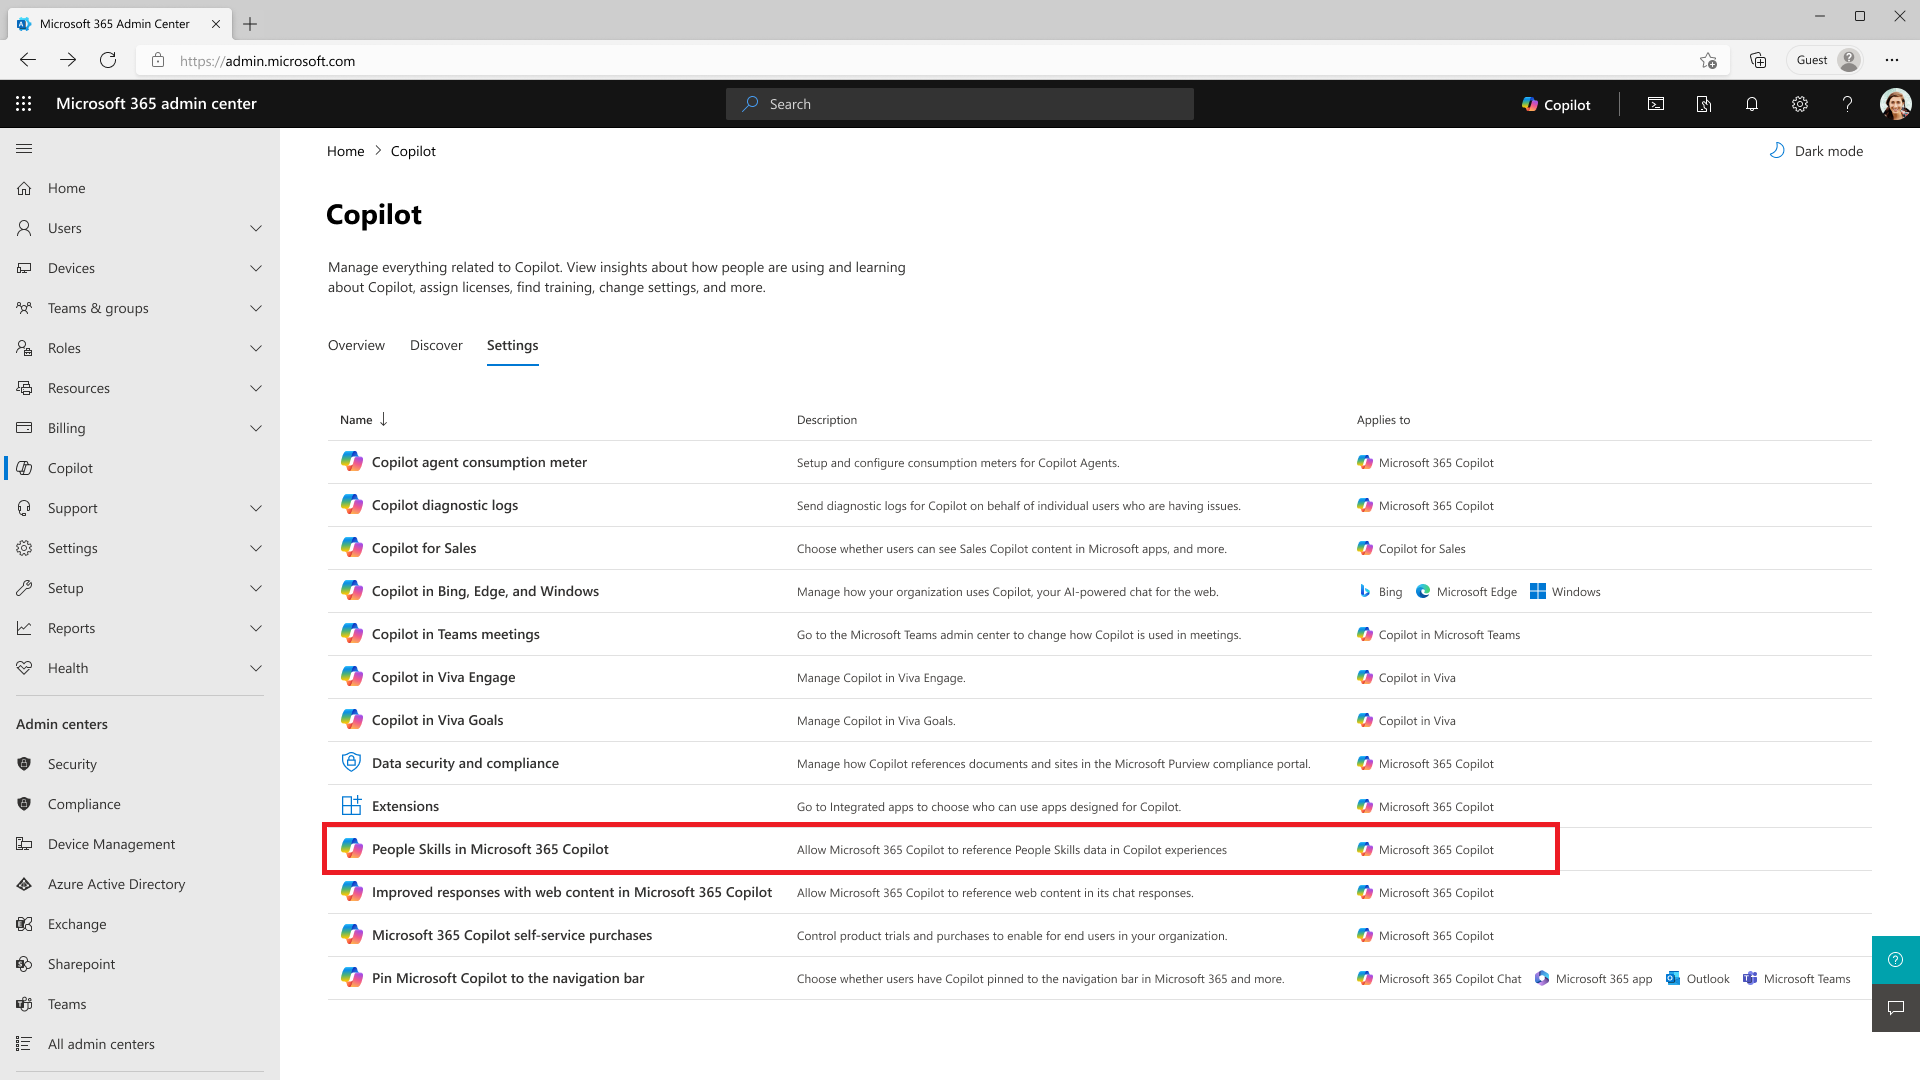
Go to the Copilot page in the Microsoft 365 admin center and select People Skills in Microsoft 365 Copilot. Alternatively, you can find People Skills page under Settings > Viva > Data Management.
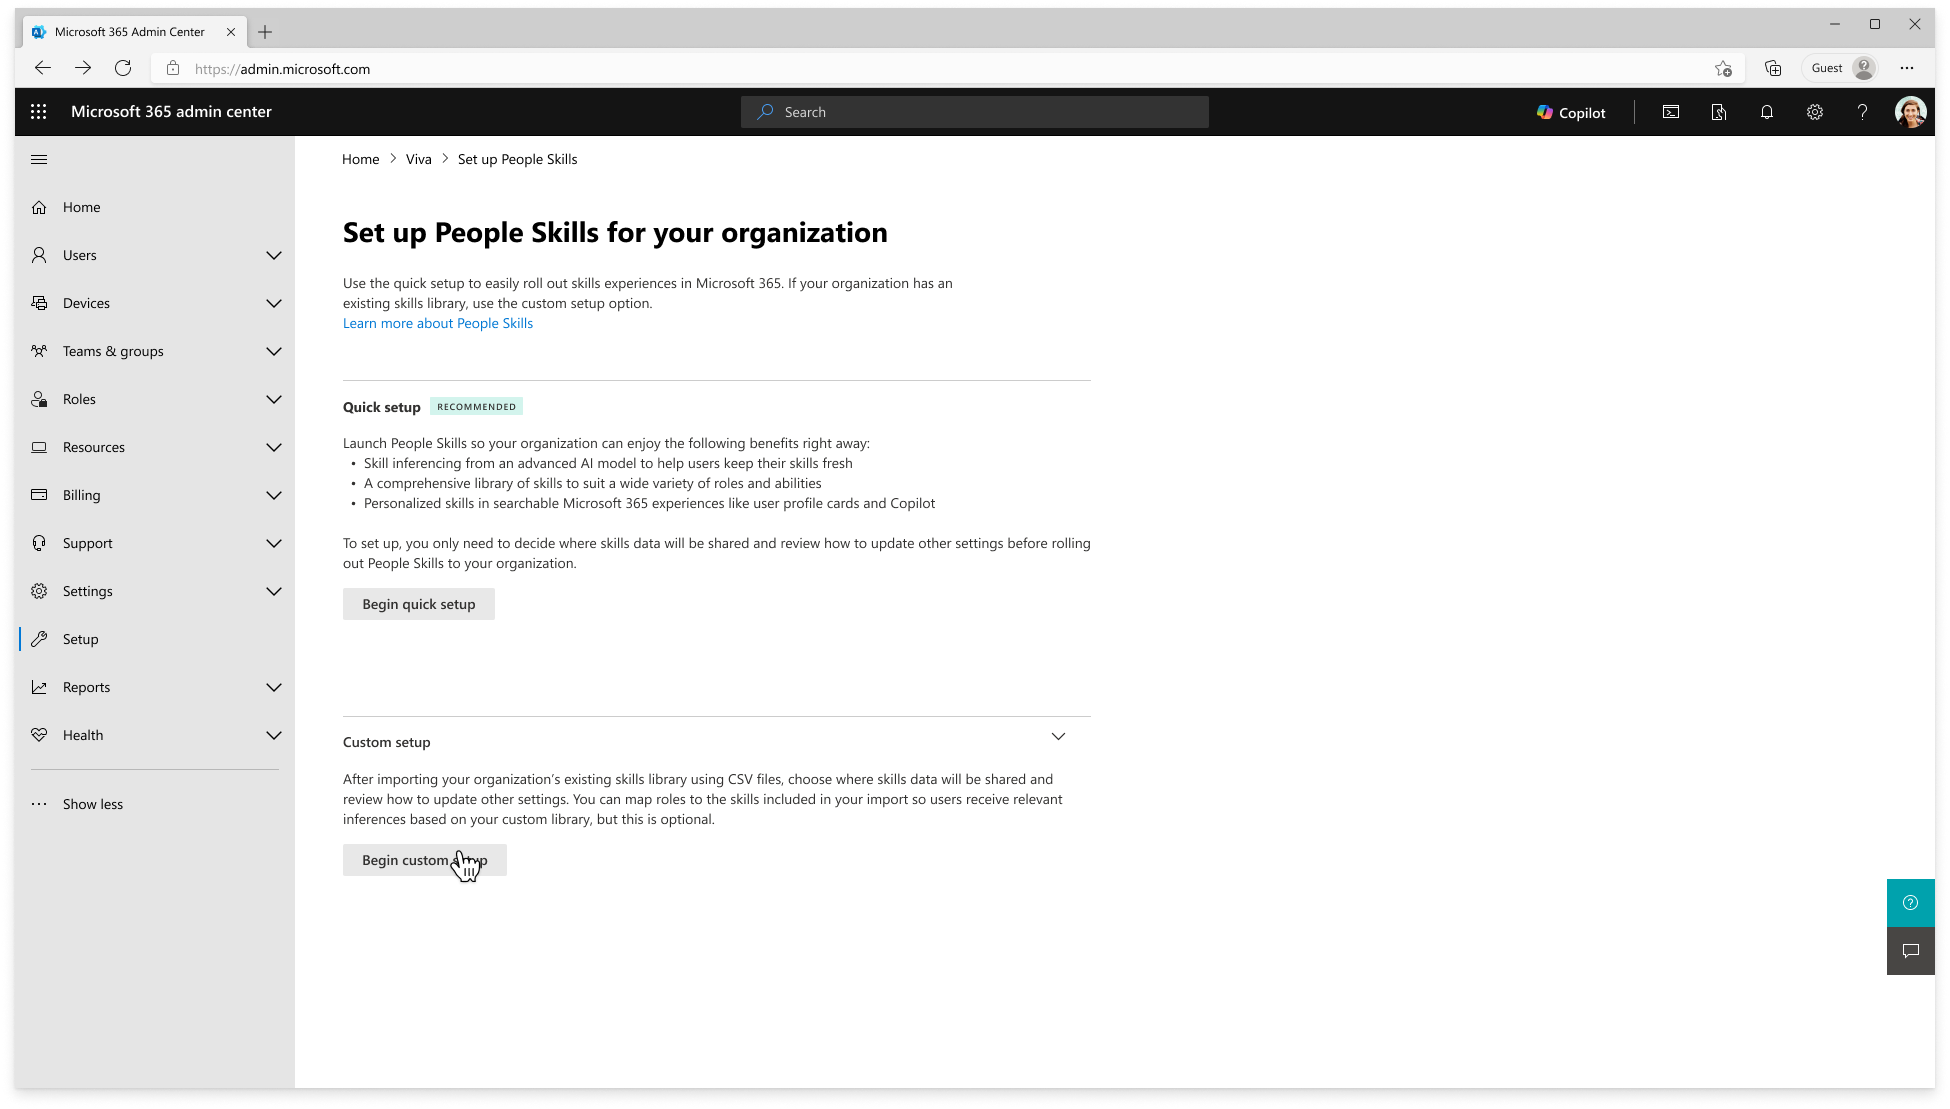
Select Being quick setup.
Choose the skills you want to use from the out-of-the-box library.
Tip
The more skills you include from the default library, the more specific AI-generated skills will be for users. All skills in the library, including all 16,000 skills are preselected by default.
- If you want to remove skills from your library, you can select View and edit People Skills.
- You may add or remove skills later after setting up People Skills. For more information, see Manage your skills library.
You can choose whether to share skill data with Viva Insights (Recommended). People Skills in Viva Insights allows organizations and leaders to discover skills within their workforce and assess skill distribution across groups. Learn more about the skills landscape report in Viva Insights. This selection can be updated later from People Skills settings.
Select Confirm to finish quick setup.

Note
People Skills initial AI-inferences should start showing up for users within 48 hours and may take up to five days to complete for all users in your tenant.
You can change the settings confirmed during this setup by Managing your skills library in the settings page. Learn more about sharing controls to manage which skills are shared across your organization.
Advanced setup using custom skills library
Organizations can build their own custom skills library with a combination of skills from the out-of-the-box skills library and by importing your own custom skills.
Got to the Copilot page in the Microsoft 365 admin center and select People Skills in Microsoft 365 Copilot. Alternatively, you can find People Skills page under Settings > Viva > Data Management.
Under Custom Setup, select Begin custom setup.
To use a custom skills library, download the template files. Select Download library template and Download mapping template.
This step is optional if you're only using skills from the out-of-the-box People Skills library. You can skip this step by selecting Next.
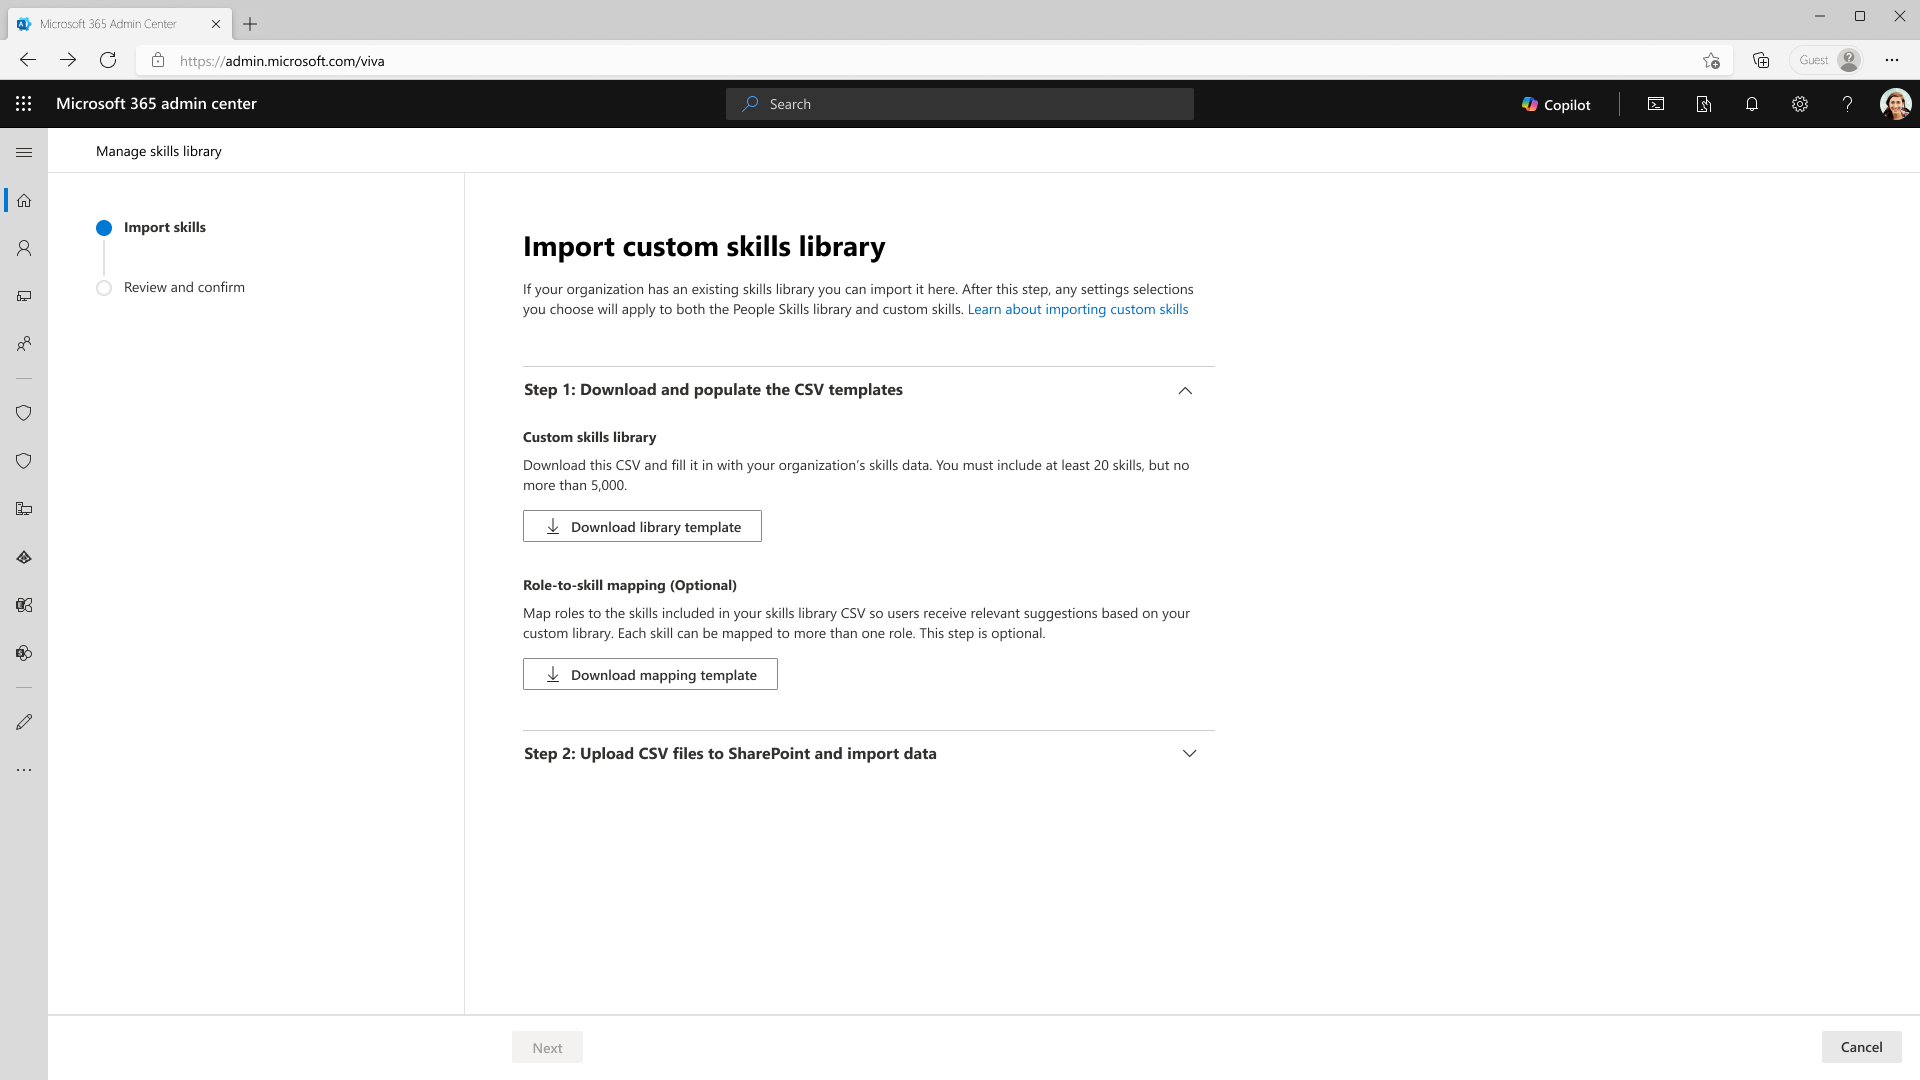
Fill out the templates as described in Create the custom skills files to create the library and mapping files. Then, get the paths to those completed files.
- Paste the file paths for both files into the **Skills library file path and Skill mapping file path fields.
- Select Next to begin file validation.
- If there's a problem with the file, you see an error message at this step.
Review your organization’s skills library details.
- The number of skills from the out-of-the-box library.
Note
You can select which skills you want to include from our default library of 16,000 skills by clicking "Edit People Skills." You can also do this later after the initial setup, see Manage your skills library
The number of skills and number of roles/job titles from your custom import.
The number of duplicate skills identified in your selection. If you have duplicates, your organization's custom data is prioritized over data from the out-of-the-box library.
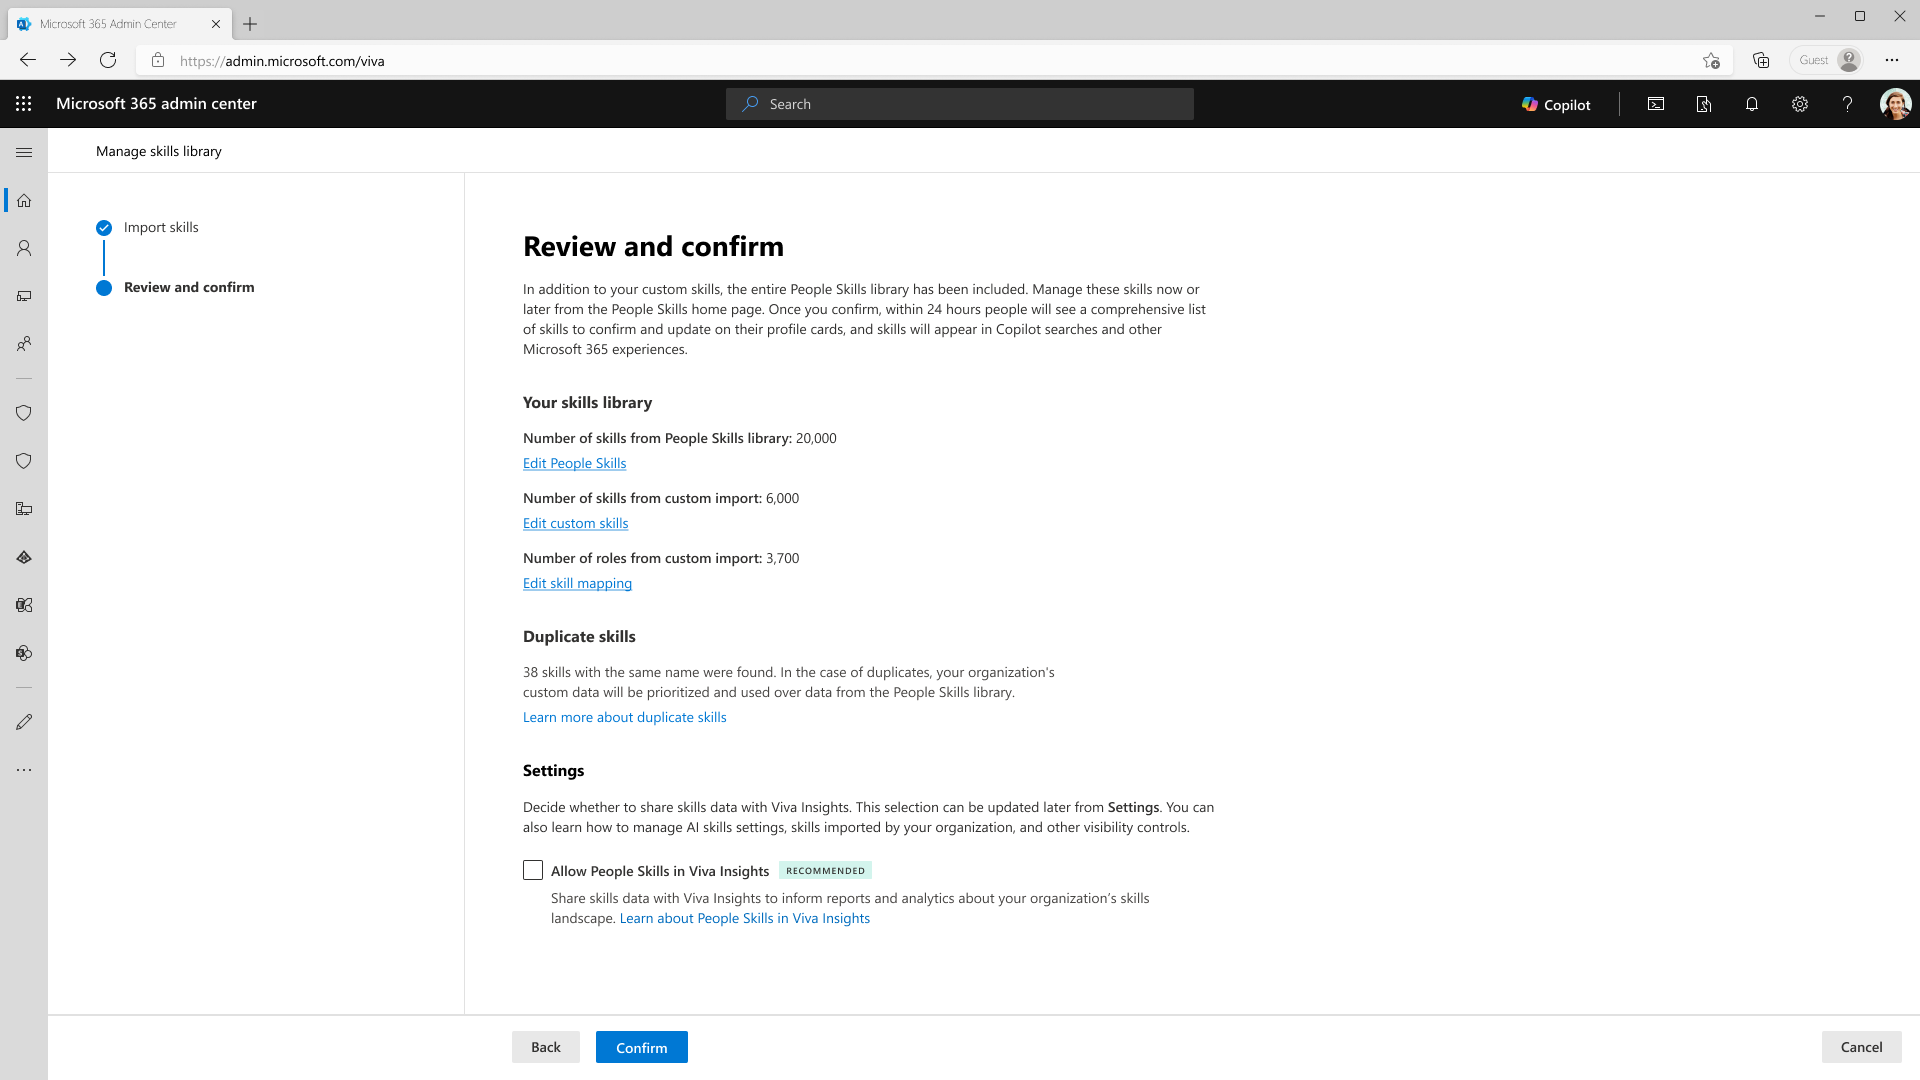
Select Turn on People Skills in Viva Insights, if it's available for your tenant. Skills in Viva Insights allows organizations and leaders to discover skills within their workforce and assess skill distribution across groups. Learn more about the skills landscape report in Viva Insights.
If everything looks correct, select Confirm.
Review People Skills settings. You can disable skill AI inferencing or set default skill sharing for specific users, groups, or your entire tenant by using an access control policy. Configure these settings through People Skills settings. For more information, see Manage which skills are shared and use of skills AI inferencing.
Review your skills library and settings information. If there are any changes you want to make, go back to those steps and edit.
When you're ready, select Done.
Your skills library is created, and your settings are saved. Initial AI-inferences display to users within 48 hours for up to a maximum of five days. You can change the setting confirmed during this setup by Managing your skills library in the settings page.


Learn more about sharing controls to manage which skills are shared across your organization.
Create custom skills files
To import custom skills into your skills library, create a file that lists those custom skills and their descriptions. Optionally, you can also create a file that maps skills to specific jobs in your organization.
Before you get started, ensure you review these guidelines:
- Minimum of 20 skills are required to import custom skills.
- Each file must be under 100 mb.
- Certain characters can't be used as a prefix in any imported field, such as '+', '-', '@', '=', '\t', '\r'.
- Save your template files as .csv files (comma separated), with no spaces in the file name.
- Use only comma as the delimiter. Your system might default to a different delimiter. In European countries, for example, it's often set to a semicolon.
To create your custom skills files:
Open the template files you downloaded during People Skills setup.
Enter the skills for your custom skills library into the library template.
- Required fields: Skill ID (externalCode), Skill Name (name.en_US)
- Recommended fields: Skill Description (description.en_US)
- Optional field: Restricted Skill tag (mark Yes or No)
See example input below, replicate this for each custom skill in your file:
- Skill ID: SN0001
- Skill Name: Customer Insights
- Skill Description: The ability to understand customer needs and validate that their needs are being met.
- Restricted Skill: Yes
Save the templates as .csv files in a secure SharePoint location.
Get the file paths for your .csv files.
- Select the file, and then select the ellipsis (...).
- Select Details, and then scroll to find the Path.
- Select the option to copy the selected file's path to the Clipboard. The file path should be formatted like this:
https://contoso.sharepoint.com/TeamAdmin/Shared%20Documents/Skills_Library.csv.
Create role to skill mapping file (Optional)
Admins can upload a file to map your custom skills to specific roles or jobs in your organization.
Before you get started, review the following information:
- Skill ID (externalCode) in the library file must map to Skill ID (SkillExternalCode) in the role to skill mapping file.
- Certain characters can't be used as a prefix in any imported field, such as '+', '-', '@', '=', '\t', '\r'.
- Save your template files as .csv files (comma separated), with no spaces in the file name.
- Use comma as the delimiter. Your system might default to a different separator. In European countries, for example, it's often set to a semicolon.
To create your role to skill mapping file:
Open the template file you downloaded during People Skills setup.
Enter the role and skills information into the library template.
- Required fields: Job Title, Skill ID (externalCode)
- Recommended fields: Skill Name (Name.en_US)
See example input below, replicate this for each custom skill in your file:
- Job Title - Software Engineer II
- Skill ID - SN0001
- Skill Name - Cloud Security
Save the templates as .csv files in a secure SharePoint location.
Get the file paths for your .csv files.
- Select the file, and then select the ellipsis (...).
- Select Details, and then scroll to find the Path.
- Select the option to copy the selected file's path to the Clipboard. The file path should be formatted like this
https://contoso.sharepoint.com/TeamAdmin/Shared%20Documents/Skill_Mapping.csv.