Note
Access to this page requires authorization. You can try signing in or changing directories.
Access to this page requires authorization. You can try changing directories.
Azure Managed Instance for Apache Cassandra is a fully managed service for pure open-source Apache Cassandra clusters. The service also allows configurations to be overridden, depending on the specific needs of each workload, for maximum flexibility and control.
This quickstart demonstrates how to use the Azure CLI commands to configure a hybrid cluster. If you have existing datacenters in an on-premises or self-hosted environment, you can use Azure Managed Instance for Apache Cassandra to add other datacenters to those clusters and maintain them.
Prerequisites
Use the Bash environment in Azure Cloud Shell. For more information, see Get started with Azure Cloud Shell.

If you prefer to run CLI reference commands locally, install the Azure CLI. If you're running on Windows or macOS, consider running Azure CLI in a Docker container. For more information, see How to run the Azure CLI in a Docker container.
If you're using a local installation, sign in to the Azure CLI by using the az login command. To finish the authentication process, follow the steps displayed in your terminal. For other sign-in options, see Authenticate to Azure using Azure CLI.
When you're prompted, install the Azure CLI extension on first use. For more information about extensions, see Use and manage extensions with the Azure CLI.
Run az version to find the version and dependent libraries that are installed. To upgrade to the latest version, run az upgrade.
- This article requires the Azure CLI version 2.30.0 or later. If you're using Azure Cloud Shell, the latest version is already installed.
- Use an Azure virtual network with connectivity to your self-hosted or on-premises environment. For more information on how to connect on-premises environments to Azure, see Connect an on-premises network to Azure.
Configure a hybrid cluster
Sign in to the Azure portal and go to your virtual network resource.
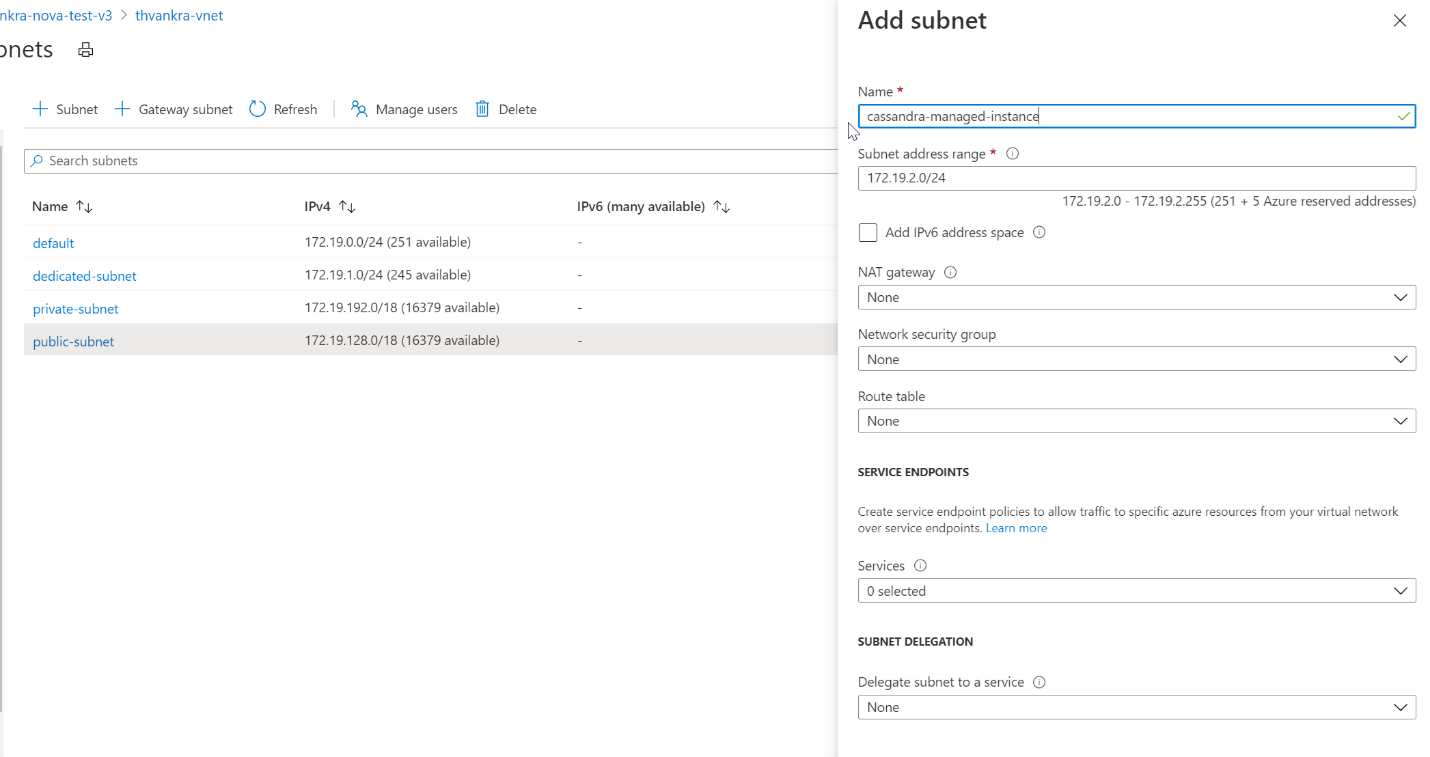
Select the Subnets tab, and create a new subnet. To learn more about the fields on the Add subnet form, see Add a subnet.
The deployment of Azure Managed Instance for Apache Cassandra requires internet access. Deployment fails in environments where internet access is restricted. Make sure that you aren't blocking access within your virtual network to the following vital Azure services that are necessary for Azure Managed Instance for Apache Cassandra to work properly. For a list of IP address and port dependencies, see Required outbound network rules.
- Azure Storage
- Azure Key Vault
- Azure Virtual Machine Scale Sets
- Azure Monitor
- Microsoft Entra ID
- Microsoft Defender for Cloud
Apply some special permissions to the virtual network and subnet, which Azure Managed Instance for Apache Cassandra requires, by using the Azure CLI. Use the
az role assignment createcommand. Replace<subscriptionID>,<resourceGroupName>, and<vnetName>with the appropriate values:az role assignment create \ --assignee a232010e-820c-4083-83bb-3ace5fc29d0b \ --role 4d97b98b-1d4f-4787-a291-c67834d212e7 \ --scope /subscriptions/<subscriptionID>/resourceGroups/<resourceGroupName>/providers/Microsoft.Network/virtualNetworks/<vnetName>The
assigneeandrolevalues in the previous command are fixed service principal and role identifiers, respectively.Configure resources for your hybrid cluster. Because you already have a cluster, the cluster name is a logical resource to identify the name of your existing cluster. Use the name of your existing cluster when you define
clusterNameandclusterNameOverridevariables in the following script.You also need, at minimum, the seed nodes from your existing datacenter, and the gossip certificates that are required for node-to-node encryption. Azure Managed Instance for Apache Cassandra requires node-to-node encryption for communication between datacenters. If you don't have node-to-node encryption implemented in your existing cluster, you need to implement it. For more information, see Node-to-node encryption. Supply the path to the location of the certificates. Each certificate should be in Privacy Enhanced Mail (PEM) format, for example,
-----BEGIN CERTIFICATE-----\n...PEM format 1...\n-----END CERTIFICATE-----. In general, there are two ways to implement certificates:- Self-signed certificates. Private and public certificates with no Certificate Authority (CA) for each node. In this case, you need all public certificates.
- Certificates signed by a CA. Certificates issued by a self-signed CA or a public CA. In this case, you need the root CA certificate and all intermediaries, if applicable. For more information, see Prepare Secure Sockets Layer (SSL) certificates for production.
Optionally, if you want to implement client-to-node certificate authentication or mutual Transport Layer Security (TLS), provide the certificates in the same format as when you created the hybrid cluster. See the Azure CLI sample later in this article. The certificates are provided in the
--client-certificatesparameter.This approach uploads and applies your client certificates to the trust store for your Azure Managed Instance for Apache Cassandra cluster. You don't need to edit
cassandra.yamlsettings. After the certificates are applied, the cluster requires Cassandra to verify the certificates when a client connects. For more information, seerequire_client_auth: truein Cassandra client_encryption_options.The value of the
delegatedManagementSubnetIdvariable that you supply in this code is the same as the value of--scopethat you supplied in an earlier command:resourceGroupName='MyResourceGroup' clusterName='cassandra-hybrid-cluster-legal-name' clusterNameOverride='cassandra-hybrid-cluster-illegal-name' location='eastus2' delegatedManagementSubnetId='/subscriptions/<subscriptionID>/resourceGroups/<resourceGroupName>/providers/Microsoft.Network/virtualNetworks/<vnetName>/subnets/<subnetName>' # You can override the cluster name if the original name isn't legal for an Azure resource: # overrideClusterName='ClusterNameIllegalForAzureResource' # the default cassandra version will be v3.11 az managed-cassandra cluster create \ --cluster-name $clusterName \ --resource-group $resourceGroupName \ --location $location \ --delegated-management-subnet-id $delegatedManagementSubnetId \ --external-seed-nodes 10.52.221.2 10.52.221.3 10.52.221.4 \ --external-gossip-certificates /usr/csuser/clouddrive/rootCa.pem /usr/csuser/clouddrive/gossipKeyStore.crt_signed # optional - add your existing datacenter's client-to-node certificates (if implemented): # --client-certificates /usr/csuser/clouddrive/rootCa.pem /usr/csuser/clouddrive/nodeKeyStore.crt_signedIf your cluster already has node-to-node and client-to-node encryption, you should know where your existing client or gossip TLS/SSL certificates are kept. If you're uncertain, run
keytool -list -keystore <keystore-path> -rfc -storepass <password>to print the certificates.After the cluster resource is created, run the following command to get the cluster setup details:
resourceGroupName='MyResourceGroup'
clusterName='cassandra-hybrid-cluster'

az managed-cassandra cluster show \
   --cluster-name $clusterName \
   --resource-group $resourceGroupName \
The previous command returns information about the managed instance environment. You need the gossip certificates so that you can install them on the trust store for nodes in your existing datacenter. The following screenshot shows the output of the previous command and the format of certificates.
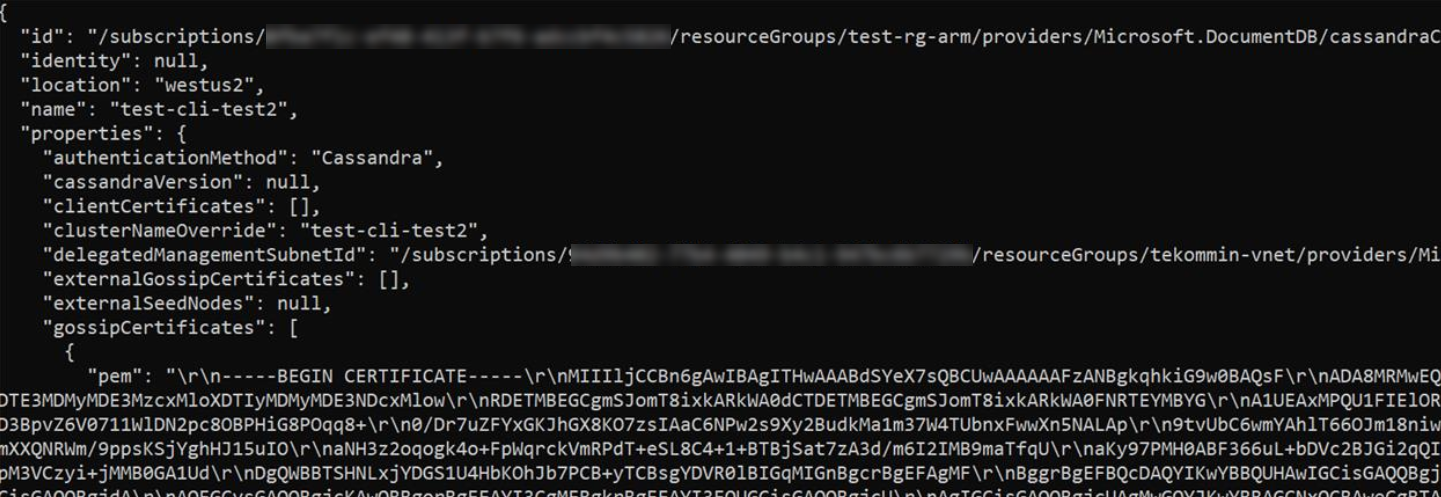
The certificates returned from the preceding command contain line breaks that are represented as text. An example is
\r\n. Copy each certificate to a file and format it before you attempt to import it into your existing trust store.Copy the
gossipCertificatesarray value shown in the screenshot into a file. Use the following Bash script to format the certificates and create separate PEM files for each. To download the Bash script, see Download jq for your platform.readarray -t cert_array < <(jq -c '.[]' gossipCertificates.txt) # iterate through the certs array, format each cert, write to a numbered file. num=0 filename="" for item in "${cert_array[@]}"; do let num=num+1 filename="cert$num.pem" cert=$(jq '.pem' <<< $item) echo -e $cert >> $filename sed -e 's/^"//' -e 's/"$//' -i $filename doneNext, create a new datacenter in the hybrid cluster. Replace the variable values with your cluster details:
resourceGroupName='MyResourceGroup'
clusterName='cassandra-hybrid-cluster'
dataCenterName='dc1'
dataCenterLocation='eastus2'
virtualMachineSKU='Standard_D8s_v4'
noOfDisksPerNode=4

az managed-cassandra datacenter create \
  --resource-group $resourceGroupName \
  --cluster-name $clusterName \
  --data-center-name $dataCenterName \
  --data-center-location $dataCenterLocation \
  --delegated-subnet-id $delegatedManagementSubnetId \
  --node-count 9
  --sku $virtualMachineSKU \
  --disk-capacity $noOfDisksPerNode \
  --availability-zone false
Choose the value for
--skufrom the following available product tiers:- Standard_E8s_v4
- Standard_E16s_v4
- Standard_E20s_v4
- Standard_E32s_v4
- Standard_DS13_v2
- Standard_DS14_v2
- Standard_D8s_v4
- Standard_D16s_v4
- Standard_D32s_v4
The value for
--availability-zoneis set tofalse. To enable availability zones, set this value totrue. Availability zones increase the availability service-level agreement (SLA) of the service. For more information, see SLA for online services.Availability zones aren't supported in all regions. Deployments fail if you select a region where availability zones aren't supported. For supported regions, see the Azure regions list.
The successful deployment of availability zones is also subject to the availability of compute resources in all the zones in the specific region. Deployments might fail if the product tier you selected, or capacity, isn't available across all zones.
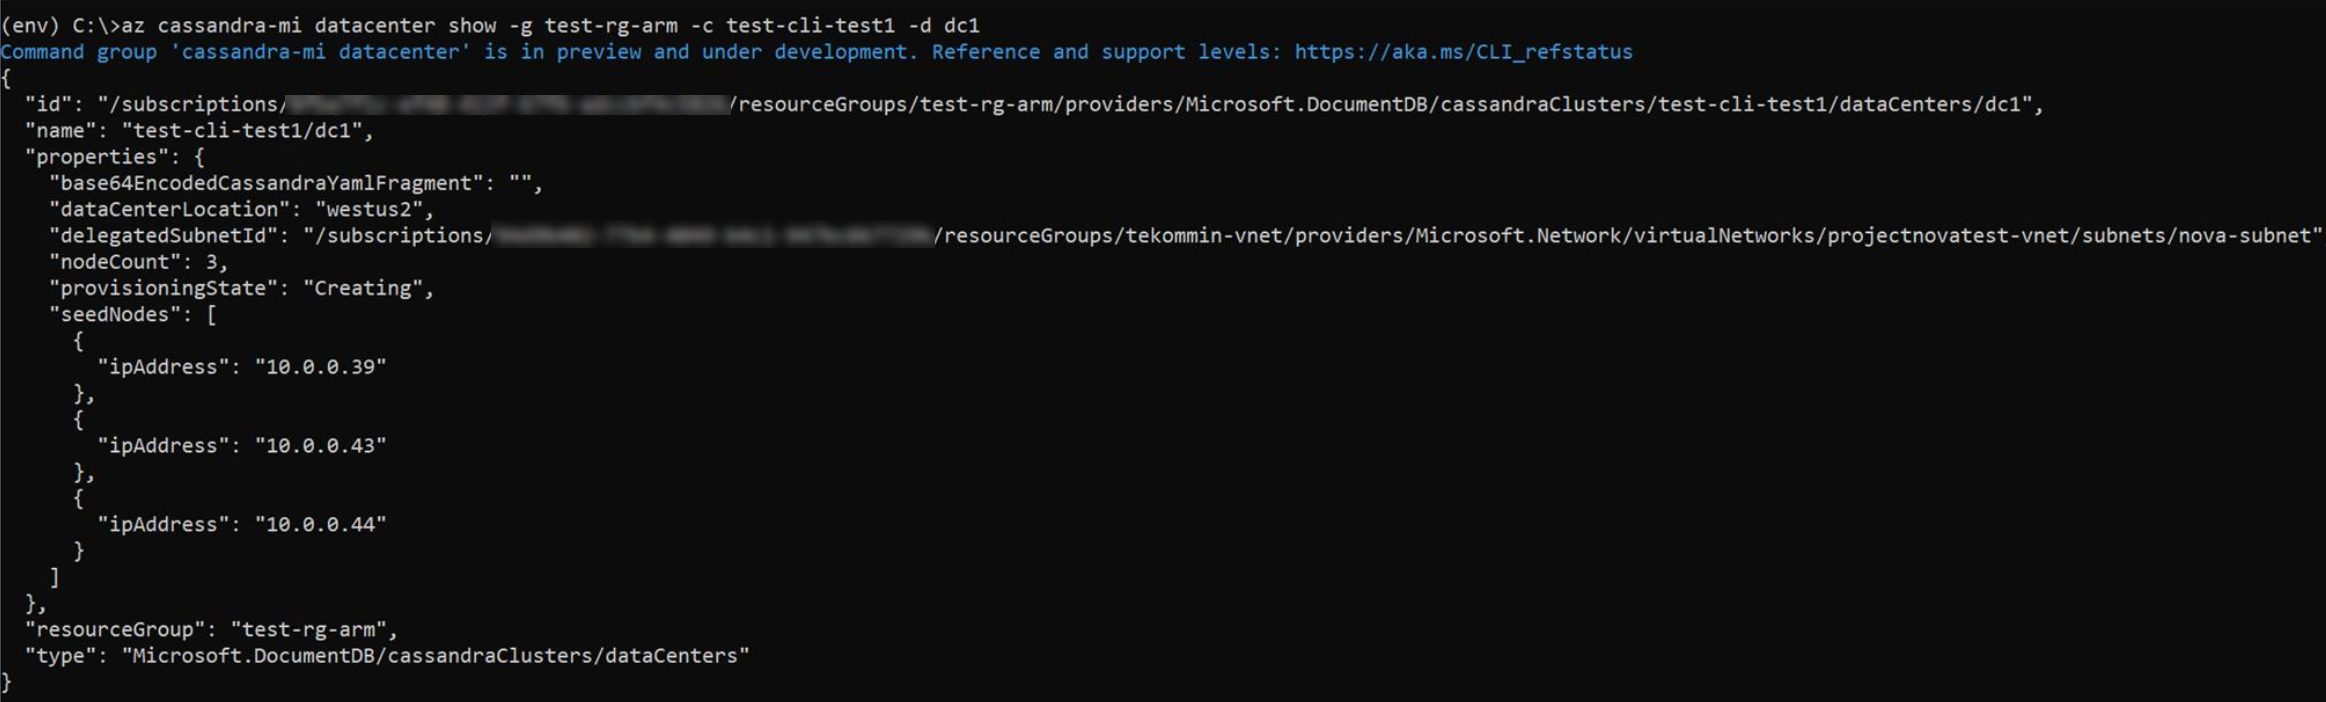
Now that the new datacenter is created, run the
datacenter showcommand to view its details:resourceGroupName='MyResourceGroup' clusterName='cassandra-hybrid-cluster' dataCenterName='dc1' az managed-cassandra datacenter show \ --resource-group $resourceGroupName \ --cluster-name $clusterName \ --data-center-name $dataCenterNameThe previous command displays the new datacenter's seed nodes.
Add the new datacenter's seed nodes to your existing datacenter's seed node configuration in the cassandra.yaml file. Install the managed instance gossip certificates that you collected earlier to the trust store for each node in your existing cluster. Use the
keytoolcommand for each certificate:keytool -importcert -keystore generic-server-truststore.jks -alias CassandraMI -file cert1.pem -noprompt -keypass myPass -storepass truststorePassIf you want to add more datacenters, repeat the preceding steps, but you need only the seed nodes.
Important
If your existing Apache Cassandra cluster has only a single datacenter, and this datacenter is the first one added, ensure that the
endpoint_snitchparameter incassandra.yamlis set toGossipingPropertyFileSnitch.If your existing application code uses
QUORUMfor consistency, ensure that before you change the replication settings in the next step, your existing application code usesLOCAL_QUORUMto connect to your existing cluster. Otherwise, live updates fail after you change replication settings in the following step. After you change the replication strategy, you can revert toQUORUMif you prefer.Finally, use the following Cassandra Query Language query to update the replication strategy in each keyspace to include all datacenters across the cluster:
ALTER KEYSPACE "ks" WITH REPLICATION = {'class': 'NetworkTopologyStrategy', 'on-premise-dc': 3, 'managed-instance-dc': 3};You also need to update several system tables:
ALTER KEYSPACE "system_auth" WITH REPLICATION = {'class': 'NetworkTopologyStrategy', 'on-premise-dc': 3, 'managed-instance-dc': 3}
ALTER KEYSPACE "system_distributed" WITH REPLICATION = {'class': 'NetworkTopologyStrategy', 'on-premise-dc': 3, 'managed-instance-dc': 3}
ALTER KEYSPACE "system_traces" WITH REPLICATION = {'class': 'NetworkTopologyStrategy', 'on-premise-dc': 3, 'managed-instance-dc': 3}
If the datacenters in your existing cluster don't enforce client-to-node encryption (SSL), and you intend for your application code to connect directly to Azure Managed Instance for Apache Cassandra, you also need to enable TLS/SSL in your application code.


Use a hybrid cluster for real-time migration
The preceding instructions provide guidance on how to configure a hybrid cluster. This approach is also a great way of achieving a seamless zero-downtime migration. The following procedure shows you how to migrate an on-premises or other Cassandra environment that you want to decommission, with zero downtime, to Azure Managed Instance for Apache Cassandra.
Configure a hybrid cluster. Follow the previous instructions.
Temporarily disable automatic repairs in Azure Managed Instance for Apache Cassandra during the migration:
az managed-cassandra cluster update \
  --resource-group $resourceGroupName \
  --cluster-name $clusterName --repair-enabled false
In the Azure CLI, use the following command to run
nodetool rebuildon each node in your new Azure Managed Instance for Apache Cassandra datacenter. Replace<ip address>with the IP address of the node. Replace<sourcedc>with the name of your existing datacenter, the one from which you're migrating:az managed-cassandra cluster invoke-command \ --resource-group $resourceGroupName \ --cluster-name $clusterName \ --host <ip address> \ --command-name nodetool --arguments rebuild="" "<sourcedc>"=""Run this command only after you take all the prior steps. This approach should ensure that all historical data is replicated to your new datacenters in Azure Managed Instance for Apache Cassandra. You can run
rebuildon one or more nodes at the same time. Run on one node at a time to reduce the effect on the existing cluster. Run on multiple nodes when the cluster can handle the extra I/O and network pressure. For most installations, you can run only one or two in parallel so that you don't overload the cluster.Warning
You must specify the source
data centerwhen you runnodetool rebuild. If you provide the datacenter incorrectly on the first attempt, token ranges are copied without data being copied for your nonsystem tables. Subsequent attempts fail even if you provide the datacenter correctly. To resolve this issue, delete entries for each nonsystem keyspace insystem.available_rangesby using thecqlshquery tool in your target Azure Managed Instance for Apache Cassandra datacenter:delete from system.available_ranges where keyspace_name = 'myKeyspace';Cut over your application code to point to the seed nodes in your new Azure Managed Instance for Apache Cassandra datacenters.
As also mentioned in the hybrid setup instructions, if the datacenters in your existing cluster don't enforce client-to-node encryption (SSL), enable this feature in your application code. Azure Managed Instance for Apache Cassandra enforces this requirement.
Run
ALTER KEYSPACEfor each keyspace, in the same manner as done earlier. Now you can remove your old datacenters.Run node tool decommission for each old datacenter node.
Switch your application code back to
QUORUM, if necessary or preferred.Reenable automatic repairs:
az managed-cassandra cluster update \
  --resource-group $resourceGroupName \
  --cluster-name $clusterName --repair-enabled true
Troubleshooting
If you encounter an error when you apply permissions to your virtual network by using the Azure CLI, you can apply the same permission manually from the Azure portal. An example of such an error is "Can't find user or service principal in graph database for e5007d2c-4b13-4a74-9b6a-605d99f03501." For more information, see Use the Azure portal to add Azure Cosmos DB service principal.
The Azure Cosmos DB role assignment is used for deployment purposes only. Azure Managed Instanced for Apache Cassandra has no back-end dependencies on Azure Cosmos DB.
Clean up resources
If you aren't going to continue to use this managed instance cluster, follow these steps to delete it:
- On the left menu of the Azure portal, select Resource groups.
- From the list, select the resource group that you created for this quickstart.
- On the resource group Overview pane, select Delete resource group.
- On the next pane, enter the name of the resource group to delete, and then select Delete.