Note
Access to this page requires authorization. You can try signing in or changing directories.
Access to this page requires authorization. You can try changing directories.
The Azure Client Configurator is a tool designed to assist you in configuring a hybrid cluster and simplifying the migration process to Azure Managed Instance for Apache Cassandra. If you currently have on-premises datacenters or are operating in a self-hosted environment, you can use Azure Managed Instance for Apache Cassandra to seamlessly incorporate other datacenters into your cluster while effectively maintaining them.
Important
The Client Configurator tool is in public preview. This feature is provided without a service-level agreement. We don't recommend it for production workloads.
For more information, see Supplemental Terms of Use for Microsoft Azure Previews.
Prerequisites
Use the Bash environment in Azure Cloud Shell. For more information, see Get started with Azure Cloud Shell.

If you prefer to run CLI reference commands locally, install the Azure CLI. If you're running on Windows or macOS, consider running Azure CLI in a Docker container. For more information, see How to run the Azure CLI in a Docker container.
If you're using a local installation, sign in to the Azure CLI by using the az login command. To finish the authentication process, follow the steps displayed in your terminal. For other sign-in options, see Authenticate to Azure using Azure CLI.
When you're prompted, install the Azure CLI extension on first use. For more information about extensions, see Use and manage extensions with the Azure CLI.
Run az version to find the version and dependent libraries that are installed. To upgrade to the latest version, run az upgrade.
This article requires the Azure CLI version 2.30.0 or later. If you're using Azure Cloud Shell, the latest version is already installed.
Use an Azure virtual network with connectivity to your self-hosted or on-premises environment. For more information on how to connect on-premises environments to Azure, see Connect an on-premises network to Azure.
A Python installation is required. To check if Python is installed, run
python --versionin your terminal.Ensure that both the Azure Managed Instance for Apache Cassandra cluster and the on-premises Cassandra cluster are located on the same virtual network. If not, you need to establish network peering or another means of connectivity. For example, use Azure ExpressRoute.
The cluster name for both the managed cluster and local cluster must be the same.
In the
cassandra.yamlfile, ensure that the storage port is set to 7001 and the cluster name is the same as the managed cluster:cluster_name: managed_cluster-name storage_port: 7001UPDATE system.local SET cluster_name = 'managed_cluster-name' where key='local';
Installation
Download and go into the client configurator folder.
Set up a virtual environment to run the Python script:
python3 -m venv env
source env/bin/activate
python3 -m pip install -r requirements.txt
Sign in to the Azure CLI
az login.Run the Python script within the client folder with information from the existing (on-premises) cluster:
python3 client_configurator.py --subscription-id <subcriptionId> --cluster-resource-group <clusterResourceGroup> --cluster-name <clusterName> --initial-password <initialPassword> --vnet-resource-group <vnetResourceGroup> --vnet-name <vnetName> --subnet-name <subnetName> --location <location> --seed-nodes <seed1 seed2 seed3> --mi-dc-name <managedInstanceDataCenterName> --dc-name <onPremDataCenterName> --sku <sku>Parameter Description subscription-IDAzure subscription ID cluster-resource-groupResource group where your cluster resides cluster-nameAzure Managed Instance for Apache Cassandra cluster name initial-passwordPassword for your Azure Managed Instance for Apache Cassandra cluster vnet-resource-groupResource group attached to the virtual network vnet-nameName of the virtual network attached to your cluster subnet-nameName of the IP addressed allocated to the Cassandra cluster locationWhere your cluster is deployed seed-nodesSeed nodes of the existing datacenters in your on-premises or self-hosted Cassandra cluster mi-dc-nameDatacenter name of your Azure Managed Instance for Apache Cassandra cluster dc-nameDatacenter name of the on-premises cluster skuVirtual machine product tier size The Python script produces a tar archive named
install_certs.tar.gz. Unpack this folder into/etc/cassandra/on each node:sudo tar -xzvf install_certs.tar.gz -C /etc/cassandraInside the
/etc/cassandra/folder, runsudo ./install_certs.sh.Ensure that the script is executable by running
sudo chmod +x install_certs.sh.The script installs and points Cassandra toward the new certificates that are needed to connect to the Azure Managed Instance for Apache Cassandra cluster.
It then prompts the user to restart Cassandra.

After Cassandra is finished restarting on all nodes, check
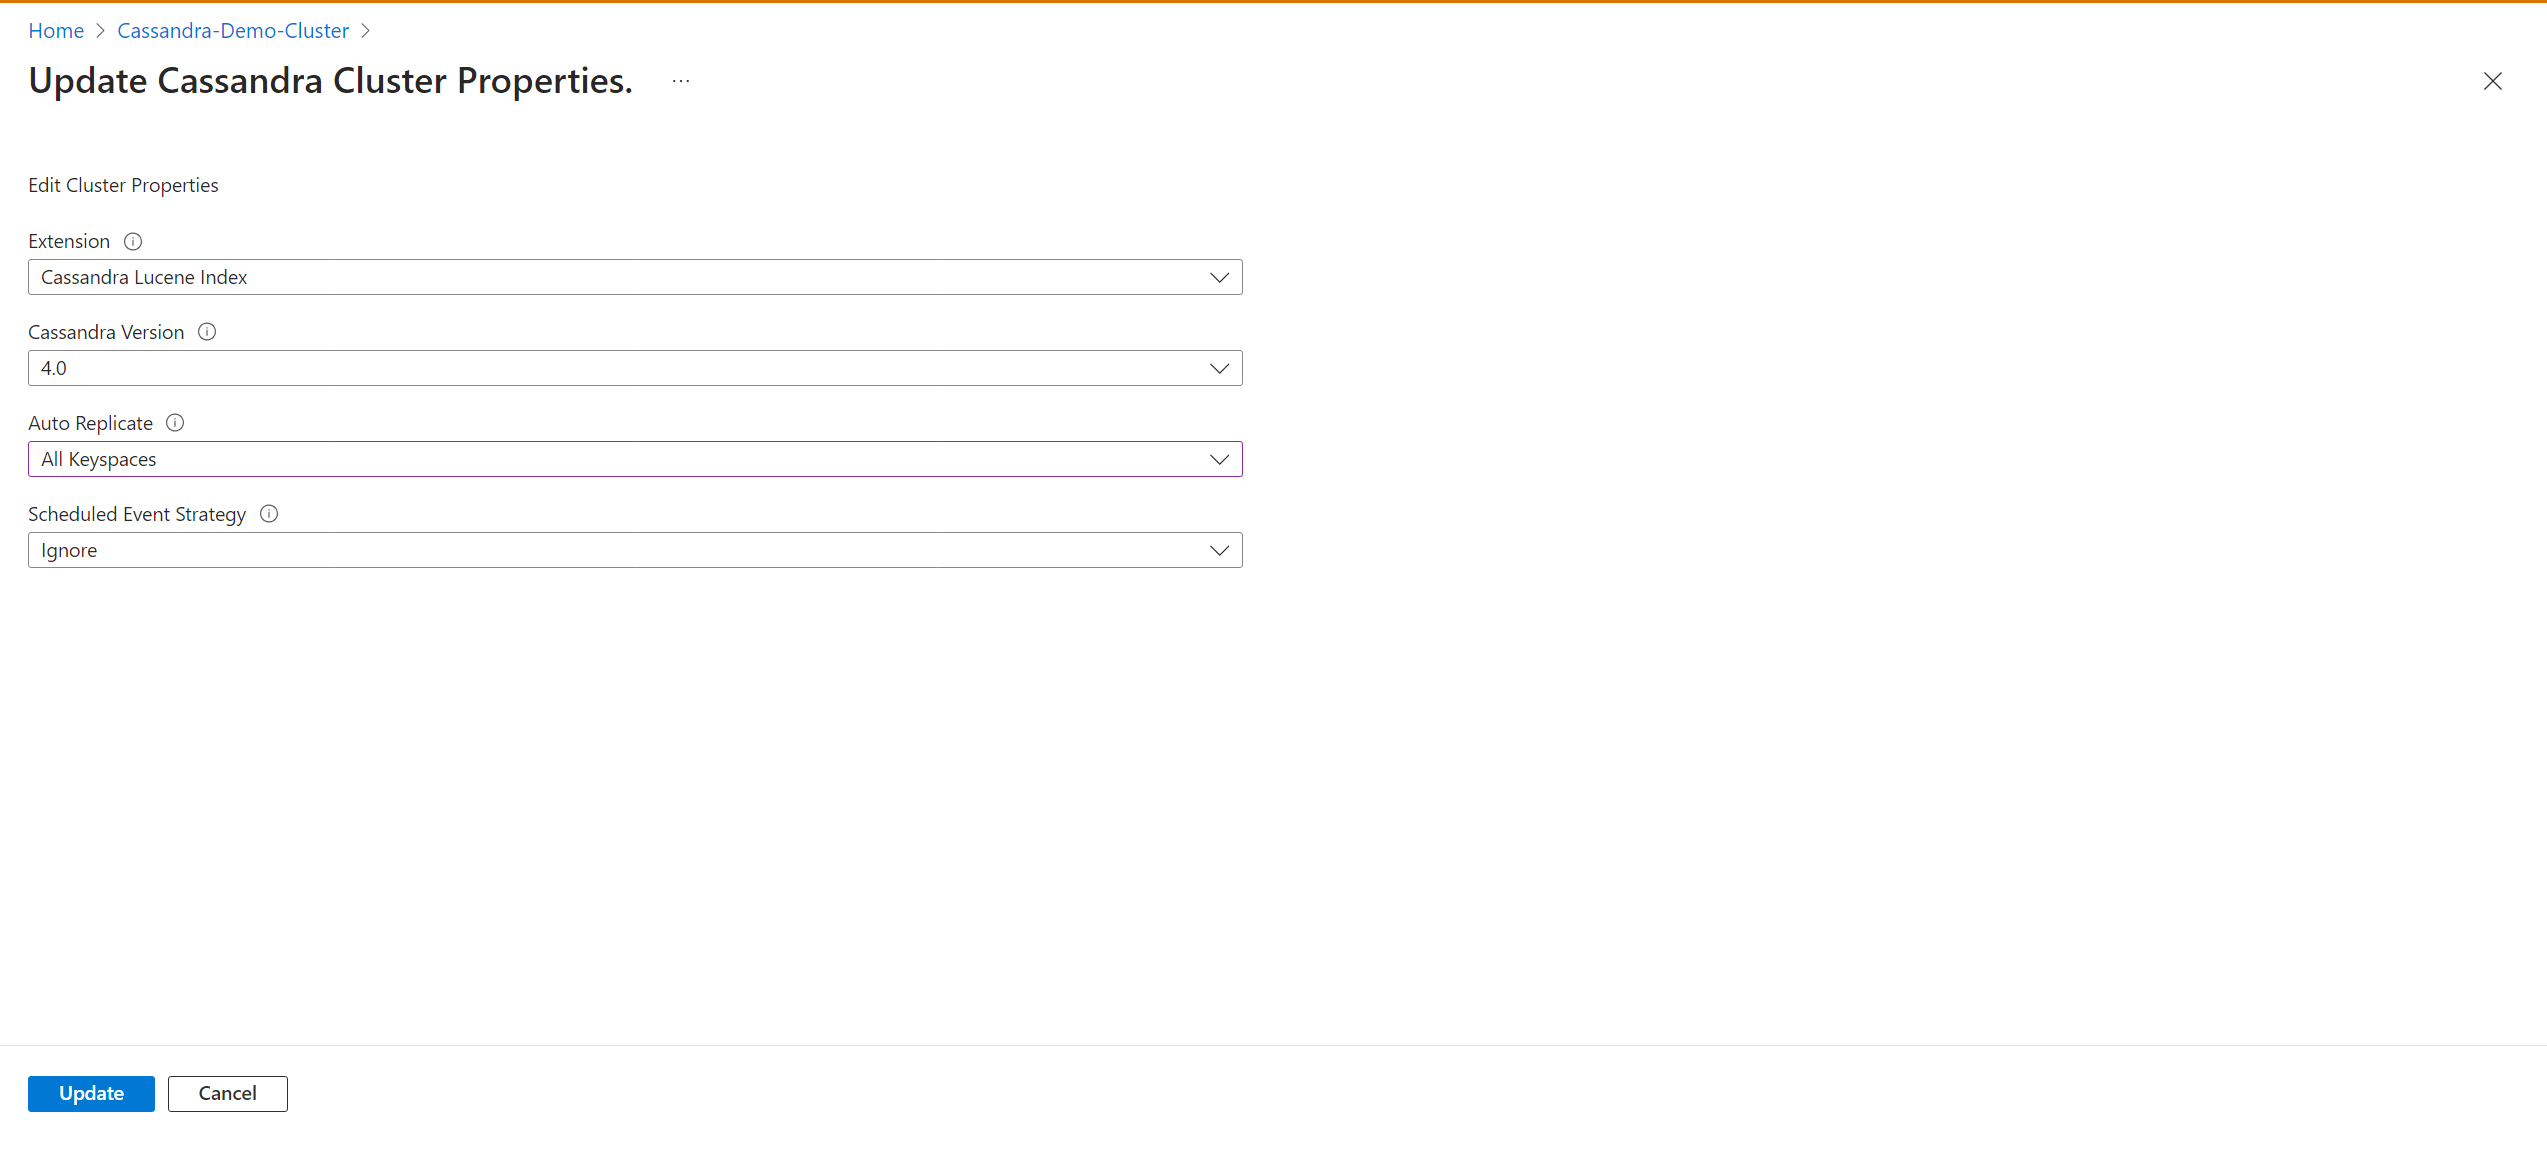
nodetool status. Both datacenters should appear in the list, with their nodes in theUN (Up/Normal)state.From your instance of Azure Managed Instance for Apache Cassandra, you can then select
AllKeyspacesto change the replication settings in your keyspace schema and start the migration process to the Azure Managed Instance for Cassandra cluster.Enable the
autoReplicatesetting by using an Azure Resource Manager template (ARM template). The ARM template should include:"properties":{ ... "externalDataCenters": ["dc-name-1","dc-name-2"], "autoReplicate": "AllKeyspaces", ... }All of your keyspaces definitions change to include
WITH REPLICATION = { 'class' : 'NetworkTopologyStrategy', 'on-prem-datacenter-1' : 3, 'mi-datacenter-1': 3 }. If this topology isn't what you want, adjust it and runnodetool rebuildmanually on the Azure Managed Instance for Apache Cassandra cluster.Learn more about autoreplication.
Update and monitor data replication progress by selecting the Data Center pane.