Note
Access to this page requires authorization. You can try signing in or changing directories.
Access to this page requires authorization. You can try changing directories.
Applies to: Azure Logic Apps (Consumption + Standard)
To automate tasks that manage resources in IBM Informix databases by using workflows in Azure Logic Apps, you can use the IBM Informix connector. This connector includes a Microsoft client that communicates with remote Informix server computers across a TCP/IP network, including cloud-based databases such as IBM Informix for Windows running in Azure virtualization and on-premises databases.
You can connect to the following Informix platforms and versions if they are configured to support Distributed Relational Database Architecture (DRDA) client connections:
- IBM Informix 12.1
- IBM Informix 11.7
This article shows how to connect from a workflow in Azure Logic Apps to an Informix database and add operations for various tasks.
Connector technical reference
For technical information based on the connector's Swagger description, such as operations, limits, and other details, see the connector reference article.
The following table provides more information about the available connector operations:
| Action | Description | Parameters and descriptions |
|---|---|---|
| Delete row | Remove a row from the specified Informix table by running an Informix DELETE statement. |
- Table name: The name for the Informix table that you want - Row ID: The unique ID for the row to delete, for example, 9999 |
| Get row | Get a single row from the specified Informix table by running an Informix SELECT WHERE statement. |
- Table name: The name for the Informix table that you want. - Row ID: The unique ID for the row, for example, 9999. |
| Get rows | Get all the rows in the specified Informix table by running an Informix SELECT * statement. |
Table name: The name for the Informix table that you. want To add other parameters to this action, add them from the Advanced parameters list. For more information, see the connector reference article. |
| Get tables | List Informix tables by running an Informix CALL statement. |
None |
| Insert row | Add a row to the specified Informix table by running an Informix INSERT statement. |
- Table name: The name for the Informix table that you want. - Row: The row with the values to add. |
| Update row | Edit a row in the specified Informix table by running an Informix UPDATE statement. |
- Table name: The name for the Informix table that you want - Row ID: The unique ID for the row to update, for example, 9999. - Row: The row with the updated values, for example, 102. |
Prerequisites
An Azure account and subscription. If you don't have an Azure subscription, sign up for a free Azure account.
To connect with on-premises Informix databases, you need to download and install the on-premises data gateway on a local computer and then create an Azure data gateway resource in the Azure portal.
The Consumption or Standard logic app workflow where you need access to your Informix database.
The Informix connector provides only actions, so your workflow must start with an existing trigger that best suits your scenario. This example uses the Recurrence trigger.
If you don't have a logic app workflow, see the following articles:
Add an Informix action
Based on whether you have a Consumption or Standard workflow, follow the corresponding steps on the matching tab:
In the Azure portal, open your Consumption logic app resource.
On the resource sidebar, under Development Tools, select the designer to open the workflow.
On the designer, follow these general steps to add the Informix action that you want to your workflow.
On the connection pane, provide the connection information for your Informix database.
After you successfully create the connection, on the action pane, provide the necessary information for the action.
When you're done, save your workflow. On the designer toolbar, select Save.
Either test your workflow or continue adding actions to your workflow.
Connection information
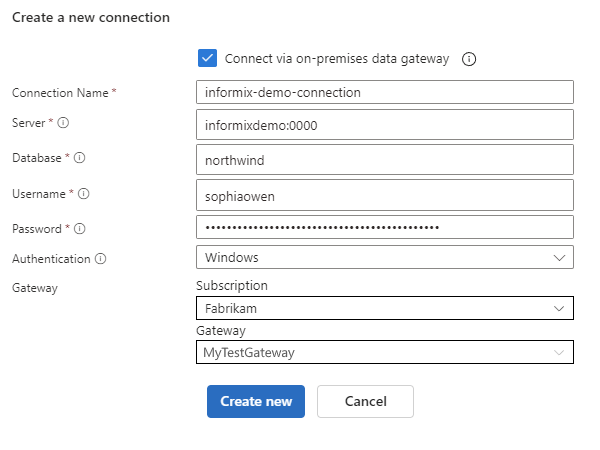
For an on-premises Informix database, select Connect via on-premises data gateway to view the related required parameters.
Specify the following connection information:
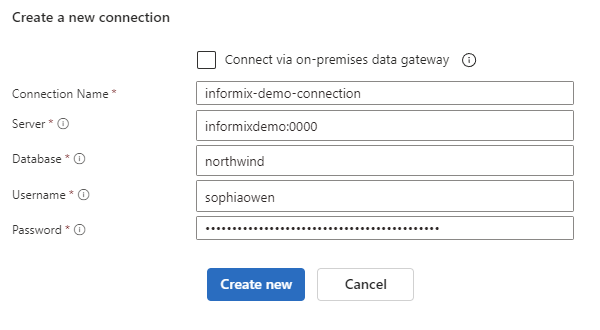
Parameter name JSON parameter name Required Example value Description Connection Name nameYes informix-demo-connectionThe name for the connection. Server serverYes - Cloud database: informixdemo.cloudapp.net:9089
- On-premises database:informixdemo:9089The TCP/IP address or alias that is in either IPv4 or IPv6 format, followed by a colon and a TCP/IP port number Database databaseYes nwindThe DRDA Relational Database Name (RDBNAM) or Informix database name (dbname). Informix accepts a 128-byte string. Username usernameNo <database-user-name> Your user name for the database. Password passwordNo <database-password> Your password for the database. Authentication authenticationOn-premises only Windows (kerberos) or Basic The authentication type required by your database. This parameter appears only when you select Connect via on-premises data gateway.
Important: Basic authentication has significant security disadvantages, such as sending credentials with every request and being susceptible to cross-site request forgery (CSRF) attacks. While this method might suit certain scenarios, consider more secure authentication methods when available. For more information, see the following resources:
- Authentication guidance
- Kerberos authentication overview in Windows Server
- Authentication and verification methods available in Microsoft Entra IDGateway gatewayOn-premises only - Subscription: <Azure-subscription>
- <Azure-on-premises-data-gateway-resource>The Azure subscription and Azure resource name for the on-premises data gateway that you created in the Azure portal. The Gateway property and sub-properties appears only when you select Connect via on-premises data gateway. The following examples show sample connections for cloud databases and on-premises databases:
When you're done, select Create new.
Continue with the next steps for Consumption or Standard workflows.
Authentication guidance
When possible, avoid methods that employ a username and password or tokens.
Warning
Microsoft advises against using the following flows for authentication and authorization:
Resource Owner Password Credentials (ROPC) for OAuth 2.0
This flow lets you sign in to an application with a password. The flow is incompatible with multifactor authentication (MFA), requires a very high degree of trust in the application, and carries risks that don't exist in other flows. Use this flow only if other more secure flows aren't supported or available.
For more information, see Oauth 2.0 Resource Owner Password Credentials.
Implicit grant flow for OAuth 2.0
This token-based flow is intended for traditional web apps where the server has more secure control over processing
POSTdata and is often used with the authorization code flow. Due to how this flow handles and returns ID tokens or access tokens, the flow requires a very high degree of trust in the application and carries risks that don't exist in other flows. Use this flow only when other more secure flows aren't supported or available.For more information, see OAuth 2.0 implicit grant flow.
Make sure that you secure and protect sensitive and personal data.
Important
Always secure and protect sensitive and personal data, such as credentials, secrets, access keys, connection strings, certificates, thumbprints, and similar information with the highest available or supported level of security.
Make sure that you securely store such information by using Microsoft Entra ID and Azure Key Vault. Don't hardcode this information, share with other users, or save in plain text anywhere that others can access. Set up a plan to rotate or revoke secrets in the case they become compromised. For more information, see the following resources:
Test your workflow
Based on whether you have a Consumption or Standard workflow, follow the steps on the corresponding tab:
On the designer toolbar, select Run > Run.
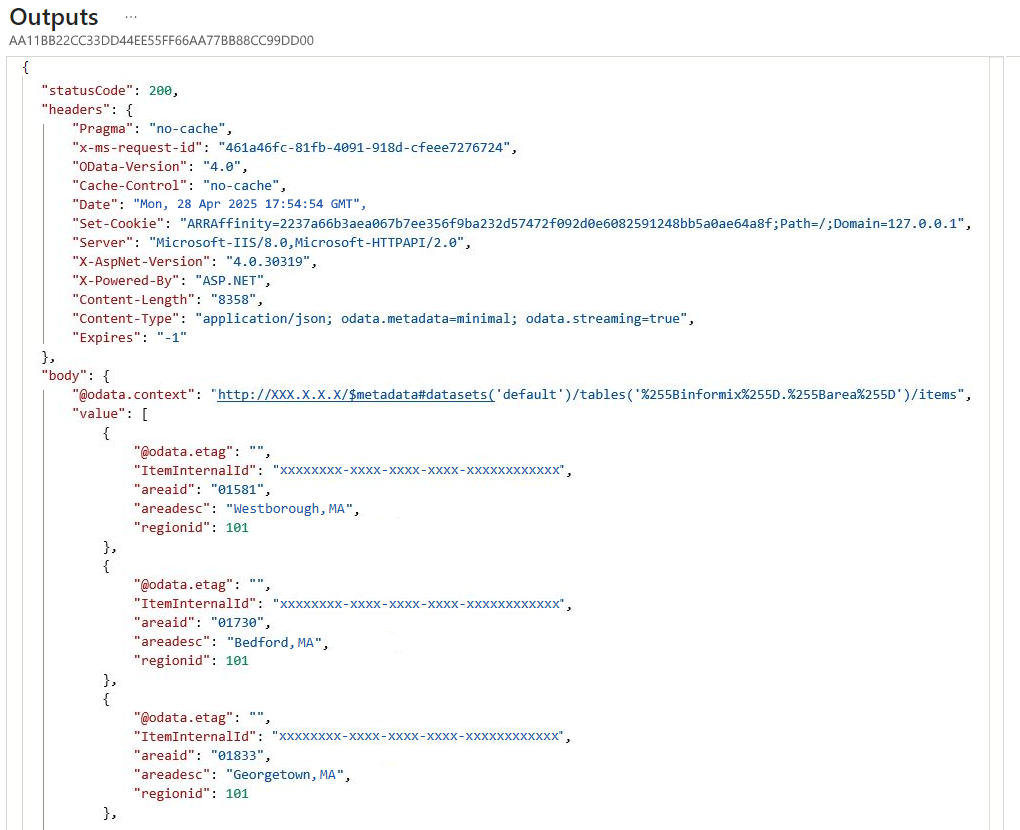
After the workflow runs, you can view the outputs from that run.
On the run history pane toolbar, select Run details.
On the run details pane, from the actions list, select the action with the outputs that you want to view.
To view the inputs, under Inputs Link, select the URL link. To view the outputs, under Outputs Link link, select the URL link.
The following example shows sample output from the Get rows action in a Consumption workflow:


